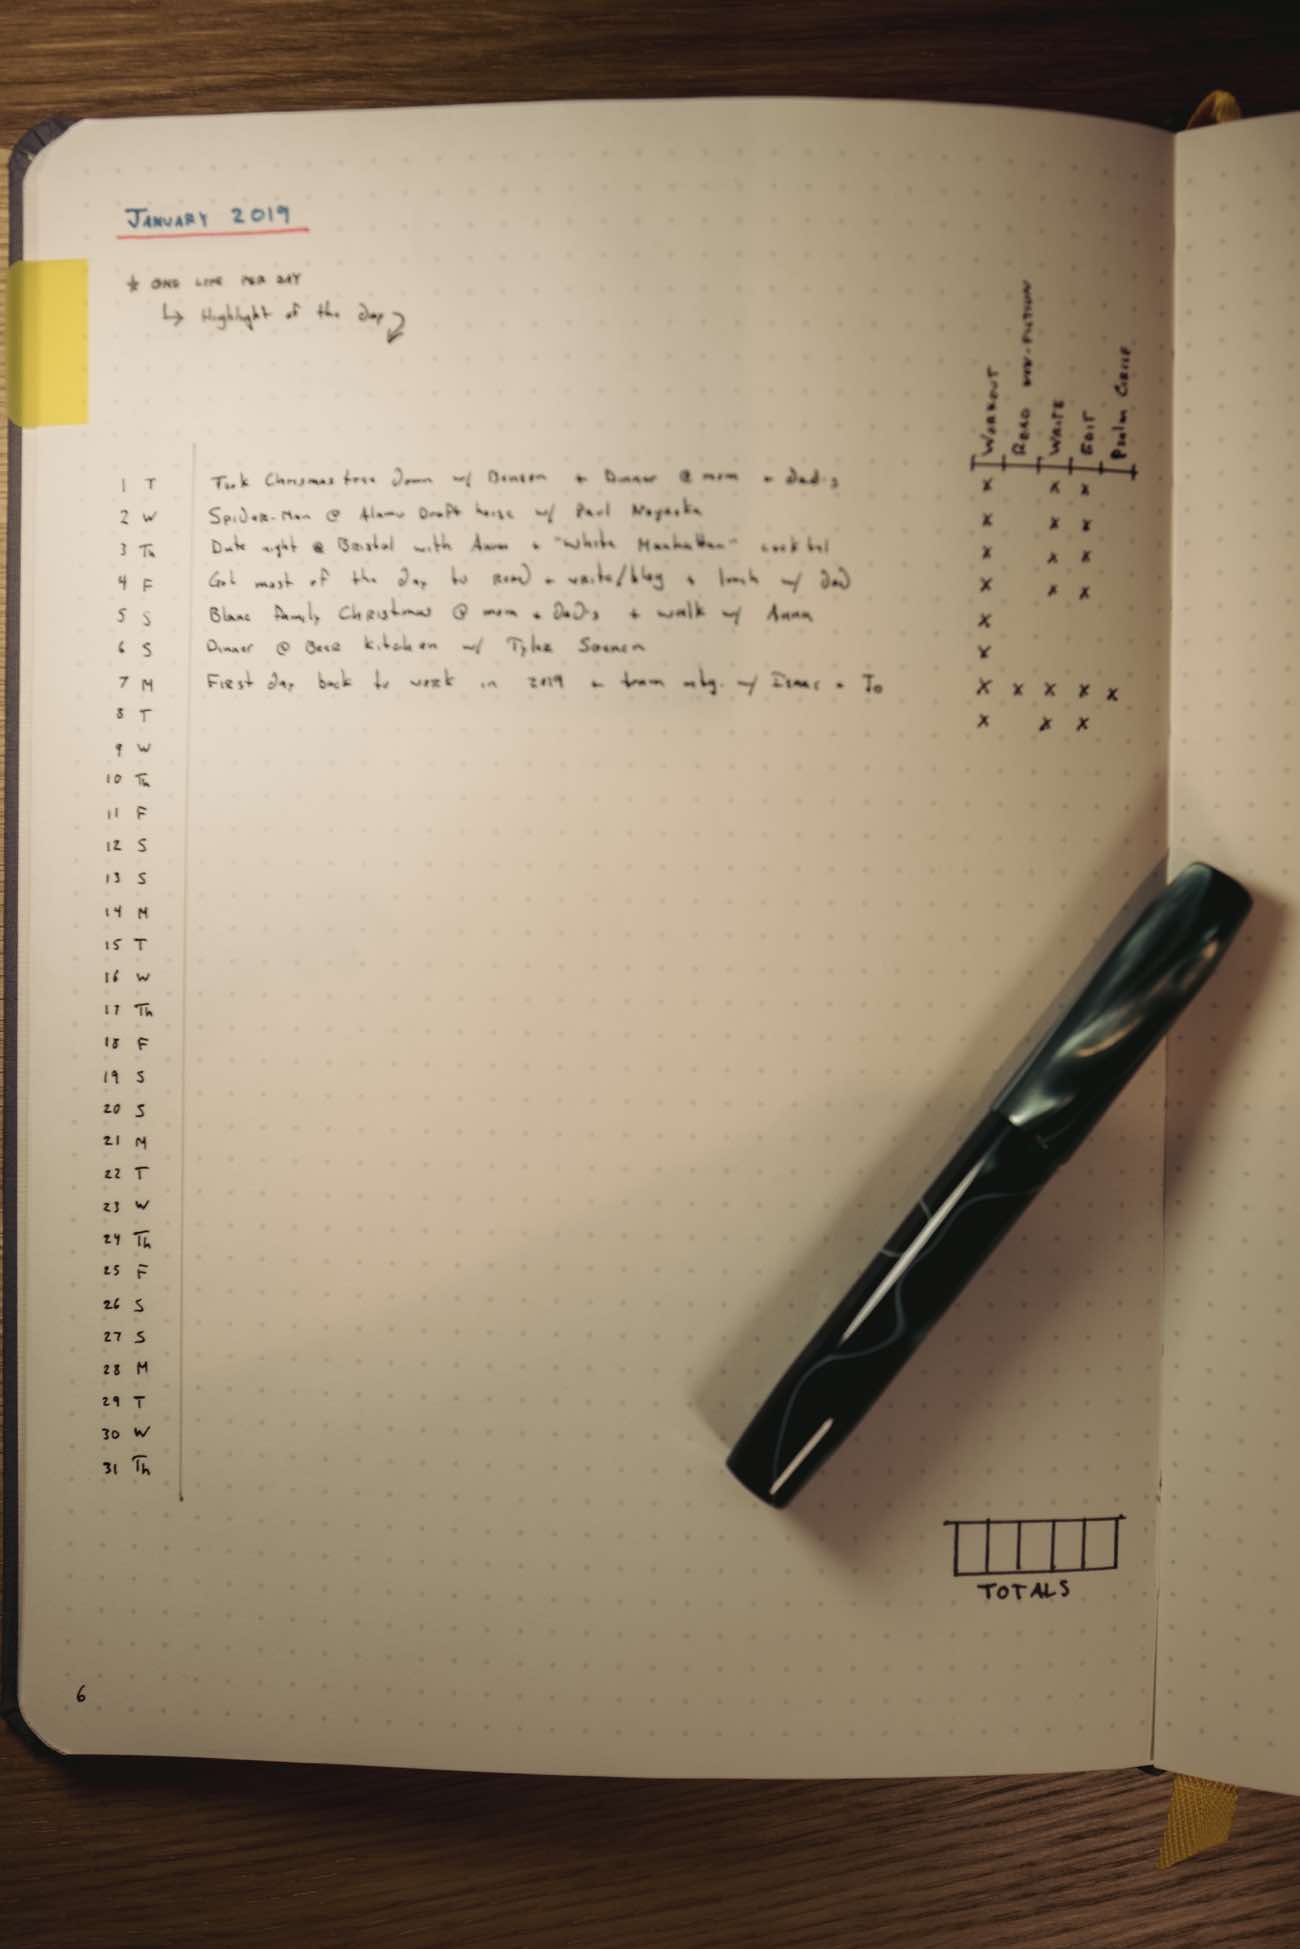
The New Backblaze iPhone App
It’s been almost two years since I began using Backblaze. If you don’t have an off-site backup solution, I highly recommend them.
Recently, Backblaze released an iPhone app for accessing all the files from your computer which have been backed up. I’ve often wished there were an iOS app available so I could view and access my Backblaze data — a great way to get at non-Dropbox’d files when I’m away from my computer. Alas, the Backblaze app leaves some things to be desired.
When you launch the app you’re prompted to sign in with your Backblaze account info. You then select the computer whose data you want to view, enter the encryption key for that computer, and you’re in. You now have full access to every file which Backblaze has backed up from your computer.
Note that every time you leave the app and come back you’ll have to re-enter your encryption key and then re-navigate through the file system. I very much appreciate the security this brings, but it’d be nice if I could set a timer for how long I want the app to wait before re-asking for my encryption password.
Since Backblaze backs up regularly in the background, you’re theoretically looking at exactly what’s on your computer (or nearly identical). For situations where you just need to get at a particular file, this is a much quicker and easier way than screen sharing or remoting back to your Mac.
When you navigate to a file, you can then download it to your iPhone. From there you’re able to preview it, and, through the “open in” button, you can save it to Dropbox, open it in another app, send it as an email attachment, etc.
Unfortunately, if you download a file type the iPhone doesn’t natively recognize (such as .zip files), you cannot do anything with the file. For example: though I can download a zip file to my iPhone, tapping that file gives me an error dialog box. And without being able to preview the document Backblaze doesn’t show me the “open in” options. Thus, I cannot even email the zip file from my Backblaze backup.
This to me is the app’s biggest shortcoming. The advantage of getting at my Backblaze data is that it gives me the opportunity to find and then do something with virtually any file that’s on my Mac. But being limited to files which my iPhone can natively handle severely limits the usefulness of the Backblaze app.
Shortcomings aside, I’m glad Backblaze has shipped something. And I trust that, like the Backblaze service itself, the app will only get better over time.
✚
Review: Riposte 1.2
Riposte is an iPhone app for App.net (ADN). It first launched in January this year and quickly became my personal favorite ADN app. In March, Riposte got even better when it brought support for private messages (individual and group) as well as granular control over push notifications (meaning you can select what you want to get a push notification for).
Today, Riposte 1.2 is available and brings a handful of new features and improvements, as well as a host of new “Pro” features.
The Pro features include customizing the app using one of several new typefaces, including Avenir; an auto-saving of drafts; a Private Messages quickview button; auto dark and light mode depending on time of day; a 3-finger gesture to control brightness; option to hide the Status Bar; and more. These features become available after a $5 in-app purchase.
Riposte is now a free app, but it hasn’t always been. When it first launched it was a $5 app, and about 2 months later it went free. If, like me, you were one of the users who bought Riposte when it first launched, to get the new pro features you’re now looking at a $10 app. But Riposte is one of the premier iPhone apps for ADN — it is fast, feature rich, packed to the rafters with clever and helpful details, and is on an active development cycle. Even if you paid full price when it first came out and now chose also to upgrade the Pro features, I consider $10 to be a fair price for Riposte.
Riposte doesn’t need the Pro features to be a great app — it already handles the core functionality of ADN with aplomb.
When Riposte first shipped, the two things which most stuck out to me were its inclusion of a 1Password shortcut button on the login screen, and its use of the hamburger / basement menu design. Though some advocate against this sort of navigational design, I think it’s great when used in a good setting. And for an app such as Riposte it especially makes sense because the primary view is just the unified timeline.
A few months after its initial release, Riposte 1.1 came with support for Private Messages and granular settings for push notifications. The granular push notification setting means you can enable or disable push notifications for many different types of interactions — I like this because it means I can choose to only get a notification when someone sends me a Private Message.
Private Messaging in Riposte is great. The app supports individual chats or group chats, and since ADN doesn’t require following for PMs, anyone can send and be a part of a private message. It’s more like a private reply versus a public reply. I’m thinking that ADN group messaging will be the new Glassboard for me this year at WWDC.
One of Riposte’s new Pro features is the option to enable a quickview button for private messages. This button hovers at the bottom-left of the screen and offers one-tap access to the messages pane from just about anywhere in the app (as opposed to having to drill down to the Menu screen to switch to the Private Messages view).
If you have any unread PMs, the icon will be filled in with blue; otherwise it will be more transparent.

Similarly, if you have the Full Screen mode enabled (as shown above — a setting you can toggle under Riposte’s General Settings), the button for creating a new post hovers in the bottom-right corner of the screen at all times. By turning on the Full Screen mode, the common “back” button (for returning to previous screens if you’ve drilled down into a conversation view or a web page) is gone.
Riposte gets past the missing “back” button by using a swipe-left-to-right gesture for going back. Pretty much from any screen you are in, swiping left to right will take you back one level.
This has become one of those gestures I find myself using in many other apps — similar to how I was always trying pull to refresh in apps that didn’t even support it, I’ve begun swiping right to go back in apps that don’t support it.
Jared Sinclair, one of the developers of Riposte, said:
We take push/pop transitions at face value: swiping to go back is like pulling yourself back to where you were before. If I can’t picture an app as a set of cards laid out in a grid on a table, I can’t understand it.
It’s clear the Riposte guys thoughtfully implemented this swipe gesture. For example: on the screen for composing a new post, swiping left-to-right or right-to-left moves the cursor one character respectively. Thus there is a “Cancel” button on the post compose screen for going back to where you were.
There are several other swipe gestures, such as two-finger swiping up/down to switch between light and dark mode, or two-finger left-to-right swipe to get back to the root Stream view.
And speaking of swipe gestures, one of the gestures included in the Pro feature is a 3-finger brightness control. While using the beta of Riposte 1.2, I showed this brightness control shortcut to my wife, and she asked why that wasn’t something you could do in every app. I agree (sort of).
In the iPhone’s Settings there are a handful of toggles buried too many taps deep, and I wish it’d be easier to get to them quickly. Brightness control is one of those, and while I don’t know that a universal iOS gesture of 3-finger swipe is the answer, I like that Riposte guys at least did something.
Typefaces
Preeminent among the Pro features in Riposte 1.2 is the option for different typefaces.
There are a total of 9 unique typefaces (a combination of iOS stock and free options, including Avenir, Exo, Gill, Signika, Source Sans Pro, and others). Some faces have multiple weights, making a total of 14 different font options.
Of the options, Avenir and Signika are my two favorites — I’ve been using Avenir at the Extra Small size.
I asked the Riposte guys why they were charging for a Pro update that didn’t include licensed typefaces such as Proxima Nova, Whitney, or Chaparral Pro. Their reply was that the typefaces they like are a little too expensive to license until they see what sales are like for the Pro update. Their intention with the Pro upgrade is for it to be the locus of future features, so it will only get better.
If I were in their shoes, I suspect I would make the same choice. Licensing a typeface for use in an iOS app is not cheap — costing in the thousands of dollars — and the ADN app market is still relatively small. Hopefully Riposte will be successful enough to both sustain its development and warrant the licensing of some elite faces like we’ve come accustomed to in the more mainstream apps like Instapaper and Twitterrific.
Post Drafts
Another Pro feature of Riposte is the auto-saving of any un-published post. You can view all your drafts by tapping the paper icon in the compose view.

Basically, when you cancel a post that has text in it (or if you quit the app), a draft is automatically created for you. It means no lost posts and not having to tap an “are you sure you want to cancel” button every time.
But it also means you end up with a lot of draft posts that should just go in the trash. After 2 weeks using the beta I had about 12 draft posts I didn’t want. A swipe and delete on each of them cleared them out before I wrote a few better drafts in order to stage the screenshot you see above.
Conclusion
ADN has become far more than just an ad-free Twitter replacement. And eventually the service will reach a point where any one single client cannot (or at least should not) handle all the functionality of ADN. But at the moment, for the core functionality of ADN as a social network, Riposte handles everything I am most commonly using with flying colors. It has become one of my favorite and most-used Home screen apps.
It’s impressive to me just how far and how fast this app has come in the short amount of time since its release. I am, as usual, looking forward to what’s in store for Riposte and for ADN in the days to come.
* * *
Free App.net Invitations
And, of course, no ADN-related article would be complete without some free invites, courtesy of the Riposte developers and the App.net team. If you want to join ADN, click here to sign up for free (while invites last).
Note, when you join ADN your new account will automatically be following me (@shawnblanc). Free accounts can only follow up to 40 people, so feel free to unfollow me if you want.
✚
Review: The Origami Workstation for iPad
The Origami Workstation from Incase is little more than a folding, rubberized board that wraps around an Apple Bluetooth keyboard.
It has two tabs with velcro that flip underneath and strap to the underside when not in use. Or they fold towards one another to form a triangle stand when you want to prop your iPad up to write. The Workstation uses a half-circle plastic clip that is the exact size for securing the round, battery-holding tube area of the Apple Bluetooth keyboard.
Therefore this case doesn’t work with any keyboard other than Apple’s.
Fortunately, Apple’s Bluetooth keyboard is excellent. It’s sturdy, well built, and capable of controlling the iPad’s volume, brightness, and media playback.
There are, however, other iPad-specific keyboards (such as Amazon’s Basics) that have additional iOS-specific buttons which can return you to the Home screen, or take you to the Spotlight page. While these iPad-specific keyboards have some cool features, I’ve yet to try one that felt better for typing on than Apple’s keyboard. Giving up quality and size for a couple neat buttons is not a fair tradeoff.
Keyboards aside, there are many other reasons I like the Origami Workstation.
The Workstation’s best feature is that it doesn’t permanently affix itself to my iPad. Most of my iPad usage is comprised of non-typing activities like reading iBooks, Instapaper, RSS feeds, surfing the Web, etc. For those activities, the plain iPad is plenty — there is no need for an external keyboard (especially not one that’s attached.)
Well, why not just use the iPad’s smart cover, and carry around the keyboard by itself? I’m glad you asked. For one the Workstation allows me to use the iPad with keyboard on my lap (for times I’m sitting in a conference room or an airport terminal). Secondly, the Workstation offers a sturdier support for the iPad than the Smart Cover. Thus allowing me to press the Home button and navigate the touch screen without using two hands to keep the iPad from tipping over. And if you prefer to type with the iPad in portrait mode, you can do that no problem.
Another great benefit of the Workstation is that it’s device agnostic and future proof. It works perfectly with an iPad 1, 2, 3, 4, iPad mini, or even an iPhone. And it will work with whatever else comes next so long as it isn’t any thicker than an inch.
My Origami Workstation has seen nearly 18 months of use on the road, in coffee shops, and at the kitchen table. It continues to be the ideal typing companion to my iPad.
✚
Review: Writing Kit for iPad
When writing long form on the iPad, I write almost exclusively in Writing Kit. It’s an app full of great features and options without being overly complicated.
I first fell in love with Writing Kit while writing Diary of an iPad 3 Owner. I wrote that article exclusively on the iPad and exclusively in Writing Kit. And I’ve been writing in the app ever since.
Writing Kit is a Dropbox-syncing, markdown-supporting, iOS text editor for writers. You can find it on the App Store for just 5 bucks.
Unlike some apps, Writing Kit gives me visibility into my entire Dropbox folder hierarchy. But I keep it pointed at my “Writing” folder because this is the folder where I have any and all articles that are in progress. This folder differs from my Simplenote database in that these articles have moved past the “idea” phase and are actually in progress. Currently I have 3 files in this folder, one of them being this Writing Kit review. After publishing, I move the document to a “Written” folder.
My biggest complaint against Writing Kit used to be its poor Dropbox integration. Writing Kit used to store a copy of its documents locally on the iPad and then would upload a copy of them to Dropbox whenever the user manually initiated a sync. That wasn’t an ideal syncing setup and led to conflicted copies on occasion.
However, Dropbox integration was completely rewritten a few versions ago and has since become significantly more reliable. The new Dropbox sync gives us access to our entire Dropbox folder hierarchy, and files are saved directly to Dropbox. And you no longer have to save manually (though you still can if you want) — Writing Kit saves your work automatically in the background while you are typing. Also, when you exit the app, your article is uploaded and saved in the background as well. I haven’t lost a single word to sync since Writing Kit’s Dropbox support was rewritten.
Like the small handful of other Dropbox-enabled iOS text editors out there, Writing Kit also has its own Markdown-friendly custom keyboard row, and it integrates with TextExpander. But this app is not like all the others. There are a handful of things that set Writing Kit apart for me. Specifically: (a) the fine-grained control of fonts and type, (b) an in-app Web Browser, and (c) some clever gestures support. The more I use it, the more I enjoy using it.
Font Control
Spitting in the proverbial wind of iA Writer, Writing Kit gives extremely granular controls over the font you choose to type with. A list of 15 “popular fonts” sits just above another list that gives you access to every single typeface that ships with iOS. Against your better judgment, you could type in Marker Felt or Papyrus if you wanted to — just don’t get caught. I usually type in Inconsolata, but have recently switched to Avenir Book.
Additionally, you have control over font size, line height, and several pre-defined color schemes (including the light and dark Solarized schemes). I use the Default theme, which is just black text on a white background. And I keep the line height somewhat generous.
The In-App Browser
Tap the upper-right compass icon and up pops a full-fledged Web browser. In the browser’s “omni bar” you can type the URL of a page you want to visit or simply type a search term to conduct a search via DuckDuckGo.
While browsing and researching, you can add and tag bookmarks locally in Writing Kit’s browser by tapping the “plus” icon. Unfortunately these bookmarks do not sync with Writing Kit on the iPhone (nor to any app on the Mac).
For bookmarking I prefer to use Pinboard. Writing Kit does support Pinboard, but it’s somewhat difficult to find and it isn’t exactly the greatest integration of all time. Tap the Bookmark icon and then tap the “Local Bookmarks” title badge. You’ll see an option to log in to Pinboard and/or Zootool. From there you get a mobile Web view of your Pinboard account which is, unfortunately, read only. So, in short, you can access your Pinboard bookmarks, but you cannot add any from Writing Kit.
However, Writing Kit does have fantastic Instapaper integration. You can view a nicely formatted view of your Instapaper queue, open those links in the browser, and you can send any web page you’re viewing into your Instapaper queue. (Gosh, I’d love to see this same type of polished integration with Pinboard.) Moreover, on any Web page, tap the “Text Only” button at the bottom and you get the mobilized view of the site, courtesy of Instapaper’s Mobilizer.
Now, presumably, with at least some of the websites you’re loading up in the browser you will want to link to within the article you’re writing. And this is one thing that makes the in-app browser so great versus switching back and forth with Safari.
When you’re on a Web page, tap the “share” icon in the lower right hand corner (it won’t be there if you have the cursor active in the Address Bar). From there you can choose to insert the URL of the current page into your text document. Tapping that option sends you back into your document with a new menu bar at the bottom of your screen, which gives you the option to either ignore the link or insert the link at the cursor point. Tapping the latter will place a fully formatted Markdown link using the title of the Web page and the URL.
If, however, you prefer to link your text after you’ve written the words you want to be hyperlinks, you can still highlight the words and then have Writing Kit wrap them in a Markdown format via the popover menu.
This text-document-to-browser integration is one of my favorite things of Writing Kit. I hope to see continued iteration and refinement here.
Clever Gestures
It seems that it’s always the little things that grab you and get you hooked. And it was the margin tap targets that first hooked me with Writing Kit.
Tapping on the left or right margin moves the cursor one character in the respective direction. If you’re writing with an external keyboard this isn’t that big of a deal, but when working with the iPad’s on-screen keyboard, having tappable margins is like a dream. Long have I wished Apple would implement this functionality into Mail.
There are additional gestures as well. Tap in the margins with two fingers and the cursor moves one word (instead of just one character) in the respective direction. Also, a two-finger swipe from right to left works as Undo, and 2-finger swipe from left to right works as Redo.
There are more gestures, and you can learn them all under the “i” icon for help, and then tap the “Gestures” cheat sheet.
Additional Unordered List of Miscellany
I’ll start with my biggest quibble: when creating a new document, Writing Kit gives you a seemingly nonsensical title. I don’t understand why not at least use the date/time stamp instead of some random string of numbers?
Update: Turns out this is a feature. Now that I know the “why” behind this, I can’t help but think it’s devilishly clever.
Terminology integration: tap a word, then tap “Replace” and you are sent to Terminology. You can then select a different word and Terminology will send it back to Writing Kit, replacing your original word.
The Markdown formatting keyboard row: It is present even when the external keyboard is active, thus giving one-tap access to link insertion, formatting, and more. The default has one-tap buttons for headers, bold and italic formatting, inserting links, images, code, and block quotes, and unordered and ordered lists. Swipe to the right and you get parentheses, brackets, quotes, and more.
When you tap on the bold formatting button, your text selection is wrapped in double asterisks for bold. If no text is selected, then Writing Kit generates the double asterisks with selected text in between ready for you type into. Tap the bold formatting button again and the double asterisks are removed. Clever.
Format selected text: Highlight any bit of text, and then tap a Markdown formatting button and that selected text will have the formatting applied. Be it bold, italics, code, or even a list.
TextExpander support: I already mentioned this above, but an app without TextExpander support is an app I’m not interested in.
Export: You can export your document as Markdown or as HTML to any number of other apps, but you can also send it as an attachment in an email or as inline text in an email. For example, once I’m done writing this review, I’ll email it as an attachment to my editor right from within the app. Won’t he be delighted?
Outline view: There is a dynamically-generated outline view that lists out the hierarchy of your document based on heading tags and links. I don’t use this often, but when I do need it I find it insanely helpful. Especially when writing multi-thousand-word articles on the iPad.
Inline link conversion: If you write your links as inline links, Writing Kit can then convert them all to reference links. Tap the “share” icon in the upper-left corner, then tap “Convert Inline Links to Refs”.
The icon: The icon, which was part of the 3.0 update, is both unique and gorgeous.

Quick Search: The in-app browser is not the only way to search the web. Tapping the magnifying glass icon in the upper-right brings up the Quick Search tool. And it’s not just for searching the document you’re in. This little magic box can also do many site-specific searches, calculations and more. You have to use it a few times to begin to understand its usefulness and cleverness.
Then, if you’ve drilled down into a site and you want to move over to the in-app browser, just tap the “full screen” icon and the page you’re on will open up in the browser.
My only quibble with the Quick Search is that it does not do find and replace.
Wrapping Up
Writing Kit is obviously one of the more full-featured writing apps out there. And I find its rich feature set to be comforting and useful. The app offers a simple enough view to qualify as a “distraction-free” writing environment, but also has enough bells and whistles that it’s great for getting work done.
Compared to many of my favorite apps that do “one thing well,” Writing Kit seems to be on a different end of the spectrum. But, on second thought, maybe it isn’t. Maybe Writing Kit does do one thing well. And that one thing is being an awesome text editor for writers.
✚
Camera Review: The Olympus E-PL5
It was the iPhone that convinced me to buy a better camera.
My son was born in February of 2012. Later in the year — some time after our summer vacation to the Colorado mountains — as I was looking through the photos we had of him, I realized I wasn’t giddy about hardly any of them.
There were many great snapshots of some very fond memories. But none of the images were of a quality where I wanted to print them out and frame them. They pretty much only looked good on the small screen of my iPhone.
That’s when I decided my iPhone shouldn’t bear the burden of being the best and only camera in the house.
I began researching mirrorless cameras looking for a rig I could easily take with me anywhere I went, and which cost under $1,000. I wanted the camera to have an Auto mode so I could just point and shoot if I wanted to, or so I could hand it to a family member to point and shoot with. But it also needed to have good manual modes so I could learn and grow into the manual controls as I learned more about the technical details of photography.
The rig I chose was the new Olympus E-PL5 and the world-famous Panasonic 20mm f/1.7 pancake lens.
After 6 months shooting with the E-PL5, I continue to be impressed and pleased by the quality of the images this small and sturdy rig is capable of.
(Note: Click the images to zoom them.)
Though my skill behind the lens still leaves much to be desired, my slow-growing collection of great images has long since proven to me that getting a nice camera was a good idea. The photographs I’ve taken with the E-PL5 juxtapose themselves against my iPhone pics because the images from the E-PL5 are ones which look better when on a big screen or printed out and framed.
This isn’t something exclusive to the E-PL5, of course. Any decent camera with good sensor and quality glass will take some great shots. At $900 — the price for the E-PL5 body and the Panasonic 20mm f/1.7 lens — I would be upset if this rig did’t produce some great images.
There are a few reasons I went with the E-PL5 instead of the many, many other options out there in the mirrorless category:
- I didn’t go with the RX-1 because its price tag is 3 times what my budget was.
- I didn’t go with any of the Sony NEX line because I wanted a better lens selection and smaller camera body.
- I didn’t go with the Panasonic GX-1 because I could afford a better camera if I could find one.
In short, the E-PL5 was the smallest camera I could find with the best possible sensor inside and most features.
As I’ll talk more about below, this camera is basically the guts of the E-M5 put inside a smaller body with a few less pro features on the outside. And that, my friends, is why I consider the E-PL5 to be one of the best-kept secrets in the Micro Four Thirds category.
Aside regarding the King of the M4/3 Hill, the OM-D E-M5
I didn’t want to write a review of the E-PL5 without at least a little bit of context and experience with some of the other offerings out there. So I rented the Olympus OM-D E-M5 along with the Olympus 45mm f/1.8 lens for a few weeks.
The E-M5 is widely regarded as the best Micro Four Thirds camera out there.
When I bought the E-PL5, it was so new to the market that I could hardly find any hands-on reviews. But what made it so special is the fact that its sensor and processor are the same as what is found in the E-M5. Because of all the great reviews I’d been reading about the E-M5, I felt confident buying the E-PL5 on blind faith, trusting that it would be able to perform admirably.
I rented the E-M5 to give myself some context for how the E-PL5 compares against the best M4/3 camera out there, and also to find out for sure if I had made the right choice in getting a smaller and cheaper camera with a few less features and controls.
The most significant differences between the E-M5 and the E-PL5 are the pro-level features the former has which the latter does not. The E-M5 has a built-in electronic viewfinder, two manual dial controls, and a slightly larger hand grip. The E-M5 is also weather proof (meaning you can take it out in the rain without fear of ruining it), while the E-PL5 is not.
On the inside, the E-M5 and E-PL5 are much more similar. They have the same 16MP sensor and image processor that made the E-M5 so famous. They both have in-body image stabilization (though the E-M5 has 5-axis IBIS, while the E-PL5 uses conventional 2-axis), and they both have a dust reduction system that silently vibrates the sensor each time you turn on the camera to help “fling” any dust which may be there.
In my usage and comparisons, the two cameras produced nearly identical images. In several situations I took images with both the E-M5 and E-PL5, even switching lenses so as to try and take the exact same image with both cameras. To my eye, the shots look like they’re from the same camera.
Below: taken with the E-M5 and 45mm lens, 1/100sec at f/1.8, ISO 500

Below: taken with the E-PL5 and 45mm, 1/80sec at f/1.8, ISO 400

Below: taken with the E-M5 and 20mm, 1/60sec at f/1.7, ISO 400

Below: taken with the E-PL5 and 20mm, 1/50sec at f/1.7, ISO 400

In my opinion, the advantages of the E-M5 over the E-PL5 are almost entirely in the bells and whistles and not in the end-product capabilities. For photographers who have used bigger DSLR rigs, or who really want a viewfinder, then the E-M5 will probably feel more comfortable. But for everyone else, the $400 you’ll save by buying the E-PL5 instead of the E-M5 is probably better spent on a nice lens.
E-PL5 Overview
With the Panasonic pancake lens attached, the E-PL5 is small enough to fit in my coat pocket, the glove box in my Jeep, or alongside my MacBook Air, iPad, and Moleskine inside my extra small Timbuk2 bag.
The build quality is excellent. The camera is sturdy but not heavy, weighing just 1 pound with the 20mm pancake lens and wrist strap attached (body only, the E-PL5 weighs a mere 12 ounces). And because of its smaller size and lack of a viewfinder, the E-PL5 doesn’t look too intimidating.
The humble appearance of the E-PL5 is one of its best features. With it I feel less like a “wannabe pro photographer” and more like a “casual photography enthusiast” when I have the camera out in public.
My goal with the E-PL5 wasn’t to get my toe in the waters of professional photography. I just wanted a high-quality camera nearby for when I would have otherwise reached for my iPhone.
Having a non-giant camera makes it far more likely that I will take it with me when I’m leaving the house and to actually use it while I’m out. Coat-pocketable means “it will get used” in this case. And isn’t that the whole point?
Sans Viewfinder
The E-PL5 does not have a built-in electronic viewfinder (EVF) — to frame your shots, you use the view screen.
For some people, this may be a deal breaker. What’s nice about having a viewfinder is that you can hide behind it, and also you can steady your camera a bit better by holding it up to your face. But in my few weeks with the E-M5 (which does have a viewfinder), I found myself using the E-M5′s view screen instead of its built-in EVF.
For me, sacrificing a viewfinder is worth the tradeoff because it means having a smaller camera body. However, since the E-PL5 supports add-ons via its hotshoe connection, you could buy the Olympus VF2 or VF3.
The View Screen
On the back of the camera is a 3-inch, tilting, LCD touch screen.
You can tap to focus, tap to adjust color settings, and more. There is a dial control “d-pad” placed just to the right of the screen which also evokes the menu and is used to navigate through all the levels of settings.
The screen isn’t stationary either — it flips out and can tilt.
I was worried about the fragility of the flip-out screen. But to my relief, the hinges are incredibly sturdy and well built. I am often taking shots with the camera held down near my waist, and it’s easy to just flip the screen up 90 degrees and look down into the view screen. In short, it moves easily, holds in place just fine, and is a considerably useful feature.
The quality of the display itself is excellent as well. Though Olympus does not say what the actual screen resolution is, they do say it’s a 3-inch diagonal screen with a 16:9 aspect of approximately 460,000 dots. If “dots” means “pixels,” then the view screen would have a resolution somewhere in the neighborhood of 904×507 pixels with a PPI density of 345. Now, the view screen is certainly nice, but it’s not that nice.
On Twitter, Milosz Bolechowski pointed out that the “dots” are likely referring to each of the 3 RBG dots in a single pixel. Which I agree is most likely the case. Meaning the 460,000 or so dots in the view screen equal approximately 153,333 pixels.
Thus, the view screen most likely has a resolution of 533×294 with a PPI density of 200.
To protect the screen, I bought one of these plastic screen covers. It’s sized for the NEX cameras, but it’s a near-perfect fit for the E-PL5 as well — I never even notice that it’s there. Highly recommended.
The Grip
The E-PL5 comes with a small, removable hand grip. Without the grip attached, the camera has a bit more of a classic look to it, akin to the thin and simple rangefinder bodies of old.
But I can’t imagine not wanting to attach the grip. It adds hardly any size and makes the E-PL5 significantly easier to hold with one hand. When attached, the grip stays quite secure, as if it were built in as part of the camera body from the start.
Manual Dials and Shooting in Manual Mode
As expected, the E-PL5 has several different shooting modes: Auto, Program, Aperture-Priority, Shutter-Priority, and Manual. As well as Movie, Scene, and Art modes.
I mostly shoot in Aperture-Priority mode and am happy to let the camera pick the shutter speed for me in order to get the right exposure.
The Movie and Art modes allow you to choose an artsy filter to apply to your movie or photograph — it’s like having Instagram built in to your camera. I’ve never used these in real life (I prefer to edit my images in Lightroom 4), but here are two sample shots I took for this review: one using the Pin Hole filter and one using the Grainy Film filter. Both of these shots are the out of camera JPGs, but the E-PL5′s in-camera filters are applied to the RAW image file as well, so I could take remove them in Lightroom if I wanted.
What I most wish the E-PL5 had was a few dedicated manual dial controls. When shooting in Aperture-Priority Mode, Manual, or the like, having a few dials that give you quick and instant access to adjust the aperture, shutter, and/or ISO are very nice. The E-M5 had these dials and I found myself using them all the time.
On the E-PL5, when I’m shooting in Aperture-Priority mode (which is the most common setting for me), adjusting the aperture number requires a tap “up” on the menu D-Pad to highlight the aperture setting, and then a tap left or right in order to increase or decrease the aperture. Moreover, the D-Pad is pretty small (smaller than a Dime) and therefore is not easy to navigate. This is not nearly as nice or fast as having a dial that you can click left or right without having to lean back and look at the camera for a few seconds.
Battery Life
Battery life is absolutely fantastic. On the very first charge, after 4 days of shooting and about 500 images, it was low on battery. After that first charge I didn’t need to charge the battery for over 2.5 weeks, and that was with near daily use.
The camera seems to go forever. The battery is one thing I’ve never once worried about, nor have I been out shooting and had the battery die on me. If I know I’ll be using the camera a lot over the weekend or something then I’ll charge it up ahead of time.
The only thing I don’t like about the battery is that it comes with its own charging station. This means when traveling there is one more cable and trinket to pack. I’d prefer to be able to charge the battery by plugging a USB cable into the camera itself.
Low-Light Performance
For what I know about low light performance, the E-PL5 performs wonderfully. Low-light images have very little noise, and can generally be doctored just fine in Lightroom.
With the default white balance settings, I’ve noticed that images straight out of the camera tend to have a bit of a warm tone to them, giving portraits a bit more orange-colored skin tone than is to my liking. This can be adjusted in the camera’s white balance settings to have a more “cool” tint to them, or the orange skin can be easily fixed in Lightroom.
The biggest downside of low light shooting is not the image quality, but the autofocus. The 20mm lens already has a tendency to hunt at times, and in low light situations you can sometimes wait 2 or 3 seconds for the autofocus to find a contrast point and snap the image.
There have only been a few low-light situations where the lighting was so dark that I was frustrated with the E-PL5′s ability to focus and snap a shot. One of those times was when we all went out to dinner for my dad’s 60th birthday. We were at a fancy steak restaurant where the lighting was extremely dim.
The E-PL5 comes with a flash that attaches via the hotshoe port on top, but I’ve never used it. In a setting like the steak restaurant, using the flash would have been rude; in most other settings the flash isn’t even necessary.
For most low-light settings (such as indoors in the evening), the camera does great with very little noise in the images.
Speed
Startup speed: From the time I press the power button to when the camera is ready to snap a picture, it’s less than 2 seconds.
The E-PL5 is usually up and ready to go before I even have the lens cap off. Which means if the Olympus is nearby, it’s actually faster for me to grab it, turn it on, and snap a shot than it is for me to pull my iPhone out of my pocket and launch the Camera app. Even when racing against the Lock Screen Camera app shortcut, the E-PL5 wins by about 1 second.
Shot-to-shot speed: If you want to manually shoot several shots in succession, in decent indoor light or better, the the E-PL5 takes just 1.5 seconds to autofocus, snap a picture, write to the card, and then be ready to focus again.
Autofocus speed: The Olympus is well known for its fast autofocus. As I mention below in the section on lenses, the autofocus on the Olympus 45mm lens is so fast it seems instantaneous; with the Panasonic 20mm the autofocus is a bit slower.
You can hold the shutter button halfway down to have the camera autofocus on either an area within the viewfinder grid, or the camera can automatically find a face and focus on the nearest eyeball. Then, pressing the shutter button all the way down snaps the image. But, if you want the camera to snap a photo as soon as it’s grabbed focus, you can press the shutter button all the way down right away and it will snap as soon as it has focus. In decent light, this is almost instantaneously.
Moreover, you can focus and shoot an image using the touchscreen. You can set the camera to tap to focus on any area of the screen, but you can also configure it to snap the shot as soon as it locks the focus.
Using the E-PL5′s touchscreen reminds me a lot of using the camera on my iPhone. The camera’s software is responsive, clever, and useful. Well done, Olympus.
Camera Straps
The stock camera strap is lame. It’s not detachable, nor is it long enough to let the camera rest at a comfortable distance when over one shoulder and under my other arm.
DSPTCH makes some pretty awesome shoulder straps. I ordered one from them that I really like, but after a couple months of use I felt like I didn’t always want a shoulder strap attached. In fact, I often don’t — most of the time the camera is in my bag or in my jacket pocket and I’m not walking around with it around my shoulder. (Of course, now that summer is approaching, that may change.)
So I ordered yet another strap. This time a small leather wrist strap from Gordy’s. The wrist strap is small enough to not be in the way when just grabbing the camera, and I think it looks great.
I probably should have ordered one of DSPTCH’s wrist straps which use the same clip that their shoulder straps use. This would have made it easy for me to swap out the shoulder strap and the wrist strap depending on my need. But the leather straps at Gordy’s were too cool to pass by. Whatchagonnado?
Lenses
A Micro Four Thirds sensor has a crop ratio of 1/2. So, for example, a 20mm lens on a M4/3 rig is actually a 40mm equivalent when compared to a full-frame sensor. Which is why shooting with the 20mm as my daily glass is not as fishy as it sounds, because it’s just a bit bigger than shooting with a good ole 35mm lens.
I’ve used 3 of the most popular Micro Four Thirds lenses:
Panasonic 20/1.7 lens: This is the lens attached to my rig. Though this lens is certainly no slouch, perhaps it’s greatest advantage compared to the lenses below is its size. The pancake lens looks great on the small body of the E-PL5 and affords the rig to easily fit in coat pockets, etc.
The disadvantages of the 20mm is that because of its compact size it doesn’t grab quite as high-quality images as a “regular sized” lens. But, at least to my eyes, the difference is barely noticeable and the advantages in both size and cost far outweigh the very slight disadvantages in image quality.
Unless you know that you want a different lens, this is the one I would start with.
Panasonic 25/1.4 lens: Compared to the 20mm pancake, this 25mm produces higher quality images, has faster autofocus, and is capable of a better and creamier depth of field. But it’s also a larger piece of glass and it costs $150 more (so, obviously it had better take better images).
Though this is my favorite lens of the 3 I’ve tried, the size turned me off to the 25mm as my daily glass — it is too big to allow the camera to easily fit in my coat pocket. And the focal length is too similar to the 20mm to justify owning both lenses (as much as I would love to own them both). So I returned the 25mm and kept the 20mm.
Olympus 45/1.8 lens: This is the portrait lens of the Micro Four Thirds world. One thing Olympus lenses are known for is their lightning-fast auto focusing, and it’s true. This lens hunts far less than the 20mm, and its images are so clear and crisp.
If and when I decide to buy a second lens, it will likely be the 45mm. Compared to the 20mm pancake, the 45mm is not nearly as compact or attractive (seriously, a silver lens on a black body?). If the 45mm were my only lens, I know I’d be using the E-PL5 less often.
Editing Workflow
So far my editing workflow is simple and straightforward. I plug my camera’s SD card into my MacBook Air, import the photos into Lightroom 4, and then make some minor edits using one of VSCO’s Film packs.
During one of our B&B shows, my pal Ben Brooks told me how he uses a 0-based rating system which I’ve also adopted. When going through the latest lot of imported photos, I flag all the blurry, crappy, or duplicate images for deletion. Then I go through and rate what I think are the best photos with a 3-, 4-, or 5-star rating.
I then upload my favorites to my Flickr account. We’ve had a few printed and framed so far, and I think it’s just great to have my own pictures of my own family up and around in my home. Printing through Shutterfly is cheap and easy enough that with a few easy-swap frames, we can change out our 8×10 prints pretty much as often as we like.
Perhaps a more-detailed writeup on this subject is in order because there are a few things about my editing workflow that I’m still not happy with. Primarily:
- Archiving old images — right now they’re all on my MacBook Air and quickly encroaching on my disk space.
- Posting my favorite images — while Flickr is nice, I’d like a spot that’s a little bit more my own. I’ve been considering setting up my own image portfolio website just so I can have a spot that encourages more regular posting of images.
Real-Life Usage
One of the most rewarding parts of photography is when, after a lot of shooting, I plug the card into my MacBook Air, import all the most-recent photos, and begin to look them over. If there are 1 or 2 (or even 3) shots that turned out awesome, then all the energy that went into capturing those few photographs was worth it.
When I find those few great images from the batch, I lean back in my chair. Looking at one of them, I take a deep breath and smile. Then I call my wife to come downstairs and check out the latest photos, and we talk about what it is that we like about it. Maybe it’s an image of our son, Noah, that captured one of his many funny faces. Maybe it’s a shot that’s framed just right, or has light that’s doing some incredible thing.
I’m still learning, and so right now maybe 1 in 500 shots turn out that good. But when they do, I love it that the quality can be there to match the times when the composition is just right. When I compare moments like that with the times I’ve gone through my iPhone’s photo library, though I have lots of pictures, they are all more like snapshots and not photographs (if that makes sense).
Shots like this are the rare ones which justify my camera purchase a hundred times over.
Images like these are, of course, not going to be exclusive to the E-PL5. There are many other amazing cameras out there. For me, going with a small rig instead of a large DSLR (or even a medium-sized NEX) means I’m much more likely to actually take the camera with me.
And that is the entire point: The E-PL5 is an extremely capable and delightfully portable camera.
✚
The Kone Brewing System

In the far-right cupboard of our kitchen you’ll find more than a few coffee contraptions. The most recent addition being the Kone Brewing System.
The Kone Brewing System is a custom fabricated coffee pot, built specifically for the Kone coffee filter.
The Kone filter is a reusable stainless steel filter originally designed for the Chemex pour over pot. The newest and best incarnation of the Kone filter (I think this is the third version Able has made), as well as its accompanying custom fabricated brewing system, were Kickstarted thirty times over last June.
I backed at the $125 level, which got me the whole brewing system with filter as a reward. And it all arrived about two weeks ago. I’ve since brewed 4 pots of coffee with my Kone Brewing System and they’ve all been quite delicious.
The Brewing System
The first thing I noticed after opening the box is how big the Kone Brewing System is. I was expecting the Brewing System would hold around 500ml of coffee, but it actually can hold twice that amount.
The Brewing System is made up of four components: the pot, the filter, the filter casing, and the lid.

When brewing, the filter rests inside the casing which rests on top of the pot. When done, you remove the top casing (using the rubber heat shield grip), and place the lid on top of the pot.
It’s an extremely handsome rig, and I’m very impressed with the design. It looks great on the breakfast or dinner table, and it looks great sitting on the shelf in our kitchen.
There is no doubt that the guys at Able put a lot of thought and attention into the entire Kone Brewing System. Everything — from the packaging to the included card of instructions to the filter and ceramic pot themselves — exudes attention to detail, care, and thoughtfulness.
Alas, the Kone Brewing System can only be used with the Kone filter. The ceramic top-piece which holds the filter is, as I mentioned, custom fabricated specifically for the Kone filter. There is no internal “V” shape which could accommodate a paper filter if you wanted — you must use the Kone metal filter.
The Kone Filter
They say the advantages of using a metal filter rather than paper are: (1) reusable; (2) you never have to pay for paper filters again; and (3) metal filters allow more oils from the coffee bean to pass through when brewing, thus making a fuller cup of coffee
You can’t argue with 1 and 2. And if you are making a big pot of pour over every single day, in the long run a metal filter will pay for itself.
As for the taste. Well, I personally haven’t been able to tell any significant difference between a cup of coffee brewed with a paper filter and one brewed with a metal filter. In fact, if I had to chose, I’d pick paper filters.
The AeroPress is certainly my favorite brewing contraption, and I use paper filters with it. I even have a metal disk filter that fits my AeroPress and I haven’t noticed any difference when using it rather than the paper filters.
One of the disadvantages to using a metal filter is that some of the “coffee dust” gets through the filter and into the bottom of your cup of coffee. Such as the grit you get when brewing with a normal french press.
Daily Brew?
When it comes to the day-to-day practicality of using the Kone Brewing System, it is not going to be my new daily driver.
For one: compared to the AeroPress or v60, cleanup of the Kone is more involved and tedious because I have to rinse and scrub the filter to get the coffee grinds out of it. Secondly, the Kone Brewing System is intended for making several servings of coffee — it’s a lot of coffee gear to use and clean for the 10-ounce cup I usually brew each morning.
I see the Kone Brewing System as being akin to my Siphon vacuum pot. The Siphon is quite impractical for day-to-day use, but it’s great for when company is over because it’s so fun to use. The Kone is in a similar category (making table-side pourover is always fun), and it can make almost 3 times as much coffee as my siphon.
If however, I was regularly brewing a larger pot of coffee instead of just my single cup, then a big pour over pot like this is just what I would use each day.
If you already own the Kone filter, the Brewing System is $120 by itself. Otherwise it’s $160 with the filter.
Being one of the Kickstarter backers I was privy to much of the behind-the-scenes of what goes in to the molding, firing, and packaging of the Kone Brewing System. And without significant economies of scale, $160 is probably as affordable as Able could get it. Which is unfortunate because as much as I like the Kone Brewing System, $160 is a hard price to swallow.
My verdict?
As cool and attractive as it is, it’s incredibly hard to justify the extra cost of the Kone Brewing System over a Chemex. The Chemex is just as capable of a coffee maker, but it’s one-third the price, holds 10-percent more liquid, works great with the Kone filter, and also works with paper filters.
✚
Review: Rego, the New Place for All Your Places
There are two types of people:
- Those who like lists.
- Those who don’t.
I like lists. I like lists of lists. I sigh a sigh of relief when my thoughts, plans, ideas, to-do items, and everything else is filed away and in some sort of order.
A place for everything, and everything in its place.
My inclination towards putting things in lists combined with my affinity for well-designed iPhone apps is why I enjoyed Gowalla (R.I.P.) so much until it shut down a few years ago. Gowalla was such a fun and well-deigned app, and I loved using it as a way to catalog my journey of places I’d been.
Though Gowalla was a social network, I wasn’t really into it for the social aspect. I liked Gowalla because I could create trips (a list of recommended places), and I could log the places I’d been (a list of past visits).
In fact, the social aspect of Gowalla was more of a turn off than a feature. Gowalla’s built-in social network meant I had to strongly police who my followers were or else censor the places I checked in to. I chose the former which meant every time I opened the app I saw the list of unanswered friend requests and felt I was being a jerk by ignoring them.
The same is true for Path, and it’s why I never used it as often as I’d have liked. I just didn’t want the burden of managing the social aspect of the app in order to get at the journalling and logging aspect.
I’m already active on Twitter and App.net and don’t want yet another social network.
My standoffishness towards new social networks (especially ones that encourage me to broadcast when I am and am not at my own home) is one reason I love the journaling app Day One. Day One has some parallels to a “private” social network. Meaning, I can post a status update or a whole journal entry, and they can include images or be nothing but an image. And the location, date, and even current weather are all automatically added to my entry.
Day One takes many of the journalling and logging elements found in Path, Gowalla, Facebook, and the like, but Day One has no social network. And that’s one of the many attractive things about it.
Enter Rego
Rego is a brand new, location-based app that fills the void left by Gowalla — and Rego is not a new social network.

The basic premise of Rego is as a personal travel log and list. Like Gowalla, you can add a place based on your current location. But, unlike Gowalla, you can also add places you are not at, or have never even been to (more on that later).
Rego has many of the cool things found in a location-based social network app, but without rewards, badges, pins, or mayors. Rego has no rules, no goals, and no friend requests. It’s just a personal list of all your places. And this is something I find quite refreshing.
Selectively Social
The divide between the connected and unconnected continues to demonstrate an economic discord: those living comfortably are also living un-connectedly. Unubiquitious computing demands have inspired developers to rush to build unconnected communities. The new connected is to be disconnected. Deadspots are the new hotspots.
What I like about Rego versus Gowalla, Path, Foursquare, and others, is that Rego is selectively social. It’s not a social network, but I can share any of my places if I want.
If I want to share my favorite coffee shop or the trailhead to a cool 4×4 trail, then I can. Any place I have in Rego I can choose to share.
Rego does this by creating a unique URL of my shared place that includes the name and location, and, if I want, any of the images or notes that I’ve added to that place.

For example, here’s a link to Quay Coffee, a place I have in my Rego. If you click that link, you’ll see the location of Quay as well as a picture I took earlier this week and a note I added to that image.
I can share the Quay link any way I would share any other link — I can email it, text message it, tweet it, etc. — but since Rego is not a social network, I don’t have to manage incoming follower requests deciding who I want to allow to see all the places I bookmark. I choose what places I want to share, and even who I share them with.
That’s what I mean by Rego being selectively social — there are dozens of other places I have in Rego that are known only to me.
Adding Places
Adding a place in Rego is a snap. As well it should be, considering it’s the chief function of the app.
You launch the app, and the map finds your location. You then tap the “plus” icon in the upper right corner, enter the name of the place you’re adding, and hit Save.
Once you’ve added a new place, you can then close Rego and return to doing whatever you were doing earlier. Or you can add more information to your place such as images and notes, or add it to a collection (even multiple collections).
In my review of Gowalla a few years ago, I listed out a few of the things I loved most (such as building trips) as well as things I most wished were a part of the app (such as adding a location without physically being in that spot). Rego has answers for both of these things.
Because Rego lets you put places into multiple collections I can easily build trips and lists. And since Rego lets you add a location even if you’re not physically standing there with your iPhone in hand, I can add places I want to visit, in addition to adding places I’ve been to but not since I installed Rego.
To add a place you aren’t currently at you simply move the map around until the cross hairs are where you want them to be. Then you tap the “plus” button to add the place and a red pin will drop right where the crosshairs were pointed.
Unfortunately there is no ability to search for a place. Which means: (a) there is no auto-suggest for the location you’re currently at; and (b) when adding a place that is somewhere other than your current location, you kinda have to eyeball it with the crosshairs and the map (I’m told that the 1.1 update of Rego will use Foursquare’s search API to help you find and add locations easier).
Collections
As I mentioned above, once you’ve added a place, it consists of three things: (1) the location, (2) any photos and text notes you want to add to your place, and (3) a collection.
Collections are just lists. A place can be added to multiple collections. So my favorite coffee shop can be placed in my “Coffee Joints” collection, as well as my “Faves” collection, and even my “Colorado Summer Vacation” collection if I want.
Earlier this week I spent the afternoon and drove around to each of my favorite coffee shops in Kansas City. These coffee shops are all in a collection within my Rego app called “Coffee Joints”:
I’ve also started building a collection of my favorite hole-in-the-wall BBQ spots in Kansas City.1
It would be great to be able to share an entire collection if I wanted to. Have an acquaintance passing through and they want to know where to get the best Americano and the best pulled pork sandwich? Here, check out these two lists. You can’t go wrong at any of these joints.2 And since I can also chose to share any notes I’ve taken of a place, I can include recommendations for what to order.3
All this while having the freedom to keep my other places (such as my home, my in-law’s home, a vacation rental, and a favorite camping spot) completely to myself.
If you’ve clicked on one of the above coffee shop links, you’ll have noticed that when someone views a shared location they can see all the info I’ve chosen to share about that location (I can just share the pin drop if I want to — I don’t have to share any of my images or notes related to that location).
When viewing a shared location, if you have Rego installed on your iPhone, you can import the location and notes to your own list of places. If you’re viewing the place on an iPad or Mac that won’t have Rego installed, or if you’re on your iPhone and just don’t want to import the location, a link appears over top of the map to open the location in Google maps.
Planning a Trip
Since you can add locations you’re not physically at, you can use Rego to plan a trip — dropping pins at all the places you want to visit, and even adding notes about that place.
Unfortunately, since Rego does not yet have the ability to search for a place, you’ll have to eyeball it when adding places. If you’ve got a lot of trails, restaurants, and other landmarks you want to visit next time you’re, say, in the Rocky Mountains, you may find building out an entire week’s worth of excursions takes a bit of time.
I’ve built a collection for my Summer vacation to the Rocky Mountains, which includes a few restaurants we want to visit and some 4×4 trails we want to hit. I can then use Rego to instantly pull up the places we want to visit and get directions.
To get directions to a place, tap the standard iOS “Share” icon in the top right corner. Then select “Open In…” and Rego will give you the option to open the location in Apple Maps, as well as Google Maps and/or the TomTom app if you have those installed. Then, you can use your way-finding app of choice to get directions to your place.
Also worth noting, is that you can reorient the map by tapping and holding. When you do this a purple pin will drop and then all the locations in Rego will be sorted by distance from the purple pin rather than from your current location. This can be helpful for, say, getting an idea of the proximity all your planned excursions are from where you’ll be staying.
Data Export
Alas, currently there is no way to get your data out of Rego. Though all your info is stored locally on your iPhone, if you ever decide to stop using Rego there’s no way to get your data out. I’m told that export is a feature they are working on and will be added to a future release.
Conclusion
Rego is available now as a free download, and allows you to add up to 10 places. To add more places than that, there is a $2.99 in-app purchase (which is currently on a launch-price sale of $0.99). This is Rego’s way of offering a “try before you buy” version.
While I do see some overlap between how one might use both Rego and Day One — because both allow you to log “Moments” with images, notes, and your location — I see both as being useful.
For me, Rego is the place where I log my favorite spots, recommended spots, and spots I want to visit. And sure, an image or two can be added to give some flair to the saved location entry, but for recording memories, I’ll continue to use Day One.
All in all, Rego 1.0 is a fantastic app with some great features and functionality. The lack of social features mean it’s not one more app you have to “manage” and “check in” on. It’s an app you use if and when you want — it doesn’t bug you to use it all the time. This is precisely what I like so much about it.
- Which will include Okie Joe’s, L.C.’s, Arthur Bryant’s, and (for those who need a place with a nice atmosphere) Jack Stack. ↵
- Of course, a situation like the above is exactly where an app like Foursquare would shine. The social aspect of the app makes it easy to aggregate the “most popular” locations. But I’ve never had trouble getting a recommendation by asking for one on Twitter or looking on Yelp. ↵
- At Broadway, get espresso. At Quay (pronounce it “key”), get a pour over. At Okie Joe’s, get the Z-Man. At L.C.’s, get ribs, order in a hurry, and pay with cash. ↵
✚
Concerning Inexpensive 27-inch IPS LCD Displays

It all started last summer when my cousin sent me a link to this article by Jeff Atwood concerning his discovery of the gray-market of inexpensive 27-inch IPS LCDs on eBay.
My beloved 23-inch Apple Cinema Display had been on the fritz for several months. It was a 9-year old monitor. It was getting dim and had something wrong with the logic board’s ability to recognize the power supply. In short, if the monitor ever lost power then I’d have to try and short-circuit / jumpstart the logic board into turning back on.
Now, I love the look of California-designed hardware on my desk as much as the next Apple nerd. But when my 23-inch ACD finally pooped out last fall, I wasn’t exactly set on replacing it with a Thunderbolt Display.
For one, knowing that new iMacs were on the horizon, I didn’t want to fork over $999 on a Thunderbolt Display when it was very possible that an update to those was on the horizon as well.
Secondly, I wasn’t totally comfortable with spending a thousand dollars on a display that I could find elsewhere for significantly less (albeit, with a few less features).
So I decided to get one of the same, cheap displays as Atwood had. Same as Atwood, I ordered the FSM-270YG. You can still find them on eBay (and if you look, you can even find them in matte).
Since I’d already tainted my all-Apple setup with a black, ugly, awesome mechanical keyboard, it made it easier to take the leap and get a black, ugly, awesome new monitor. You know, to match the keyboard.
Aside from being ugly, the disadvantage to the FSM-270YG is that it comes with no bells or whistles. There are no USB hubs, no thunderbolt ports for daisy chaining, no ethernet, no HD FaceTime camera, not even the ability to tilt the thing. Moreover, when you buy one of these monitors off eBay, you’re taking a gamble. If you get one with a dead pixel or 10, then you’re out of luck.
But, my eBay monitor certainly has some advantages: (a) it was about 1/3 the price of an Apple Thunderbolt Display; (b) it has a matte screen — no gloss, no glass; and (c) one feature it does have is a built in speaker that sounds like if you were to plug in your earbuds, lay them on your desk, and then turn the volume up all the way.
I don’t mind the lack of features because you get what you pay for. And though it’s ugly on the outside, the part that matters the most — the pixels — is just what you’d find inside an Apple display, or any other expensive computer monitor.
My goal was to get the best possible display for the cheapest possible price. All in all I spent $406.76 ($339 for the monitor + $67.76 for a Dual-Link DVI adapter).
Monoprice’s Version
Just recently, Monoprice began selling their version of the FSM-270YG. It’s called the CrystalPro.
The CrystalPro looks exactly like the FSM-270YG monitor I have in front of me right now, except their’s has a Monoproce logo slapped on the front.
The CrystalPro costs $390 + shipping. You can find plenty of the generic FSM-270YG monitors on eBay for less than what Monoprice is selling their monitor for, but there is a significant advantage to going with Monoprice: the warranty.
Not only does Monoprice check each monitor they sell to make sure it works, they also offer a one-year warranty which means they’ll replace the display if there are more than 5 dead pixels.
The Problem with Dual-Link DVI Adapters
What’s unfortunate about both the FSM-270YG and the CrystalPro is that they require a Dual-Link DVI connection. And if you’re running your monitor off a MacBook, you’ll have to get a Mini DisplayPort to Dual-Link DVI adapter. And, they stink.
Not only are they expensive, but they’re flaky. I often have an issue with my monitor where, when waking the computer from sleep, the screen will show “snow” (like when your TV is on a dead channel). Fortunately, a quick off/on of the monitor itself resets the connection and the snow goes away. But still.
So far as I’ve been able to tell, this has to do with the adapter itself. I thought it was because I’d originally purchased a Monoprice adapter, but I had the same problem after purchasing an Apple adapter. And after researching about it online, I’ve realized I’m not the only one.
Not only are Mini DisplayPort to Dual-Link DVI Adapters expensive, they also take up a valuable USB port on the Mac, and they’re known for causing occasional video issues.
So my biggest complaint against these monitors is not the monitor itself, but the adapter they require.
Dell’s Offering
The Dell UltraSharp U2713HM is just as ugly as the Monoprice CrystalPro but with a lot more advantages.
On Dell’s 27-inch ISP monitor you can adjust the height and viewing angle, it has a USB hub, and you have several options for how to connect to it — including DisplayPort. And a Mini DisplayPort to DisplayPort cable costs all of $5.
The price of the Dell UltraSharp moves up and down, but lately it’s been hovering around $650. Factoring in shipping, cables, and adapters, you can get the Dell monitor for about $200 more than the Monoprice.
Which Inexpensive 27-inch IPS LCD Display Should You Get?
If you’ll be plugging your monitor into a tower that already has plenty of USB ports and doesn’t need a Mini DisplayPort to Dual-Link DVI adapter, I’d go with the Monoprice CrystalPro.
If, however, you’re looking for a nice, big monitor to run while your MacBook is in clamshell mode, go with the Dell. Its extra USB ports and non-reliance on a Dual-Link DVI adapter make it worth it the extra money.
✚
Quick-Capture Notes Apps
Something I left out of my Simplenote / Dropbox / writing workflow article last week is what iPhone app lives in my Dock for the sole purpose of being the go-to for initially capturing ideas, lists, and other miscellaneous tidbits of information.
The iPhone can be pretty awkward when you need to quickly jot down a piece of information. Such as someone’s shipping address, phone number, and/or email address; a list of things to get while you’re out that your wife is rattling off to you as you walk out the door; the coffee order your co-worker wants you to pick up for them while you’re out; etcetera.
The point being, there are many occasions when typing the information into the app it belongs takes too much time and attention than you have at the moment.
For this stuff, and more, I use an app called Scratch by Sweet Mac Alum, Garrett Murray and his team at Karbon.
Scratch
Scratch is a no-nonsense “scratch pad” app for your iPhone. It launches in a hot second, and greets you with a blank text-entry pane and blue blinking cursor. You are then free to type whatever it is you need to type out right now, and leave the fiddling to later when you have a few minutes.
The reason you want to use an app like Scratch for stuff like this is all in the way Scratch handles your text after you’ve typed it in.
Once you’ve made your note, you can export the text you’ve just typed by sending it to Simplenote, Byword, Notesy, et al. You can also email it; text message it; send it to OmniFocus as a to-do item, or as the note for a to-do item; tweet it from Tweetbot or post it to App.net; send it to Quotebook; send it to Day One; create a new text file in Dropbox, or append your new text to an already existing text file.
And the export options are customizable. When you tap the export button you don’t see the entire list of every supported app, you see only what you’ve enabled in Settings. I’ve enabled Simplenote, Day One, and Email export.
Scratch isn’t just for capturing now and processing when you’ve got a minute. It’s also great for capturing disposable information, like that coffee order or your Honey Do List — why launch an app that syncs when you only need to jot down something that’s relevant for the next hour?
The Custom Keyboard Row
Scratch makes clever use of a custom keyboard row. Instead of there being a top Navigation / Title bar, the text pane goes all the way to the top. And then above the default iOS keyboard is a 5th keyboard row.
This 5th row can be swiped left and right. It sports a set of Markdown-friendly custom keys, action buttons for your current note, and access to the settings pane.
Additional power-features include TextExpander support, and markdown auto completion for links.
Drafts
Similar in scope to Scratch is another excellent app: Drafts.
A few of Draft’s main differences include:
- An iPad version which syncs to the iPhone.
- An option to always launch with a blank text entry box.
- A link mode, which takes mailing addresses, emails, phone numbers, and events and turns them into tappable links.
* * *
I highly recommend either of these apps — Scratch being one of three apps in my Dock. People have asked me why I use Scratch over Drafts. And though Drafts has a few more power features and is available on the iPad, I prefer Scratch because of the design.
✚
Twitterrific 5
If you’re old school, Twitterrific for Mac was probably your first Twitter client.
Twitterrific for the Mac came out in January 2007. I joined Twitter in March. It was the first native Twitter app for the Mac, and I loved its small footprint, dark UI, and color-coded @replies. For a long time Twitterrific was Twitter for me.
It’s funny to look back at how I used Twitter over half a decade ago. I followed dozens of people and would often post Tweets through a Quicksilver plugin, treating my tweets as one-line “status updates” which lived on my site’s sidebar. Visitors to my blog circa 2006 and 2007 could see a “this is what the author is currently doing” message.
Obviously our usage of Twitter has changed drastically since then. Twitterrific for Mac shipped the same week Steve Jobs announced the original iPhone. Now, almost 6 years later, I primarily check and post to Twitter via my iPhone.
Six months after Twitterrific for the Mac shipped, the first proof of concept for “MobileTwitterrific” was announced in August of 2007. Twitterrific for iPhone launched on July 11, 2008, and was one of the first apps in the brand new App Store for iPhone. Before Twitterrific for iPhone, we were all using web-based Twitter apps. Remember Hahlo?
T5

Today, Twitterrific is 5 years older and 5 versions mature. The app has gone through many design iterations over the years, but has always remained true to its roots. Additionally, Twitterrific has made many significant contributions to the Twitter ecosystem at large — it was the first native Twitter client on both Mac and on the iPhone, it was the first to coin the word “tweet”, and it was the first to implement a bird icon.
Graphics-wise, the newest version of Twitterrific is simply stunning. Without any hyperbole, I consider T5 to be the best-looking version of Twitterrific to date and one of the most attractive iPhone apps I’ve seen in a long time. Thanks in no small part to the great use of typography and color. Though this new version seems to me the furthest departure from the original design, it still has hints of familiarity and does not cast aside all design elements from past versions.
I haven’t used Twitterrific on my iPhone since 2008, which is when I switched to Tweetie. Then it was Tweetie 2, and then Tweetbot. All these aforementioned Twitter apps are not just great apps for Twitter, but they are (or were) great iPhone apps, period. The look and feel of Twitterrific 5 is, in my opinion, its greatest selling point — it has a UI design on the same caliber as what I consider to be some of the best iPhone apps ever built.
Twitterrific 5 strikes me as an exercise in simplicity with a focus on all the little details. When your UI doesn’t use gradients or drop shadows or boxes to hold itself together, all the loose elements have nowhere to hide. Any designer worth their salt will tell you that a “minimalistic” app like this is extremely difficult to pull off well. I say the Iconfactory hit a home run.
I asked David Lanham, designer at the Iconfactory, about the redesign. He said, “the focus of the redesign was to bring Twitterrific back to making reading tweets as enjoyable as possible while also applying what we’ve learned over the last few years for interface and interaction decisions to the usage of the app.”
Twitterrific’s most historic design detail is its liberal but clever use of color. Twitterrific has always used colors to signify the various types of tweets, and it’s no different in version 5: - @replies directed to you use a yellow, orange, and red color scheme. - Tweets which simply mention your @username use a brown and tan color scheme. - Incoming direct messages are dark blue. - Outgoing direct messages are teal, with an arrow pointing to the name of the user you sent the message to. - A purple line underneath a Tweet signifies where the current tweet marker is (you can sync your timeline position via iCloud or the TweetMarker service).
Another historic design element is Twitterrific’s customizable themes. Just like in past versions of Twitterrific, T5 lets you choose between light or dark themes, adjust the font size to anything from teeny-tiny to ginormous, and more.
What’s new, however, is you now get a choice of the typeface itself. Custom fonts include Helvetica (of course), Proxima Nova, Museo Slab, Calluna, and Signika. Naturally I’m using Proxima Nova — it’s a gorgeous typeface which I think looks especially stunning on a Retina screen.
Also new: T5 can switch between light and dark themes automatically based on the time of day. Bright theme in the daytime, dark theme in the nighttime (a la Instapaper). This option is clever and fun; I had it turned on for a few days, but ended up turning it off because I like the dark theme too much.
Interestingly, popover notifications and slide-up selection buttons are not customized. So much of Twitterrific’s design is unique and customized, I was a bit surprised to see these default iPhone elements.
Direct Messages
Showing DMs right within the main timeline, as Twitterrific always has, always freaks me out. After a few days I’ve slowly acclimated to seeing a blue message and knowing blue means not publicly viewable.
There is, of course, a Messages tab, however, you cannot start a new DM thread from within it. You can view and reply to any current DM conversation you’re having with someone, but you cannot begin a new one with a new person.
The only way to start a new DM thread is to first navigate to a user’s profile, and if they follow you then you’ll see a small envelope icon. Tap that to start a new DM conversation with that person.
Alternatively, you could send a DM the old-fashioned way: “d @username Hey pal!”
A Few “Missing” Features
Being a hard and fast Tweetbot user for the past few years, there are 3 elements I instantly noticed were not features of Twitterrific 5:
- No mobilizer view available in the in-app Safari web view.
- No muting of keywords, tags, clients, users, etc.
- No push notifications.
But this is something Craig Hockenberry (the man who had the idea for Twitterrific in the shower) addressed all the way back in 2008:
There will always be more than one way to solve a problem: a developer’s personal preferences will inevitably seep into the implementation. Having many choices for a Twitter client means that developers don’t need to create a “one size fits all” solution. In essence, users get to choose a developer whose preferences match their own. [...]
For Twitterrific, our core function is reading.
The core function is not managing your Twitter account. Nor is it being a general purpose tool to exercise every nook and cranny of the API. It’s primary function is not to act as a surrogate for SMS messaging.
I asked the awesome gents at Iconfactory why they chose to not ship T5 with push notifications. It was a two-fold answer from both Craig Hockenberry and Gedeon Maheux.
“Twitterrific 5 is a clean slate. The visual design is obviously a fresh start, but our code base is as well,” Craig said. Gedeon added that if they’d included push notifications as part of T5, it would have added another 3 – 4 months to the development cycle: “So much has changed in the Twitterverse this past year with Twitter introducing new guidelines and restrictions that we felt any further delay in getting version 5 out the door increased the risk of not being able to release it at all.”
But that’s not the only reason. “When everything is new and clean, you think carefully before adding new stuff,” Craig said. “The things in this initial version are things we, as a team, really wanted to have. I know a lot of people love push notifications, but as iOS matures I find myself actively disabling notifications in apps. There are just too many and they end up being a distraction.”
I am an advocate of Craig’s stance on disabling as many notifications as are reasonable. But for me, there are many peers and comrades that I connect with throughout my workday, and Twitter DM is one of the primary ways we go about doing that. Fortunately, push notifications are in Twitterrific 5′s roadmap, they’re just not here yet.
And alas, for me, some of the “missing” elements in Twitterrific are deal breakers. Despite how fast and gorgeous Twitterrific 5 is, I do not want to give up push notifications, mute filters, or the mobilizer web toggle. These 3 features of Tweetbot are so important to how I use Twitter that I won’t be switching to Twitterrific as my one and only Twitter client.1
For the past week, I’ve been bouncing between both apps — using Tweetbot for DMs and Twitterrific for the rest. I know it’s silly to use more than one Twitter app, but the look and feel of T5 is so splendid that I’m happy to be silly for the time being. Not to mention, if you have any appreciation at all for world-class app design,2 then Twitterrific 5 is worth checking out for that reason alone.
It’s a universal app and is currently $2.99 in the App Store.
- Going a week with a client that didn’t mute certain keywords or user agents did make me realize that perhaps I should just re-think who I follow on Twitter. No, no — of course I’m not talking about *you*. ↵
- If you don’t, then I question how you’ve survived as a regular reader on this website. Is it the coffee links? ↵
✚
Fantastical for iPhone
Fantastical for iPhone is available today. You’ll probably be hearing a lot about it, and the good words are merited. I’ve had it on my iPhone’s first Home screen for the past 6 weeks. Right now it’s $2 in the App Store, and I wholeheartedly recommend it.
There are two headline features: (a) The ability to create an event using natural language. This is the headline feature of the Mac version that won me over last spring. And (b) the DayTicker, which is a clever new way of displaying the upcoming days and events.
Creating an Event
Why does it always seem that I’m in a rush, or that someone is waiting on me when I’m trying to create a new event on my iPhone? Creating new events on the iPhone has never been a particularly easy or quick task.
- The iPhone’s default Calendar app is okay at best when it comes to entering new events, but if you’re not creating an event for the very near future, it can take many taps to get the event created.
- Agenda (a very fine 3rd-party calendar app) has done a good job at making it easier to input a new event, but it is still a somewhat tedious task that requires many taps.
- Siri can be great, but I still find it awkward to use Siri in a public setting, and she doesn’t exactly have a great track record of being accurate and frustration free.
Fantastical is, in my opinion, the easiest way to create a new event thanks to the natural language parser. But for maximum ease and speed you really need both thumbs available since you’re typing a normal sentence — Skydiving lessons tomorrow at 9 am.
Moreover, if you don’t want to type out a sentence, Fantastical still gives you the ability to create an event exactly as you would in Apple’s default Calendar app.
Calendar Views, the DayTicker, and My Visual Thinking Mojo
Fantastical has something I’ve never seen before: the DayTicker.

Design-wise, the DayTicker is money.
However, as pretty as it may be, I’m still not fully sold on the DayTicker. The way the 5-day ticker slides left-to-right while the event list scrolls top-to-bottom is a little bit jarring. My eyes don’t know where exactly to focus with two lists scrolling in different directions at the same time, and so I often find myself looking back and forth between the two instead of focusing on one list while looking for a specific day or event.
And yet, that’s not to say I’m convinced the DayTicker view is flawed. For me, the jury is still out on this one. And the reason is because I’m a visual thinker. When I think about my calendar I don’t think in dates, I think of a traditional calendar view and the S-M-T-W-T-F-S layout. Sunday is on the left, Saturday is on the right, and Wednesday is in the middle. The DayTicker messes with my mojo by removing the visual boundaries of a traditional calendar view.
What redeems it for me is how quickly you can switch between the DayTicker and the month-view. Pull down on the DayTicker and the month-view calendar will take its place. Pull down again to switch back to the previous view.
Having a quick and easy way to transition between list view and month view is something I’ve always loved about Agenda, and it’s equally great in Fantastical.
Using it day in and day out as the calendar app on my first Home screen for the past six weeks, I’m not ready to say it’s the best calendar app bar none. It’s still a toss up with Agenda, the calendar app I’ve been using since it first came out nearly two summers ago.
Design
What I like most about Fantastical on the iPhone is the design.
There’s no denying that the design of Fantastical is top notch. I love the overall color scheme of deep red, whites, and blacks. The app feels balanced and unique. And there are several little design details that give Fantastical a fun and polished feel.
One of the most notable of the little design details is the magnification within DayTicker. As you slide the ticker left to right, the center-most day get’s “magnified”. This is a great touch.
Another detail: when creating a new event, the words you tap in animate in to the calendar view below. This gives you a visual cue that what your typing in is getting entered into your calendar, much like it is with Fantastical on the Mac.
It’s these little things in the design that make Fantastical feel professional and refined. This is easily the best-looking Calendar app on the iPhone and it’s a welcome addition to iOS.
✚
First Impressions of the Olympus E-PL5

My Olympus E-PL5 arrived on Tuesday, and the lenses arrived yesterday. Most of yesterday afternoon I spent reading the user manual and shooting a few hundred photos.
My first impression of the camera is that it’s great. Really, really great.
Here is a Flickr set with the 31 photos I thought were good enough to share with the Internet. All the images were shot in RAW and edited a bit in Lightroom using the default presets.
* * *
Hardware: It’s a dense and heavy camera. Heavier than I thought it would be which makes it feels expensive. But it’s not so heavy that it’s difficult to hold or operate. With the front grip attached I can comfortably hold and operate it with my right hand.
The movable / tiltable touch screen has sturdy hinges and I don’t feel like I’m going to break it. As a feature, the adjustable screen is very welcome. I found myself frequently holding the camera at waist height to take a shot and then tilting the screen up towards me so I could see to frame the picture. It makes taking shots at or near ground level as easy as kneeling down.
Speed: I have two Panasonic lenses I’m trying out (see more below). Olympus cameras are known for their super-quick auto focus, and my E-PL5 lives up to its reputation. Focusing seems near-instantaneous most of the time, but in lower light it can take up to half a second to focus (even with the “slower” focusing 20mm pancake). And speaking of focus, the tap-to-focus-and-then-snap-a-photo feature of the touch screen is great. Very useful for auto-focusing on something not in the center of the frame.
Not only does the E-PL5 focus quickly, but it turns on in about one second. After I press the power button, it’s up and ready to go before I have the lens cap off. One of the reasons I bought this camera is so I could take better shots of Noah. Assuming the camera is nearby it would be ready to take a picture nearly as fast as my iPhone would be.
Point and Shoot (but only if you want): After my first day shooting, I felt like I got several high-quality images that turned out great and all I did was point and shoot. The E-PL5′s Automatic mode is great at detecting what sort of image your taking and what the lighting is like and then favoring the best settings. Thus this camera will allow you to take some great photos without having to do much more than frame the shot.
But it’s not all auto. The E-PL5 has priority modes and full-on manual mode — I can adjust all sorts of stuff that I don’t yet understand.
This is exactly the sort of camera I was hoping to get. It will allow me to learn how it works and learn about the finer details of photography, but not require it of me. I could give this camera to anyone and tell them to just point and click and they’d likely get a pretty decent image, if not a great one.
Battery Life: I took a little less than 300 pictures yesterday and the battery indicator says it’s still at full. I don’t yet know for sure how long the battery will last, but it’s obviously much longer than a good afternoon of shooting.
Preconceived Notions: I’m trying hard to remember what I’ve always told myself when it comes to print and web design: tools do not a designer make. In my dreams I tell myself that after 5 years of avid iPhone photography, I’ve slowly grown in my composition skills as a photographer and that I’ll pick up this new high-quality camera and instantly produce jaw-dropping photos.
While I’m sure that the photographic eye I’ve developed over the past few years is better than starting from nothing, it’s also likely that since I’ve been using one camera for so long I’m now somewhat pigeonholed into what the iPhone is and is not good at. There is now a whole world of options and styles that the Olympus and it’s different lenses will open me up to.
Simply having a nice camera does not mean my shots will be what I want them to be. And that’s okay — I’m here to learn.
Voice: I am as excited about editing images as I am about taking them. Just as a writer, over time, develops their writing voice, so too does a photographer. But with photography you develop your voice not just in composition but also in post processing. And those two come together.
Lightroom: I bought Lightroom 4 when it came out and have been using it to post-process some of my iPhone photos. Mostly to clean them up and make them pop a little bit. There is still a lot I have to learn about post-processing.
One thing to note is that Lightroom 4.2 does not support RAW files from the E-PL5. Adobe recently made available the beta RC1 for version 4.3 that does.
The shots from yesterday I took in RAW and edited with Lightroom’s stock presets. For my first day shooting and editing with what could be considered “pro” gear, I am thrilled with the results. But I’m not blown away — I know I can do better. The good news is that I feel only held back by my own skill and knowledge.
Lenses: Though I only plan to keep one, I ended up ordering two lenses: the Panasonic 20mm f/1.7 and the 25mm f/1.4. Because I’ve read and seen so many good things about both I wanted to use and compare them side-by-side and determine for myself which I wanted to keep as the daily shooter. The lens I decide not to keep will just be returned or sold.

The 20mm f/1.7 is a pancake lens, which, in terms of size, is ideally what I want. Not only does the pancake make the camera more portable, it also makes for a less intimidating camera. People who aren’t used to a fancy camera, tend to act awkward or look funny when there’s a giant camera pointing at them. A small camera that looks like no more than a humble point-and-shoot I got at Walmart may help friends and strangers alike to pay no mind and thus allow me to capture some great candid shots.
However, the 25mm f/1.4 is a bit faster and is slightly higher-quality glass. It gives a creamier depth of field than the 20mm, and it’s auto-focus is quicker as well. And so it has me wondering if the tradeoff in portability and incognito-ness may be worth it.
But it’s impossible to conjecture about which lens is the better daily driver without using and comparing the two. All throughout the day I tried to take the same shot twice — once with the 20mm and then again with the 25mm. As I was later going through all the photos in Lightroom, most of the shots which stood out to me as being better than the others were the ones taken with the 20mm. (Perhaps this is because the focal length of the 20mm seems more akin to that in the iPhone, and so I’m naturally used to framing shots in such a way that the 20mm shines more?)
Down the road I’m planning for my 2nd lens to be the Olympus 45mm f/1.8. It will make a fine companion to the pancake 20mm, and so, though I haven’t made my final choice yet, my gut instinct is that the 25mm — as nice as it is — will not make the cut.
Is it fun? I felt like a dork walking around with my camera and taking photos. I’ve never thought other people with cameras were dorks, but I sure felt like one. I’m just going to assume that this is something all photographers feel and that once I get over it I’ll have a lot more fun taking photos, and the quality and style of my photos will increase as well.
As they say: just relax.
* * *
My favorite two photos from yesterday are this one of Noah laughing (though that picture would have looked good no matter what camera it was taken on), and this one of Anna and Noah playing:
It is tough to say after only one day of shooting, but I’m feeling extremely happy with the E-PL5 and the Panasonic lenses. So far, it looks like I made the right choice for the best compact, mid-priced, Micro 4/3 camera.
✚
Review: The Kindle Paperwhite (Compared to the Kindle Touch)
It took about a week from when I bought my first iPad until I realized I would likely never buy a physical book again.
The iPad was to books what my first iPod was to music. It had been years since I’d bought a physical CD — all my music lives in iTunes and comes from the iTunes music store. So too would it now be with books. The convenience of being able to buy a book with a few taps, have it download instantly, and add it to my small-but-now-growing digital library was just too awesome of a perk.
My enjoyment for reading digital books evolved even more when, last year, I purchased my first Kindle. My reasoning for buying the Kindle Touch was mostly business. I wanted to review it, to get some experiential knowledge of what e-ink was like, and I wanted to compare the size and weight of the Kindle Touch to the iPad.
It took all of 10 minutes of reading on the Kindle Touch for me to regret the money I’d spent in the iBookstore up until that point. For long-form reading, the Kindle was obviously leaps and bounds better than the iPad, and now I was thinking about all the digital books I had bought on the iBookstore and how they were no good on the Kindle. The few books I was currently in the middle of reading on my iPad I bought again on the Kindle store and the rest is history.
Reading a book on a Kindle truly is a more enjoyable and relaxing experience than reading one on the iPad. There are the obvious, tangible advantages: the Kindle is easily held for long periods of time with one hand and the e-ink display is easier on the eyes. But there are also the less obvious, intangible advantages: when you’re holding a Kindle there are no other apps, no other options of things to do, no distractions sitting impatiently behind the text before you, no notifications, or any of that.
The Kindle is a single-serving device. It’s meant to offer all the niceties of reading print, enhanced by all the luxuries of a digital device. It’s as light as a paperback book, the screen looks like printed ink on paper, but it can hold a massive library and you can buy a book with just a few taps without even getting up from your chair.
The only significant quibble I had with the Kindle Touch was its non-illuminated display. I do most of my reading in the evenings on the couch and/or in bed. Often when reading in bed the lights are out, and thus I’ve become a regular user of the Kindle app for my iPad.
Which is why, when the Kindle Paperwhite was announced, I ordered one immediately.
What’s Great
Not all the gadgets I buy to review continue to get used after I’ve written about them. But my Kindle Touch proved to be something I use all the time. After a month with the new Kindle Paperwhite, I consider it to be superior to its predecessor in every way.

For one, the Kindle Paperwhite just looks cooler than the Kindle Touch. It’s the most attractive Kindle to date. The front of the bezel is a semi-gloss black plastic with nothing but the Kindle logo centered in silver.
The Kindle logo used to be on the top-most bezel, and on the bottom-most bezel is where there used to be a Home button. The Kindle logo has now been moved to the bottom and the Home button has been removed. It’s obvious that Amazon was going for ultra-simplicity in the design of the Paperwhite; it’s a shame they didn’t remove the front logo altogether.
(I will say that the missing Home button hasn’t bothered me one bit. It is quite easy to get to the Home screen through the software menu, and for how infrequently I visit the Home screen of my Kindle I’m fine with an even simpler front bezel design.)
On the bottom edge you’ll find the only port and the only button: a micro-USB port and the power/wake/sleep button. On the Kindle Touch, the very bottom also sported a speaker. I never once used that speaker except during testing, and so I’m glad to see Amazon removed it on the Paperwhite.
The back of the Kindle is black and sports a matte, slightly-rubbery, grippy plastic which bends around the side and top edges and meets the front bezel with a single seam. There are no screws or clips on the whole device. It’s lightweight, easy to hold, and built very well. It is the nicest non-Apple “tablet” I own.
But the refinements to the hardware are only the beginning. The higher-contrast screen with its higher DPI looks better than previous Kindles. And, best of all, the screen is now illuminated. This was the whole reason I popped for another Kindle despite the fact I had a perfectly good one that was less than a year old. Because, as I mentioned above, the Kindle Touch’s lack of an illuminated screen was actually a hindrance to me using it as often as I wanted to.
Moreover, the Paperwhite’s screen itself sits closer to the rim of the bezel. Or, put another way, it’s not sunken down into the device as much. And even the touch responsiveness is faster. Perhaps this is due to hardware upgrades to the internals, or perhaps it’s due to the software that the Kindle Paperwhite is running. It’s probably a combination of both.1
In addition to being more responsive, the new version of software running on the Paperwhite is easier to use. The new cover view on the Home screen is so much nicer than the list view. Also, you can now view the books you have on your device and all the books you’ve ever purchased, but that are in the cloud and not currently downloaded.
All these little changes really add up to a great device. But, of course, the Kindle Paperwhite is not perfect.
What’s Not So Great
No Page-Turn Buttons: I have never actually used a Kindle that had the physical page-turn buttons, but I suspect I’d love them. And why shouldn’t this version of the Kindle have them?
John Gruber, in his review of the Paperwhite wrote:
To remain relevant in an iPad (and Kindle Fire) world, a single-purpose device like the Kindle Paperwhite needs an obsessive focus on the reading experience. Page-turning buttons would make that experience better.
Another disadvantage of the Kindle Paperwhite’s lack of physical page-turn buttons is that you cannot rest your thumb on the screen. If you tap the screen on accident you end up turning the page. If you leave your thumb resting on the screen then you end up highlighting a word.
In the countless hours I’ve spent reading on my Kindle, a touch screen seems so obvious. It makes highlighting passages and looking up definitions a breeze, as well as navigating the Home screen and other menus. The inability to rest my thumb on the screen is only an issue when reading while lying down on my back. And so to me it’s worth having the touchscreen of the Paperwhite than the non-touchscreen of the Kindle 5 (especially since the Paperwhite now has a crisper, illuminated display).
Ultimately, my ideal Kindle would be smart enough to know when I’m resting my thumb on the screen and when I’m trying to highlight a passage or define a word. And it would have physical buttons for turning pages.
The Illumination Spotlights: By far, my biggest complaint agains the Kindle Paperwhite is with the way the lights illuminate the bottom of the screen. Underneath the bottom bezel of my Kindle are four LED lights, shining upwards to light up the screen. Yet they shine like spotlights, and it’s not until about 3/4 of an inch up the screen that their light beams blend into one another and you get a soft, even lighting.

This is common. All the Paperwhites have it and nobody likes it. The darker your reading environment, the more pronounced the uneven lighten is. It’s unfortunate for sure, but it is what it is and by no means is it a deal breaker.

Text alignment: Nearly all books are aligned with full justification. I say nearly all because the Tom Clancy book I’m reading right now actually has a ragged-right text alignment; surely it’s not the only one. Kindle books are notorious for having odd typos here and there (like the numeral “1″ in place of a capital “I”). And so, in a way, it seems like we’ve just come to expect sub-par layouts with our Kindle books. But why should we?
There’s no reason Amazon can’t offer ragged-right text alignment. I second John Gruber’s vote for Amazon to hire a world-class book designer and put him on the Kindle product team.
Poor Access to Previously-Highlighted Passages: I highlight passages like it’s my job. It’s how I revisit a non-fiction book. Unfortunately, there’s no great way to access my highlighted sections of a book other than within the Kindle itself.
Right now, the only way I know of to get a highlighted passage from my Kindle to my Mac is to share that passage via Twitter and then copy/paste the passage onto my Mac. It’s unfortunate that I cannot access my Clippings via the Amazon website, nor can I email a highlighted passage to myself.
Update: Thanks to everyone who has let me know kindle.amazon.com/your_highlights should show me all my highlighted passages. Alas, it lists nothing for me. I’ve contacted Amazon Customer Support to see about that. In the meantime, I also learned that if I plug my Kindle in and put it in USB mode then in the device’s Documents folder there is a My Clippings.txt file. (Thanks, Scott!)

Special Offers: I suppose technically the special offers are not that great. But for me it’s not worth the $20 to get rid of them.
Last year I bought the version of the Kindle Touch with Special Offers and I never paid the $20 to turn them off. The ads don’t bother me much — I usually just have the Kindle resting face down — and there have been a few times where there’s a deal that I’m actually interested in and I get a book for a buck, or something like that.
The End
The Kindle is in the same category of gadget as my Apple TV. Both are great gadgets that I use often and seem like a steal at their relatively inexpensive prices.
The Kindle Paperwhite has a lot going for it: the e-ink screen, million-year battery life, illuminated display, improved software, the iOS Kindle apps that sync with my iPad and iPhone, and the lightweight yet rugged build of the device hardware. The biggest compliment I can give the Kindle is that thanks to it, I read more books and I read more often.
Amazon seems to have shown their hand with future Kindle updates in that software and hardware updates are coupled together. The most recent version of the Kindle Touch software is version 5.1.2; the Paperwhite is running version 5.2.0 which (in addition to support for the illuminated screen and the missing home button) sports a refined menu a Home screen layout.
I emailed Amazon to ask if the Kindle Touch would get the 5.2 software update but I got a non-reply about how Amazon has made no announcements for future firmware versions of the Kindle. ↵
✚
The iPhone is Here to Work
Noah was finally asleep. Sitting in the center seat, my wife was holding our 7-month-old son as he slept on her shoulder. The three of us were flying back home from a week in Colorado, and Noah had spent the first half of the flight fussing. Anna and I — as well as our fellow travelers — were relieved that he was finally resting.
Noah likes to be held but hates to cuddle. It’s such a rare occurrence for him to fall asleep in our arms that I had to document the rarity (and cuteness) of the moment.
The seats on a 737 are not exactly spacious. I reached into my pocket to retrieve my iPhone 5, and in the process the back edge of my phone had an encounter with the metal frame that held the seat’s arm rest in place. My iPhone was a couple weeks old, and the slate black body was, until that moment, still unscathed.
As if writing on a chalkboard, I could feel the frame of the phone shudder ever so slightly as it slid across that metal surface. Once out of my pocket I looked down at the back edge. Sure enough, part of the slate coloring had been scratched away revealing the silver-looking aluminum.
In that moment, while appraising my phone’s new scar, I was unexpectedly reminded of why the iPhone is special.
The iPhone is an uncanny amalgamation of beauty and utility — it’s a design and engineering marvel. Our western culture tells us that when you own something this nice, you protect it. Your sports car sits in the garage all winter; that painting belongs behind a sheet of glass; the silver flatware is kept in a box in a drawer; the mobile phone goes in a protective case.
The iPhone, however, prefers not to play by these rules. Though exquisite in design, it was not born as art to be put on display. It belongs in our pockets. It is a tool. A utility. A gadget of gadgets.
The iPhone is here to work.
It’s beautiful enough to be put on display. Simple enough to be used by your grandmother. Powerful enough to be used by CEOs. Popular enough to be made fun of on network television.
And this is why the iPhone is so incredible. Because it is equal parts niceness and usefulness.
This blows my mind. Here I have this gorgeous object of industrial innovation, and yet its proximity to my life is not due to my above average affinity for fine gadgets. No, the iPhone has earned its place by virtue of usefulness. The curiously-thin slab of glass and aluminum that I carry around in my pocket is my camera, my jukebox, my map, my newspaper, my phone, my email, my photo album, my schedule, my to-do list, my notebook, my Internet, and so much more.
“[Design is] not just what it looks like and feels like. Design is how it works.” — Steve Jobs
* * *
After snapping a few photos of our sleeping boy, I turn the phone around so Anna can see the screen and browse the images I’ve just captured. I think to myself how it’s unfortunate my iPhone is no longer mint. And yet I wouldn’t trade that scrape for a case or a cover, and certainly not for a lesser device where scratches seem less intrusive.
✚
The Hidden Radio
Nearly a year ago I backed the Hidden Radio project on Kickstarter. The device looked great and the reward level seemed very reasonable for backers who wanted to get a device when the project was complete.
I had been considering a Jawbone Jambox, but instead decided to back the Hidden Radio. It seemed like a win-win situation: I would be able to help the project happen, and in return I’d get a clever Bluetooth speaker that looks cooler than a Jambox, gets twice the battery life, and costs less.
Last week, the first round of Hidden Radios began shipping. Mine arrived on Thursday evening. Anna and I have been using the speaker around the house as much as possible all weekend long. Below is my review of the device.

The Concept
The design and idea of the Hidden Radio is brilliantly clever. I mean, it’s basically just a giant volume knob. As Gilbert Lee wrote, when concepts of the Hidden Radio were first sent out back in the fall of 2008 (the same time the Google Chrome public beta was released): “The entire product is the UI!”
After several years of R&D, it wasn’t until 2011 that John Van Den Nieuwenhuizen and Vitor Santa Maria were ready to mass produce the Hidden Radio. They turned to Kickstarter in November of 2011 and raised just short of a million dollars over the course of their 60-day campaign.
And now, a year later, the Hidden Radio is a reality.
I received a white version and it’s altogether beautiful. When closed, the device is about the size and weight of a thick, double old-fashioned glass. Anywhere you put it, the Hidden Radio looks like it belongs there.
As mentioned above, the device is entirely UI. The Hidden Radio is designed to work as simply and beautifully as it looks. Alas, this is only in theory. In reality, the manifestation of the UI is difficult and thus frustrating.
Controlling the Volume
The Kickstarter concept video shows people casually reaching over to their Hidden Radio, placing a few fingers on the top of the device, and turning up the volume with ease (cut to 00:50 of the video to see what I’m referring to).
Unfortunately it just doesn’t work that wonderfully. Turning the volume up requires a fair amount of downward pressure on the unit in order to keep friction between the speaker’s base and the table top. But that same downward pressure also causes friction within the housing itself, thus making it extremely difficult for the shell to twist upwards and reveal the speaker grill.
There are a few surfaces in my house that have enough friction with the Hidden Radio’s base that I don’t need to apply too much downward pressure and thus could successfully turn the volume up using one hand. However, most of the time turning the volume up — and turning the device on — requires two hands.
The device is little more than a giant volume knob with a speaker inside, and yet, ironically, it’s the most difficult-to-use volume knob in my home.
It’s hard to know if the volume adjustment become easier over time. Perhaps after regular use of the Hidden Radio’s cap will eventually loosen its grip, making it easier to adjust with one hand. Or perhaps this is something the Hidden team will resolve in the next iteration of the Radio.
Turning the volume down is easily done with one hand.
Connectivity Issues
Perhaps the most maddening shortcoming of all is the Hidden Radio’s irrational desire to power off.
This can happen when you least expect it, and usually when you least desire it. My Hidden Radio powers itself down after about 60 seconds of inactivity. And so, if I pause the music on my iPad in order to take a phone call or have a conversation, I have to turn the Hidden Radio off and back on before resuming music playback.
What’s worse, on Saturday evening the Hidden Radio refused to play music for longer than 15 minutes at a time. A handful of songs in and the speaker would simply disconnect its Bluetooth connection. I would then toggle the inputs (there’s a switch underneath that toggles between Bluetooth, audio-in, and FM radio) to get the Bluetooth to reconnect.
(For some owners, I’ve heard this mid-music shutoff happens as often as every couple of minutes.)
What’s interesting is that the mid-music shutdown was only happening on Saturday evening. Since then it hasn’t been an issue.
Sound Quality
For a small speaker that majors on portability, wireless connectivity, and battery life, you know there are going to be tradeoffs. Even with that in mind, and even after the 8-hour “break in” period for the speaker, the sound quality does not impress me.
At best it sounds a bit like a cheap boombox. At worst it sounds like a muffled, cheap boombox.
When turning the sound down, not only does the volume output of the internal speaker decrease, but as the grill gets increasingly covered up, the sound becomes more and more muffled.
The sweet spot for the Hidden Radio’s sound is somewhere around 75-percent open. This is quiet enough to keep the bass from distorting and open enough to not sound muffled.
Worth it?
After 4 full days of jamming out to my Hidden Radio I find it to be a trophy of design and a failure of engineering. It is, unfortunately, the most textbook case of gadget form without function I’ve ever seen.
As a backer of the Hidden Radio on Kickstarter, I got my device for $119. They are now currently on pre-order for $150, and will then sell for the regular price of $190. At that price, I do not consider the Hidden Radio to be worth it.
If you’re going to spend $150 or $190 on a Bluetooth speaker, get the Jawbone Jambox.
I ended up ordering the Black Diamond Jambox to have some context to compare the Hidden Radio. The Jambox costs the same price and is so much better of a speaker.
The Jambox sounds fantastic — it is much louder and fuller than the Hidden Radio with richer bass and no distortion. Moreover, it is easier to control (how ironic), and its dimensions seem more portable to me. There is, however, one clear advantage the Hidden Radio has over the Jambox: Battery life. 15 hours versus 10, respectively.
The Jambox is certainly not as clever as the Hidden Radio. Nor is it as complementary to the decor of its surroundings. But the Jambox works and sounds better — and that’s what matters.
✚
iOS 6 and Every-Day Life
Remember in 2010 when Apple held an iPhone 4 Press Conference as an answer to the “Antennagate” hubbub?
After his presentation, Steve Jobs was joined by Tim Cook and Bob Mansfield. They all sat on barstools at the front of the room and had a Q&A with the press in attendance. John Gruber asked if any of them were using cases on their iPhones. All 3 of them held up their iPhones to show no case. Steve even demonstrated how he uses his phone (by holding it using the infamous “death grip”) and that he has no reception issues.
What these guys also showed was that they’re using the same phones we are. Three of the top leaders at Apple sitting in a room full of writers and broadcasters, and everyone’s got the same phone in their pockets.
We like to think that Cook, Mansfield, Ive, Schiller, Forstall, and the rest of the gang are walking around with private versions of the 2014 iPhone and its corresponding (though surely buggy as all get out) version of iOS 8.
Everyone knows Apple is an extremely organized and forward thinking company that puts a lot of thought and energy into the planning and testing of its future products. But Apple is also riding on the cusp of its production and engineering capabilities.
After Apple announces and demoes the latest iOS at a WWDC event, most developers wait for the first few rounds of updates to ship before installing the iOS beta on their main devices. And it’s far more likely that the hardware prototypes for the next iPhones are locked away in some design vault, and the software roadmap for the far-future versions of iOS is still mostly on the white board. Meanwhile the folks at Apple are using the same daily driver iPhone and the same operating system you and I are.
Today, right now, we’re using the same mobile operating system with the same apps as the guys in Cupertino who dream this stuff up and make it happen.
And it seems to me that there are several things in iOS 6 which reveal just that. This version of iOS is not full of any one amazing new jaw-dropping feature that will have our minds spinning. Instead it’s filled with dozens of little things that will get used by real people ever day. And it will make our lives a little bit nicer and a little bit easier.
Things like Do Not Disturb mode, and the slide-up options you can act on when you get an incoming call, and VIP emailers, are all things that were thought up by guys who uses this device day in and day out and says to themselves, man, I’m tired of always declining phone calls when I’m in a meeting, texting the person back, and then forgetting to call them when I’m done with my meeting. (Or, perhaps, man, I am tired of getting text messages from my crazy uncle at 2 in the morning, but what if my mom calls and it’s an emergency?)
With that said, here are a few of things in iOS 6 that I am most glad about:
Open Browser Tab Syncing via iCloud
The browser tabs you have open on all your devices are now shared via iCloud. Had a website open on your Mac but then had to jet out the door, no problem. You can open it right back up from your iPhone or iPad.
If your Mac is running Mountain Lion, click the cloud icon in Safari and you’ll see the list of tabs open on your iPhone and iPad. And from your iPhone or iPad, tap the bookmarks icon in Mobile Safari and the drill down into the iCloud Tabs bookmarks folder.
Do Not Disturb
Another one of those features that is so simple and obvious, and yet has a significant impact on the day-to-day usability of our phones. You can activate Do Not Disturb mode from the Settings app.
You can turn it on and off manually (like Airplane mode), and you can set it to automatically start and stop at pre-defined times. (Not unlike Glassboard or Tweetbot allow you to set sleep options for when you do not want to get a push notification.)
To fine tune your Do Not Disturb schedule, and who you’re willing to allow to get through, drill down through the Settings App → Notifications → Do Not Disturb.
The Slide-Up Options on Incoming Calls
This has become my main “show off” feature.
When a friend asks me what’s cool about the new iPhone software I ask them to call me. Then I demo the slide-up menu for incoming calls and watch as they “get it” instantly. We’ve all been in that situation — whether it be a board meeting, dinner, a movie, or whatever — where we have to decline an incoming call from a friend or colleague. This is a feature that makes perfect sense and makes you scratch your head a bit about why it took so long to get here.
Pull to refresh in Mail
We were all doing it out of habit anyway. Now it actually accomplishes something.
Notifications for VIPs
I have worked in places were emails are sent like text messages. I often would get an email asking for me to come to a spontaneous meeting that was starting in 5 minutes.
Or how many times do you watch for that email from your boss or assistant or whomever? There are whole conferences centered around the idea of how checking your email every 5 minutes is a massive productivity killer (and it’s true). But that doesn’t mean the fact remains: a lot of workflows and company cultures are still very much dependent upon people being near-instantly-reachable by email.
VIP emails — and, more specifically, the way iOS (and OS X) are helping us to set them apart — are a great example of how iOS is becoming increasingly usable in real life.
High-Resolution Spinner on shutdown
I mean, finally, right?
Folders shown in Spotlight
After 4 years worth of App Store, some Home screens (including the one on the iPhone that’s sitting here on my desk) are getting unwieldy. There are apps I know I have, but I don’t know where they are. For those I have no choice but to use Spotlight to get to them, but say I want to move them to a more prominent spot?
Now when you use Spotlight to launch an app, if it’s in a folder Spotlight will tell you the name of that folder.
This is one more (of what feels like a) bandaid fix towards a better way to launch and mange apps.
Launching Apps using Siri
Siri is becoming the way of “ubiquitous capture” on the iPhone. It’s the quick-entry popup of OmniFocus on the Mac. Assuming Siri can connect to the servers, she is the fastest way to get sports scores, directions, set a timer, log a reminder, and now launch an app that’s not on your first Home screen.
* * *
The mobile phone industry has is no shortage of impressive, whizbang features which sound great and make fun ads but which rarely get used by real people in their day-to-day lives.
The niceties shipping as part if iOS 6 are great because they’re the sorts of little things that will play big, unsung roles in our everyday lives.
✚
Review: Tenkeyless Clicky Keyboards
Mechanical keyboards are addictive.
I think I have a problem. But I’m quitting now. Once you’ve acclimated to the tactile feedback and the clickety clack, typing on anything else doesn’t feel (or sound) the same.
Earlier this year I spent a nerdy amount of time testing and comparing the three most popular Mechanical Keyboards for the Mac. I landed on the Das Keyboard as the winner and my preferred keyboard for typing.
My Clicky Keyboard conclusion ended thusly:
If you too want to adorn your desk with an ugly keyboard — one with a loud personality and which increases typing productivity — then I recommend the Das Keyboard. I prefer both the tactile feel and the sound of the blue Cherry MX switches, and though I find the Das to be the ugliest of the bunch, a serious typist knows you shouldn’t be looking at your keyboard while you’re typing.
I’ve been typing away on the Das every day for the past 6 months, but there has always been one thing in particular which bugs: the size.
Every time I’d reach for my Magic Trackpad I was reminded of how big the Das is. Aside from improved aesthetics, the only thing that could make the Das Keyboard any better would be the removal of its number pad — a tenkeyless Das would be a dream.
Last month, at the recommendation of several readers, I bought a tenkeyless Leopold with Blue Cherry MX switches. These are the same switches in use by my Das, and though the Leopold is technically intended for Windows use, a bit of tweaking in OS X’s System Preferences has it working fine with my Mac (see below for more on that).
The Leopold
I used the Leopold for a month, and as a keyboard I liked it pretty well. I especially liked having the Magic Trackpad back in the same zip code as the rest of my rig.
But when compared to the Das Keyboard, however, I find the Leopold to be slightly inferior in certain areas:
The Leopold has an ever-so-slight ring from a few keys that you can hear if it’s quiet in the room and you’re really pounding away. I hardly ever notice it, but sometimes my ear catches it.
This was perhaps my biggest gripe with the Matias Tactile Pro. It was a fine keyboard and felt great to type on, but nearly every key press brought with it a slight ring. The Das Keyboard does not ring.
The Leopold’s key action is not as “quick” or “snappy” as my Das. Technically this is not an issue of inferiority at all — it’s just a difference. But I’ve grown used to (and apparently fond of) the way the Das clicks.
However, there are things about the Leopold which I find to be superior to the Das, not least of which being the smaller footprint:
Obviously the Leopold is smaller because it is tenkeyless, but it’s smaller in other ways as well: (a) the bezel around the whole keyboard is thinner, and (b) the keyboard has a slightly shorter stature (that is to say, the top of the space bar is closer to the top of my desk).
The Leopold is cheaper by about $35. But you cannot return it unless you get a DOA unit.
I suppose the best way to compare the two is that when using my Das I was frequently bothered by how far away the Magic Trackpad was. However, when using the Leopold, I rarely ever think about how it types differently.
The Filco Ninja Majestouch-2 Tenkeyless
Not being completely satisfied with the Leopold, I decided to give one more keyboard a try. (After trying and testing 4 mechanical keyboards so far, what’s one more? Right?)
And so I ordered the Filco Ninja Majestouch-2 Tenkeyless.
It’s “Ninja” because the key caps have the lettering on the front side instead of the top, which I think looks awesome. And I made sure to get the one with Cherry MX Blue switches.
Filco has a great reputation for their keyboards. Part of the reason I didn’t go with the Filco over the Leopold in the first place was because a few of the reviews I’d read said the Filco rings a bit. But there is no ring. At least with the model I bought.
The Filco has a high-quality build and the same “quick” typing action like the Das. Moreover, it has the small footprint and thinner bezel like the Leopold (the Das looks like a boat when pulled out next to the Filco). It’s the most expensive of the three (about $20 more than the Das and $50 more than the Leopold), but it’s worth it — the Filco Ninja is superior in every way that’s important to me.
In short: the Filco Ninja is the best keyboard I’ve used yet. This is my new keyboard, and I’m done trying others.
Aside Regarding the Windows Keys
Part of the reason I didn’t originally review any tenkeyless keyboards was because (so far as I know) there are none made specifically for the Mac.
Both the Leopold and the Filco are Windows keyboards. Basically all this means is that the Command and Option keys are flip-flopped — both physically on the keyboard itself and within software.
Swapping the physical keys is easy. The Filco comes with a key cap puller; Elite Keyboards sells one for cheap. This little tool makes it a piece of cake to easily change any key on your keyboard.

And flip-flopping the keys in software is easily done from System Preferences → Keyboard → Keyboard → Modifier Keys.

* * *
So, which mechanical keyboard should you get? It ultimately just comes down to the question of the number pad.
If you want a number pad — or if you don’t care either way — go for the Das. It’s Mac-specific, high quality, and a bit cheaper than the Filco.
If you don’t want a number pad, go for the Filco Ninja. It’s the best-looking of the bunch, it’s of equal quality as the Das, and it’s easy to set up to work on your Mac.
✚
The Espro Press
Since I’m caffeinated, I’ll get right to it: The Espro Press makes an amazing cup of french press coffee.
These things are finally starting to show up for sale, so it’s time to review the one I got from Kickstarter back in April.
The original Espro Press is an 8-ounce single-serving press pot. I’d never even heard of it before I saw their project on Kickstarter, where their aim was to build a 32-ounce version. Since I am genetically predisposed to back any coffee-related project on Kickstarter, I pitched in my $85 and “pre-ordered” one of the large Espro Presses.
Their project was funded (more than five times over), and in early April of this year I received my 32-ounce (1,000 ml) press.

Seven days a week I brew a cup of coffee. Most days it’s with my AeroPress, but once or twice a week I like to make french press. People often ask me what makes a better cup of coffee — AeroPress or french press? Well, they both make fantastic coffee with their advantages and disadvantages. I enjoy both for different reasons; they’re both favorites, really.
So what is it about the Espro Press that makes it so much nicer than my Bodum french press? Two things:
1. Double-walled Steel Vessel
The pot is durable and rugged. And it’s heavy. Since it’s stainless steel, the best way to keep it clean is to hand wash it. But I’ve been putting it in the dishwasher since I got it and there are no rust spots.
The double-walled steel construction helps keep the coffee hotter for longer. Normally after brewing a pot of french press I would pour it into a vacuum thermos. Now I just bring the press downstairs to my office with me. Though the Espro Press doesn’t keep the coffee piping for 3-4 hours like my vacuum thermos does, it does keep it hot enough for over an hour (about how long it takes me to finish a pot) and it means one less vessel to clean.
| Time (min.) | Temp (F) |
| 41 | 168° |
| 10 | 166° |
| 15 | 162° |
| 30 | 156° |
| 45 | 149° |
| 60 | 144° |
Since the press rod and lid are metal, they conduct a good amount of heat. Which means some heat is lost through the rod and lid, as well as the fact that the lid gets very hot to the touch. But it also means they are built to last — a tradeoff I’m willing to accept.
Double-walled stainless steel french presses are not a new thing. For example: the $100 Frieling french press has a high-quality double-walled stainless steel carafe, not unlike the Espro Press. But the Frieling has the same basic steel mesh filter that you’ll find in a common Bodum french press.
What makes the Espro Press the Espro Press is the filter.
2. Double-Layered Micro Filter Basket With Rubber Seal

It’s a double-layered micro filter basket with a rubber lip seal. It’s unlike any other press pot filter I’ve seen, and it makes a great cup of coffee.
The filter basket is designed to keep as much of the grit out of the brewed coffee as possible. Here’s a comparison of the grit left at the bottom of a cup of coffee by an AeroPress, an Espro Press, and a classic french press:

Obviously the AeroPress wins the “keep as much grit out as possible” competition because I used a paper filter.2 The Espro Press, however, has far less grit than the classic french press. And since the Espro uses a micro filter, you don’t lose any oils to a paper filter. (Though I don’t know that I’d even be able to tell the difference.)
I drank all three of the now empty cups of coffee you see above. Comparing the Espro Press to the French Press side by side like that I realized just how superior the Espro Press is. The classic french press coffee was noticeably more acidic and bitter (not horribly so) than the Espro Press coffee.
I’ve always loved the rich and bold coffee that a french press makes, and the Espro seems to make the best version of it.
Cleanup
The Espro Press, despite having a much more complex filter than your average french press, is still just as easy to clean.
Removing the filter basket from the pot, I simply rinse off the grounds from the sides of the basket, rinse out the pot itself, and then put the whole thing into the dishwasher.
The basket can be easily separated so as to clean out the middle zone of the double walls. Until today, I had yet to do this. Here’s a is a shot of the grit that accumulated inside the middle filter wall after 30 or so uses of the Espro Press (and, for the record, I intentionally didn’t clean the inside wall of the basket, because I wanted to see how dirty it would get over an extended period of time):

There’s no reason to let even that much grit accumulate. Taking apart the filter basket is quite simple (it easily twists apart), allowing you to easily separate the outer and inner baskets every time you put it in the dishwasher.

The Best Recipe
The Espro Press carafe can hold 1,500 ml of water. But that leaves no room for any coffee grounds or the filter basket. You can brew up to 1,000 ml of coffee, but I’ve found that the best recipe is when you brew 750 ml.3
The reason I shy away from brewing the full 1,000 ml capacity is that large filter basket gets in the way when you are brewing that much liquid. About 230 ml of liquid are displaced into the basket and thus don’t fully brew with the rest of the water.
Therefore, when brewing 1,000 ml of coffee I do 70 grams of grinds instead of the recommended 60. This causes the water below the basket to brew stronger, and then be diluted a bit once the basket is pressed down and the previously displaced water rejoins the brewed coffee.
The recipe I prefer is the one that Espro recommends for a 3/4 pot:
- 45 grams of coarsely ground coffee
- 750 ml of hot water
- Pour most, stir, pour the rest, wait 4 minutes, press
Now, if you’re looking for an iPhone coffee app, I can recommend one of those as well.
- For comparison: I brewed a Bodum glass french press alongside the Espro Press. At the 4 minute mark, just after pressing the grounds, the Bodum coffee temperature was 158° — a temperature it took the Espro nearly 30 minutes to reach. ↵
- This is one reason I love the inverted AeroPress method with a coarse grind. It’s not unlike brewing a pot of french press, but thanks to the paper filter you keep all of the grit out of the brewed cup. ↵
- For reference: the classic Bodum french press has a maximum brewing capacity of 750 ml. ↵
✚
Review: Day One
When my Great Uncle Howard passed away, they found a shoebox in his closet that was full of journals. They were those thick, index-card-sized, 5-year diaries that allot just a few lines of space per day. He had 8 of them, and they were all filled with what the weather had been that day. 40 years worth of Uncle Howard’s daily local weather report.
I’m not as regimented or peculiar as my Great Uncle Howard was, but I have been keeping a personal journal for the past 20 years.
My journals have always been logged with pen and paper. I very much enjoy the time when I leave my standard-issue Apple nerd gadgets in the other room and sit down with the analog to write about what’s currently on my mind.
In a way, perhaps I am more regimented than my Great Uncle Howard was. Through Twitter, Instagram, Path, Stamped, email, and other such apps, my days are meticulously logged with over-filtered pictures of the sandwich I ordered for lunch and tweets about the friends I’m out to coffee with. But how many of my tweets or Instagram photos are worth revisiting 40 years from now? Some of them, but surely not all of them.
And this is where I see the difference between the deeply personal issues that I write about in my Moleskine and the memories that I log on my iPhone and iPad. The former have great value to me now as it’s a way to help me process the current season in life, and the latter have great value to me in the future as they are a way to look back on memories and significant events.
For a few months I tried to use Path as a way to capture the little memories. Path is a beautiful and fun app that makes it easy to check in at places, snap photos, shoot videos, and write notes. But as a “journal” Path has a few shortcomings. For one, what gets logged in Path stays in Path (Is this an app that will be around in 20 years? I doubt it. How then will I get my data?). Secondly, the app is iPhone-only. And lastly, Path is a social network and not a personal journal — something that in and of itself causes hesitation when considering posting a personal memory.
Regarding Day One
Then there is Day One: a Mac and iOS journaling app. Day One shipped in March 2011 as a Mac and iPhone dynamic duo, and a few months later the iPad version was added to the line up.
![]()
I bought the iPhone and Mac apps when Day One first shipped. In part because I’m a sucker for a good looking app. And, to be sure, Day One is extremely well-designed. The color scheme, typography, and the overall design are all clean. No detail is left wanting, no pixel out of place.
Additionally, Day One supports Markdown, it works with TextExpander on iOS, it syncs via Dropbox or iCloud, it has a passcode lock, and it will export all your entries as plain text.
For a classy journalling app that works on all your devices, I don’t think you can do better than Day One.
But despite its ubiquity and style, Day One never stuck for me because it only allowed text entries.
A text-only digital journal is too much like a replacement to my Moleskine. And I don’t want to replace my analog journal, I want a compliment to it. And if it’s going to be digital, I want all the benefits that digital provides. And so the text-only limitation was something that kept me from using Day One on a regular basis.
That is, until about two months ago when I was fortunate enough to get early access to the current version of Day One.
Day One’s Big Update
Day One now supports adding images to entries. Also your current location and the current weather (Uncle Howard would be proud) are automatically added to your entry’s metadata. These seemingly small changes make Day One an order of magnitude more appealing to me.
Over the past few months I have been using Day One regularly and enjoying it. Many of my entries have been nothing more than a photo and perhaps a quick descriptive sentence. That, combined with the automatic location and weather logging, and I’m creating worthwhile journal entries with very little effort on my part.

Day One has nearly all the advantages that Path had for me, but with none of the disadvantages. I can use my Mac, iPhone, or iPad to log pictures, notes, and locations. I can know what the weather was like that day, I can know where I was when I wrote that entry, I can export my entire journal as a Plain Text file that will be readable 20 years from now, and I don’t have any friend requests to wade through.1
As a long-time Mac nerd, something I appreciate about Day One is that it’s both simple and geeky. It’s easy and fun to use, it sports a clean design, and yet it has a lot of under-the-hood horsepower that you can use to do a lot of nerdy stuff with.
For example:
- There is a command line interface so you can write scripts that interface with the Mac app. Helpful for importing into Day One from other apps, logging via Alfred, and more.
- Day One on iOS supports URLs, and it has a pretty robust library that plays well with Launch Center Pro.
- Day One on iOS works with TextExpander for iOS.
- Markdown, of course.
In a day and age where an app like this could have easily justified a heavy-handed skeuomorphic design, Day One keeps it clean. Normally I would say here that Day One is very Mac-like, but Mac design has been getting more and more skeuomorphic these days. (Sigh.)
Though Day One has been updated across the Mac, iPhone, and iPad, it’s the iOS version that I think shines the brightest. In part because of the iOS app’s ability to include location and weather data to your entries (more on that in a bit). And also because I find the iPhone version to be the best version of the 3-device suite. (Similar to how I find OmniFocus on iPad to be the best version of its 3-device suite.)
Photos, Location, and Weather
When you open up the new Day One on your iPhone, its main menu screen (or the sidebar on the iPad) which used to feature just a “+” icon, now features a camera icon as well.

This encourages you to consider that creating a new journal entry using a photo is just as legitimate as a text entry. And, as I mentioned above, it is this feature that turned Day One around for me and I’ve been using it ever since.
But it’s not just that you can slap a photo into a journal entry. Day One is very smart when it comes to adding photos. Say you snapped a picture yesterday when you were out to lunch with some friends. If you use that picture to create a new journal entry then Day One will ask you if you want to use the date and geolocation data from the photo (even the past weather for that time and place is added to the entry). Thanks to this cleverness, it’s as if you created the journal entry when you were out to lunch rather than the next day.
Moreover, If you have Camera+ installed on your iPhone, then Day One takes advantage of its API so you can edit your photo and add cool effects and stuff.
If being able to add photos is Day One’s killer new feature, the icing on the cake is the automatic adding of location and weather data to your journal entries. For example, in a previous version of Day One, if I wanted to make a note about how Macworld throws a classy WWDC get together, it would have been text only, and I probably would have just skipped it.
But now, that same entry can include a snapshot of the party, a quick caption, a map showing where the party was, and the info about what the weather was like.

All this is added with little or no effort, and it makes the entry far more valuable. (Note that when creating a new journal entry on the Mac version, automatic location and weather data are not yet supported.)
Typography
Previous versions of Day One offered broad-stroke typography options — you could chose between Serif, Sans, or Monospaced. The new version gives a more granular choice of typefaces (though it still doesn’t open up the whole font library that you have on your Mac).
And on the Mac Day One now includes Avenir, a typeface that ships with Mountain Lion and will ship with iOS 6.
Markdown
Speaking of typography, Day One has long supported Markdown. In the latest update to the iOS app there is now a Markdown formatting bar that rests at the bottom of the text entry box.

Adding a custom row to the on-screen keyboard isn’t new, and many fine apps have their own take on it. Compare and contrast to the custom keyboards of Byword, iA Writer, Scratch, and Writing Kit.
But the Markdown formatting bar in Day One isn’t just for quick access to common Markdown syntax. Swipe the bar left or right (a feature which several of the aforementioned apps also support) and you’ll get options for adjusting the metadata of your entry: You can change the date and time, add a photo, share the entry via Email or Twitter, delete the entry, open a new entry altogether, launch into “full screen writing mode,” and more.
Basically everything you need for that journal entry is a swipe and a tap away.
Reminders
If you want to be regimented about your Day One entries (as opposed to writing whenever the mood strikes you), Day One can remind you to punch in.
These reminders can be as often as every 15 minutes or as infrequently as once per week. If, like my pal Chris Bowler, you use Day One as your daily work log or the place for your end-of-day brain dump then setting a daily reminder just a few minutes before the work day is done could prove helpful.

And hey, if you’re not ready (or if you’re still not in the mood to type something), then you can snooze the entry or just skip it altogether.

Full-Screen Writing
The iPhone and the Mac versions both have a nice Full-screen mode. (For whatever reason, the iPad does not.)
The iPhone version removes the system status bar, the top navigation bar, and the Markdown formatting buttons. Presenting you with as much screen real estate for your words as possible.
The Mac version doesn’t need to take up the entire screen (especially if you’ve got a large external monitor), so its custom full-screen view sports a dark textured background with subdued controls on the left-side and a focus on the writing space.
* * *
As a writer, I believe journaling on a regular basis is critical. It’s writing that will never be judged. It’s writing that doesn’t require an editor. It’s the only place where I am completely free to write for my truly ideal reader: a future me. I have my own inside jokes, my own running story arc, my own shorthand. I love the freedom to write whatever I want, however I want, with no need to make it tidy or clear or concise. And I have no doubt that it makes me a better professional writer.
As a new dad, my latest hobby is the incessant documentation of every cute thing Noah does.
Over the years, most of the major, monumental milestones of life were documented in my Moleskine. But not all. And that’s why I’m glad to have an app that let’s me easily and joyfully add a snapshot or a quick note about an important or memorable event. These are the things my family and I will look back on 20 and 30 years from now with great fondness.
You can get Day One for $5 on the Mac App Store and $5 on the iTunes App Store.
- Worth noting is that images are stored in their own folder within the Day One backup folder. When exporting your Journal Entries as plain text images are not included. Ideally I think an HTML or PDF export would be nice in addition to the plain text. That way images could be embedded inline with entries, and the location and weather data could be formatted. ↵
✚
Mountain Lion Miscellany
As a card-carrying member of the Apple Fanboy Brotherhood™ it’s my unspoken responsibility to write something nerdy about the Mountain Lion. And so here are a few of my favorite changes, updates, and nit picks which are to be found in OS X 10.8.
(My article about Mountain Lion and the simplification of OS X is here.)
In Safari
The blue progress bar that loads in the Address Field has a faded out right-hand edge instead of the sharp edge. Once the page has fully loaded the blue progress bar shoots across the remainder of the Omni Box and then it all fades out from dark blue to light blue to white. And since the “Reader” button is blue, it’s as if the loading bar fills the Reader button up with color.
Interestingly, it was the animation of the blue loader that first attracted me to the Mac and OS X back in 2004. And even now it’s one of my favorite “little things” about the operating system.
The Syncing of iCloud Tabs is great. I only have one Mac so it’s currently of no use to me, but I’m very much looking forward to when it will sync my tabs across all my devices including my iPhone and iPad.
The RSS button in Safari is gone completely. If you come across a site and you want to subscribe to its RSS feed you’ll need to either have your own bookmarklet that adds the site to Google Reader or Fever, or the site will need a link to its RSS feed.
Click and hold on a bookmark’s name in the Bookmarks Bar and you get the option to rename it.
Rocking a lot of tabs? Do a pinch on the trackpad (or View → Show All Tabs) and all the tabs will turn into their own mini-window within the current window and you can scroll through them. It’s pretty great.
Regarding Notification Center
Without some fine tuning Notification Center could prove to be a bit distracting. While I love the implementation from a design and functionality standpoint, I’ve found that more often than not the notifications waiting for me inside Notification Center are irrelevant by the time I look at them. If it’s not showing me emails I’ve already read then it’s showing me Tweets I’ve already seen, or calendar events that are already over. While I love the growl-like pop-up notifications, I think I’m still learning how to get the most out of Notification Center itself.
You can define a system-wide keyboard shortcut to show/hide Notification Center by going to: System Prefs → Keyboard → Keyboard Shortcuts → Mission Control → Show Notification Center.
You can also launch Notification Center from your trackpad by sliding two fingers onto the trackpad from the right-hand edge. And then, a two-finger swipe from left-to-right will hide Notification Center.
With Notification Center showing, if you scroll to reveal the top then you’ll discover a preference to not show notifications. When this is enabled, the icon fades to gray and all alert popups and banners are hidden. If a calendar reminder goes off while Notification Center is set to not show alerts and banners, then your Mac does not alert you to the event. You can also enable this by simply Option-clicking on the Notification Center icon in the Menu Bar.
Notifications for new emails only appear when Mail is running. So Notification Center doesn’t get new email messages on its own.
In Mail
New layout of the email message window: The date sent is in the top-right corner, next to an avatar of that person (If there is one. And since Mountain Lion can link your Contacts with their Twitter profile, you may start seeing some people’s email avatars as being the same as their Twitter avatars.).
Deleting an email takes you to the one below or above the current in-view message based on which way you were previously navigating the message list. I love having the next-below message come into view as, in my opinion, it’s better quickly processing through emails.
New options for emailing links from Safari: when you hit CMD+SHIFT+I to send the current web page you can send it as just a link, a PDF, the text-only version, or the whole website embedded within the email body. I always opt for just a link:

AirPlay
The “Display Preferences” icon that used to sit in the Menu Bar has been changed from its old Cinema Display-like icon to the AirPlay icon found also in iOS.
With AirPlay you can now mirror your Mac’s display and audio to your Apple TV. However, the system sound only channels through the HDMI cable of the Apple TV. And so, if, like me, you have video piped to your TV via HDMI but audio piped to a separate sound system via the optical audio cable, then the sound system does not receive the audio signal when doing AirPlay mirroring from the Mac.
But fortunately, if you AirPlay a video using the iTunes option (found in the lower-right-hand corner of iTunes) then the audio will go through the optical audio port.
RIP: “iCal”
iCal is now called “Calendar”. If, like me, your LaunchBar habits die hard, did you know you can tell LaunchBar that you want “ic” to be the abbreviation for Calendar.app? Yeah. Just type “Calen” (or whatever it takes until Calendar is selected), then Control click on LaunchBar and choose “Assign Abbreviation”.

Contacts
The application formerly known as Address Book threw off the horrible page-turn functionality from Lion.
You can send someone an iMessage from within Contacts. I hope LaunchBar adopts this functionality. It’d be great to pull up someone’s contact info and then fire off an iMessage to them all from the keyboard.

The Other Two New Apps
Believe it or not, I don’t use Reminders or Notes. I use OmniFocus and nvALT with Simplenote.
The Finder and Overall OS Miscellany
In a Finder window, if you choose to sort by kind, then your files and folders are, well, sorted by kind. And as you scroll, the file-type header stays at the top. Like in iOS when scrolling a list, such as Calendar and how the date sticks to the top until you scroll through to the next date and so on.
While downloading a file from Safari, you see a progress bar within the file icon itself and a time countdown:

This in-context progress bar is for several things, such as transferring or copying files and folders.
A couple new Menu Bar icons: Notification Center and AirPlay. If you like to keep your Menu Bar as sparse as possible, Apple is making it an uphill battle.
The keyboard shortcut for “Save As” is back, but it’s different. Apple says: Use Command-Shift-Option-S to save a document using a different name and location.
✚
The Official shawnblanc.net Mountain Lion Review, in Which I Aim to Concisely Answer the Question: Is Mountain Lion Apple’s Best Operating System to Date?
Yes.
✚
Thoughts and Impressions of the Nexus 7
Over the past few weeks I’ve read a dozen or so of the early reviews of the Nexus 7. They were nearly all positive.
What seems to be the prevailing statement about the Nexus 7 is that it’s the best Android tablet by far, and that it’s the best $200 tablet by far. While that may be true (and I think that it is), I don’t know if it’s saying much.
It’s praised for two primary reasons: (1) the hardware has a surprisingly high-quality build for how inexpensive it is, and (2) Jelly Bean has proven to be a significant update to the Android operating system.
As Jerry Hildenbrand points out in his review of the Nexus 7 on Android Central:
Jelly Bean is like Ice cream sandwich, with all the features we wanted Ice Cream Sandwich to come with. It’s fast and smooth (like buttah), full of the latest and greatest APIs for developers to do all sorts of magic with, and there’s a level of polish we’ve all been waiting for.
* * *
My Nexus 7 arrived on Tuesday. It is the first Android tablet I’ve ever used, the first 7-inch tablet I’ve ever used, and the first $200 tablet I’ve ever used.
The small form-factor of the Nexus 7 is quite nice. My iPad has become my laptop and most of the time when I am out and about the size of the iPad is perfect for me. But when using it around the house for reading or surfing the Web, there are times when the iPad feels a bit too big. My biggest gripe being that the iPad cannot be used with just one hand. Extended reading on the iPad requires that it rest on a couch cushion, your lap, or your chest.
But with the Nexus 7, its size, weight, and rubbery-back make it easy to hold with one hand. It seems silly to buy such a capable tablet for the sole purpose of easier couch surfing and extended reading, but to me that is the Nexus 7′s strongest suit.
But what then? Is the fatigued iPad reader meant to buy another, smaller tablet with the intentions of keeping it on the coffee table or at their bedside? Perhaps. But that seems a bit extreme to me. Surely there are other benefits and advantages to the Nexus 7 beyond its size.
To be true, the Nexus 7 is a fine tablet. Anyone awaiting a quality Android tablet will be pleasantly surprised. And anyone in want of a tablet that costs less than $399 would do fine with the Nexus 7.
As some are wont to say, the iPad is a device meant for consumption only (if you’re reading this site I have no doubt you roll your eyes at that statement too). Well, if the iPad is not meant for content creation, then the Nexus 7 certainly is not. For two main reasons: its screen size (and, thus its keyboard size) and its app store.
Typing on the Nexus 7 in portrait mode is not unlike typing on the Galaxy Nexus in landscape mode. It’s easy and quite doable with two thumbs.
However, typing on the Nexus 7 in landscape mode is pretty much a joke. The keyboard is too big to easily type with your thumbs while holding the device, and yet it is far too small to type home row style. Moreover, with the soft key system buttons resting just below the spacebar it is extremely easy to tap on one of them instead of Space.
If you do expect to type a lot, the Nexus 7 pairs easily with a Bluetooth keyboard. I was able to pair my AmazonBasics keyboard with the Nexus 7, and even the iPad-intended modifier keys worked.
Price and hardware aside, I find that my overall sentiment towards Android remains relatively the same from my week-long excursion with the Galaxy Nexus last Winter. On a technical level, Jelly Bean is noticeable improvement over Ice Cream Sandwich. But I still do not see the appeal of an Android device over an iOS device unless your motives for using one are based solely on price, screen size, or a vendetta against Apple Inc.
For me, when it comes down to it, software will always trump hardware. When I’m using a device like the Nexus 7 I want to know where the details are. Where is the magic? The fun? The incredible 3rd-party apps? It is because of these elements that the iPad is more than the sum of its parts while its competition continues to remains less than.
✚
Review: Checkmark for iPhone
Checkmark is an upcoming reminders app for the iPhone. And it is awesome.
For some folks, Apple’s default apps are not powerful enough or feel absent of features. As such, many 3rd-party devs have made a name and a living for themselves by building “pro” versions of the apps that already ship on the iPhone. A few examples:
- Calendar → Agenda
- Camera → Camera+
- Notes → Simplenote
- Calculator → PCalc
- Mail → Sparrow
And now: Reminders → Checkmark
Apple’s Reminders app is relatively simple. Your to-do items (a.k.a. reminders) can be viewed based on the list they are in or the date they are due. These to-dos can be triggered to go off at a particular time or when leaving or arriving at a particular location. Or they can have no trigger and simply be an item which needs to be done.
For me, the Reminders app on my iPhone has but one interface: Siri. Though my go-to to-do app is OmniFocus there are often times when setting a quick and simple reminder via Siri is easier.1 Especially when those reminders are location based, such as: “Remind me to swing by the post office and buy stamps when I leave here.” Or: “Remind me to take out the trash when I get home.”
There are, however, two quibbles I have with Siri and Reminders:
- Oftentimes I am in a situation where I can’t or don’t want to use Siri. But setting a location-based reminder manually is a surprisingly arduous task. And if it’s for a location other than my current one, then there is much scrolling to find the entry in my contacts list. Not to mention, if the location is not already in my list of contacts then I cannot add a reminder to trigger based on that place.
- Once a reminder for another location is set, Siri often proves to be unreliable at reminding me. For example, in my contacts I have cards for my local Walmart and Lowe’s, but asking Siri to remind me to buy batteries when I get to Walmart does not always work. The next time I go to Walmart it’s hit or miss that the reminder will actually trigger (why this is, I do not know).
Like Reminders+
Checkmark solves the aforementioned Siri and Reminder shortcomings and then some.
In terms of reliability and ease of use, Checkmark beats the built-in Reminders app in several areas (especially if you are manually tapping in a time or location-based reminder — Checkmark is leaps and bounds faster at this). And, as mentioned above, on more than one occasion the built-in Reminders app has failed to trigger a location-based reminder. With Checkmark, not a single one of my reminders have failed to trigger.
Checkmark’s biggest downside is its current inability to work with Siri.2 Of course Siri and the Reminders app have a few downsides of their own. And so I find myself using a combination of both apps.
What I’m using Siri for:
Quick reminders based on “here”. It’s easiest to let the iPhone set a quick geofence around wherever I am and then remind me of something when I leave that fence (“remind me to swing by the grocery store and pick up a gallon of milk when I leave here”).
Trivial, time-based reminders (“remind me to check the brisket in 45 minutes”).
What I’m using Checkmark for:
Where Checkmark truly shines is with location-based reminders that trigger on arrival. It’s fast and totally reliable.
This is something that Siri should be able to do, but in practice I’ve found her to be unreliable at reminding me to get AAA batteries next time I’m at Walmart. Which is one reason I’ve found Checkmark to be far superior to the built-in Reminders app for these types of reminders.
When you launch the app there is a “home screen” with icons for each of your saved locations. I have 7 commonly-visited places set up in Checkmark.

Tapping on a pre-saved location takes you to the list of reminders which are set to trigger around that place. From there you can tap to add a reminder. Checkmark gives you options to trigger the reminder or arrival or departure and even to time-delay it.

It takes a whopping three taps (one of which is launching the app) to get to the screen for adding a new location-based reminder. Put simply: Checkmark is fast. I use it for all my location-based reminders. I only wish I could set a repeating location-based reminder (such as one that reminded me every time I went to the bank to log the miles in Trip Cubby).
Also notable is Checkmark’s conservative battery usage. Nearly all location-based apps that I try seem to drain my battery like its their job. But I have no qualms letting Checkmark run in the background.
On top of its reliability and ease of use is a pixel-perfect design. Checkmark is, in this writer’s opinion, of the best kind of apps: thoughtful, useful, and attractive.
- OmniFocus for iPhone has the clever ability to look at the items in your Reminders list and add them to your OmniFocus inbox. Thus, enabling you to add items to OmniFocus using Siri. You can set this up in OmniFocus’s settings. ↵
- Ryan Cash, one of the guys behind Checkmark, told me they are working on the best way to integrate the app with Siri. ↵
✚
Review: Tiny Tower
Rarely do I play games on my iPhone. Over the past four years I can think of only a handful that I’ve played for longer than a few minutes: Orbital, Frenzic, Horror Vacui, and Mage Gauntlet.1 Last week while vacationing in Colorado I decided to give Tiny Tower a try.
Tiny Tower came out over a year ago. It was picked by Apple as the 2011 iPhone Game of the Year, and it has a 4.5-star average rating based on 285,000 ratings. Needless to say, it’s incredibly popular. Chances are you’ve played it.
Anyone who has played Tiny Tower knows it requires no skill or strategy. So long as you check in on the game (or let its push notifications alert you) then you can’t help but progress. There is no goal other than to keep building. And there is very little strategy other than to give your Bitizens a place to work (preferably based on their skill sets).
More or less, Tiny Tower is a digital ant farm.
Anyone can build a gloriously tall tiny tower, it’s just a matter of how long it will take — because the only thing working against you in the game is time. The game requires you to wait a certain period of time between building a new level and opening it for business. You also have to wait for the inventory in your stores to be re-stocked. Even the elevator moves painfully slow if you’re delivering someone beyond the first few floors.
Time, however, can be “traded” for Tower Bux. Or, as we say in the real world, time is money. And the more time you spend in the game the more likely you are to earn a Tower Bux here or there.
- Spend time manning the elevator and you’ll occasionally get tipped a Tower Bux.
- Spend time helping a visitor find someone in the tower and they’ll give you a Tower Bux for your time.
- After you’ve earned enough coins to build a new level you get a Tower Bux as a bonus.
- If a store is completely stocked you sometimes get a Tower Bux bonus.
Tower Bux can be spent to speed along the game play. You can use your Tower Bux to:
- speed up the re-stocking process;
- buy a faster elevator;
- advertise open apartments and get renters in sooner;
- speed up construction of a new level; and/or
- upgrade the amount of inventory a store can hold, allowing it to go longer before needing to be restocked.
The taller your tiny tower gets the longer new levels take to build. And though you’re earning coins faster due to a higher number of shops being open for business, Tower Bux are accumulated very slowly no matter how far you progress in the game. Thus, the longer you play, the more you feel the pain of time with no way of beating it… 2
Or you can cheat. You can use real-life money to load up on Tower Bux via an In App Purchase. $0.99 gets you 10 Tower Bux; $4.99 gets you 100; and $29.99 gets 1,000.
Early on I resolved not to buy any Tower Bux (it seemed like buying cheat codes). It took me two and a half days to organically earn 25 Tower Bux so I could buy a faster elevator. The next elevator upgrade cost 75 Tower Bux. At my current rate that’s at least a week away.
I can’t help but feel that the whole point of Tiny Tower is to bore me or frustrate me to the point of spending real dollars to buy Tower Bux in order to speed up the game play. As cute and clever as Tiny Tower may be, I prefer games with a strategy and a goal.
- Which one of these is not like the other? ↵
- There are 40 different missions you can complete in order to earn Tower Bux as a reward. However, after a week of play I’ve built a 17-level tower and yet I still only have the proper stores to complete 1 of the 40 missions. Since you cannot chose the actual stores that get built (only the category) the missions are at the mercy of the game itself. ↵
✚
The New Codas
I perform all my own stunts. Some people get sweaty palms when they look down from tall buildings, but for me it’s when it’s time to upgrade WordPress or migrate to a new server.
As nervous as I may get doing database- and server-related tasks, the things that I am comfortable doing — such as stylesheets and basic php functionality to make this site do spiffy things — are a lot of fun for me. I’m not a professional programmer, nor do I play one on the Internet, but I love taking time off from writing on occasion to tackle a web design project. It’s the sort of work I can do with the music turned up.1
If I’m coding, it’s in Coda. I have been using Coda 1 since shortly after it came out more than 5 years ago. The site you’re reading now was built entirely from scratch using Coda and Transmit.
I have never felt constrained by Coda. It is fast, reliable, fun to use, and the way it works with files makes a lot of sense to me.
Coda 2.0
As the saying goes, simplicity is the ultimate sophistication.
There is a challenge with apps like Coda that have much functionality. That challenge is to design the functionality in such a way that it is the user who discovers and then defines how simple or complex they want the application to be.
Coda 1 did this well, but Coda 2 does it better. There are so many options, features and functions within Coda that it seems there is nothing it cannot do. But even for the amateur programmers like myself, Coda never feels overwhelming or overbearing. It expands or contracts to the needs of its user.
In my review of the Coda 1 I wrote:
Panic didn’t set out to make the best text editor, CSS editor, etc… They set out to make one single application that contains all you need to build a website. And Panic has done a great job at keeping each of Coda’s components concise, powerful and focused – giving you the features you need while not requiring you to learn 4 or 5 new applications simultaneously to be able to use Coda efficiently. Sometimes good development decisions are about what you don’t put in.
After its launch on a Monday morning in April of 2007, Cabel Sasser said: “This was by far the most complicated program we’ve ever built.”
Coda went on to win an Apple Design Award at WWDC in 2007 for Best Mac OS X Experience. And rightfully so — Coda was a groundbreaking application. Five years later comes Coda 2 — an application that is better than its predecessor in every way.
Coda 2 has kept all that was great about the original and improved all that was frustrating or confusing.
Using Coda 1 was like sleeping with a pea under the mattress. Or, as Joe Kissel said in his review, “like buying your dream car, only to find out that the seats are kind of uncomfortable and there’s no heater.”
The idea of a one-window web development tool that wasn’t built and priced by Adobe was a dream come true. Yet there was a slight frustration that accompanied the Coda workflow.
Web development usually consists of four (yea five) apps: (1) a text editor, (2) a web browser or three, (3) an FTP client, (4) reference material, and (5) perhaps the terminal.
Coda brought all of these apps together into one so that you wouldn’t need four or five different applications all open and running. It was good, but it was not great.
When I do coding for this site I use Coda as my text editor and FTP client, but that’s it. I still have a browser open in the background because switching between code view and preview always felt a bit clunky to me.
In his review of Coda 1, John Gruber wrote:
The appeal of Coda cannot be expressed solely by any comparison of features. The point is not what it does, but how it feels to use it. The essential aspects of Coda aren’t features in its components, but rather the connections between components.
The premier difference between Coda 1 and Coda 2 is its improvement between components. The workflow. Though each individual component (the text editor, the FTP client, etc.) has been improved upon, the most significant improvement to Coda is its central aim as a one-window web development tool.
Those who have been using Coda 1 as their primary web development app will love the update. Those who use other applications for their Web development may likely find Coda 2 to be a worthy companion.
It is the application I use and recommend for people looking to build websites. Now let’s take a look at some of the highlights in the new version.
The Tabs
The toolbar in Coda 2 is actually a document navigator. Like tabs in a web browser toolbar tabs are for different workspaces and documents. There are two tabs that are always there, always active, and those are the “Sites” tab and the “Files” tab.
The “Sites” tab is the standard start screen we know and love from Coda 1. It’s basically a favorites list containing the remote login information for any and all websites you hack on. Something new here is that sites can now be grouped together. Simply drag one site onto another as you would two apps from your iPhone’s Home screen.
The “Files” tab is basically Transmit integrated right into the app. This is a huge improvement to Coda’s previous FTP functionality. Coda has always used the same FTP turbo-engine from Transmit, but the visual file browser was not nearly as robust. If you’ve ever found yourself using Transmit and Coda at the same time, that habit may change with Coda 2.
After these two tabs, any additional open tabs are yours to set up as you need for your project. You can open multiple documents, a preview tab, a reference tab, and more. This is the meat of what Coda is all about and this is where things have improved the most.
Tabs Improved
The way Coda 1 handled workspaces and open files was awkward at best. And though I became familiar enough with it to feel comfortable, it was never quite natural — for example, a document tab could be both a file and a preview of that file.
In Coda 2, however, the new tabs and the way open files are managed is much more intuitive; this is the area that needed improvement and Panic has improved it greatly.
Tabs Designed
The tabs in Coda 2′s toolbar don’t just function different — they are completely redesigned. Visually, they have three optional states: Small Icon and Text; Large Icon and Text; or Text Only. You can select these from a contextual menu when Control-clicking on the toolbar, or you get them automatically if you resize the toolbar.

I prefer the Text Only tabs if only because I’m short on vertical screen space. However, the tabs with icons are tempting because they give you a live preview of that tab’s document.
For the Sites tab, Coda 2 will grab the Web Clip Icon in your root folder, assuming you’ve got one, and give you a high-resolution thumbnail image for the remote site you are currently working in. This beats the pants off a pixelated favicon.
To correspond with the fluidity of the toolbar and the different tab designs, even the traffic lights in Coda 2 have two different states. For the text only tabs you get the standard left-to-right layout. For the icon-based tabs, you get the top-to-bottom traffic lights akin to our old pal iTunes 10.0.

Additional Tabbiness
When you create a new document, it is saved to your local machine by default. If, however, you are in the middle of working on a live site and you want the file to be on your remote server, just grab the tab of your document and drag it into the sidebar file browser to upload it to the folder of your choice.
Alternatively, you can Control-click within the file browser and select the option for New File.
In Coda 1 a small blue circles showed up in the sidebar’s file viewer, just to the right of an unsaved document. Now unsaved documents you are working on sport that small blue circle within their tab as a way of letting you know the current working version of this file has not been saved to the server.
The iPad version of Coda (Diet Coda) uses these blue dots on the tabs in the file drawer as well.
Preview
If you’re going to have a one-window web development application, you need good in-app preview of the site you’re working on. This is something that never felt easy or natural to me in Coda 1, and so I still used Safari to view and check my changes.
But, thanks to the improved tabs, previewing your work in Coda 2 is much simpler.
You have four options for previewing:
A dedicated tab with web page loaded in it.
Split screen previewing that is side-by-side with the document you are coding.
Split screen previewing works quite well. You can code in the top window and preview your work in the bottom window. In fact, as you work, the bottom preview pane updates in real time as you code. Hit save and your changes are pushed to the server.
Previewing in another window. Ideal for multi-monitor setups. When your document is in Preview mode (the right-most breadcrumb) click the settings gear icon in the bottom-left corner of the window and choose Preview → New Window. A new Coda window will pop up with a browser preview of the file you’re working on. As you make changes to your document you see them live in the Preview window.
AirPreview: connecting your iPad as an external monitor like a boss.
Coda 2 will pair with Diet Coda on your iPad to turn your iPad into a dedicated window to preview the site you are editing in Coda.
You first pair your iPad with your Mac by pointing the camera at your Mac’s screen while a box flashes bright random colors. Then, anytime you have Diet Coda open on your iPad, you can turn the iPad’s screen into a secondary preview window.
Furthermore, the iPad preview auto-refreshes when you save your changes to the file you are editing in Coda 2. No more hitting save and then navigating to the browser and hitting refresh.
You don’t have to be working on the root file of your preview window either. You can be working on the CSS stylesheet, or a related php document, while viewing your rendered Index page. When you make changes to the file you are working on, then your previews are auto-updated and relevant changes are then shown. This makes many instances of Command-Tabbing and refreshing far less necessary, if not obsolete.
Miscellany
Pro-tip for the Sites tab: If you don’t want to use the auto-generated image for your site, you can Control+click on a site and choose to change the artwork.
Coda 2 cannot import the .seestyle settings for syntax highlighting from Coda 1.
The new way that auto-tag completion works is much more friendly. In Coda 1, when you typed an opening tag, such as
<p>or<span>or<div>then you would get the closing tag auto-inserted into your text immediately. If you were just starting out your opening tag then that’s all fine and dandy, but often times (at least the way I code) I would find myself placing opening tags in front of lines of code that I had already written. And then, Coda would auto-insert the closing tag right there at the front as well.Well, Coda’s new format for auto-tag closing is much more clever. They wait until you begin to close the tag yourself by typing
</and then Coda plops in the rest for you.Coda 2 does not support Lion’s auto-saving and versioning for local files.
If you buy the Mac App Store version, you get iCloud syncing of your sites. This, however, does not mean that your iPad version and Mac version stay in sync (yet). But if you have more than one Mac that is using Coda 2, then those sites will sync.
* * *
Coda 1 was ambitious. It takes a lot of guts (or, in some cases, naiveté) to build an all-in-one application for a task as extravagant as web development. It also takes self-control to keep that application from getting too big for its britches. Coda 2, while following in the ambitious footsteps of its predecessor, is also more useful and more elegant.
I have been using Coda for years, and all the updates in Coda 2 meet my needs almost exactly. But there was another need I had, and that was the ability to access and edit files on my websites using my iPad.2
And Panic has done it. They not only improved an already impressive one-window web development tool, they also built an equally-impressive one-app web development tool. It’s called Diet Coda for the iPad.
Diet Coda
Diet Coda is an example of why the iPad is thriving as a personal computer.
Using FTP, Diet Coda is both a terminal and a text editor built for the purpose of making changes to files which are already on your remote server. Moreover, Diet Coda is the best name for an iOS app ever. If there were an ADA for app names, Diet Coda would win it.
Does the advent of Diet Coda mean professional web developers can now put away their iMacs and replace them with iPads? No. And that was never the intention.
Diet Coda isn’t meant to be a full-featured web-development tool for the iPad. Because, seriously, who is going to use an iPad for full-fledged website development? Virtually nobody.
But who wants to use an iPad to remote in to their server to update a file, copy a link, reboot something, or perform some other form of on-the-fly maintenance or editing? A lot of us.
My point isn’t that you can’t use the iPad for web development, but that most people won’t. And so why build an app to prove a point when you can instead build an app that meets genuine need just right? For this reason, Diet Coda is the best on-the-go web-development app you can buy. It’s not too much, it’s not too little; it’s just right and that’s the point.
What I like about Diet Coda is that it follows the same flow of working with files that Coda for Mac does. I have worked with a handful of other FTP / text-editing apps for the iPad and while they offer some features that Coda does not, they also make me shuffle my files around in a way that is not completely intuitive to me.
With Diet Coda I connect to my site, navigate to the file I want, edit that file, and then save my changes to the server. I don’t have to juggle both a remote and local version of the file — I just open it, edit it, and save it. This is how Coda 1 worked, it’s how Coda 2 works, and it’s how Diet Coda works. It makes working in Diet Coda feel comfortable and secure.
iPaditized
When creating an iOS version of a desktop app you can’t just drag and drop the code and click an “iPaditize” button. You have to balance the juxtaposition between the two platforms. Keeping the same core functionality of the Mac version, yet completely reimagined what the user experience and interface will be.
There are two dynamics to successfully building two versions of the same app, one for iOS and one for OS X:
Both apps need to feel native on their respective platform. The iOS version needs to feel like it belongs on the iPhone/iPad, and the desktop version needs to feel like it belongs there. This doesn’t just mean the buttons should be bigger to accommodate for fat fingers, it means the presentation of the core functionality, along with the flow of navigation and the user interaction within the application all have to pull together to form a well-developed iOS app that still has striking familiarity to its desktop counterpart.
Both apps need to feel like they are the same app. Meaning, Panic had to reconcile the two-fold need for Diet Coda to feel like a native iPad app while also feeling like the very same application they made for the desktop.
Because iOS and OS X exist side by side — two separate but similar platforms — we are seeing software innovation attain new heights as the two different platforms lean on and learn from one another. Put another way: iOS software is teaching us new things about Mac software and Mac software is teaching us new things about iOS software. The two are playing off one another.
The Omni Group is a prime example as ones who are helping lead the charge in this way. Their suite of iPad apps stand on the shoulders of their already award-winning desktop software, with OmniFocus being one of my favorite examples this. It started as a powerful and feature-rich Mac application and it was then perfectly ported to the iPad. In fact, I find the iPad version of OmniFocus to be superior to the Mac version in many ways, and I have no doubt that the next Mac version will be using many of the best components found in the iPad version.
We even see Apple doing this. With Lion and Mountain Lion they are taking much of the functionality and applications found in iOS and bringing it over to OS X for the sake of unification.
And, of course, Diet Coda is great example of Mac-app-gone-iOS. In addition to having the heart of its desktop sibling, Diet Coda is also filled with many iOS-esque details and innovations that delight.
There is the Super Loupe. The Super Loupe is the real steel deal. It is Panic’s take on the iOS magnification bubble for cursor placement, and it is clever, fun, and extremely useful.

If you have connected to a remote site and are in the file browser view, a tap on one of the four purple buttons in the Info Panel emits what I can only describe as a purple orb that radiates out from the button.

But the functionality of these buttons is also quite handy. You’re one tap away from copying a link, a URL, a file path, or the
imgtag with the source URL embedded (though it does not auto-detect the width and height when copying the image tag code).
Working with Files
Diet Coda makes it extremely easy to navigate around your remote server, working with live files, moving them, editing them, and previewing them. However, as I mentioned above, Diet Coda has no place for you to save files locally on your iPad. If you want to create a new file it must be saved to your remote server, and any work you do on server-side files is pushed back up to that live file when you tap save.
This is by design, and as such, it means there are some clever tricks for making sure you don’t lose your work when switching to another app for a moment, nor make an erroneous error to a live file.
If you have a document open in Diet Coda and then leave the app, the file is saved locally just as you left it, even if Diet Coda has to “force quit”.
In Diet Coda, though you are working with a file as it is on the server, you can preview your document before committing your changes. Diet Coda renders the web page as if the local version were the live version. This doesn’t work for dynamic files of course, only static ones.
Quibbles
Diet Coda is not perfect in every way, though. I do have a few requests:
I’d love to see support for Amazon S3, and more robust FTP capabilities such as being able to upload files that are on my iPad.
I wish I could duplicate a site’s details to more easily create additional sites that are subdomains that use the same connection credentials. (Or better: I wish Coda 2 and Diet Coda synced Sites.)
There is no master password for the app. Thus I either need to remember my FTP passwords and enter them every time I connect to a remote site, or else I allow Diet Coda to be freely accessible to anyone whom I let use my iPad.
(If you wish to have Diet Coda ask you for your FTP password every time you connect, simply leave the password field blank when entering the site info.)
Additionally I’ve found that Diet Coda can get memory constrained when working with large CSS files, or if too many documents are open in the Document Drawer. And though the app has crashed on me a few times, not once have I lost any work.
A Concluding Remark
To say I’m impressed and pleased with Coda 2 and Diet Coda would be an understatement.
My initial impression of Diet Coda is that it is the Tweetie 2 of iPad text-editing apps. As many people have proclaimed, Tweetie 2 was not just one of the best Twitter apps for iPhone, it was also one of the best apps for the iPhone, period. Although Diet Coda is still brand-new, it strikes me being a best-in-class code-editing app as well as a great iPad app, period.
- Writing, however, requires silence. ↵
- This isn’t so I can turn my iPad into my primary work machine, but rather it’s so I can leave my laptop at home more often without having to sacrifice anything. Though I prefer to work on my MacBook Air, I don’t want to be restrained if I’ve just got the iPad. Put another way: MacBook is now my “desktop” and my iPad is now my “laptop”. ↵
✚
Sweet App: Visual, an iOS Timer
Visual is a simple countdown timer for your iPhone. Instead of showing a stopwatch-like countdown, the app takes over your whole iPhone screen with a single color. It starts out green and slowly fades to yellow and then red as your time runs out. You can pick other color pallets if you like.
Last month I changed my email workflow to only allow myself 44 minutes per day for email checking — one 22-minute segment in the early afternoon and another 22-minute segment towards the end of my day. And I’ve been using Visual to budget that time. 1
There is no shortage of iPhone timer apps. iOS comes with a built-in timer, and if that’s not good enough for you, Due is a highly-recommended and splendid alternative. What I like about Visual is that the face of the iPhone doesn’t say exactly how much time I have (well, it does, in ultra-fine print at the bottom of the screen for those who just must know).
Instead visual conveys about how much time is left through the nature of the visual timer.

A countdown timer like this would never fly in a NASA control room, but for my office it works quite well.
My only two gripes with Visual are:
The icon. I’m not sure where it came from, but it sure doesn’t seem related to the rest of the app which is simple and well designed.
If you launch the app after the timer is done you are greeted with the “timer’s done” screen, rather than the launch screen for starting a new timer. Since you’re pretty much always are launching the app to start a new timer the app always requires an extra tap to get to the settings pane.
Visual is just a buck on the App Store. And be sure to check out the promo video, it’s pretty great as well.
- My reasoning behind the 44-minutes of email routine could take up an article all its own. But, in short, my reasoning is that cleaning out my whole inbox every single day is an unrealistic goal. And so, instead of allowing the amount of email in my inbox to dictate how much time and attention I need to spend there, I’ve set my own time budget for how much I’m willing to give to my email inbox. And yes, I admit that I am in a unique and fortunate position that I don’t have to check my email as part of my job. It behooves me to check my email, but I have no boss or co-workers relying on me to read and reply to email. ↵
✚
Clicky Keyboards
As do most people, I suspect, I’ve always used the keyboard that came with my computer.
The first computer I ever used on a regular basis belonged to my tech-savvy grandfather. I’d play games on it during the weekends when my family visited, until one summer when he upgraded and my folks inherited the hand-me-down IBM. Many years and a few family computers later, I bought my own computer: a Dell laptop that went off to college with me.
After the Dell was my first Mac, the iconic 12-inch PowerBook G4. A few years later, in the spring of 2007, I bought a Mac Pro. The Mac Pro is a beast of a machine. So beastly, in fact, that it doesn’t come with a single peripheral attachment — you have to pick out your own monitor, keyboard, mouse, and anything else you may need. And so, for the first time, I got to pick my own keyboard. At the time, I didn’t know any better and so I went with an off-the-shelf Bluetooth white plastic Apple Pro Keyboard.
The white and clear Apple Pro Keyboard was perhaps the worst keyboard ever designed in California. It was dull and soft to type on, it was neither quiet nor loud, and it had a see-through casing to display all the food crumbs, wrist hairs, and dead bugs that fell between the keys.
In the fall of 2007, Apple redesigned their keyboards to the new slim aluminum keyboards they still sell today. I eventually bought one of those to go with my Mac Pro. Though the thinness of the keyboard made it seem to me like a less-serious keyboard for folks who type a lot, it looked extremely cool. And we all know how important it is to have a clean and hip-looking desk.
It turns out, however, that Apple’s slim aluminum keyboard is quite nice to type on. I’ve been typing on them in some fashion or another ever since 2007. In addition to the full-sized USB version I bought to replace my clear Apple Pro Keyboard, I also bought one in Bluetooth flavor to pair with my original iPad, and the MacBook Air I bought last summer has the slim chicklet-style keyboard built in.
Recently, when I was interviewed on Daniel Bogan’s site, The Setup, he asked me what my dream computing setup would be. My reply was that thought I pretty much already have a dream setup, the one component that I have never truly considered is that which I interface with nearly the most: the keyboard. I wrote:
I think I might like a better keyboard. I’ve never thought anything bad about the slim Apple bluetooth keyboard I use, but recently I spent some time using my cousin’s mechanical keyboard and there was a completely different feel to it. I’ve never been a keyboard snob, but considering my profession, perhaps the time to get snobby about keyboards has come.
As someone who writes for a living it befuddles me why I never thought to research a proper keyboard.
As a computer-nerd-slash-writer, I am always looking and advocating for the right tools. But for years, I have always equated “writing tools” with “software” — I own more text editors than I have fingers to type with — but it never dawned on me until recently that a good keyboard could be equally as important as a good text editor.
I own a dozen different writing applications, a programming application or two, an email application, and a blog-posting application. And what do they all have in common? They all get typed into via a single, solitary device: my keyboard.
A month ago I ordered a Das Keyboard for my Mac. Not because I was dissatisfied with my beautiful and trusty Apple keyboard; rather, I needed to know if life could be better with a bigger, louder, and uglier keyboard.
When I placed the order, I had no idea what I was getting into. Owning a mechanical keyboard is like owning a Jeep Wrangler — there is an unspoken fraternity amongst owners that others don’t quite “get” and which I honestly don’t think I can explain in a blog post of only a few thousand words.
Mechanical keyboards like the Das are bulky, loud, and fantastic for typing. Compared to the slim Apple keyboards, the Das is different in every way except that the end result is still the same: words get onto the screen.
How I felt when I upgraded my keyboard to a mechanical one, reminds me of the excitement James Fallows felt when changing from a typewriter to a personal computer for the first time:
What was so exciting? Merely the elimination of all drudgery, except for the fundamental drudgery of figuring out what to say, from the business of writing.
I wouldn’t go so far as to say that the Das Keyboard has eliminated all computing drudgery, but I would say that it has greatly enhanced the act of typing. Especially the act of typing for long periods of time, which I happen to do on a daily basis.
The construction of a mechanical keyboard is much more friendly to typing. As I discovered by taking several typing tests (the results of which I share below), a mechanical keyboard actually does help me to type both faster and more accurately. The sound of the keys clacking and the feel of the key switches clicking makes for an aura of productivity and work that fills the senses.
When using a mechanical keyboard you don’t just see your words appear on the screen as you type them, you also feel and hear them. A mechanical keyboard engages all the senses but smell and taste. Which is why you should always type with a hot coffee at your side.
The Keyboards
The sound, size, and durability of a mechanical keyboard make it a device to be reckoned with. It is a wholly different keyboard than the slim Apple ones, but that is not to say I have been turned off to the slim Apple keyboard. When I’m working on my iPad (using the bluetooth keyboard) or my MacBook Air’s built-in keyboard, I still type quickly and comfortably.
This review has been typed out using three of the most popular mechanical keyboards for Mac. They are:
Das Keyboard Professional Model S: This is the keyboard that I started with. I pre-ordered one a few months ago for $113, and it arrived about a month ago. The Das Keyboards begin shipping on Friday, April 27 for $133.
Apple Extended Keyboard II: Bought on eBay, the keyboard itself is circa 1990, uses Alps switches, was not made in Mexico, and cost me $31.45 shipped. I also had to purchase an ADB cable for $8.35 and a Griffn iMate ADB to USB adapter for $25. Total cost: $64.80.
Matias Tactile Pro 3: A well-known 3rd-party keyboard that bills itself as the modern version of the Apple Extended II. It seemed unfair to write a review of Apple mechanical keyboards and not include the Matias Tactile Pro. These sell for $149, but Matias was kind and generous enough to send me a review unit.
Further down I have written more in-depth about the sound, feel, and overall typing experience of each of these three keyboards. But, before we get into that, let’s first check out some side-by-side statistics to give context for the general differences between these three keyboards.
Weight & Size
| Keyboard | Length (in) | Height (in) | Weight (lb) |
| Apple Extended II | 18.68 | 7.50 | 3.75 |
| Das Keyboard | 18.00 | 5.83 | 2.53 |
| Tactile Pro 3 | 18.00 | 6.50 | 2.96 |
| Slim Apple, Full, USB | 16.80 | 4.50 | 1.25 |
| Slim Apple Bluetooth | 11.00 | 5.25 | 0.69 |
Typing Scores
They say that using a mechanical keyboard doesn’t necessarily make you a more productive typist. But based on the typing tests I took it would appear that a mechanical keyboard does improve your actual typing productivity.
I took this typing test to measure the speed and accuracy of my typing. As you can see, I typed the slowest and the least accurate on the Apple slim aluminum chicklet-style keyboard that I’ve been using for over 4 years. My fastest and most accurate test was performed on the Das Keyboard.
| Keyboard | Words Per Minute | Accuracy |
| Das Keyboard | 91 | 100% |
| Tactile Pro 3 | 81 | 95% |
| Apple Extended II | 80 | 95% |
| Slim Apple | 74 | 93% |
I typed a staggering 15 words-per-minute faster on my Das Keyboard than on my Apple slim keyboard, and at least 10 words-per-minute faster than on the Matias or the Apple Extended keyboards. And the words typed on the Das were more accurate. The difference in speed adds up to at least 900 additional words (with fewer typos) for every hour of typing.
Of course, nobody types at a constant rate, especially when the typing is creative. But nevertheless. Considering I spend nearly 6 hours a day at my computer, mostly typing, that difference in speed and accuracy is not insignificant.
Sound
Not all clicky keyboards are noisy, but I greatly enjoy the sound of the mechanical keyboards. At first I was timid about the noise coming from my home office, but I have since become acclimated and comfortable with it. Even proud of it.
Each keyboard I tried has a different sound. The Apple Extended II is the quietest and has the lowest tone of clack. The Tactile Pro 3 is the loudest and has a hollow ring that accompanies the clicks of the keys (more on this later). And the Das Keyboard has a crisp higher-pitched click.
Of the three I prefer the sound of the Das Keyboard the best. But, if I could mix and match, I would place the letter keys of the Das with the spacebar of the Apple Extended II and the Backspace of the Tactile Pro.
Here is a brief audio overview of the sounds between the Das Keyboard, the Apple Extended Keyboard II, and the Matias Tactile Pro 3:
Mechanical Key Switches
As I began researching mechanical keyboards and the different types of switches they use, I had no idea the rabbit hole I was crawling into. For brevity’s sake, I’m only going to share a little bit about the differences between the switches found in the 3 keyboards I have.
If you want to learn more about mechanical keyboards and the various switches used, then I’d start with this Mechanical Keyboard Guide. The writer of this thread wrote a well-said opening paragraph for why you want a mechanical keyboard:
For most people it’s all about the feel. With the keyboard you’re typing on right now you’ve got to press the key all the way down to the bottom to get it to register. This wastes a lot of energy and causes fatigue, as most of your effort is spent pushing against a solid piece of plastic. Mechanical keyswitches are designed so that they register before you bottom out, so you only need to apply as much force as is necessary to actuate it, not wasting any. And with as many different types of switches as there are you can pick and choose which one you’re the most comfortable with, as each one has a different feel to it. And most people who try one can never go back to using rubber domes, as they realize just how “mushy” they really feel.
As I quickly discovered, not all mechanical key switches sound or feel the same. Not only are there many different designs of switches, but some are better for typing, some are better for gaming, some have a slight snap-resistance that provides a tactile feedback as you press the key, and some give off a noisy click or clack.
Of the three keyboards I tested, they use two (yea three) different switches:
- Blue Cherry MX switches in the Das Keyboard
- Complicated white ALPS in the Apple Extended II
- Simplified white ALPS in the Tactile Pro
For reference, the slim Apple keyboards shipping today all use plastic scissor switches. Most all laptops use scissor switches because it allows for about half the travel of the more common dome switches used in most all commodity keyboards.1
Cherry Switches
The Das Keyboard uses blue Cherry MX switches. The blue Cherry MX switches have a very pronounced 2-stage travel with a very audible click that happens upon activation.

The total travel of a Cherry Blue MX switch is 4mm; the switch actuates and clicks half-way down at the 2mm mark.
This two-stage click is not nearly as pronounced on the ALPS switches, and it is this pronounced two-stage click that leads many people to consider the blue Cherry MX switches to be the best for typing. They have low resistance and a very noticeable tactical “bump” or “click” that can easily be felt when typing.
You don’t have to bottom out the key to get it to activate. Once you’ve pressed past the “click” at the 2mm mark, that is when the key switch activates and the keystroke is registered by the computer. It’s hard to explain the tactile sensation of typing on the Das Keyboard compared to using the Apple Extended or the Tactile Pro. I would say that because of the pronounced 2-stage switch, the Das has a more defined tactile feel, is less work, and is more enjoyable to type on.
ALPS Switches
ALPS switches are not only a type of switch, but also a brand. Tokyo-based Alps Electric Co., Ltd. makes the switches. You may have also heard of their brand of car audio gear: Alpine.
The Apple Extended Keyboard uses white Alps switches, as does the Tactile Pro. However, the Apple Extended Keyboard uses what is known as “Complicated ALPS” switches, while the Tactile Pro uses “Simplified AlPS.” This is because the complicated switches are no longer in production.
Over time, the complicated ALPS switches can be known to generate resistance because of dust and other elements that can build up within the switch. The Simplified ALPS switches, which the Tactile Pro uses, are less prone to this.
Based on my typing experience with both the Tactile Pro and the Apple Extended II, the Simplified ALPS switches give a bit more resistance than the older Complicated switches. The newer ones seem to have a more pronounced “click” or initial force of resistance. They are also louder. This is not necessarily a bad thing — one of the things that makes mechanical keyboards so great for typing is their click and their clack.
Apple Extended Keyboard II

Before you’ve even typed a word, the first thing you notice about the Apple Extended Keyboard II is how huge it is. The AEK is the widest keyboard of the bunch. It measures just wider than 18.5 inches. My son, Noah, was 19.5 inches when he was born. He could have taken a nap on the Apple Extended Keyboard. Who knows, he may have written something clever in the process.
With the AEK on my desk, my 23-inch Apple Cinema Display, which measures 21-inches across, now seems tinier than it used to. When I used the thin and sleek Apple Bluetooth keyboard, the cinema display seemed so large in contrast. With the Apple Extended Keyboard in front of the monitor, the screen now has a peer it must reckon with.
Next, you realize that the Home Row markers are on the “D” and the “K” as opposed to the “F” and the “J”. The latter is now the de facto standard and it takes some time to acclimate to the feel of the markers being under my two middle fingers rather than my two pointer fingers.
Lastly, the Apple Extended II uses an ADB cable. The keyboard I bought off eBay didn’t come with the cable, so I had to buy an ADB cable separately ($8) along with a Griffin iMate (an ADB to USB adapter that cost me another $25 on eBay).
I had been typing on my Das Keyboard for nearly two weeks before the Apple Extended II arrived. I expected it to sound and feel nearly the same as the Das Keyboard, but the complicated white ALPS switches are quite different than the blue Cherry MX switches. It is true that they are both clicky mechanical keyboards, but if you did not know that and you were only to type on each of these you would not classify them as being the same type of keyboard.
My Apple Extended II feels softer and sounds quieter than both other mechanical keyboards I have here. If you’re listening to the different audio tracks I’ve recorded, the MP3s may sound a bit deceiving. Sitting here, in my office, the Apple Extended Keyboard II is the quietest of the bunch. It is certainly not quiet — but it does not have the same high-pitched click. The Das is like a snap, the AEK is like a clap. The AEK has more bass to it, and the sound is more muted.
Again, I don’t know if the stark differences are because the ALPS switches in my Apple Extended II are used and 22 years old, or because they are the complicated ALPS switches. Perhaps I will never know because I don’t feel compelled to invest nearly $200 for a “brand new” 22-year-old Apple keyboard. The $32-find I got on eBay is simply the best one that was guaranteed to work and which was not assembled in Mexico.
Matias Tactile Pro 3

The Matias Tactile Pro bills itself as the modern version of the Apple Extended Keyboard II. Though the look of the Tactile Pro is patterned after the design of black-keyed Apple Pro Keyboard circa 2000, it uses white ALPS switches, akin to the 1990-era Apple Extended and Extended II keyboards. But the switches are not the exact same because those used in the Apple Extended are no longer made today.
The key switches on the Tactile Pro feel very different than those on my Apple Extended Keyboard II. The click-down on the Matias is much more pronounced than on the AEK II. Though I am not fully certain that this is because of the difference in switches rather than the age of my Apple Extended keyboard, the reviews I read online about the differences between the complicated and the simplified ALPS switches did seem to be concurrent with my experience.
Typing on the Tactile Pro is bittersweet for me. The tactile feedback of the key switches is quite pleasant, and there is a firm resistance within the switches that gives the keyboard a sturdy and hearty feel. I like the slightly higher resistance that the Tactile Pro gives.
Moreover, the sound of the Tactile Pro when typing is much louder than the Apple Extended II. I like the louder volume, but unfortunately it has a hollow sound to it that seems incongruous with the sturdiness of the switches. Additionally, there is a ringing that echoes around in the chassis of the keyboard itself.
Here is an audio recording which tries to catch the ringing that reverberates after a keystroke. You may need to turn your volume up to hear it:
After typing on the Matias for two days, as much as I liked the tactile feel of it, the sound was constantly a distraction. I asked Matias about the ring, and was informed that the noise comes from the springs in the ALPS key switches. Matias tells me they are advancing the key switches to remove the ringing in a future version of the Tactile Pro. Also, the chassis design of the original Tactile Pro is built in such a way that the spring ring is not nearly as audible.
Das Keyboard

This new model of the Das, which has the keys mapped out especially for a Mac, seems to be re-kindling the interest in mechanical keyboards. It is the first mechanical keyboard I got, and before that the first (and only) mechanical keyboard I had ever used was my cousin’s Adesso MKB-125B. Both the Das and the Adesso use the blue Cherry MX switches. It was through using the Adesso that I first began considering upgrading my typing tool.
Unfortunately, the Das (like the other 2 keyboards I tested) is big, bulky, and generally an eye sore. In fact, of the few other reviews I’ve read about it, the general consensus is: it’s ugly, but it’s great to type on. The clickety-clack quickly makes up for the aesthetic sacrifice by telling everyone within earshot that you are getting some serious work done.
The aesthetics of mechanical keyboards today baffle me. Just because it has mechanical switches, which were especially common from keyboards of the ‘80s and ‘90s, doesn’t mean it should also look like it’s been rescued from 20 years ago.
In addition to being the ugliest of the three mechanical keyboards currently in my office, the typeface used on the key caps of the Das is horrendous. Perhaps the worst offender is the single-quote / double-quote key, which rests just to the left of Return. At a glance, it looks like a period and a single-quote.
However, the Das Keyboard has two great things going for it. More than the other two keyboards, I prefer the tactile feel of the blue Cherry MX switches and the audio click of the Das. Since you don’t buy a mechanical keyboard for its aesthetics, for those looking to get a clicky keyboard, this is the one I would recommend.
Mapping the Special Function Keys
Though the Das Keyboard for Mac has custom modifier key commands drawn onto its function keys, those special modifier keys aren’t recognized by OS X. The “F14″ and “F15″ keys work to dim and brighten the display (rather than the traditional F1 and F2), but in order to control the previous track, next track, play/pause, and volume up/down/mute you have to press the Function Key which is awkwardly placed under the right-side Shift Key.
Since the System doesn’t recognize the Das Keyboard’s special keys, you can’t tell it to treat F1 like it would on an Apple keyboard without pressing that Function key. For the life of me, I don’t know why this is, but it just is.
Fortunately Keyboard Maestro is a keyboard’s best friend. A little bit of fiddling with the Macros and I was successfully able to map F6 all the way through F11 to act as the blue markings say they should act.
Moreover, since I use Rdio as my tunes source, I hacked together a rather clever if/else macro that allows me to control iTunes if I’m in iTunes, but otherwise to default to controlling Rdio from anywhere else in OS X.
With the Keyboard Maestro hacks in place, you may have trouble using your normal modifier keys on your MacBook Air (assuming you use your Das Keyboard with your laptop in clamshell mode). If so, check out this cool little utility called Function Flip.
Outro
After a month of using and testing the three most popular clicky keyboards for Mac, I am extremely glad I jumped into these waters. The sound and the feel of a clicky keyboard only takes a few days to get used to, and what follows is this intense feeling of productivity that now accompanies anything I type.
Something I like about mechanical keyboards is that each key has its own unique sound and feel. You could tell how many words someone types, and how many in-line typos they fix, simply by listening. Space Bar, Backspace, Return, and the letters — each produce a unique sound and have their own tactile feel. There is variety when typing on a mechanical keyboard. All of these keyboards are just so darn loud that there’s no ambiguity as to if I am typing or not — I know it, Anna knows it, and heck, the neighbors probably know it. When I set out to type a sentence, I am committed — it is like the typing equivalent of writing with ink.
If you too want to adorn your desk with an ugly keyboard — one with a loud personality and which increases typing productivity — then I recommend the Das Keyboard. I prefer both the tactile feel and the sound of the blue Cherry MX switches, and though I find the Das to be the ugliest of the bunch, a serious typist knows you shouldn’t be looking at your keyboard while you’re typing.
Update: See also the review of tenkeless clicky keyboards.
- For even more on the difference between membrane, dome, scissor, and mechanical keyboards see this Wikipedia article on keyboard technology. ↵
✚
Diary of an iPad (3) Owner
Wednesday, March 7, 2012
11:51 am CST: With a thermos full of coffee on my desk, half a dozen Safari tabs open, and Twitter in the corner, I am ready to watch the liveblogs.
12:21 pm: Tim Cook announces the new iPad!
12:23 pm: Phil Schiller is now talking about it. Overview of features: Retina display; better camera; 4G LTE; voice dictation; and 10 hours of battery life. Wow.
12:38 pm: Phil Schiller: “This new iPad has the most wireless bands of any device that’s ever shipped.” Wi-Fi, GSM, UMTS, GPS, CDMA, LTE, and Bluetooth to be exact.
1:13 pm: Phil Schiller: “Don’t let anyone ever tell you that you can’t create on an iPad.”
1:45 pm: Schiller says that the non-Retina-optimized apps will still look great on the new iPad’s screen. I disagree. They will look blurry and poor, especially when contrasted against the apps which are Retina optimized.
1:21 pm: Apple is calling the new iPad the same thing everyone else is going to call it: “The new iPad.”
Later this year? “The new iPhone.”
1:30 pm: “Resolutionary” is a brilliant tagline. Reminds me of “Thinnovation” and “The Funnest iPod Ever”.
1:49 pm: Now attempting to order a 16GB, Black, AT&T new iPad.
2:49 pm: Make that trying to order a 16GB, Black, AT&T new iPad.
3:09 pm: Got through. But it looks like the LTE models are not available for in-store pickup when pre-ordering. I’d prefer to wait in line, but I’m not going to wait inline without a pre-order guarantee to get the right model.
Thursday, March 8
1:14 pm: Well, apparently AT&T’s map of 4G coverage (which is linked to from Apple.com’s website talking about LTE coverage) doesn’t actually mean LTE coverage.
I went with AT&T because I thought they had LTE in both Kansas City and Denver, but turns out they do not in Denver. Now canceling my AT&T order and going with Verizon instead.
2:44 pm: Just received the order confirmation email, and fortunately the new iPad is in fact expected to arrive on Friday the 16th. I’m a bit bummed that I won’t be standing in line this time. Me and two other friends were all planning to pre-order for pickup but the Apple online store didn’t have pickup available at the time and so we had to choose to get it delivered to our house.
And, I see that my time spent refreshing store.apple.com yesterday was pretty much in vain.
Wednesday, March 14
7:12 pm: Watching a few episodes of Star Trek: The Next Generation with Anna while we wait for the reviews of the iPad to hit the wire.
7:14 pm: Okay, fine. While I wait for the reviews to hit the wire.
8:31 pm: Looks like the embargo has lifted. Reading the Reviews.
Using my “old” iPad 2 to read reviews about the new iPad seems like some sort of cruel joke.
11:57 pm: I dig the long-form, personal, in-depth stuff. Folks have been griping about bullet point posts for years but I read this type of writing as entertainment. I especially enjoyed Jason Snell’s review.
Friday, March 16
8:00 am: Brewing coffee and getting ready to wait out the day.
8:32 am: Just got a text from my friend who is at the local Apple store and he says there is no line. He just walked right in and snagged a 64GB Black Verizon model.
Well, in that case, why should I sit around and wait for FedEx? Moreover, I’ve been thinking about how 16GB may not be enough any more. Already my iPad 2 is maxed out and I’ve had to delete all my music off of it. I think I’m going to cruise over to the Apple store and pick up a Verizon 32GB model instead. I can simply return my 16GB later.
I guess 32 is the new 16.
9:52 am: After waiting for Noah to go down for his nap, I am now leaving for the Apple store. Anna jokes with me that she’ll sign for my FedEx iPad while I’m out.
10:04 am: I arrive at the Apple store. It’s weird to be here on launch morning but with no huge lines out front. There are the customary police officers, carts of Smart Water, big signs on easels for the pre-order line, and dozens of blue-shirted Apple employees… but only a handful of customers.
I ask the employees manning the front door how the morning has been. They say that yesterday at around 11:00 am the first person arrived and that this morning when the store opened at 8:00 there were about 80 people in line. I hope that guy who waited 21 hours didn’t stick around to see the line totally dissipate after just an hour.
10:11 am: New iPad purchased. This is the 3rd iPad (3) that I’ve bought. (!) First was the AT&T one, then was the 16GB Verizon model, and now this 32 GB Verizon. Oy.
10:43 am: Now back home and beginning setup. The first thing I notice, right away, is the weight. The new iPad is obviously heavier. I think it feels thicker, but if I didn’t know that it was thicker, I’d probably chalk it up to the fact it weighs more.
And since this is a 4G-equipped iPad it’s even a bit heavier than a Wi-Fi-only iPad 3. To get nitty gritty: according to my kitchen coffee scale, my iPad 2 weighs 613 grams and my new iPad weighs 663 grams.
10:44 am: The second thing I notice: the screen. It looks familiar and yet not at the same time. I’m not as shocked to see the iPad’s Retina display because I’ve seen one before (on my iPhone). And yet, I am so thankful that a device which is pretty much just a screen, now has such an incredible screen.
10:53 am: Doing a quick iCloud backup of my iPad 2 so I can restore from that backup to the iPad 3. Since I don’t charge my iPad 2 in on a daily basis, I don’t have a recent iCloud backup of it.
10:58 am: Initiating iCloud restore onto the new iPad.
10:59 am: 21 minutes remaining. Time to brew another cup of coffee? I think yes.
11:40 am: While waiting for all my apps to finish downloading, I set up my Verizon service. I imagine that I could use 1GB without trying too hard, so I’m going with Verizon’s 2GB for $30/month plan. but I guess we’ll see in practice. How often will I take just my iPad when out and about? And how often will I need the cellular data?
It seems Verizon wants me to set up my own account and enter in my credit card info. I was hoping they would charge me through my Apple account and so I could just enable it via my iTunes password, but I had to enter in complete billing info. If I cancel my data plan next month but want to enable it the month after that, will I have to re-enter all this billing information again?
The 4G cellular connection works different than what I thought. For some reason I thought the cellular connection would be off most of the time and if I wanted to turn that on then I would have to manually switch it on each time. But no, it works on the iPad just like it does on my iPhone — it is always connected. If it has a Wi-Fi signal nearby then it grabs that, but if not then it uses the cellular signal. Thus there’s no interruption of connectivity.
I could manually turn off the data connection but I’ve read that leaving it active has a negligible drain on battery life, so I see no point in keeping it disabled when I don’t need it.
11:52 am: The apps download in order of priority. Apps in the Dock download and install first, then left-to-right and top-to-bottom starting on the first Home screen.
Sadly, the apps did not download their latest versions. They downloaded the version I had on my iPad 2. Now go into the App Store and update them all. So more downloads
3:04 pm: FedEx finally arrives with my Apple.com-ordered 16GB iPad 3 and my Apple TV they tried to deliver yesterday. The FedEx guy looks tired.
7:25 pm: The battery was at 94-percent this morning when I first turned it on. I’ve been using surfing, reading, tweeting, and emailing pretty much nonstop since 11:00 am and it is now at 40-percent.
8:30 pm: Hey! The Retina update to Instapaper is now available. It looks fantastic. Loving Proxima Nova.
Saturday, March 17
7:42 am: Rearranging my iPad’s Home screens and apps. What else would I be doing on a Saturday morning?
8:32 am: Setting up the last of the apps that need new passwords entered and to sync their data: Rdio and 1Password.
Apps that are not updated for Retina yet don’t strike me as being as blurry as non-Retina iPhone apps were. Perhaps it’s because I am further away from the iPad screen than the iPhone’s? Or perhaps because the iPhone’s Retina display has a higher pixel density than the iPad’s?
9:10 am: Battery is currently at 22-percent. Letting it charge for a bit while I make my morning cup of coffee.
9:37 am: People on Twitter are talking about difference in color temperature between the screens of the iPad 2 and the 3. I see a color variant but it’s not a temperature difference — rather my iPad 3 is more vibrant and rich.
2:15 pm: The battery is now fully charged, but I’m not sure how long it’s been there. Based on the past few timeline notes, it seems like the iPad charges at about 15-percent per hour.
11:02 pm: Doing my first LTE speed test. It’s averaging 10Mbps down and 3Mbps up. That’s here in the south end of KC, where I live. So it’s not quite as fast as my home broadband connection, nor is it as fast as some of the jealousy-inducing speeds that some folks are tweeting about, but it still pretty impressive and nothing to complain about.
11:14 pm: Streamed an HD video trailer (Unraveled) over LTE with only one minor hiccup at the front end. The HD looks stellar on the new iPad.
Sunday, March 18
9:53 am: Decided to move the Mail app out of the iPad’s Dock. I have every intention of using the iPad more and more as a serious work device. And a serious work device needs its email application in a place where it is least likely to wiggle its way into the center of attention.
Monday, March 19
1:25 pm: After recording Shawn Today and listening to the Apple financial conference call this morning, I’ve been spending the rest of the day working solely from the iPad. Writing, reading, emailing, and linking — all from the iPad while I watch Noah in the living room so Anna can get some down time.
What I like about working with the iPad is that I feel like it’s just me and my work. Even if there are other distractions available (like Twitter) they are not present. They are in the background and in another app, not peeking out from behind the frontmost window.
I remember two years ago, when the first iPad came out, I very much wanted it to be a laptop replacement but it couldn’t be. For me, at least. When the iPad and its 3rd-party apps were still in their infancy I couldn’t properly manage my email workflow, my to-do list, nor could I write to the site or even have synced documents.
Since 2010 so much of that has changed. In part, my own workflow has simplified and can now acclimate mostly to what the iPad is capable of. But also the apps for the iPad have come such a long way, that in some regards (to-do list management, for example) the iPad is a better tool than my laptop.
4:01 pm: While visiting my sister and her husband, I thought I’d bring the iPad so I could do a speed test at Mark’s house and wow, Verizon’s LTE is much faster here than at my place. Seeing speeds around 30Mbps up and 20Mbps down.
9:07 pm: I haven’t touched the older iPad 2 in a few days. But I just now picked it up to do some comparisons of websites rendering on the different displays and it’s amazing how much lighter and thinner this thing feels.
I’ve gotten used to the thickness and the weight of the new iPad and in day-to-day it doesn’t affect its usefulness, but it still is interesting that the difference is so noticeable when picking up the iPad 2. Or, put another way, the difference in weight and thinness is much more noticeable when going from heavy to light than the other way around.
The second thing I noticed with the iPad 2 in hand was how horrid the Internet looks. Everything is fuzzy. Text isn’t clear; Retina display-optimized header graphics look just as blurry as non-optimized graphics on the new iPad. There is no going back.
9:51 pm: It strikes me that the Retina display is the other side of the coin to iOS. Meaning, iOS is the software and the screen is the hardware and that’s it. Those are the two sides to this coin. On a laptop or desktop computer you have three user interface components: the keyboard, the mouse, and the screen where you watch the user interface. On the iPad you have one user interface: the screen. And you touch and manipulate what is on the screen.
I love the way Ryan Block explained why the new iPad’s Retina display is such a big deal:
The core experience of the iPad, and every tablet for that matter, is the screen. It’s so fundamental that it’s almost completely forgettable. Post-PC devices have absolutely nothing to hide behind. Specs, form-factors, all that stuff melts away in favor of something else that’s much more intangible. When the software provides the metaphor for the device, every tablet lives and dies by the display and what’s on that display.
Ever since 2007, one of the hallmark engineering feats of iOS has been its responsiveness to touch input. When you’re using an iOS app it feels as if you are actually moving the pixels underneath your finger. If that responsiveness matters at all, then so does the quality and realism of the screen itself.
Highly-responsive software combined with a dazzling and life-like screen make for the most “realistic” software experience available.
I don’t know how this relates exactly, but it makes me think of how I would flail my hands and the controller of my Nintendo Entertainment System when I was trying to get Mario to jump over a large pit. As if, by moving the controller around I could give Mario that extra boost of speed for his jump. Have we always had that natural tendency to relate our physical actions to the manipulation of pixels on a screen?
10:12 pm: My only disappointment with the new iPad’s display is that it’s not laminated to the glass the way the display of the iPhone 4/4S is. The iPad’s screen is significantly larger than the iPhone’s, and so there is an epic element in that regard, but there is a unique beauty to the iPhone’s Retina display that the iPad does not have.
Tuesday, March 20
1:30 pm: Putting Noah in the car seat to take him to his one-month doctor checkup.
1:38 pm: I need a sleeve for this iPad because, already, taking it out on its own is becoming more common.
This X Pocket iPad case from Hard Graft looks absolutely stellar, but do I really want only a sleeve? If I’m going to be leaving my Air at home it’d be nice to have an iPad bag. My beloved Timbuk2 is already the smallest size they make and though it’s perfect for holding my Air, iPad, keyboard, and other little peripherals, the iPad alone seems to swim in it.
Another option could be this sweet bag from Hard Graft, but it may be just a little bit too small because I’d want to be able to fit my bluetooth keyboard in there as well. My pals Ben Brooks and Brett Kelly both use Tom Bihn’s Ristretto, but I prefer cases that are horizontal rather than vertical.
2:09 pm: Did a quick speed test here in Overland Park before going in to the pediatrician’s office. The LTE service here is faster than by my place, but nowhere near the speeds it was seeing at my sister’s home.
You know, all these speed tests keep me thinking about what I’ll do if and when an LTE iPhone comes out. Will I cancel my AT&T contract and switch to Verizon, will I stick with my 4S for an extra year and move to Verizon when my contract expires, or will I stick with AT&T and get one of their LTE phones?
2:13 pm: Anna’s looking at me like can we go in now?
Wednesday, March 21
12:13 pm: I remember when the iPad was a luxury item and I was embarrassed to use it in church or the local coffee shop. But now? Now it seems everyone has one. I walk into the coffee shop and half of the people here are reading or working on their iPads.
Two years ago, we didn’t know where the iPad fit in. It was a $500 luxury item that went somewhere between a smartphone and a laptop. But now, people are using iPads as their main computers. As a $500 computer replacement the iPad seems sensible, not extravagant.
10:48 pm: Whoa. Turn a page in iBooks.
Thursday, March 22
9:58 am: I have figured out how to properly classify the three generations of iPads: * Vintage * Old and Busted * New Hotness
Friday, March 23
12:45 pm: Ugh. Hit with the stomachs flu; I’m taking it easy today. But while I’m upstairs in bed, trying to relax, I’d like to do some work on my development site. Surely I can do this from the iPad, no?
I search the App Store for “FTP” and come across two apps which allow me to access and edit FTP files: FTP on the Go PRO, and Markup. However, asking for recommendations on Twitter yields a single answer: Textastic.
1:28 pm: Coding on the iPad is a much more delicate process than coding on my Mac. When on my Mac I have at least a few Safari tabs open with the site launched, and Coda going with 3 or 4 or more tabs worth of documents I’m working in. On the iPad it’s a bit more uni-tasky, and you can’t see as many lines of code all at once on the smaller screen.
While I don’t see myself ever doing large-scale coding projects solely on my iPad, it’s nice to know that if I need to jump in and make edits or changes to my site I could do so. Also, it’s nice to be able to make small tweaks to current back-burner projects.
Saturday, March 24
8:37 am: Downloading songs for Anna on the iPad 2, and again I’m reminded of how thin and light this device is compared to the new one.
It is an interesting juxtaposition of the senses to hold the iPad 2 after getting used to the new iPad. The older hardware feels superior according to the physical senses — eyes closed (or screen off) and you would assume you’re holding the latest and greatest iPad. However, one look at the screen and your mind wonders how it was that your hands could have deceived you. How can this lighter and thinner device have such a vastly inferior screen?
John Gruber describes it well:
Apple doesn’t make new devices which get worse battery life than the version they’re replacing, but they also don’t make new devices that are thicker and heavier. LTE networking — and, I strongly suspect, the retina display — consume more power than do the 3G networking and non-retina display of the iPad 2. A three-way tug-of-war: 4G/LTE networking, battery life, thinness/weight. Something had to give. Thinness and weight lost: the iPad 3 gets 4G/LTE, battery life remains unchanged, and to achieve both of these Apple included a physically bigger battery, which in turn results in a new iPad that is slightly thicker (0.6 mm) and heavier (roughly 0.1 pound/50 grams, depending on the model).
The trade off is worth it. After a short while of using the new iPad I quickly acclimate to its size and weight. And who among us would vote for a new iPad that didn’t have 4G LTE, or that didn’t have the Retina screen, or that didn’t have 10 hours of battery life and was instead as thin and light as the iPad 2? Not me. And, well, if you did vote for that, then you can just buy an iPad 2 and even save $100.
11:12 am: Anna’s friends are over for brunch to celebrate her birthday. One of them is currently in nursing school and we all get onto the subject of studying, textbooks, laptops, and iPads.
Her school is excited about the soon-coming transition to when textbook money will be a part of the tuition cost and it will be used to buy the student a new iPad and cover the cost to load up that iPad with the course-necessary electronic textbooks.
But these girls are not excited about that. They don’t want textbooks on iPads because they can’t write in them, can’t highlight them, can’t spread them all out and reference multiple pages simultaneously. And they don’t like the idea of needing a laptop and an internet connection either because it means you have to study at home or at a coffee shop or library, and you can’t go somewhere outside and away from it all.
Sunday, March 25
7:29 am: Checking my iPad to see when the latest iCloud backup was, and yes: the iPad automatically backed up to iCloud last night. This has got to be one of the most underappreciated features of owning an iDevice. Automatic iCloud backups are like Time Machine but better. All my apps, all my settings, all my pictures, backed up to the cloud while I sleep and while my iPad charges.
Remember when we had to plug into iTunes and manually sync? Ew.
Monday, March 26
11:27 am: Finally able to pair my Apple Bluetooth keyboard to the new iPad. In short, this keyboard seems to only want to be paired with a single device at a time. I had to tell my MacBook Air to forget the keyboard (plugging in my Apple USB keyboard instead). Though I like this keyboard more for typing, I had been using the Amazon iPad keyboard with the iPad 2 and, though it is a great and inexpensive Bluetooth keyboard, it isn’t quite on the same par as Apple’s.
Coincidentally, this Apple Bluetooth keyboard is the same one I bought two years ago when I bought an original iPad. I always intended to use it with the iPad but it ended up becoming my desktop keyboard instead.
12:05 pm: Was planning on heading out for the afternoon to field test the iPad some more, and to wrap up this piece, but Noah is having a rough and fussy afternoon. I’ve opted to stay home and give Anna some time off. So hey! I’m “field testing” in the backyard.
I’m in my camping chair out on the back patio, a baby monitor by my side, my lunch shake resting in the cup holder, and the new iPad resting on my lap in its InCase Origami Workstation.
It’s unfortunate that the iPad’s glassy screen doesn’t do well outdoors. If the screen is light and the text is dark, it works pretty well, but only so long as you are away from sunlight. And I notice that there’s virtually no difference of increased visibility between 50- and 100-percent brightness.
12:15 pm: The thing that bothers me the most about promoting the iPad to a more regular work device is that it still doesn’t fit my email workflow. On my Mac I have many rules in Mail that process and file away those “bacon” emails that I want but never want to see. Also, I get a lot of receipts via email, and most of these are for tax-deductible items that I need to keep and process. I can’t do that on the iPad because I use AppleScripts and Yojimbo…
Hmmm. What if there a way to send an email to a Dropbox folder?…
Doing some research reveals there are a few options. Send To Dropbox looks to be the best. It’s a service that connects to your Dropbox account and then gives you a unique email address. It will store any attachments as well as store plain text or HTML version of your emails. Sounds ideal.
12:35 pm: The sun is creeping over to my shaded spot. I may be forced to move inside.
1:02 pm: For the past 30 minutes I have carried on a couple of iChat conversations (thanks to Verbs App app), researched some ways to send an email to Dropbox, worked on this article, and changed a certain baby’s dirty diaper.
However, my backyard is now completely bathed in sun and I have no choice but to move back inside. Noting that the battery level is currently at 68-percent; about an hour ago it was at 82.
1:21 pm: Since I am “field testing,” I’ve been using LTE instead of my home Wi-Fi. This morning I checked my Verizon data plan and it reports 307MB used since the 16th. Today is the 26th, and so that averages out to 31MB per day so far. My plan allows me 2,048MB per month, and that averages out to 66MB per day — twice what I’ve been averaging so far. I think the 2GB plan will prove to be just right.
3:11 pm: Now taking that field trip and driving to the Roasterie.
3:23 pm: The weather is so nice today that everyone else thought they’d head over here as well. I could sit inside, but that’d be a disservice to the weather.
So here I am on a sidewalk bench down by Le Creuest, some kitchen accessories store. This is where the oddity of using an iPad in public comes in to play once again. Sitting on a bench in front of a kitchen store drinking an Italian Soda and tapping away on my new iPad. I’m too timid to bust out the Origami Workstation in this environment.
3:29 pm: Alas, I cannot connect to the coffee shop’s Wi-Fi from way over here on this bench, and Verizon service seems to be poor on this side of town. Ah well, I am mostly only writing and therefore Internet speeds are inconsequential to me at the moment.
You know, it’s funny. I bought a 4G iPad and signed up for a data plan so that I could take the iPad anywhere and still be able to use it with an Internet connection. In some ways the data plan is a safety net — if I find myself in a place with poor or no Wi-Fi, then no problem because I can use my data connection. But in some ways the data plan is a permission slip — if I’d rather go work at the park instead of a coffee shop I can.
In my mind I imagine the permission slip mindset as being the more exciting and freeing option. I mean, that is one of the great advantages to cellular data and it’s certainly the main reason for why I bought the 4G model. Yet, I find myself too timid to take advantage of it in fear that I’ll use up my data plan too fast and then not have it when I need it, or pay unnecessary overage rates.
Tuesday, March 27
11:13 am: Checking the Verizon data usage and today it reports a total of 350MB used. So yesterday, while on the field and using my data connection what seemed like a lot, I only used 43MB. That is still under my daily allotment of 66MB.
3:49 pm: Finished setting up my Send To Dropbox workflow, and I now have a Folder Action and an AppleScript working on my MacBook Air so that any receipts I get via email I can simply forward on from my iPad or iPhone and they’ll safely land in Yojimbo.
And, relatedly, thanks to Printopia I can also now print from my iPad (since I don’t have an Air Print-enabled printer).
All these tricks and workarounds and 3rd-party services that make my iPad work better with my Mac strike me as an odd necessity for a “Post-PC Device”. In some ways it makes the iPad seem more like a thin client rather than its own, stand-alone computing device. Perhaps it’s not a fault of the iPad so much as it is my own desire to fit the iPad into my particular and age-old workflows that I’ve long since gotten used to on my Macs over the years.
Yet, even with my workflows aside, I suppose the iPad is still, in a way, a thin client — a thin client to the World Wide Web. How many of the apps on my iPad have need of an Internet connection? How many of the tasks I do on the iPad require an Internet connection? How often do I front load Instapaper and Reeder before getting on an airplane?
The answer is: a lot.
Because the iPad works best when it is connected to the Web. It is intended to be connected.
Having an iPad with a cellular data connection instantly raises the overall utility of the device. Because it takes it from a device that works best in the comfort of a home or coffee shop Wi-Fi connection and turns it into a device that works virtually anywhere your feet will take you.
This tablet is extremely portable. And its software makes it usable as a work and entertainment device. These are the things that excite me most about the iPad. And I don’t mean this specific new iPad that I am using to write these very very words. I mean the iPad as a product category — as the next generation of devices where things are versatile, robust, and yet simpler.
✚
Byword
You can’t throw a rock at the iTunes and Mac App Stores without hitting a minimalistic writing app.
If you do a lot of writing, I see no reason not to find an application that has been built to best suit your needs as a writer. Sure, you can scribble something down on the back of a cocktail napkin using a mechanical pencil, but why torture yourself like that?
What I find so compelling about these simple writing applications is that they are custom tailored for writing, especially if you’re writing for the Web. In contrast, I never write in Pages.
Off the top of my head I can think of half a dozen or so minimalistic writing apps, and I’ve tried them all. Writing is my job, and it behooves me greatly to find the best possible writing app that I am comfortable in and that keeps me moving the cursor to the right.
Over time, the writing apps that have stuck for me are:
Preferring Byword over other similar apps is not to objurgate or even criticize them. As water naturally flows downward, it seems that I naturally gravitate toward Byword. I like it so much, in fact, that it tied for my favorite new Mac app of 2011.
I am also a fan of iA Writer. I love that big blue cursor and the elegant way it stylizes my Markdown-riddled writing. But even still, Byword usually wins my writing attention due to its basic typographic options. Writer, on the other hand, is famously free from any and all settings. The only option you have in Writer is to use the app or not.
Byword, by comparison, is rich with preferences. However, compared to your standard-issue text editor or word processor, Byword is slim in this area.
On the Mac, Byword’s settings pane looks like this:

You choose a typeface and size, a column width, and decide on light or dark. I write mostly in Menlo at medium width, and it seems I flip between light or dark mode depending on the weather or time of day. Springtime morning? Light mode. Rainy afternoon? Dark mode.
I’ve been using Byword since its debut last spring. But for any and all documents which I want to have available on my iPad or iPhone I’ve used the nerd’s common Simplenote+nvALT combo of apps. However, a good audit of one’s workflow is often in order and I’d like to start using a single text editor for my article drafts rather than spreading them out across multiple apps and folders.1
Therefore, with the advent of Byword for iOS and its iCloud document syncing, I’ve decided it’s time to evaluate and upgrade my writing workflow.
This isn’t a spontaneous decision. More and more I have been wanting to promote my iPad to a stronger work device. If I need to get “serious” work done I rarely turn to my iPad. I think that could change, and I think I could be the better for it.
For my trip to Macworld this past January, I took the Apple nerd’s three standard-issue gadgets: my MacBook Air, my iPad, and my iPhone. For the first time I can recall, I didn’t even use the Air. Nearly all of the reading, writing, linking, emailing, and tweeting I did was via my iPhone. And the rest of the reading and writing I did was on my iPad.
It’s one thing to look at a spec sheet, nod in agreement and say that yes the iPad has most of the tools I need in order to do my day-to-day job. But it is another thing entirely to actually put that into practice. And so my time at Macworld, working almost solely from my iPhone, was a bit of an eye opener for me.
The linchpin for me to use the iPad for work is the ability to write from it. But this is a bigger issue than just needing a text editor — the iPad is not in want for writing apps. What’s important is that whatever article I’m writing be available to me on my Air, my iPad, and my iPhone.
Enter Byword
Today the Mac app I write from so frequently was updated to accompany the launch of the its iPhone and iPad siblings. What’s new in Byword for Mac is little more than integrated iCloud support. With the new iOS apps, Byword now ships out of the box with the ability to sync all your documents via iCloud or Dropbox.
The iCloud integration is, as with most other apps, painless and quick. I’ve found that apps which sync their documents through iCloud are quicker and more reliable. However, what I don’t like about using iCloud syncing is that it is application-specific. And so, in a way, an app becomes a silo of my work. There are definite advantages to using Dropbox instead of iCloud (and I’m not just talking about Byword here), but the latter is new and still feels novel.
In addition to the new iCloud support, here are a few things about Byword for Mac that have always been there:
QuickCursor support.
Exporting of your markdown as HTML. Meaning, you write with Markdown and then copy and paste, but when you paste it’s been converted to HTML. I have a WordPress plugin that converts my Markdown to HTML when I publish, but there are times when I need an HTML formatted page (such as a Craigslist listing) and so I write it in Byword and then just export. Handy.
In-line stylizing of Markdown syntax. This has become standard practice for minimalist writing apps, and I like the way that Byword and iA Writer do it best — though they are somewhat different in their styles.
All the other Lion-specific features, such as versioning, auto-saving, and glorious full-screen mode.
Byword for iOS
Byword on the iPhone and iPad has a very distinct, subtle design to it with very low-contrast buttons and a monochromatic look throughout. All the interface elements and popovers are custom drawn to fit into the “style” of Byword, and yet they are still familiar and follow standard conventions of a familiar iOS app.

When Apple began introducing monochrome icons to OS X I rejoiced. I prefer the more simple look that’s now found in the iTunes and Finder sidebars, and I like the simple and subdued look found in Byword for iOS as well.
It’s this custom yet simple design aesthetic seen in the app that carries throughout the whole of the app.
Custom but Simple
Obviously the main feature of Byword is the writing window. And, I’m pleased to say that it’s pretty much just a single text entry window. Unlike Byword on the Mac you cannot adjust the width of the text column, nor can you choose between light or dark themes.
The features and highlights of Byword on iOS include:
Typography: There are four typefaces to choose from. Two familiars — Georgia and Helvetica — and two custom fonts from the M+ outline family.
The Byword default typeface is “M+ C Type 1″. It’s a nice sans serif with monospace overtones, and I like it. The other custom typeface, “M+ M Type 1,” is a monotype font that I do not like. The other two, Georgia and Helvetica, I consider great for reading but I do not prefer to write with them.
TextExpander support: This is stellar. I have quite a few custom snippets I use in TextExpander on my Mac. The TextExpander iOS app can sync all your snippets via Dropbox so that whatever abbreviations and shortcuts you use on your Mac can also be used on your iPhone and iPad. And, though it’s not a system-wide availability on iOS like it is on the Mac, TextExpander for iOS can be utilized by other iOS apps if they wish. Simplenote takes advantage of this, as does Byword. And so, my TextExpander library is available to me when typing in Byword on my iPad or iPhone.
AirPrint: If you have an AirPrint-capable printer you can print your Byword document. If you don’t have an AirPrint printer, check out Printopia.
Word count: To give a little bit of breathing room at the bottom of the text-entry window there is a small footer. In the footer by default it displays the word count. Tap it and you can see character count instead. Tap it again and you get words + characters.
Custom Soft Keyboard Keys: Swipe the footer and you get a custom set of keyboard buttons. Including brackets, parens, and shortcuts for inserting Markdown links, images, headers, etc. As well as one-character-at-a-time cursor navigation.
Those familiar with iA Writer know that custom keyboard buttons are not a new idea. However, I’ve found that I don’t use Writer’s custom buttons all that often, yet they take up the full size of an additional row from the on-screen keyboard. And so I like the way that Byword has implemented its custom on-screen buttons because they are smaller, more subtle, and easily forgettable if you are not using them at the time (this is especially true of the iPhone app, where screen real estate is at a premium). But they are there when you need them. It’s good to see a useful feature like this implemented but re-thought out.

Worth noting is that the custom soft keyboard keys are not available when a Bluetooth keyboard is in use. When you’ve got a full-blown keyboard you don’t exactly need custom soft keys for inserting common Markdown syntax like brackets, asterisks, parenthesis, or pound signs, but it would be nice to have quick access to the link or image formatting.
Automatic list continuation: This is nice, and it’s something that bugs me when I’m typing in Simplenote, TextEdit, or iA Writer. When you start an ordered or unordered list in Byword then the next line is auto-formatted for the next list item. You don’t have to continually re-enter a new asterisk, dash, or number for each list item.
A Trick and Quibble Wrapped Up in One
There are a few quibbles I have with the iOS apps, and though I dedicate an inordinate amount of space to it in the below paragraphs, this is something I’m confident will be worked out in a near-future version of Byword.
The way Byword is designed, the settings button doesn’t show when the on-screen keyboard is brought up. This is because the entire top menu bar is intentionally hidden when you’re typing. This allows the most amount of space to be dedicated to your typing field as possible. Which is as it should be because when you’re working on a screen the size of an iPad, and especially the iPhone, you need as much space as possible to see the text you’re working with.
However, this makes for a bit of a quibble to get to a document’s settings, as well as being able to get to the list of documents.
On the iPad the only way to access the in-document settings is to hide the keyboard. When the cursor is active in the document then the Title Bar is hidden; when the cursor is not active the Title Bar is visible. On the iPhone there is no native key to hide the on-screen keyboard. Fortunately Byword provides one within the custom keyboard keys that are built in to the app. However, those custom keys are only visible if you swipe the word count over to the side to reveal the customized software keys.
Why not simply bring up the document’s Menu Bar (and thus the settings button) when the user taps within the text field?
Moreover, I discovered (while in the process of writing this review) that it can be quite tricky to get at the in-document settings when you are using a Bluetooth keyboard.
Since the Title Bar is hidden when you’re typing, you cannot “hide the keyboard” to disable the cursor. Thus, when typing with a Bluetooth keyboard, the only way I’ve found to get to the in-document settings is to swipe on the document from left to right. This will slide the active document over to the right and un-hide the document list. In the process the document’s Title Bar returns to views. Next, just tap the “3-bar” icon and the document will re-enter full-screen mode, but with the Title Bar still in view, and from there you can now see and tap on your current document settings.
This left-to-right swipe trick also works well as a shortcut on Byword’s iPhone and iPad apps even when not typing with a Bluetooth keyboard.
The Final Word
This review was written and edited exclusively in Byword.
I began this article on a Tuesday night from my iPhone around 11:30 pm while my son, Noah, was up for his late-night feeding. On Wednesday morning I picked up where I left off by opening Byword on my MacBook Air while in my office. After lunch, I grabbed my iPad and a Bluetooth keyboard and visited my favorite local coffee shop where a latte accompanied me as I finished the article.
This is exactly the sort of writing workflow that I’m looking to adopt.
That’s not to say I will always be writing articles in an assortment of locations and on a plethora of devices, but it’s nice to have a text editor on all of my gadgets that I enjoy using, and it’s nice that all my currently-working-on articles are now synced and easily accessible from within that application.
- I still use Simplenote + nvALT for all sorts of other snippets of text, running lists, etc. I’m just moving away from it for my long-form writing. ↵
✚
A Clear Review
Some people thrive on lists. They have lists for errands, groceries, chores, ideas, dog names, and so on. I am one such fellow. I keep lists to help me remember things, but also to help clear my mind. The moment when the need to make a list hits could be at any time.
For me, a good list app needs to be both fast and available. Clear is both of those while also managing to be unique and quite unconventional.
As any reader of this website knows, I am an avid user of OmniFocus. Any list I may jot down will eventually work its way into OmniFocus. But the biggest caveat with OmniFocus is its speed. It takes more than a few seconds to launch the iPhone app and enter something in. New OmniFocus items beg to be given contexts, projects, start dates, and due dates. While this is OmniFocus’s greatest strength, there are times when this is also OmniFocus’s greatest weakness.
And so there are two things I like about Clear:
As a list app it is fast to use and to navigate. It launches up very quickly, you can enter in a slew of items in no time, and you can get to a particular list very quickly as well.
As a man who simply has an affinity for fine software, Clear stands apart as a very unique and clever app. I dive into this a bit more in my review below, but even if you are not in the market for a new list app, Clear is worth checking out if only to experience its unique design and user interface.
Clear
Clear is a list app for the iPhone like no other. When you’re in the app you only see your color-based lists. Clear is an app without chrome or buttons or menu bars or metadata. Each item holds just 30 characters of text, and there are no due dates or notes or projects.
It has the underlying simplicity and ease of use that an app with just a white background and an unordered list of items would have. And yet, through the use of color and actions and gestures, clear has a surprising amount of life to it.
Clear is literally just pixels and gestures. But combined in just the right way to make an app that is a unique and clever blend of simplicity and spunk.
Action-Centric
Clear relies heavily on the use of color and gestures to navigate. It is very action-centric. Nearly all the gestures that you normally do on the iPhone — swiping up and down, left and right, pinching open and closed — are the ways that you navigate the app. The way Clear works is quite unconventional compared to other list apps, and yet all the actions feel natural because they are common gestures for anyone that’s used an iPhone for longer than their lunch break.
When you’re in a list, you pull the whole list down to create a new item at the top of the list. Or, if you want the new item inserted somewhere other than at the top you can pinch open the list and insert a new item anywhere you like.
Swiping left-to-right completes a task, swiping the opposite deletes it. Swiping left-to-right again on that task un-completes it. Pulling up on your list clears out all the crossed off items, and pinching the list closed takes you up a level to see the menu of all your currently active lists.
In addition to pulling down or pinching open, you can also add a new item to the list by tapping in the blank space underneath your list. A new list item “drops down” and you can then fill in its contents. If you want to quickly add a series of new items, then pull down from within the item creation pane. This is actually an extremely quick way to add new items to your list as fast as your thumbs can tap them out.
Even though Clear relies heavily on the iOS pinching gestures to navigate within lists and for adding new items, the app was still designed so that it can be used one-handed. For example, when pulling a list to add a new item, if you continue to pull down you will get an option to switch lists:

You can navigate through the whole app this way.
Despite its extreme reliance on gestures and actions, I found Clear to be surprisingly discoverable. And if that’s not enough, a brief pre-launch tutorial guides you through the first time you launch the app, and you’re even presented with a list of pre-populated to-do items which inform you how to use the app.
Colorful
Like I said, Clear is just pixels and gestures. The lists are color-based with the darker colors at the top to signify greater importance.
You can re-order items by tapping and holding to move them. And as you navigate through the different hierarchies of the app the colors change as well. The default color scheme has “red hot items” as the individual list pane, cool blue items as the pane showing all your lists, and then a cooler slate grey for the menu.
You can change your color scheme in the menu. There are red, green, pink, grey, and black themes. Also there may or may not be some easter eggs to be found in the app related to themes. But that’s all they’ll let me say.
Hierarchy
One of the things that instantly struck me was the spatial stacking that Clear uses to convey hierarchy.

A typical iOS app has a hierarchy that goes left to right. Meaning, the left-most pane is the highest level and the right-most pane is the furthest drilled down into the app. For example, in Mail if you hit the back button enough times your left-most pane will be the list of your mailboxes; as you move deeper into Mail it takes you to the panes that exist on the right until you get all the way into an individual message.
For Clear, the hierarchy goes top to bottom as you can see in the image above. Also worth noting is that Clear’s bottom-most pane is an individual list — you can not drill down to an individual item. Further emphasizing the forced simplicity of Clear.
This spatial stacking is different than the way most apps work, but because of Clear’s gesture-based navigation it really works well. When you are pulling down to add a new item, the bar for that item “folds up” as if coming from underneath. Likewise, when you pinch open for a new item in a list, the item folds open. The animations are quite clever and fit in well with the unique hierarchy structure of the app.
Clearclusion
For the connoisseurs of fine iOS app or list apps alike, Clear is definitely worth checking out. And it’s just a buck in the iTunes App Store.
✚
Tweetbot for iPad Review
Great design is often polarizing. When opinions about your design work seem to be either extremely positive or extremely negative then it’s likely that you’ve hit a home run.
And I can think of no other Twitter client that has received more polarized praise and criticism than Tweetbot. People seem to love it or hate it; very few are just “meh” about it.
I check Twitter on my iPhone an order of magnitude more than on my Mac and especially on my iPad. It’s no secret that I love Tweetbot. I’ve been using the iPhone app as my main Twitter client since late 2010 when the app was still in its early beta days.
Up until recently I have always used the “official” Twitter for iPad app. It always struck me as odd that an app on my iPhone (Tweetbot) could serve as a better twitter client than one on my iPad (Twitter). But now Tweetbot has an iPad version. And it rocks.
The most obvious differentiator between Tweetbot and other Twitter clients is that Tapbots-style of design. It permeates all of their apps and it is a part of their brand. But design for the sake of design is never enough.
No doubt that the vast majority of those who read this site are familiar with form-versus-function commandment: thou shall not let form trump function. The way an app works is far more important than the way an app looks.
Tweetbot is that rare bird of an app that carries an extremely strong and unique mix of both form and function.
Every single pixel is completely customized. The Tapbots color pallet of blue and black and grey with textures and gradients is prevalent throughout. So too, every sound is unique with the playful robotic sounds of clicks and swooshes.
But it doesn’t stop there. The amount of custom design in this app is only surpassed by the amount of functionality and usability tucked underneath those pixels.
Tweetbot, even with its extremely custom design, is still an app with greater function than form. Though the first thing you see is the custom designs done by Mark Jardine, and these are the pixels which are always before you when you use the app, what makes the app great is how functional it is.
Over time I’ve become so very used to Tweetbot’s functionality that it’s an app which has stuck on my iPhone’s Home screen since its beginning. And now it’s stuck on my iPad’s Home screen as well.
If you love Tweetbot on your iPhone, you’re going to love it for iPad. It carries all same power-user-friendly bells and whistles that the iPhone version has.
Here are a few of the iPad app’s features which stand out to me:
Tweetbot for iPad still treats lists as first class citizens. This is one of my favorite bits about the iPhone app and I am glad that on the iPad it is still easy to set lists as your main timeline view.
Reading articles via the in-app browser is fantastic. You get a full-screen browser along with that same awesome Readability / Instapaper mobilizer toggle that the iPhone app when in the in-app browser. Just flip the switch and you get a text-friendly layout of the site you’re on:
Tapping an Instagram or other linked image in your timeline darkens out the background and expands the image:
Composing a new tweet is a lot more spacious than the official Twitter client, and has the same quick-access buttons that Tweetbot for iPhone does:
Tweetbot for iPad is a power Twitter user’s best friend. It’s an ideal app for those who make good use of lists and who follow folks who post a lot of links to articles. You can still apply filters to mute certain users or hashtags, you can see your favorites, and retweets, and more.
I’ve been using it for the past several weeks and the more I use it the more I like it. Highly recommended.
✚
A Long-Time Apple Nerd’s Review of the Galaxy Nexus and First Experience With Android
For the past week I’ve been using a Galaxy Nexus on loan from Verizon as my primary phone.
The Galaxy Nexus is the Android world’s version of the iPhone 4S. The software on it is the latest and greatest version of Android, and the hardware is Google’s newest flagship phone made in conjunction with Samsung. As far as Google is concerned, right now, the device and software I have are the best yet. This is the best possible first impression Google could hope for me, an Apple nerd, to have of their products.
I say first impression because this is the first time I have spent longer than 5 minutes with an Android device. I’ve been using the new Nexus as my primary phone to do just about anything and everything I normally would use my iPhone for. Such as: make calls, send texts, check and post to Twitter and Path, listen to Rdio and Pandora, get directions, browse the Web, and read my RSS feeds.
There were things I could not do on the Nexus that I can do on my iPhone, but they were mostly limited to the 3rd-party iOS apps which are not not available on Android Market. Otherwise the Galaxy Nexus worked fine as my full-time phone. Now, if I was impressed and delighted by the hardware and software is another question.
Read on for my review of the Galaxy Nexus and my first impressions of Android.
I. The Galaxy Nexus (Hardware)
The Galaxy Nexus is one of just a few devices that currently run Android 4.0 (a.k.a. “Ice Cream Sandwich”; a.k.a. “ICS”). For me the bigger experience was Android, which I’ll get to later in the review. A device is only as great as the software that runs on it. Moreover, what is good or bad about the Galaxy Nexus as a hardware unit, is not necessarily indicative of what is good and bad about Android. If you don’t like the Nexus you can simply wait for another hardware device that you do like. But if you don’t like Android, then you need to look somewhere else altogether.
Speaking strictly of the hardware, my overall impression of the Galaxy Nexus is that it’s fine from afar, but it is far from fine.
Ironically, the biggest shortcomings of the Galaxy Nexus are also its most-hallmarked features: the screen size and its 4G LTE connectivity.
The 4.65-inch Screen
The screen of Galaxy Nexus is noticeably larger than the iPhone. In fact, it’s larger than any other phone I’ve held or even seen since the ’90s. Every single person I showed the phone to, their first comment was, this thing is huge.
The Nexus is just ever-so-slightly thicker than the iPhone 4S, and it is just ever-so-slightly heavier as well (144g and 141g respectively). But, despite it weighing more than the iPhone 4S, it actually feels lighter when holding the Nexus in one hand and the iPhone in the other.
The huge screen size of the Galaxy Nexus actually made me appreciate the smaller size of my iPhone even more. A smartphone is a mobile device. It is meant to go with you everywhere. It should fit in any pocket on your outfit, it should be tough, it should be easy to use for a few seconds or for several hours, it should have a battery that lasts for a long time, and it should be your favorite gadget because it’s the one that’s with you 24 hours a day.
I never got comfortable with the Galaxy Nexus. I cannot comfortably use the Nexus with one hand because it is just too big. It is too tall and too wide for a comfortable grip, and so the phone never feels balanced and safe in my hand. Professional basketball players may prefer the Galaxy Nexus and its 4.65-inch screen, but I prefer the size of the iPhone.
Not only is the screen of the Galaxy Nexus bigger than the iPhone, the screen technology in the Galaxy Nexus is also different. Both the iPhone and the Galaxy Nexus have gorgeous screens, and I never felt like the Galaxy Nexus had an inferior display — it was extremely crisp — but despite its high density, the Super AMOLED PenTile screen is not a true Retina display like the iPhone 4 and 4S is.
There are two types of Super AMOLED PenTile screens. One type is Super AMOLED plus, and one type is sans-plus. The Galaxy Nexus has a Super AMOLED display (no plus). Which means that it shares sub-pixels, thus even though text looks crisp and colors are bright, if I hold it up close to my eye it is easier to make out the pixels than on the iPhone 4/4S display. This display is nice, but it’s not Retina display nice.
Also, the screen does not do well with large spots of dark color. Dark-colored websites (such as this one) seemed to have textured backgrounds. So did dark apps.
The screen has an ever-so-slight curve to it that I don’t even notice when holding. The curve helps to make the phone more comfortable when held up to my ear when on a call, or when placed in my pocket. And I think it adds a nice aesthetic to the device.
Something else of note about the screen is that it does not have a home button on the bottom. After more than 4 years with an iPhone, I kept going for the Nexus’s Home button, but there is nothing there. To turn on the display you have to tap the “lock/unlock” button which is on the right-hand side of the device toward the top. To unlock the Lock Screen you then slide to unlock the phone, similar to iOS. (You can also use a slide-pattern or even facial recognition to unlock.)
Believe it or not (I bet you believe it), the Lock button and the slide-to-unlock tap target are too far apart from one another. This drove me nuts!
The phone is literally too big to easily and comfortably unlock with one hand. It’s so big, that to hold it in one hand where I can comfortably press the lock/unlock button I am holding the phone in the middle. But in that grip I cannot comfortably reach the slide to unlock slide. And so I would have to shimmy my hand down the phone to be able to reach the slide-to-unlock tap target. Or, I have to use the phone with two hands. It would be better if the “slide to unlock” icon were sitting right underneath the time/date on the Lock screen.
I unlock my iPhone dozens if not hundreds of times per day. It’s a muscle memory at this point and it is a piece of cake. Due to the size of the Galaxy Nexus and the placement of its Lock button, I don’t feel that I have a good solid grip on the phone when holding it in such a way that I can press the hardware lock button and also reach the slide-to-unlock tap target.
This gives the Galaxy Nexus an aura that makes me wonder if it’s supposed to be a tablet that makes phone calls or a phone that you need two hands to use. I realize that’s a goofy and exaggerated statement, but I exaggerate it to make a point I am serious about: the phone is simply too big.
If this were my full-time phone, I’d be sad. It never once was fun or comfortable to hold. I would not recommend this device simply on its size alone.
4G LTE (and therefore, Battery Life as well)
Download and upload speeds on 4G LTE can be crazy fast. When I ran the Speed Test app, the 4G gave me some relatively impressive numbers, with download speeds as fast as 10Mbps and uploads of 5.5Mbps. At times, some of the tests on the 4G network were actually faster than the test run when Wi-Fi was connected — though my 4G numbers were nothing compared to the 44Mbps down and 16Mbps up that Dwight Silverman saw. On average, however, the 4G speeds on Verizon’s LTE network turned out to be comparable to the 3G speeds of AT&T’s network (at least here at my house in Kansas City).
Here are the results from speed tests conducted at my home in Kansas City. These results are the average of 5 consecutive tests I ran using the SpeedTest.net app (which has both an Android and iOS version).
| Device | Connection | Ping (ms) | Down (Mbps) | Up (Mbps) |
| Nexus | Wi-Fi | 99 | 27.14 | 5.17 |
| iPhone 4S | Wi-Fi | 106 | 28.44 | 5.18 |
| Nexus | 4G LTE | 113 | 7.00 | 3.13 |
| iPhone 4S | 4G LTE | n/a | n/a | n/a |
| Nexus | 3G CDMA | 159 | 0.22 | 0.33 |
| iPhone 4S | 3G GSM | 229 | 4.34 | 1.68 |
The default of the Galaxy Nexus is to run on LTE and fallback on CDMA. But you can turn off the LTE connection altogether if you want. Which is your only hope if you like battery life.
I would assume that most Android users would like to have the option of being able to turn on or off the 4G connection at their discretion. Because it seems like that is what Android is all about: include lots of options and let the user decide what they want. You get good and bad with this because it means if you don’t like something about the OS you can probably find a hack or a 3rd-party solution to change it. But, on the other side of that coin, you get lots of design and functionality tradeoffs (both in hardware and in software).
Today, 4G LTE may be the quintessential functionality tradeoff. Fortunately you don’t have to leave the LTE connection enabled. Personally, I would like the option of 4G, but in normal day-to-day use of the Galaxy Nexus I would have the 4G connection disabled. I am usually around a hotspot and though the Verizon’s LTE network in Kansas City is pretty good it’s actually not mind-blowing.
With 4G simply being enabled, even if I am at home where I have Wi-Fi, and if I use the Nexus very little, the battery will be dead by the end of my day (about 10 hours). With 4G disabled the phone would last for more than 20 hours with light usage.
Here’s the crazy part: when I am actually using the 4G network for tasks — such as turn-by-turn navigation or video streaming — it will drain 1-percent or more of battery life per minute.
Now, the Galaxy Nexus takes about 90 minutes to charge from 0 to 100-percent when plugged into the wall. Thus, when using 4G data while plugged into the wall charger your battery is basically treading water. If the phone is plugged into a less-powerful power source (such as a USB hub or a car charger) then using 4G will actually drain your battery faster than the power source can charge it — though it will not drain at the same one-percent-per-minute speed.
Earlier this week I spent some time driving around Kansas City in order to field test the turn-by-turn navigation, the LTE network, and the battery life. At 11:30 AM I started out and the battery of the Nexus was at 43-percent. After 25 minutes the battery had drained down to 33-percent even though it was plugged into a car charger.
Think about that. If you’re on a road trip and want to use the 4G LTE network to provide you with driving directions, your drive had better be shorter than 4 hours because even when plugged into a car charger, the battery will not last.
To disable 4G LTE on the Nexus go to: Settings → More → Mobile Networks → Network mode → CDMA.
The Camera
It stinks. It reminds me of the camera on my 3GS.
Here are two pictures of our christmas tree, Doug VI. The one on the left was taken with the Nexus, the one on the right with my iPhone 4S. Both images are straight out of the phones with the default settings.

The lens on the Galaxy Nexus aside, the camera software on Android has some cool features. Including exposure control, silly video effects, and a clever panorama ability.
Hardware Miscellany
The Galaxy Nexus is glass and plastic. The Galaxy Nexus does not feel cheap, but it does feel lighter and less elegant than the iPhone. Of course, the plastic also helps contribute to the weight. I think if the Nexus were metal and glass like the iPhone it would be much too heavy.
As I mentioned earlier, there is no Home button on the front. This means, if the phone is on your desk and you want to turn on the display you have to grip it on both sides and press the unlock button. On the iPhone you can simply tap on the Home button. Also, this means if you pull the phone out of your pocket to quickly check the time or see a notification you have to hold the whole phone and balance it properly in order to hit the Lock button and turn on the display.
The Nexus has “vibrate on touch” on by default. This struck me as annoying at first, but after a few days I got quite used to it. Though I don’t miss it on my iPhone, it is a nice feature that helps with improved typing on the software keyboard.
The top of the phone got noticeably warm after being on a 15 minute phone call using the 4G LTE network.
To take a screenshot you press and hold the Lock button and the volume down button. I had to do a quick Google search to figure this out. But apparently screenshots have not always been so easy on Android in the past. I got a lot of comments on Twitter asking how I figured out how to take a screenshot.
What I also like about the way Android 4.0 handles screenshots is that they go into the Notification Center. If you take a screenshot that you want to use immediately you can swipe down the Notification Center, tap on the screenshot and then act on it.
There is no branding on the front of the device. The Typography and layout of the lock screen is pretty cool.
The small, LED notification indicator that pulses on the bottom of the screen is a nice touch. It flashes different colors for different apps that are causing the notification. The colors I’ve seen are white, blue, and yellow. So far as I can tell:
- White = new email, an update is available for an app, and/or a new message
- Blue = Official Twitter app
- Yellow = TweetDeck
The speaker is pitiful. For such a large screen you would think that the device is primed for media. But it’s not. Even in my quiet living room I could barely make out dialog in a movie. Music streaming was at best light background music. If you plan on using the Nexus to watch movies, keep your earbuds nearby.
Who’s Fighting For the Users?
In short, the Galaxy Nexus seems more like a phone that its makers can brag about making rather than a device that its users would brag about owning. It has all sorts of features that seem great on posters and billboards and board meeting reports, but none of those features enhance the actual user experience.
II. Android 4.0 (Software)
As I mentioned, this is my first long-term exposure to Android. There are several great things about Android that I like, and there are several things about it which drove me bonkers. Some are related to the user experience and some are related to the design and aesthetics of Ice Cream Sandwich.
Android is jam packed with options and customizability. In some cases, these extra options are great. For example, the alarms app and its ability to set multiple repeating alarms, or the battery detail page within the Settings app. But in some cases the extra options seemed annoying .
What can I do on Android that I cannot do on iOS?
Since I’ve been using an iPhone since 2007, it’s easy to list off the slew of functions, features, and 3rd-party apps I’ve grown to rely on over the past four and a half years. But other than the apps, what about Android is different? I asked this question on Twitter, and along with some of my own observations, put together this short list of some of the highest-level things that set Android apart from iOS (not including the two different app store ecosystems).
Side load apps. This means you don’t have to get your apps via the Android Market. There are pros and cons to this of course. It means you can load any app you want. How many average users do this though?
Widgets on the home screen. This is one of my favorite features of Android. I have a clock widget, a weather widget, and a quick settings widget that lets me toggle on/off the Wi-Fi, Bluetooth, GPS, and screen rotation lock, and brightness levels. I like how the Android Home screen feels open and functional — it is more than just a springboard.
Apps are not silos. They can share information with one another and offer services. If you’re in the photos app and you choose to “share” this photo, any app on your phone that can do something with that image is available on the share list. You can mail it, tweet it, paste it into a note, send it as a text message, post it to Path, upload to Picasa, etc. The limit is only the amount of apps you have installed.
You can replace system apps and services with 3rd party apps, such as the Keyboard (example: Swype).
Tight integration with Google, and the Google apps are pretty swell — Google Voice, Gmail, navigation, maps — these are all some of the best apps on Android. I use Gmail pretty much like IMAP, so having a native Gmail client on my phone doesn’t have any extra appeal to me.
Android Market and 3rd-Party Apps
Speaking of 3rd-party apps, this is where you can really get locked in to one mobile operating system or another. If you’ve been using one platform for a while you begin to rely on many of the 3rd-party apps that are found on that platform. It’s one thing to learn a new operating system, it is another thing altogether to change your daily workflow and habits because the apps you’ve grown accustomed to no longer exist on your new device.
The Android Market is certainly full of apps, and it gets a lot of traffic. Twitter for Android, for example, has been downloaded more than 10,000,000 times.
To use the market you have to have a Google account. When you search for an app a list of common search terms begins to populate. When you get to an app’s page in the Market you see how many downloads it has had and how many ratings it has. When you download an app you are shown what the app’s permissions are (i.e. what it can access and modify on your phone). For free apps, there is no need to authenticate every time you download an app.
I did not find a single 3rd-party Android app that I felt had the same spit and polish to it as my favorite iOS apps. The Google maps and turn-by-turn voice navigation app were both very impressive, but these are not 3rd-party.
My favorite 3rd-party Android apps were Path and Rdio (which also happen to be iOS apps).
The Difference of iOS Apps That Have Android Versions
Twitter: The first thing I noticed about the Twitter app was the poor scrolling, and the jankiness when I pulled down to refresh. However, I think this speaks more of Twitter and perhaps less of the entire Android OS because most of the native Android apps scroll very smoothly.
The official Twitter app does not have an in-app web browser. Thus, links to websites open in the Android browser app. To get back to the main Twitter timeline from a link in an individual tweet means I have to press the Android OS Back button about 4 or 5 times (due to the
t.coredirects). Sometimes though I would’t be able to get back at all because the Back button wouldn’t switch me back out of the browser app and back into the Twitter app.Path: Path is another app that has an iOS counterpart. There are many things about Path and Twitter that are different on their Android versions than on their iOS versions. For instance, if you’ve used Path then you know how your cover image moves a bit if you pull down on your timeline. On Android the timeline and cover image are static once you reach the “top”. Also the text is much smaller in the Android version than it is on iOS.
Rdio: I was pleasantly surprised to find Rdio in the Android Market. It is a fine app on Android and works great.
Square: Another iOS app that also exists on Android. There are more than just these 4 I’m sure.
The Back, Home, and App Switching Buttons
My motto for using the Galaxy Nexus became: “When in doubt, hit the back button.”
When launching an app, nearly every one would place me on the screen that I left it. I would get to an app (such as the settings or email or Twitter) and not be at the “first” screen in that app. If it had been a day or so since last coming into the app I may not have known exactly why I wasn’t looking at the starting screen for that app and so I would simply hit the Back button and see where that got me. Sometimes it would kick me back to the Home screen. Sometimes into another app. And sometimes to the previous page in the app. I’m still not sure I know what the Back button does exactly.
The Home button works as advertised. Tapping it would take you home. Personally, never did get used to this being a software button. I am so used to the hardware Home button on the iPhone, and I often find it through tactile feedback. The Galaxy Nexus’s software home button has to be seen to be touched.
I have read many past reviews about the maddening placement of the home button and how dangerously close to the space bar it is. People would be typing and accidentally hit the home button and be kicked out of their work. I never once had this problem.
The App Switching Button also works as advertised. And is actually one of my favorite little features and UI designs on Android OS. Let’s talk more about it…
App Switching
The fast-app switcher in Android 4.0 is awesome. I love the way it pops up over the screen and shows the screenshots of the apps. I also like how you can swipe an app off the screen to end its background process.
On the other hand, when switching between apps from within apps there is no tip-off within Android to let you know that you’ve switched apps. In iOS this is done by an animations that shows one app’s window moving over and off the screen as another app’s window comes in from behind. You know that you’ve switched to a new app. But in Android there is no such animation.
For example: in TweetDeck and in the Google RSS reader, links to websites would open in the browser app, not the app I was in. There was no animation for it and so I didn’t know I was in the browser app. And so hitting the “Back” button would then take me back to the Web page I had last been on in the browser app, not the screen I was last at in the previous app.
Regarding Options
Android strikes me as an operating system that greatly values having a plethora of options and choice. In fact, if I had to sum up all I’ve learned about Android over the past week it would be about the high value placed on being able to customize your phone.
Compared to Android I can see why iOS seems so “closed” to some people. iOS values simplicity and refinement over tweakability.
Android has options for just about everything. But, in spite of all its options and ability to customize, I didn’t find Android to be more powerful than iOS. Of all the options and choices that I was given by Android, there was nothing in Android that I could not also accomplish on iOS. In fact, the options and choices usually got in my way.
Moreover, of the millions of users on Android, how many exercise this freedom of choice that is a part of the Android OS?
UI Miscellany
I do like the overall “transparent look” of the Android operating system windows. Such as the way the notification panel is semi-transparent over what’s in the background, and the way the fast-app switcher is also semi-transparent.
And I especially love the Android Home screen. Something I have always liked about Android are the way the wallpapers work on the Home screens. Not only the live wallpapers (which I quite enjoy), but also the way that even a static wallpaper will slide slightly in the background as you navigate left and right to different home screens.
I like that you can install widgets on the Home screen that allow you to do certain tasks and access certain settings. I like how many of the Home screen icons are smaller and are not all the exact same square shape with rounded edges. In fact, after using Android my iPhone Home screen felt a bit crowded.
Moreover, on Android your main home screen isn’t the left-most screen. I do not use Spotlight in iOS that often and wouldn’t mind it being two screens to the left.
The Keyboard
One benefit of the larger screen on the Nexus is that it makes for plenty of room to accommodate the keyboard. The Keyboard is one of the nicest things about Android. It felt responsive and easy to tap-type on. It autocorrected nearly perfectly every time. And, most of all, the auto-correct and quick-access bar (or whatever it is called) that sits above the QWERTY keys quickly became an invaluable tool that helped with typing.

Notifications
The way Android handles notifications is excellent. On Android 4.0 the notification only takes over the very top status bar. It is much less graphically driven and is a simple text update. On iOS 5, if you are using it when a notification pops up, it hijacks two rows worth of space on the top of the screen. I like the Android way of doing notifications better.
Scrolling
Scrolling on the Nexus is, for the most part, very fast. Websites that have loaded, list views in native apps and some 3rd-party apps — they all have smooth and fast scrolling. The official Twitter app for Android however is a turd when it comes to scrolling. This is unfortunate because there are no great Twitter clients for Android. In fact, the Twitter mobile website scrolls better on Android than the native Twitter app.
Though Android is responsive, the overall UI still doesn’t feel fast to me. Because it’s not an issue of responsiveness but rather of consistency in design. I can fly through iOS because it’s both responsive and consistent. Android 4.0 on the Galaxy Nexus is responsive, but there are things about it that are inconsistent or confusing. Often times the same actions (such as sharing) in different apps use different buttons stashed away in different places.
Also, the size of the screen really does make a difference. As I’ve said before, I simply cannot easily use the Galaxy Nexus with one hand. That’s not a fault of Android, rather it’s an issue with the Galaxy Nexus hardware. But it does mean the device is slower to use because I cannot get a comfortable grip on it where I can access the whole screen with one hand.
Scrolling a website, like in webOS, is handled better on iOS than on Android. Take a look at this chart I drew comparing scroll behavior in webOS against iOS. Substitute “Android” for “webOS” and the chart is still relevant.
You cannot tap on the top status bar to scroll to the top of the screen. So far as I know, the only way to scroll to the top is to swipe, swipe, swipe. This is a feature of iOS I use all the time.
When you reach the top or bottom of a scroll view a glowing light appears. The scroll view does not rubber band like on iOS. The same goes for left-to-right scrolling. But not so in the Apps and Widgets adder. When I reached the end of the list of pages, the final page acted as if it wanted to turn but could not.
Final Verdict
Android should be reserved for those who know what they are getting into. If someone I know needs a recommendation for what smart phone to get, I would not recommend Android to them.
To those who want to use Android, I say go for it. I don’t think that choice is wrong — there are many fine things about the Android OS and many things it does differently and better than iOS. I can understand how tech-savvy power-users who know what they are getting into would like Android. For them, the trade-offs in certain areas are a welcome sacrifice in exchange for the customizability, the different look, and the plethora of hardware devices to choose from. At the OS level, Android is certainly much more customizable than iOS (you can install a 3rd party keyboard if you don’t like the system’s default one), you can put widgets on the Home screens, and the turn-by-turn voice navigation is killer.
But my overall impression after using Android for a week was that of being underwhelmed. Though the operating system is functional and advanced in certain areas, it still has an overarching feel of still being immature. Moreover, there was nothing on Android that made me feel more empowered compared to using my iPhone.
Sure, there are bits of the Android OS that I like and appreciate, but never once was I wowed or delighted. Which is unfortunate, because those are important elements when you are using a device day in and day out every day of the year.
More software and hardware reviews here.
✚
A Review of the Doxie Go
Disclosure: The folks at Doxie sent me this Go as a gift. No review was promised to them in exchange for me receiving it. The words below are, as always, my honest and sincere opinion.
The Review
The biggest draw of the Doxie Go is that it’s cordless, or rather, that it’s battery powered. Cordless does not mean wireless. You do need a micro-USB cable to charge it, and the USB cable is the default way of getting your scans off the Go and onto your computer.
The Doxie Go can scan about 100 pages before the battery needs recharging. And the internal storage will hold at least 6 times that amount.
The idea behind the Go is exactly what the name hints at. The Go is a portable scanner that you can take with you. And while I don’t have a need for a portable scanner — my other scanner is an iPhone — I do like the idea of an attractive, small-yet-powerful, cordless scanner as part of my office setup.
The Go is small and attractive enough to warrant being kept on a desk top, but it is small enough to be kept in a drawer or on a shelf. And since it needs no wires to be able to function, you really can keep it anywhere you like.
Compared to the original Doxie, the Go weighs 4 ounces more but is an inch narrower. The Go is also cordless and has a much more attractive design (no pink, no hearts (no offense, Doxie)).

The Go scans color as well as black and white. The default resolution is 300 dpi, but you can also choose to scan a document at 600 dpi by a tap of the power button. (Hold the button down and you’ll turn the Go off.)
You copy files from the Go onto your computer in batch. You plug in the USB cable (or you can connect a USB thumb drive or photo card to the Go) and then import the files via Doxie’s own Mac app.
The Doxie software is akin to a simplified iPhoto. I don’t know why, but I half expected the Doxie Mac app to be found wanting. To my delight, I found it was quite the opposite. The app is easy to use, minimal, and it makes importing a cinch.
I’m more than pleased with the quality of the 300-dpi scanned documents. Once the files are imported you can quickly and easily make adjustments if you need to, but I found the auto adjustments that the Doxie app makes were often perfect the first time. If the app auto-adjusts incorrectly, you can re-adjust manually.
It is also relatively easy to name your files (since the scanner doesn’t know what to name them). A clever idea once OCR is implemented would be to auto name the file based on the first line of the document scanned.
The Go treats every single scanned page as it’s own document. And so, within the app is a vital function: you can select multiple files and then “staple” them together with a click. It could not be easier to join multiple scans into a single PDF document.
You can save the scans to you computer or just leave the files in the Doxie app. Unsaved Doxie scans stay in the Doxie app whereas saved scans can be removed from the app when you quit or kept in there indefinitely. You cannot import documents from your computer into the Doxie app. Thus, once you remove a scan from the Doxie app there is no way to get it back into the app other than printing it out and re-scanning it in.
I prefer to save my scans as PDFs. Mostly because I am scanning in documents that I no longer have to keep in a filing cabinet. The default when you hit Command+S is to save as a JPEG. However, Shift+Command+S is the hotkey for Save as PDF, and Option+Command+S for save as a PNG. I like Saving as a PDF because PDFpen can then OCR the document and then I save in Yojimbo. It’s amazing how once a PDF has been OCRed the contents of that PDF are completely searchable. It makes going paperless seem like a no-brainer.
And in my estimation, the Go’s file sizes are quite reasonable. A PDF of my 8.5×14″ Car Insurance Declarations page scanned at 300 dpi, saved at medium-quality, and then OCRed via PDFpen, weighed in at 1.2 megabytes. That is certainly more than a PDF from the source, but it is not bad for a large page that is high-resolution and has searchable, selectable, text.
Welcome to your new paperless office, Shawn.
✚
Simple Social Networks
The apps I use the most tend to be apps that do one thing well. No doubt the vast majority of those reading this opening paragraph are of that same disposition. Instead of using apps which do lots of things fairly well, I much prefer to use apps that do just one thing and do so very well.
Simplenote is a prime example. It’s a note-taking app that syncs across all your devices. And it does this task exceptionally well. Dropbox is another example: it will sync the main Dropbox folder with any other computer you have Dropbox installed on. Another example: Yojimbo. Hands down, the finest Anything Bucket out there.
What is now growing as a new type of “thing” is social networks which are built around a singular idea and which implement that idea very well.
Twitter was one of the first examples of this, and is now certainly the most prominent. It has grown a bit more complex since it first began several years ago, but the premise is unchanged: what are you doing? Answer that question in under 140 characters and you can use Twitter.
Instagram is another prime example of a simple social network. The only function of the app and its integrated social network is to post pictures. You have fun with it by applying semi-cheesy filters and exaggerated tilt-shift blurs, but there is little complexity beyond posting your own pics and then liking and commenting on other people’s pics.
I believe it is their simplicity that makes social networks like Twitter and Instagram sticky. If a service is easy to use, people are more likely to use it. The more complex it is, the less likely people are to use it.
Obviously there are additional and very significant things which make social networks appealing, such as the ability to share and connect with friends and family members. But I like how the forced brevity of Twitter and the forced cheesiness of Instagram help to remove the potential for self censorship. The constraints of these social networks also turn into a game — or challenge — for users who adopt the goal of tweeting deeply meaningful or hilarious things or ‘gramming beautiful images.
Stamped is another simple social network. It is more like Instagram than Twitter in that: (a) it currently exists only on the iPhone; and (b) the social network and the iPhone app are one and the same.
I downloaded Stamped last week when it came out and it quickly worked it’s way onto my iPhone’s Home screen, right next to Instagram. I love the simple concept of Stamped: you pick something you like and you stamp it with your stamp of approval. What Twitter is to status updates, Stamped is to our favorite things in life.
Pros
It’s not the simplicity in and of itself that appeals to me. I like the whole idea of the Stamped app. I enjoy stamping things that I like. Who doesn’t?
Beyond that, there are a few things in particular which stand out to me as great:
The Design: You cannot launch the app without instantly noticing the design. Every pixel seems as if it were put in place with precise intent. The use of color, type, and layout is extraordinary. The interface of Stamped goes a long way in making the app easier to use and more enjoyable.
The To-Dos: When you come across something new that your friend has stamped, you can add it as a to-do (maybe its a book you want to read or a restaurant you want to check out next time you’re in San Francisco). This is one of my favorite features of Stamped, and is a clear sign that the people who designed this app actually use it as well.
The way your To-Do list works is simple: (a) someone you’re following Stamps something you’ve never heard of (could be a movie, a book, a band, a restaurant, or something totally obscure); (b) you decide you want to check it out; and (c) you add it as a To-Do item.
Right now I have 9 To-Dos in Stamped. A few movies, a few books, a restaurant in San Francisco, a Web app, and a kitchen appliance.
The Liberation of Simplicity: There are no rules for what you can stamp. On Thanksgiving Day people were stamping things like “after-lunch nap” and “pumpkin pie”. Stamped is set up in such a way as to encourage the stamping of whatever suits your fancy. It can be as serious as your favorite book, or as lighthearted as a 2nd cup of coffee on a Wednesday morning. There are no rules.
Cons
I do have a few quibbles with the app.
New User Discovery: One thing I don’t like about the app is how difficult it is to discover new people to follow. If I don’t follow you on Twitter or if you are not in my iPhone’s contact list then the chances of me finding you are slim to none.
I don’t just want to follow my friends, I also want to follow people who have impeccable taste. Who in Kansas City knows the best restaurants? Who has the same taste in movies as me but gets out more often? Who reads a lot of fabulous books? Those too are the people I want to follow on Stamped.
How can Stamped solve this problem? Perhaps give us the ability to stamp a user. Or, when viewing someone’s profile, show a descending list of who they give the most credits to. Just like there are people on Twitter that I don’t follow on Instagram, and vice versa, how do I find the great users in Stamped whom I don’t yet know are there?
No Business Model, Yet: Build a big and happy user base now, figure out how to sustain the business later. That seems to be the business model of choice for many new startups. It was Twitter’s business model, it is Instagram’s, and it is Stamped’s as well.
However, I did notice that Stamped has one source of income: affiliate links. When a book or a DVD is stamped and can be purchased on Amazon, then a Buy Now button will show up on that item’s detail page within the App. Tapping “Buy Now” will launch you over to the Amazon site with Stamped’s affiliate ID in the URL.
Also I’ve noticed that if it’s a movie which is playing in theaters, then you can get tickets via Fandango. Tapping to buy a movie ticket will kick you through a Commission Junction domain.I have absolutely no problem with affiliate links. I think the feature of being able to find and buy a Stamped item right from within the app is a great idea. And so if you’re going to be linking to Amazon anyway, there’s no reason not to do so via an affiliate link. It’s a clever and non-invasive way to make a few extra bucks from the app. However, affiliate links require a lot of traffic to generate even a modest income, and they are not Stamped’s primary plan for income.
I emailed the guys at Stamped to ask them if there were any planned sources of revenue beyond the affiliate links. CEO and Co-Founder, Robby Stein, wrote me back, saying:
Right now, we are 100% focused on building a product that our users love. We will continue to look at revenue opportunities that make the product more useful by allowing people to easily go try what’s been stamped, but don’t have any specific plans right now.
Building a large and happy user base is much easier when your product is free. But monetizing later on can be tricky. There are pros and cons to both strategies, and so I hope Stamped has wild success.
Stamping Stamped
One of the first things I stamped in Stamped was Stamped, Inc.
I very much love the categories that this app slash social network is in. It is a simple social network, and, though it is Web based, it is not a Web app. I much prefer native apps over Web apps (on the desktop and on mobile). I also prefer apps which are simple and do just one thing. Stamped is a blend of both, and I think it has a lot of potential to be very fun.
✚
The Kindle Touch
A few days ago, a lightweight cardboard box was delivered to the doorstep, and in it was the first Kindle I’ve ever owned: an Amazon Kindle Touch. Not only is this the first Kindle to take residence in the Blanc household, this is the first Kindle I have ever held in my hand. I’ve seen them in passing at Best Buys, coffee shops, and airplanes, but never have I picked one up, held it in my hand, and read.
I was familiar enough with the Kindle to know that it is lightweight and great for reading. I knew that they are famous for how effortlessly you can hold it with one hand and how great the E Ink text is for reading.
For the past year and a half I’ve been reading books on my iPad and never felt a need for a Kindle. However, after now using the Kindle Touch for several hours a day over the past few days, I feel as if all the accolades I ever heard about the Kindle were vast understatements.

Hardware
Hardware-wise, the Kindle Touch has several positive things going for it. Most notably:
Size: The Kindle is small and lightweight; easy to hold with one hand and read for long periods of time.
Battery life: Extremely long battery life; rarely do you need to consider charging it.
Touchscreen interface: The only buttons are a lock/wake button and a Home button; the touch UI (though slow to respond in heavy-input areas such as the Home screen or the Kindle Store due to the nature of E Ink) feels natural and is easy to use.
Let’s dive a bit deeper into a few of these:
Size
After using only an iPad for reading ebooks over the past 18 months, it’s impossible not to noticed how incredibly small and light the Kindle Touch is. Moreover, the Kindle’s smallness and lightness are accentuated by a sturdy build and an attractive, simple design. It’s small and light but not cheap or flimsy.
My Kindle weighs 7.375 ounces. The custom box it shipped in, with the Kindle and all other contents still inside, weighed a mere 14 ounces. My iPad alone weighs 1 pound, 6 ounces.
Upon opening up the top of the box the Kindle is sitting there with a plastic sheet attached to the front of the device. There is an image which demonstrates you should plug your Kindle into a computer. When I peeled off the plastic I found that the image was actually being displayed by the screen. I did a double take because it looked so much like a printed image and not like something electronically displayed using a screen.
I plugged the Kindle into my MacBook Air and let it charge. When charging, a small yellow light is on. Once charged, that light turns green. It took about 90 minutes via the USB plug on my MacBook Air to get the Kindle fully charged.

While charging, I registered my Kindle with ease by simply by typing in my Amazon.com email and password into the device. Then I spent some time browsing the Kindle Store, buying a couple books which I am currently reading in iBooks. It’s unfortunate that I’ll have to finish all the iBookstore books I’m reading. The cost of buying those books again just so I can read them on the Kindle Touch is not something I want to do.
Holding, Reading, and Turning Pages
The iPad just cannot be held with one hand. Its weight, size, and slippery aluminum back all force the use of two hands or one hand and a prop. That is not to say the iPad is awkwardly heavy, but it’s not easily held up with two hands for a long time (such as an hour or more).
The Kindle, however, is extremely easy to hold with one hand thanks to its weight, size, and grippy plastic back.
Naturally, when holding the Kindle one-handed, it’s important to be able to progress to the next page without requiring two hands. The past Kindles, and the new D-Pad Kindle, all do this by placing hardware page-turning buttons on both sides of the Kindle. When holding the device (regardless of which hand) you can easily rock your thumb over the button and turn the page.
The Kindle Touch has no such hardware buttons. I was fearful that the lack of buttons would make it difficult to turn pages when holding the device with just one hand. Fortunately that is not the case.
The screen of the Kindle sits about an eighth of an inch deeper than plastic bezel surrounding it. I have found it very easy to simply roll my thumb over the edge and onto the touch screen, and this is all that’s needed to activate a page turn.

However, if you are holding the Kindle in your left hand, rolling your thumb onto the screen will turn the page back, not forward. That is because the left-hand side of the screen is the touch target for previous pages.

Of course, as you can see in the image above, the touch target for turning to the next page is significantly larger than for the previous page. And so, for the times I am holding the Kindle in my left hand, I can still turn to the next page by using my left pinky to support the bottom of the Kindle and then move my thumb over half an inch to reach the touch target for the next page.
Also worth noting is that swipe gestures will turn the pages as well. Left-to-right for the previous page; right-to-left for the next.
The Screen
I had two fears related to the Kindle Touch’s screen: (a) that without the hardware page-turn buttons it would not be easy to turn pages while holding the Kindle in one hand; and (b) that it would gather all sorts of fingerprints and muddy up the reading experience.
Both of those fears, however, were unwarranted. As I mentioned above, turning pages on the Kindle Touch is no trouble whatsoever.
Regarding fingerprints, the Kindle’s touch screen is not a fingerprint magnet. The screen is very matte — like the matte screens on Apple’s laptops from yesteryear but even more matte than that. The screen on the Kindle touch is the least fingerprint attracting screen in my house. Certainly more than the glass on my iPhone and iPad.
A third issue that I’ve heard people talking about is the new way that pages refresh. Now, instead of the full-on black-to-white blink that the Kindle used to do between every page turn, the page only blinks once every 6 page turns. This supposedly causes an increase in E Ink artifacts which get slightly left over from page to page. But with my naked eye I barely tell the difference at all between the sixth page just before the Kindle blinks, and the seventh page just after a blink.
Regarding the E Ink screen, I am still not used to just how kind E Ink is on the eyes. I have read for many, many hours on my iPad and have never thought anything of it. Perhaps my appreciation will wear off a bit once I become more used to the Kindle or when the iPad ships with a Retina display. But after three days with the Kindle I am still very appreciative of its screen.
The only disadvantage to the Kindle’s screen is that there is no light for it whatsoever. I often read through my Instapaper queue or a few chapters of a book when in bed before I go to sleep. But the lights are usually out and I rely on the self-lit screen of the iPad to read in the dark. The Kindle will not be able to replace my iPad for these times of reading.
You can get clip on lights, but I wonder why Amazon hasn’t incorporated something similar to the Timex Indiglo backlight system? Or, why not put a dozen small LED lights around the inner edges of the screen that could illuminate it.
Software
Not only have I found the hardware of the Kindle Touch to be impressive, but so also the software.
Touch-Based OS
I ordered the Kindle Touch rather than the D-Pad Kindle because I was anticipating that the touch screen and its user interaction would be more natural and convenient than using the physical controller.
Of course, I haven’t actually used the non-touch Kindle and its D-Pad controller, and so I can’t fairly judge one over the other. But I can say that the interacting with the Kindle Touch OS has been just fine.
Though the UI is designed for touch input, I still haven’t fully acclimated to the concept of touching the E Ink device. The screen does not look like the backlit touch screens I have been using for the past 4 and a half years. The Kindle looks like an actual printed page, not a screen. And since the display is not manipulated by touch input the same way an iOS device is, I don’t always feel like I’m supposed to be touching the display.
But, despite its vast differences when compared to any other touchscreen device I have used, the Kindle Touch only has one caveat in my opinion: There is no immediate feedback upon tapping a touch target.
On the iPad, tapping a button or a link will cause the state to change as if you’ve truly pressed that button. On the Kindle there is on immediate feedback, you simply wait for a second, and then the screen refreshes to display whatever it is you activated via your touch. (Note that page turns are quite speedy.)
But there are a set of buttons which do show an immediate change of state when tapped: the keyboard. When typing, the keyboard buttons turn black underneath your finger taps. No other buttons in the Kindle OS do this.
And, speaking of typing, I don’t find it difficult at all on the Kindle’s soft keyboard.

Lastly, in addition to tapping buttons and items, you also use scroll gestures to navigate lists or pages. You can swipe your finger from top to bottom or bottom to top on the list view as if you were scrolling it and the list view will refresh with the items moved in the direction of your swipe.
It is a much different feeling compared to iOS where you feel as if your finger is literally manipulating the pixels you are touching. But it is something that I quickly got used to. And, considering the limits of E Ink, I think the way the touch interface works and responds is completely fine. It’s different, but not worse.
Instapaper
Amazon gives you an email address for your Kindle. You can then send articles and documents to your Kindle via that Kindle email address.
Instapaper uses this as a way to send you the 20 most recent items in your queue every 24 hours. You cannot archive or favorite the articles, you can only read them in their purest form: a personally-curated periodical.
Does Instapaper on the Kindle even come close to comparing to Instapaper on the iPad or iPhone? No way. Is it nice to have it there? You bet. Even though I know Marco won’t do it, I’ll still say it: a native Instapaper app for the Kindle would be awesome.
The Kindle Store
Shopping for books, magazines, and newspapers on the Kindle Store is extremely easy. When you find a book you like it’s just one tap to buy and the download begins in the background immediately. If you didn’t mean to purchase an item you are given the opportunity to cancel your order.
The Kindle Lending Library
When I was on Amazon.com making some adjustments to my Kindle options, I went ahead and set up a free one-month trial of Amazon Prime so I could check out the Kindle lending library.
Basically, if a book is available to borrow for free it will say so on the book’s page in the Kindle store. If you are a member of Amazon Prime then you can go ahead and borrow that book. But, alas, right now it sounds cooler than it is.
The Lending Library works like this:
- You can borrow up to one book per month. This limit is not a big deal for me because I cannot remember the last time I finished more than one book in a month. Also worth noting is that it’s one book per calendar month, not one book per 30 days. If you borrow a book on November 30, you can borrow again on December 1.
- You can only borrow one book at a time. So even if it is a new month, you cannot borrow another book unless you’re ready to give up the one you’re currently borrowing (previously borrowed books are removed once a new one is downloaded).
- The Lending Library is sparsely populated. As of today, there are 5,464 total Kindle Books available in the Lending Library. However, there are 1,078,735 total Kindle Books. Which means that just one-half of one-percent of the total Kindle eBook selection is available to borrow. This is due in a large part to the fact that the Big Six publishers (Random House, Simon & Schuster, Penguin, HarperCollins, Hachette, and Macmillan) have not joined the program.
To get to the Kindle Lending Library you go to the Kindle Store home page, tap “All Categories” (which is just under the Menu button), and then tap “Kindle Owners’ Lending Library”. From there you can browse all the items in the Lending Library.
When you find a book is just like buying it for $0. You get an email receipt from Amazon thanking you for your purchase, yet the cost is $0.00.
Right now I am borrowing Do the Work by Steven Pressfield. It is great to see that the books published under Seth Godin’s Domino Project are available on the Lending Library.
Newspaper Subscriptions
I signed up for a free, 14-day trial subscription of The Denver Post, The New York Times, and The Wall Street Journal. Since then, each morning they all 3 have been updated and then automatically moved to the top of my Home screen’s list of items, sitting there just waiting to be read.
Maybe it’s just the honeymoon period of a new device, but having the day’s newspapers pre-downloaded and waiting for me on my Kindle when I get up is pretty darn cool.
But where did yesterday’s papers go? Well, down the list on the Home screen there is an item called “Periodicals: Back Issues”, and it holds the previous issues. So the old ones are never gone, but are always out of the way when the new ones download.
Magazine Subscriptions
The Kindle store has 133 different magazine titles. The top 10 most popular include Reader’s Digest (at number 1), The Economist, The New Yorker, Time, and others. Up until yesterday I was completely unaware of the availability of magazines on the Kindle. I naively thought that when many of these magazines came to the iPad it was their first venture into the non-printed space beyond the World Wide Web.
I subscribed to a free 14-day trial of The New Yorker. The visual layout of the magazine is completely forgone on the Kindle and you get a Kindle-optimized text-version instead. And it would seem that the price reflects the text-only versions. In the Kindle store, a single issue of The New Yorker costs $3.99, and a monthly subscription is $2.99/month; on the iPad, The New Yorker costs is $4.99 and $5.99 respectively.
Special Offers & Sponsored Screensavers
I bought the $99 Kindle Touch with special offers, and so the bottom-half-inch of my Home screen displays an ad. At first I didn’t think this would be a big deal because I expected: (a) that I wouldn’t be spending a lot of time on the Home screen; and (b) even when I would be on the Home screen the ads are minimal and unobtrusive.
However, after a few days with the device the home screen ads feel more intrusive than I thought they would. I think, in part, because not all the content which is on my Kindle is displayed on the first page of the Home screen. And, knowing that there is additional books and periodicals further down the page, it seems that the (albeit minimal) ad is in the way. Or, put another way, it feels more like one of those ads which are right in the middle of two paragraphs of text on a website, rather than an ad on the sidebar.
You can pay Amazon to remove the ads by “Unsubscribing from Special Offers & Sponsored Screensavers” by paying the difference of your subsidized purchase: $30 for the plain Kindle and $40 for the Kindle Touch.
Playing MP3s
The Kindle can play MP3 files, and only MP3s, that you transfer to it.
You transfer the MP3s onto the Kindle when it’s plugged into your computer. To play them go to the Home screen and tap Menu → Experimental → MP3 Player.
A basic player UI will pop up at the bottom of the screen offering you to skip forward and backward to different tracks, play/pause the audio, and adjust the volume. The MP3 player will always appear at the bottom of the screen, even if you’re not playing audio. It will always be there until you turn it off.
When you are playing music you can either plug in headphones, or listen via the stereo speakers on the back of the Kindle which sound about as good and bass-free as you’d expect on such a device.
Coda
Because it is so inexpensive and all of its content is backed up on Amazon.com, the Kindle Touch is a stress-free device you can take to the beach, the pool, the mountains, etc. Compared to the “eReader” I have been using for the past 18 months — an iPad — the Kindle’s primary user experience is significantly different. For the single-purpose device that the Kindle Touch is meant to be — a device that’s easy to hold and to read — the Kindle does this exceptionally well. And, in many settings, better than the iPad. Moreover, the iPad isn’t something you would take to the beach or the pool without at least thinking twice.
Of course, not every context finds the Kindle better for reading. Obviously in low-light or no-light situations the iPad is better because of its backlit screen. But also the iPad is significantly better for reading RSS feeds and my Instapaper queue. This is not only because the iPad has a stellar RSS app and the Kindle has none, but also because when reading feeds on my iPad I like to fly through them. On the Kindle, tasks take a little more time due to the nature of E Ink.
It is also arguable that the iPad is better for reading magazines. While I like the text-friendly version of The New Yorker that is served up on the Kindle, magazines have always been more than just text. And though I do think that the magazine reading experience could be significantly better on the iPad, I do appreciate the full-color graphics and customized layouts (most of the time).
But who says the Kindle has to replace the iPad? It’s not uncommon for people to own both. I know people who use their Kindle and their iPad. Of course, I also know others who abandoned their Kindle back in April 2010.
For me, I can see the Kindle becoming the reading device I keep on the coffee table and take on vacations. But, if I’m going to head out the door and am going to take just one device, you can bet it’ll be the iPad.
On the other end of the spectrum, what say ye about the Kindle versus a good ole book? Well, compared to a physical book the Kindle is at least as easy to hold and just as easy read from. And if you’re outside on a windy day or if you’ve got a big fat hardcover novel, then I would argue that the Kindle is even easier to hold.
The other advantage of the Kindle over a physical book is that you can have an entire library of content on a device the size of an extra-large wallet. And finding something new to read (a newspaper, magazine, new book, etc…) is just a few taps away. That is why the Kindle has appeal beyond just nerds who practically have it in their DNA to love a new gadget.
Overall I am extremely pleased with the Kindle Touch. Even more than I expected to be when I pre-ordered it so many weeks ago. The quality of the hardware and the usefulness of the device betray its exceptionally low price.
Affiliate Plug
If you decide to get a Kindle Touch, use this link and I’ll get a small kickback from Amazon which helps me to keep writing here. Thanks.✚
iPhone 4S Review
On Friday morning, October 7, I pre-ordered two new iPhones: a black, 16GB iPhone 4S for me, and a white one for Anna. A week later they were delivered by FedEx.
Anna’s white iPhone is the first white iPhone I have seen up close and used outside of an Apple store. And it looks great. I have always gone with black iPhones because, well, it’s black. But I really do like the look of Anna’s white iPhone — it is much more classy and well built than the white iPad.
The two phones arrived around 10:00 am. The delivery driver mentioned how we were the first to get them and he had hundreds on his truck.
About 7 hours later I was finally able to activate the phones.
Frustrations of AT&T’s overloaded activation servers aside, the activation process was incredibly simple. I activated and set up both iPhones without a single cable. My unofficial goal is to never plug my iPhone into my computer again.
After unboxing the phone, I turned it on, unlocked the screen, and followed the on-screen instructions for setup. The iPhone knew my phone number and prompted me to confirm that this was indeed the phone number I was upgrading. I then was asked to enter in my billing zip code and last 4 digits of my social security number to confirm my identity, and then let the iPhone activate.
At first the activation was unsuccessful. And so I started over. The second attempt was unsuccessful as well. I tried again, and again, and again, for over two hours. Then I just let it be and came back a few hours later. Even then, I still had no luck.
It was dinner time when iPhone was finally able to activate. I, of course, was not the only one with activation woes. I read about all sorts of people having trouble activating their AT&T iPhones. And, from what I understand, those on Verizon and Sprint had little or no trouble activating on day one.
Once I was finally able to activate my iPhone 4S, I simply restored it from the iCloud backup of my iPhone 4. The restore took less than 10 minutes altogether and all the apps from my iPhone 4 were downloaded and in place. The only missing data were all my passwords.
Aside from having to wait for several hours to get my 4S activated, this was, by far, the most seamless and easy iPhone setup I’ve ever had.
Those automatic iCloud backups are great. Every evening I plug my iPhone into the wall charger by my bed and every evening all that’s on my iPhone gets backed up to the cloud.
These backups are especially great for my wife. Of the two of us, she is probably more prone to losing or breaking her iPhone than I am. Moreover, she is certainly less motivated to plug her iPhone in and sync it to her computer. Having her iPhone backed up each night means if her iPhone ever does go missing, the info that’s on it won’t disappear with the device.
Big Picture
The iPhone 4S has three headline features which make it superior to its predecessors: speed, camera, and Siri.
The speed is a combination of the A5 processor and the new antennae design. The former lets the iPhone 4S work and act quicker. The latter helps with better download speeds from the cellular data network.
The camera is better and faster. More on that in a bit.
And Siri is, well, amazing. But more on that in a bit, too.
My thought on if you should upgrade? Well, if you are at all an iPhone junkie (as in, you use your iPhone more than the maximum amount even possible) then I think the upgrade is well worth it. The speed, better camera, and Siri are all something you’ll benefit from every day (even if you’re already on an iPhone 4).
Siri
My first impression of Siri is that Siri is to the GUI what the GUI is to the command line. Meaning, using Siri is a far easier and quicker way to navigate certain tasks than using iPhone’s multi-touch user interface. The GUI is still much more powerful, but there are already things which are more efficient to do by using Siri.
The scope of what Siri can do on its is not all that striking — setting a timer or an alarm is relatively simple task. But it’s not the scope that makes Siri so darn impressive.
The practical implication of Siri is that certain things are significantly easier and faster to do by asking Siri to them. Such as: setting a reminder, creating a calendar event, getting the current temperature, setting a timer, or setting an alarm.
Siri is not the first voice recognition software to come along allowing you to make a phone call or dictate a note. But Siri is conversational and accepts a multitude of various types of requests for the same task. Which means you don’t have to memorize what you’re asking for. And because of that, Siri’s usability and convenience become exponentially more impressive and helpful.
Something else that stands out to me about Siri is how well it can understand what I’m saying. I don’t have to talk slowly and in monotone. Nor do I have to hold the iPhone right up to my face to talk directly into the microphone. In my home office I can leave the iPhone on my desk next to my keyboard while talking at a normal speed and volume, and Siri will catch exactly what I’m saying.
Another thing that stands out to me about Siri’s usefulness is that it knows if you are “hands free” or not. And if so, Siri accommodates accordingly. For example, if I have my iPhone earbuds plugged in and I ask Siri to send a message to my wife saying “Hey babe, just wanted to say I love you.” Siri will reply not only that the message was created but also read it back to me. If I were not “hands free” Siri assumes I can read my message as it’s brought up on the screen, and thus I would have to ask to review my message in order to get it read back to me by Siri.
In short, Siri is smart enough to know if I am not able to look at my iPhone’s screen and if so Siri becomes more chatty in a good way.
Talking to and using Siri could easily be maddening. If it took too long to process a simple request, or if it didn’t understand most what I said, then the friction of using Siri would slowly grind away any desire to use it. But it’s the little areas of polish that make Siri usable and enjoyable.
Using Siri in Public
I have not yet been in a large, open, public place (such as a restaurant or coffee shop) where I wanted to use Siri. If I did, there’s a clever feature Apple built in which, if your iPhone’s screen is unlocked, you can raise the phone to your ear and Siri will activate and you can interact with it as if you were talking to someone on the phone.
There were, however, a few times over this past weekend when I was around family and something came to my mind that I waned to set a reminder for. I felt a bit uncomfortable launching Siri and asking it to set a reminder for me because I knew it would interrupt the conversation happing in the next room over and draw attention to myself.
And then, as I thought about how easy it would be to have Siri set the reminder compared to setting it up manually, I decided simply to not set up the reminder at all. Lazy? Perhaps. But it’s also telling. For how many people will Siri become the only interface into their iPhone’s apps for reminders, alarms, and timers?
Phonetics
I highly recommend populating the Phonetic Name fields for common contacts which Siri mispronounces. This will also increase the accuracy of your requests to call, text, or email someone.
To set a phonetic field just go to a contact’s card from your iPhone, tap “Edit”, then scroll to the bottom and tap “Add Field”. From there you’ll find the fields you’re looking for.
Text Input for Siri
Natural language input is one of the primary benefits to Siri. This is what makes the calendar app Fantastical so fantastic. If Siri understands and parses our requests into text, why not allow us to type our Siri requests in from the start?
If I’m not in a place where I can talk to Siri, typing in my request may still be easier than doing the task manually. For example, typing the text: “Remind me to take out the trash when I get home” would still be easier than launching the Reminder app, creating a new reminder, typing in “take out the trash”, tapping on the reminder itself, choosing “Remind Me”, turning on “At a Location”, selecting “When I Arrive”, choosing “Home”.
Easter Eggs
There are a slew of easter eggs in Siri. You can ask Siri to tell you a story or a joke. There are certain phrases you can say to Siri to solicit a clever response, such as: “open the pod bay doors”, “beam me up, Siri”, or even, “klaatu barada nikto”.1
Since Siri is server-side software, it will be interesting to see how it evolves (perhaps not the best word-choice?). Will new easter eggs be added? Will new responses to the same questions be added? Beyond simply wishing for an API so 3rd-party apps can get access, how will Siri’s responses and functionality be updated in the future?
Finding friends and family members
Siri integrates with Apple’s Find My Friends app, and I think this could offer some great functionality. Especially for immediate family members. You can ask Siri things like “where is my wife”, and if the Find my Friends app has their location data then you can see where they are.
Location-Based Reminders
Surely the location-based reminders are one of the coolest “little features” in iOS 5.
Having a phone that’s smart enough to remind us to take out the trash when we get home or to not forget our jackets when we leave the office is the next step in handy task lists.
I’ve added new contacts in my iPhone for Walmart and Lowe’s, two locations we visit often. This way I can create a reminder such as “Remind me to get batteries next time I am at Walmart.”
What would be great is if a location-based reminder could contain a “group” of locations. We don’t buy batteries only at Walmart. There are a handful of stores we go to which sell batteries, and so if we need batteries I want to be reminded at any of those stores.
If I could create a group of contacts labeled shopping which contained all the various stores we regularly visit, then I could say “remind me to get batteries next time I go shopping” and then a geo-fence could be set up around all of those “shopping” locations, and would go off at whichever one I arrived at next.
And what would take that even to the next level? An ability to have shared reminders. Something like: “Remind me or Anna to get batteries next time we go shopping.”
An example of that in real life could look like this: I’m at home and realize we need batteries. I create the reminder and it syncs to my iPhone and Anna’s. Then, suppose Anna realizes she needs to swing by the store on her way home from work to get an ingredient for dinner. When she gets there a reminder pops up notifying her that we also need batteries.
Siri’s Interface Design
I think the look of Siri’s interface design is fantastic. I like the way Wolfram|Alpha results are displayed as well as custom UI elements for native things such as a reminder, an event, or a message. The look for an alarm and the timer are my favorite two designs.
Matt Legend Gemmell has a collection of screenshots on Flickr showing off the look of Siri as well as many of its functionalities.
Network Availability
There are patches of time during the day when Siri simply won’t work. In my usage, it doesn’t have to do my iPhone’s connectivity, but simply that the cloud is too busy. Its must be all those millions of iPhone 4S users.
This surely is why Apple limited Siri to be exclusive to the iPhone 4S. They sold 4 million iPhones over the weekend, but there are 20 million people who upgraded to iOS 5. If the Siri network gets bottlenecked with 4 million users, imagine if it were available to 20 million right now.
It’s one thing for Siri to need a network connection to parse and interpret the voice requests. But it would seem that Siri needs the network connection for everything it does — from the very start to the very end of any task.
I found that if Siri lost network connectivity mid-interaction, it could not complete the task. I had all but confirmed a new reminder when Siri lost network connection, and so the reminder could not be created. Even though I was staring at it on the Siri screen. After waiting about 30 seconds, Siri was able to connect and the reminder was set.
Of course, the non-connected moments are fewer and more far between than the connected moments. And when Siri does work, it’s fast. So fast, in fact, that it feels as if Siri is processing the requests right on the phone. (Part of this speed may be because I think Siri begins streaming your audio request to the Apple servers almost as soon as you begin talking.)
The A5 Processor
The iPhone 4S is significantly faster than the 4, and not just on paper.
The speed increase is especially noticeable in all the little animations and movements you see on your phone all the time. Such as the app launching animations and sliding between home screens and scrolling a list view. They are all more smooth.
Something that the iPhone is so well known for is that as you are tapping on and interacting with the interface, the response time is so good that it feels as if you are actually manipulating the interface with your finger. Well, on the 4S, that perceived manipulation feels even more real.
And, aside from the Camera app which surely has the most noticeable speed bump of all, it’s the Spotlight search results that I’ve noticed as having the most obvious speed increase.
The Camera
It’s fast. Like, crazy fast.
I had switched to Camera+ as my primary camera app simply because you could snap, snap, snap, several photos in a row. But you can now do that with the native camera app.
So, not only does the Camera app launch quicker, but the “shutter speed” is much faster as well. This is a welcome change indeed. But that’s not all. The lens of the camera on the iPhone 4S is also significantly improved. The quality of the photos is higher resolution and better image quality. I am not a photographer, but even I can notice a better depth of field and better color with the camera on my 4S.
Additional Miscellany
The Home Button on my iPhone 4S sits differently than on my iPhone 4. The button on the 4S feels more flush with the top glass and it has a slightly more smooth transition (from the glass to where the button begins).
The vibration alert the 4S is very different than on my iPhone 4. It’s more obvious, yet less noisy and less abrasive. It’s hard to explain what exactly is different about it, but it is most certainly different.
The reason is that the iPhone 4S uses the same vibrator motor as the Verizon iPhone 4 does: it’s a linear oscillating vibrator as opposed to the rotational electric motor that was in the AT&T Version of the iPhone 4.
The screen on the 4S seems “cooler”, more crisp, and more appealing to look at than the screen on my 4.
iMessages go to all devices that are set up with your Apple ID and are running iOS 5. However, only the most-recently-used device gets the iMessage notification. So, if you are having a conversation with someone via iMessage, only the device you’re having the conversation on gets each and every notification of a new incoming message.
And so here’s a thought: if Apple can manage which device gets notified of a new iMessage, then why not use that same logic to simmer down the calendar alerts?
Summary Statement for Skimmers
For a phone that looks so similar, there are so many things which are different. Though the iPhone 4S looks just like my previous iPhone, it sure doesn’t act like it. The 4S is a welcome upgrade for someone who has his iPhone within arms reach just about 24 hours a day.
- Thanks to reader Ken Weingold for the tip off on The Day the Earth Stood Still quote. ↵
✚
Exciting and Ambitious
The USB cable had a good long run, but its usefulness and convenience is breaking down.
I don’t just have an iPod with songs on it any longer. I have an iPhone, an iPad, and a Mac, and all three of them have all sorts of similar content. If you use more than one computer or device, then over-the-air syncing is extremely convenient.
While browsing Twitter on my iPhone, if I come across a link I want to read later I can just send it to Instapaper. Later that evening I can sit down on the couch, pick up my iPad, and the article is there waiting for me. And this is just one of hundreds of examples of the convenience of using the cloud. Emails, photos, documents, music, notes, to-do items, and ebooks are all prime examples of things we want to share and sync across multiple devices.
The iPhone, announced in 2007, was always meant to be more than a widescreen iPod with touch controls, more than a revolutionary mobile phone, and more than a breakthrough Internet communications device.
Smartphones in 2007 were somewhat smart (they could do email and barbaric Internet), but they were not easy to use. And regular, or dumb, phones were easier to use, but they didn’t do a whole lot.
iPhone was designed to be a device that was very smart and very easy to use. Smarter than the smartest smartphone. Easier to use than the most simple dumb phone. This is a hard position to keep because the smarter (or more capable and feature-rich) a device gets the harder it is to maintain its ease of use.
The launch of the App Store in 2008 made the iPhone significantly “smarter”. That was the intention — Apple wants the iPhone and iPad to run desktop class mobile applications. The more our devices work and function as miniature computers (which is what they are), the more important it is that they work side by side with our actual computers.
That side-by-side functionality started with iTunes and the USB cable. You could plug your iPhone into your computer and sync your music, photos, videos, podcasts, contacts, calendars, notes, Safari bookmarks, and email accounts.
In 2008, MobileMe came along, and for $99/year you could ditch the USB cable at least for syncing contacts, calendars, bookmarks, and email.
But the .Mac re-brand and re-launch to MobileMe was disastrous in some ways. In an internal email to Apple employees, Steve Jobs said, “The vision of MobileMe is both exciting and ambitious.”
Over the past 3 years in its current state as “Exchange for the rest of us,” MobileMe has been neither exciting nor ambitious.
What about owning an iPhone is less exciting than having to plug it in, launch iTunes, sync the info, and then eject it every single time you want to get info in sync or transfer over new music?
But now, with iOS 5 and iCloud, we no longer need the USB cable.
In fact, if there were another way to charge the iPhone 4S, I wouldn’t have been surprised if the new phones came only with earbuds. But the cable will be there — if only for the purpose of charging the phone.
I cannot help but wonder if iCloud is what MobileMe was meant to be. MobileMe earned a sour reputation right off the bat. As they say, if you don’t like what people are saying, change the conversation. And so we now have iCloud as the MobileMe successor. It’s better. It’s free. It’s more exciting. It’s more ambitious. It still uses the @me.com email addresses.
iCloud is ambitious and exciting in a way MobileMe never was. This is the foundation, the cornerstone, the hinge, the linchpin, and the future of where Apple is headed. Lion + iOS + iCloud = Apple’s development plans. Their desktop and mobile hardware and software offerings will be unified via iCloud.
On a less dramatic tone, I am very thankful for iCloud because I am tired of plugging in my iPhone and iPad in order to sync them. In fact, I cannot remember the last time I plugged either of them into my computer. I mean, who goes through those iTunes hoops any more? Average consumers never did in the first place unless they had a specific reason (such as to transfer a new album or movie onto their iPhone), and even us nerds gave up on it a while ago.
I sit at my desk for hours every day and my iPhone rarely gets plugged into my laptop. Persnickety power users are surely the most motivated of all to plug our iDevices in and keep things in sync, and yet even we have given up on the chore of syncing.
Ever since App Store purchase became available as over-the-air downloads (regardless of what device the app or song was purchased on) I stopped having any reason whatsoever to plug my iPhone into my laptop.
If I buy an app on my Mac, my iPhone and/or iPad will download it as well. If I buy a song on my iPhone, my Mac will download it as well. If I buy an app on my iPad, my iPhone will download it.
Moreover, since I use MobileMe, my contacts, calendars, and bookmarks are synced. And several of my most-used apps use a web service to sync their data over the air across multiple devices. Apps such as 1Password, OmniFocus, Reeder, Instapaper, and Simplenote.
iCloud promises all this and more. Photos that you take with your iPhone will show up in your iPad’s photo library. Music that is on your laptop will be available to download on your iPhone or iPad. Documents that you’re working on in Numbers will be accessible on your Mac, iPad or iPhone.
“Last Century”
Yesterday I re-watched Steve Jobs’ January 2007 keynote. Something struck me about it when Jobs was demoing the phone app on iPhone he called the number keypad as “last century”. He said:
“If I want to dial the phone, if I’m real last-century, I can push keypad here, and I can dial a call.”
A few minutes later as he was re-capping the phone app and listing the features again, naming them out he again called the keypad as last century:
“Favorites, last century, visual voice mail.”
As if Jobs was annoyed that he couldn’t remove the keypad altogether.
Instead of being “last century” and dialing our calls, Apple wanted us to scroll through our contacts list. They wanted us to tap on names and phone numbers to call people. They wanted us to find restaurants and shops using Google maps and to tap on their contact info to call them. They built the best phone app on any mobile phone — it was one of iPhone’s original killer apps.
Today, iPhone’s “last century” element is the USB cable.
New iPhones will still ship with a USB cable in their box, but Apple doesn’t want you to use it. The only time you should be plugging your iPhone into the cable is to charge the battery. Apple wants you to set up your device wirelessly and let everything sync wirelessly.
What iPhone made the keypad in January 2007 is what iCloud will make the USB cable today: “Last century.”
iMessage
Even iMessages is building on the idea of synced information. Except it’s not syncing media or documents, it’s syncing conversations. You can have an iMessage conversation with someone while reading your Instapaper queue on your iPad, and then continue that same conversation on your iPhone when you’re out of the house. This is something that up until now only Twitter DMs seemed to handle (a DM thread is accessible from the iPhone, iPad, iPod touch, and Mac), which means the next step will be, of course, iMessages for the Mac.
What else is so fun about Apple’s new messaging service is the fact that you can have delivery confirmation, read receipts, and see when the other person is typing. Alas, for me this means that if I get a text message that I’m not ready to reply to yet the other person will still know that I’ve read it. No hard feelings, okay guys?
Notifications
Other than Siri, the new notifications system may be the most exciting and notable front-end feature to iOS. Put another way, notifications in iOS 5 rock.
For the past 4 years iPhone users have had to suffer through a sub-par notifications system on the iPhone. If a text message comes up, you’re in trouble. If you have a handful of calendar reminders, your phone becomes locked down until you clear all of them. It’s been insufferable.
The new notifications not only work much better, but they look much better as well. There are 4 new or different user interface elements:
- The single-notification window that appears on the lock screen is now black instead of blue, and it has a gradient across the very top of the box instead of the curved bezel.
- If additional notifications appear while iPhone is locked, then the notifications get smaller and form an unordered list on the lock screen.
- Notifications that come when you are using your phone “roll in” on the top of the screen for a few moments, and then roll back out. The animation is really quite nice.
- And there is an entirely new notification pane which houses all your notifications, upcoming events, current weather, stocks, and more. This is accessed by sliding down from the top of the screen.
The new notification system and its accompanying UI elements are great. I think that the look of the lock screen with a few notifications is very cool. And I love the design of the notification slide-down pane.
But a word of caution: don’t overdo it. The temptation is going to be to sneak into the Notification Settings and turn on every app. But my suggestion is to keep it clean. Keep it down to only what’s helpful to you and keep it so that the notification panel doesn’t turn into the new time sink for the Just Checks. Don’t play the notification panel.
When I first installed the beta of iOS 5 a few months ago I turned on just about every notification I could. New emails, @replies and DMs on Twitter, SMS messages, iCal alerts, missed calls, OmniFocus items, and more — all of them were showing up as notifications. I wanted my Lock screen and notification panel to be well stocked.
After enjoying it for a day or two I had to turn nearly all of them off so I could have my life back. It was fun while it was new, but now the only things which alert me are Twitter DMs, SMS and iMessages, phone calls, upcoming meetings, and location-based reminders.
Location-Based Notifications
This is where things get fun.
You can set a notification to remind you of something when you arrive at or leave a place. Set a reminder that tells you to buy some AA batteries when you arrive at Walmart. Or, set a reminder that tells you to swing by the post office when you’re leaving your house.
The update to OmniFocus taps into the location-based API in iOS 5 and you can set the same. Assign a location to a context in OmniFocus and all items assigned to that context will become due upon arrival to or leaving from that location.
Miscellany
Text Expansion Shortcuts
Under Settings → General → Keyboard → Shortcuts you can set up custom shortcuts.
So, for example, typing the letters “omw” will expand to “On my way”. It does not instantly expand like a TextExpander snippet would, but rather iOS treats your shortcut like a misspelling and offers to auto-correct it to the expanded text. Hitting the Space bar launches the expansion, hitting the “x” in the popover box dismisses it.
Faster Camera Access
Double click the Home button from the Lock screen and — in addition to the iPod controls being where they always have been — a camera icon now shows up to the right of the “slide to unlock” slider. Tap that icon and you are in the Camera app. Boom. It is a significantly faster way to get to the camera.
The New Round Toggles and Other Graphical Interface Changes
There are more new design elements in iOS 5 than any previous version of iOS.
- New look of notifications on the lock screen and the new Notification Center
- New rounded toggle buttons
- Camera icon when you double click the Lock screen
- Blue talk bubbles used for iMessage messages
- Siri microphone icon on the keyboard
- Tabs in Mobile Safari
To me, all of these new or modified elements are a welcome change.
What struck me when thinking about the new look of the toggle switches and other new elements in iOS 5 is that this version of the OS has the most new UI elements of any of its previous siblings. Though the iPhone 4S does not have any physical design changes to it, the operating system installed certainly does.
iOS 5 and iCloud mark the next chapter in Apple’s mobile operating system. The groundbreaking and revolutionary new features shipping from Cupertino this week are signposts of Apple’s course for the next several years.
✚
Sweet App: Goodfoot for iPhone
Goodfoot is an iPhone app that helps you find cool, nearby places. And it does so by using the Gowalla API in one of the most clever ways I’ve seen.

I came across this app while doing research and preparation for our Creatiplicty episode with Trent Walton.
Goodfoot works by taking the most popular spots on Gowalla and then sorting them by distance (walking, biking, or driving distance) from where you currently are. Then it removes all the non-interesting spots from the list (such as big-brand locations, doctors offices, grocery stores, etc.) and does a pretty good job at only showing you worthwhile locations.
As you’re looking at each location Goodfoot has its own built-in Awesometer®. Goodfoot’s Awesometrics System rates the likelihood of that location being awesome by looking at how many total check-ins the location has compared to how many of those check-ins are unique. So, for example, a place with 100 check-ins from 100 unique people is probably a tourist hotspot and thus not that awesome (unless you think gift shops are awesome). A place with 100 check-ins from 20 people is clearly a local favorite and thus more likely to be awesome.
Once you find a spot that you want to go to, you can view that site in Gowalla or use Google Maps to get the exact location and directions.
Goodfoot is just a buck in the App Store and works wherever Gowalla users have been.
✚
Sweet App: Hues for Mac
This Sweet App review is the first in a new type of post I’ll be writing for the site: short, mini-reviews of apps that come across my path. I’ve had it in my head that the only valid software reviews I shall ever publish to shawnblanc.net are ones which exceed 3,000 words. Moreover, I shall only write about apps which have become an integral part of my day-to-day computing life.
Well, that’s baloney. What about the apps I like but which don’t change my life? What about the apps I want to talk about but don’t have 3,000 words for? The weekly Sweet App review is the answer to these conundrums. Enjoy.
Hues
Hues is a simple and useful color finding tool for your Mac. I came across this app when its developer, Zach Waugh, emailed me to let me know about it.

I like Hues because it has the familiarity of the built-in OS X color-picker tool, yet it with a few special modifications of its own:
- It gives you the HEX, RGP, and HSL values for any color you pick. Since I design live in a browser having a light-weight app that helps me find colors and their HEX values is super helpful. I’m embarrassed to admit that used to launch Photoshop for the sole purpose of finding a color I liked and copying its HEX value. Needless to say, Hues is much more economical for that purpose than Photoshop is.
- It has 5 rows for saved swatches instead of one. (Update: news to me is that if you click and drag the little dot underneath the swatch palette you can adjust how many rows of saved swatches are visible.)
- In the app’s preferences you have the ability to remove any of the color pickers from the toolbar that you don’t use. I, for instance, only ever use the color wheel, so I removed the Sliders, the Palettes, and the Crayons.
- It works, looks, and feels just like the native color picker, just better.
✚
Guts and Glory: A Review of the MacBook Air
The first computer I ever owned was a laptop. It was a Dell Inspiron that I bought after high school to take to college. It lasted a few years until my roommate bought a PowerBook G4, and that was the end of my career as a PC guy. Since that Dell, I’ve owned three more laptops: a 12-inch PowerBook G4, a 15-inch aluminum MacBook Pro, and now this 13-inch MacBook Air.
There was a brief stint where I also owned a Quad-Core Mac Pro. Doing print design on the PowerBook was no longer cutting it, and I needed a better work machine. But, when I purchased the 15-inch MacBook Pro to act as my “secondary computer” I realized that the Mac Pro was overkill and I had no need to own two professional-grade machines.
That Mac Pro was a fine computer. If you were in the next room over when the Mac Pro was turned on you could hear the fans kick in. My father-in-law used to say that if you put wings on it, it would fly. And there was something safe about owning a computer that was easily and indefinitely updatable. More RAM? No problem. More storage? No problem. New graphics card? No sweat.
As great it was, the Mac Pro is most likely the first and last desktop computer I will ever own. At least I went out with style.
Laptops have far too great of a personal value to me. Having a desktop as my only machine would be like a prison sentence. Even while I owned the Mac Pro I had a laptop as a secondary computer so I could still work and be connected away from my desk. My office is not my office, my laptop is. And because of that I have the freedom of being able to work from anywhere.
For instance, my wife’s brother recently got married in Colorado. Since both Anna’s and my family all live in the Denver area, I chose to stay in Colorado for an extra week after the wedding was over. I still worked for 8 – 10 hours each day, but thanks to the fact that all my work is contained on a laptop, I had no trouble being 600 miles from my office. I didn’t miss a beat, and I got to spend the mornings and evenings with my family.
It was from Colorado that I wrote and published my Lion review, and it was in Colorado that I bought this very MacBook Air.
In October 2010 when the MacBook Airs got their first major revision, I couldn’t justify the upgrade from my early 2008 MacBook Pro. The Air was almost the laptop I had been waiting for.
Since I had already put an SSD in my MacBook Pro, the specs between my current laptop at the time and the new Core 2 Duo Airs were nearly identical. Since my MacBook Pro was still hanging in there, I decided to wait until the next major refresh or until my current laptop died — whichever came first.
I use my laptop all day, every day. It is primarily a machine for writing, emailing, and Web browsing. I don’t do nearly as much heavy Photoshopping as I once did. The Adobe app I use the most nowadays is InDesign, and it’s relatively light on the CPU.
That 2010 refresh of the MacBook Air, as substantial as it was, was more like a warning shot — a signal to say that this is the future of the Apple laptop.
The Air is the not-so-secret forerunner laptop among Apple’s lineup. When it was introduced in 2008 it was the first Apple laptop to ditch the optical drive, it was the first to incorporate the then-new black, plastic keyboard, it was the first to offer the larger trackpad, the first to offer SSD drives as a build-to-order option, and it was the first unibody laptop.
In the 2010 refresh, the MacBook Air was the first to offer only flash storage. And now, with its powerful and battery-friendly mobile i5 and i7 processors, the Air is an extremely capable laptop. It is no longer a niche device appealing only to those who live on the bleeding edge.
But what makes the Air so appealing? The fact that it comes with just the bare necessities.
Packaging
As the years go on, Apple includes less and less stuff with our computers.
The MacBook Air box is closer in size to an iPad box than to my old PowerBook box. In fact, I can fit my MacBook Air box inside my old PowerBook box. When I bought my 12-inch PowerBook in 2005 it came in a box that was almost 8 inches tall. In addition to the laptop and power cable, the box had a few CD-ROM discs, a display adapter, a telephone cable, some stickers, and a decent-sized manual.
When I bought my MacBook Pro in 2008 the case was noticeably smaller, and it came with fewer items: the power cable, the recover discs, a small manual, an Apple remote, and a very nice screen-cleaning cloth.
The MacBook Air comes with hardly anything: a power cord, instructions, and stickers. No remote, no adapters, no USB boot drive, and not even a screen cleaning cloth. Is this Apple’s way of cutting costs or saving us from junk drawers overflowing with white cords and unused adapters? Perhaps both.
Form Factor
The MacBook Air is, without a doubt, the most attractive laptop Apple makes. It’s sleek, silent, sturdy, and surprisingly lightweight.
The Air is most attractive when the lid is closed. Every time I pick it up I am still slightly stunned by how light and sturdy it is to hold. At just under 3 pounds the Air weighs close to half that of my previous laptops. And by nature of the unibody design, the Air’s lid closes flush against its body. The lids on those aluminum PowerBooks and MacBook Pros never sat flush against the body when closed, which meant that when holding the laptop with one hand the lid would tap and bend against the body a little bit.
When opening the lid and waking the laptop, there is no optical drive to read and no HDD to spin up. You don’t know if it’s actually going to wake up until the display turns on, which is within seconds.
And with no “breathing” light to wait for when you close the lid, you never know when it has gone to sleep. Which means, that for all intents and purposes, you don’t think about the MacBook Air going to sleep. You are either using it or not. Like the iPad.
On laptops with spinning platter drives, that breathing light is very important. I would never move my laptop until I was confident it was sleeping and thus the HDD had spun down. When I first bought my MacBook Pro, it would sometimes take as much as 45 seconds to sleep because it was writing all the contents of RAM to disk. There are Terminal commands to turn safe sleep off and allow the MBP to sleep in about 10 seconds instead of 45.
But with the MacBook Air, you just shut the lid and put it in your bag. Because there is no spinning hard drive there is nothing to worry about when moving the laptop around.
This is my first unibody Mac, which means that some of the MacBook Air’s features, though they’ve been around for a few years now, are new to me. Such as: the large glass trackpad, the magnetically locking lid, the black chicklet keyboard, the glossy display, and the headphone jack that works with and responds to the iPhone’s earbud controls.
Screen
Pixel junkies have a hard time giving up screen real estate, and the thought of downgrading from a 15- to a 13-inch screen can be enough to keep one up at night. In fact, one reason I didn’t buy a Core 2 Duo MacBook Air last October was in hopes that a 15-inch MacBook Air was just around the corner.
If you’ve read many other reviews about the 13-inch MacBook Air and its 1440×900 resolution, you’ll likely know that the transition from a 15-inch laptop to this 13-inch Air is virtually painless. Moreover, content on the 15-inch MacBook Pro now looks comically large. I’m looking at the same graphics and the same icons, but they look bloated and fuzzy.
All in all, the high-res screen on the MacBook Air is fantastic. Text is crisper and images are sharper. Though it has taken some time to get used to everything being a wee-bit tinier due to higher pixel density.
I have always been a die-hard matte fan. The only thing I do not like about the Air’s screen is that it is glossy. Fortunately it is not the same glossy found on the MacBook Pros, iMacs, and Cinema Displays. In those screens there’s a giant slab of glass over the whole bezel. On the Air there is only a thin slice of glass that sits under the bezel. It is more glossy than the beloved matte displays of old, but it is not as glossy as the newfangled machines.
Fortunately, there is still a matte display at my disposal. When at my desk I put the Air in clamshell mode and plug it into my 23-inch Aluminum Cinema Display. The Cinema Display has an even lower pixel density than the 15-inch MacBook Pro but it does not have the same “comically large” feel that the MacBook Pro does. Since I sit farther away from the monitor and since the screen is quite a bit larger, the Cinema Display still looks fine. Though I am sure that a higher pixel density would look even better.
Here’s a look at the screens I am now using, compared to past screens I’ve owned and compared to some of the latest devices Apple is selling today.
| Device | Width (px) | Height (px) | PPI |
| 23-inch Aluminum Cinema Display | 1920 | 1200 | 98 |
| 12-inch PowerBook G4 | 1024 | 768 | 107 |
| 27-inch Cinema Display (Mid 2011) | 2560 | 1440 | 109 |
| 15-inch MacBook Pro (2011) | 1440 | 900 | 110 |
| 15-inch MacBook Pro (Early 2008) 1 | 1440 | 900 | 112 |
| 13-inch MacBook Pro | 1280 | 800 | 113 |
| 13-inch MacBook Air | 1440 | 900 | 128 |
| iPad | 768 | 1024 | 132 |
| 17-inch MacBook Pro (2011) | 1920 | 1200 | 133 |
| 11-inch MacBook Air | 1366 | 768 | 135 |
| iPhone 4 | 640 | 960 | 330 |
One more minor point about the screen is that the lid hinge opens wider than my 15-inch MacBook Pro did. Though it still doesn’t open quite as wide as my old PowerBook did, the Air’s obtusity is more than welcome in this regard.
Full-Screen Mode and the Full-Screen Conundrum
The smaller the screen the more delightful a full-screen app becomes.
Only a few full-screen apps looked good on my 15-inch MacBook Pro: writing apps (such as Byword and iA Writer) and Safari.
On the MacBook Air almost all the apps that support full-screen mode look good. Right now not many of the apps I use support full-screen mode in Lion, but the ones that do look great. Byword and Safari of course, also Mail and iCal (well, all things considered, iCal looks good in full-screen). And Reeder? Well, Reeder looks amazing in full-screen mode.
Thanks to the MacBook Air, full-screen mode is growing on me in a way that it never did when I tried to use it on my MacBook Pro. Perhaps what I like the most about apps in full-screen mode is the non-cluttered and organized tidiness that seems to come with full-screen mode apps. Each app is in its place, and when I’m using that app no other windows are floating behind it pestering me or getting in my way.
Something clever about Safari when in full-screen mode is that the title of the page you’re on appears in the Address Bar just after the URL. And if the URL is so long that it takes up the whole address bar, you get an ellipsis at the end with enough room to still display the title.
Safari’s title display in full-screen mode:

Safari’s title display in non-full-screen mode:

However, there are a few quibbles I still have. For one, the transition between screens is extremely slow. But it’s only slow when you are switching between screens — switching between apps causes a faster screen-slide transition. Meaning, if you use the four-finger gesture to switch from one full-screen app to the other, the speed at which the screens slide over is slower than if you use Command-Tab to switch between the full-screen apps. I would love for that faster switch to be the default speed.
Secondly is the issue of when I plug the Air into the 23-inch Cinema Display. You can have too much of a good thing, and full-screen apps on the Cinema Display are certainly too much. And so, when I switch to clamshell mode I have to exit all those apps out of full-screen. A system utility that recognized this would be much appreciated.
Trackpad
The larger, glass trackpad of the Air is much nicer than the trackpad I’ve been accustomed to on my older MacBook Pro. Especially when it comes to multi-touch gestures. However, due to the larger size of the trackpad and the smaller chassis of the Air, trackpad is under the inside of my palms when typing and it often throws me off. The Air is smart enough not to respond to mouse movements when typing but there’s still a natural desire to avoid touching the trackpad while typing.
Clicking with your thumb while two fingers are on the trackpad does not always register the “right-click”. You have to click right towards the bottom of the trackpad. Though it works on the Magic Trackpad, and it’s what I got used to for right-click on my MacBook Pro (the kind that still had the actual trackpad button). Moreover, there is no option in System Preferences to enable 3-finger click.
USB and Thunderbolt Ports
My external HDDs are all FireWire — my primary backup drive uses FW800 and the secondary is FW400. I will now have to connect them via USB until I upgrade to either a Thunderbolt-equipped external drive or a Thunderbolt hub. It would be great to get the functionality of the new cinema displays without the cinema display. A Thunderbolt hub with FW800, FW400, USB, and additional Thunderbolt ports would be fantastic.
My 23-inch aluminum Apple Cinema Display works fine with the MacBook Air via a Mini-Display Port to DVI adaptor plugged into the Thunderbolt port. And, worth noting is that the Thunderbolt port in the Air is one-half the power and capacity of a standard Thunderbolt connection.
Keyboard
Since the Air has no optical drive, what would be the eject key on any of Apple’s other keyboards is instead the power button.
Moreover, the F4 key on the Air now brings up Launchpad instead of Dashboard. All of Apple’s new keyboards do this. It’s unfortunate for someone like me who never uses Launchpad, but does use the Dashboard dozens of times a day. There is a workaround, however, using a handy utility called Function Flip.
As you know, the top row of an Apple keyboard has the default hardware control buttons and the row of function buttons. What Function Flip does is swap the default action of those keys. And so when pressing the Launchpad/F4 button, I can use Function Flip to have it default to react to the F4 command rather than the Launchpad command.
With Function Flip installed I go into System Preferences → Keyboard → Keyboard Shortcuts → Mission Control and set “Show Dashboard” to be F4. Now I have my Dashboard hotkey back, and if I want to activate Launchpad then I can hit fn+F4.
Proper Baggage
The Air is the first laptop I’ve ever owned where I feel that putting it in a case is unfair — I’d rather carry it around caseless like I do my iPhone 4. But it still needs a good carrying case because a laptop and its carrying case go together like a suit and tie.
I am big-bag-averse — I much prefer smaller, rugged bags that don’t look like they belong on a space mission. I never did find a bag that fit my MacBook Pro that was just right. But, for the Air, I already have an old, rugged Timbuk2 bag that is full of character and happens to be exactly the right size for the new laptop.
In the Timbuk2 bag I use a sleeve for the MacBook Air: Acme Made Skinny Sleeve. If I didn’t already have the Timbuk2 bag then I would likely get the Acme Made Clutch bag or the Bomber Jacket Messenger bag from Levenger.
Guts and Glory
My history with computers is that I use them for about 3 – 4 years. Therefore, I wanted to get the most specced-out MacBook Air available. And I did. I picked up the dual-core i7 MacBook Air with 256 GB of SSD storage and 4 GB of RAM. If the Air had wings, it would fly.
Processors
Ordering the i7 seemed like an easy decision at first. For only $100 I could get a newer generation processor with a faster clock speed and more L3 cache. For the 13-inch model, going from the 1.7 i5 chip to the 1.8 i7 chip does not offer a huge jump in performance. In fact, it’s likely that in day-to-day use I wouldn’t even notice the difference. But, since I plan to have this computer for a few years, I wanted to future-proof it a bit by going with the i7 rather than the i5.
The i7 turned out to have a bit of drama attached. But now that the dust has settled, it’s clear that the i7 build-to-order option was the right choice.
When the new Airs were first announced, Apple listed the i7 as being build-to-order only. When buying a new computer, it’s always harder to order it online and wait for it to be built and shipped than to simply drive to the Apple store and buy one that day. However, I was in Colorado at the time and I knew that I wanted the i7 model. So I ordered online, expecting it to arrive back in Kansas City by the time I flew home. However, once I relieved my email confirmation from Apple, the shipping time had already changed from 24 hours into 5 – 7 business days.
The longer the wait, the harder it is to be noble and deny the temptation for instant gratification. So I called the local Apple Store to see if they had any of the new Airs in stock, but, alas, they did not.
The next day, at 7:15 am Mountain Time I got a message from a friend on the East Coast. He was just leaving his local Apple Store with a new i7 MacBook Air in hand. I was shocked that the i7 Airs were available in-store. I decided to do some research about the differences between the i5 and i7 processors — were the speed bumps really worth the extra cost and (in my current case) the extra wait.
I had a very hard time finding accurate reports and information about the latest, mobile Sandy Bridge processors. And therefore, my initial research was way off. At first, it appeared that the i5 chips did not have Hyper Threading enabled and that the i7 chips did. If this were true it would make the i7 chips far superior to the i5.
However, as it turned out, the i5 chip does have Hyper Threading enabled. Making the speed bump to the i7 nice, but negligible. I decided to cancel my online order, drive to the local Apple Store and buy the best MacBook Air they had. If, like my friend on the East Coast, I was lucky enough to get an i7, then great. If not, then I’d be content with the i5.
Fortunately, they had the i7 MacBook Airs in stock and I happily picked one up.
My personal MacBook Air has a Geekbench score of 6281. This is about double the average Geekbench scores of the previous-generation MacBook Airs. The i5 Air scores around 5900.
According to Macworld’s lab tests, upgrading to the i7 chip in the 13-inch Air (which comes with a 1.7 GHz i5 chip) is a negligible gain. Upgrading to the i7 in the 11-inch Air is much more noticeable because the 11-inch Air comes with a 1.6 GHz i5 chip.
Now that I had the i7, next came the concerns of battery life. Sure I had a faster MacBook Air, but just how much is my battery suffering for it?
Battery Life
In my real-world, this-is-how-Shawn-uses-his-laptop tests, the battery easily lasts 5.5 hours. This is with brightness at 80%, a select few utility applications running in the Menu bar (Dropbox, Text Expander, Fantastical, Droplr), and doing work with Safari, MarsEdit, Mail, Yojimbo, Twitter, and iTunes.
No doubt I could get 6 or more hours out of the battery with the brightness turned down. The worst I’ve gotten out of the battery so far has been 4.5 hours. During that time I had Rdio streaming music the whole time, except for a 70 minute stint where I recorded an episode of The B&B Podcast and powered my USB microphone.
When the battery gets down to the red (less than 10%) I still get 45 minutes worth of use. And what else is so impressive about the battery is how quickly it recharges. Just 30 or 40 minutes plugged in and the battery will charge back up and I’ll easily get another 3 – 4 hours.
In short, having a battery that lasts for so long inspires a lot of confidence in your machine. The guaranteed 5 hours of use isn’t mind-blowing, but it isn’t poor by any means either. When you’ve got a portable office, you want to grab it and go.
Moreover, recent tests by Anand Tech show that the battery life of the i5 compared to the i7 was nearly identical. Though the i7 draws more power, it works faster and therefore gets approximately the same battery life as an i5 MacBook Air. However, This Is My Next was able to get just under 7 hours of battery life on an i5 MacBook Air.
Solid State Drive
My MacBook Air cold boots in under 20 seconds. Faster than any other device in the house.
Speedy launch times like these are becoming more and more common, but most of us have been around computers long enough to remember when you would start your computer and then go down to make coffee. Just because a 20 second boot-up is less rare doesn’t make it any less delightful.
In addition to the speed, having a drive with no moving parts can be a relief when you’re using a laptop. No need to wait for the drive to spin down before you toss it in your bag because, other than the fans, everything in the MacBook Air is stationary.
Not every SSD has been manufactured equally. Some of the MacBook Air drives are made my Samsung and some are made by Toshiba. The Samsung drives are slightly faster than the Toshiba drives.
According to Disk Speed Test, the Samsung drive in my MacBook Air has a write speed of 248 MB/s and a reed speed of 265 MB/s.
Compare that to the Toshiba which, according to Engadget’s review of their Air with a Toshiba SSD, has a write speed of 184 MB/s and a read speed of 202 MB/s.
They say the speed difference between the faster Samsung drive and the slower Toshiba drive is not even noticeable. However, as a nerd, that’s not the point. Buying something new that’s even the slightest bit slower than another available option makes you want to shake your fist in the air and shout, “Arrg!”
Fortunately, the 256 GB SSD that came with my MacBook Air is made by Samsung, which means that I have the fastest MacBook Air I could possibly own. And that feels good because I plan to use this machine for several years.
Even if I had gotten a Toshiba SSD, it still would have been faster than the OWC Mercury Extreme Pro that I put into my MacBook Pro less than a year ago. Using Disk Speed Test, my OWC reports a write speed of 109 MB/s and a read speed of 134 MB/s — or, about half the speed of the Samsung SSD that’s in the MacBook Air.
Remote Disc
One of my favorite “features” of the Air is its lack of an optical drive. Too many times have I opened the lid to my MacBook Pro and been forced to listen to that horrendous wailing cry of the optical drive as it checked for physical media.
Moreover, I cannot remember the last time I used the Super Drive on my MacBook Pro. All the music I buy is digital; all the music I listen to is on my iPod or iPhone; all my software is downloaded (now, even my OS); and all my movies I get from Netflix or iTunes.
The only time I need to put a physical disc into my computer is to reinstall Adobe Creative Suite, or if I am sending a large file to print and I have to burn it onto a DVD. You can buy a USB-powered external Super Drive from Apple, or you can use another computer’s optical drive and connect to it remotely. The latter is aptly named Remote Disc.
Setting up Remote Disc is a piece of cake (I used it to install Adobe CS3 onto my Air).
- On the Mac that has the optical drive, go to System Preferences → Sharing, and turn on “DVD or CD Sharing”.
- On the MacBook Air, go to Remote Disc, which is found in the sidebar of the Finder window, and you’ll see the computer that has the optical drive shared.
- Choose “Ask to Use” and a dialog box will appear asking if you want to give permission for the MacBook Air to access the CD drive.
- Say yes, and then in the MacBook Air’s Finder, you’ll see what’s in the optical drive as if it were on the Air itself.
The downside to Remote Disk is that it slower than if the optical drive were internal. It took 40 minutes to install the 2.4 GB of Adobe Creative Suite software (Illustrator, InDesign, and Photoshop) over Remote Disk. An install speed of about 1.02 MB/s
An alternative to Remote Disk is to create a Disc Image (.dmg) of the physical media and install it that way. This is also a great way to digitally store your physical media and finally toss out those boxes of CD-ROMs.
If you want to take your software that still exists on physical media and turn it into digital disk image files, the process is quite simple. With the disc in the optical drive, go into Disk Utility, select the CD or DVD that is in the optical drive, choose “New Image”, and then save the .dmg file to your computer.
Starting Fresh
When installing a new operating system or setting up a new computer I love to start from scratch. Or, as I said earlier this month, it’s when I do my most serious tinkering.
Starting fresh is a perfect way to re-evaluate what I want to keep on an app-by-app basis. It also assures me that any cruft which slowly accumulated on the previous system is left in the dust.
Nothing makes you appreciate building out your clean install more than the Mac App Store. Once I had unboxed my MacBook Air and done the initial admin setup, I logged into the Mac App Store and downloaded half a dozen apps right off the bat (Byword, Twitter, Take Five, and a few others). There are more in the Mac App Store available for download, but I wanted to wait until I needed or wanted them before I downloaded them.
While the Mac App Store apps were downloading I downloaded and installed Dropbox to get it syncing.
Then I installed LaunchBar and Keyboard Maestro because without them I can barely navigate my Mac. Once these two apps were installed I replaced their Application Support files with those from my MacBook Pro, instantly re-enstating my LaunchBar preferences and Keyboard Maestro macros.
While everything was downloading, I took a lunch break. When I returned, and Dropbox had fully synced up, I then installed the rest of my necessary apps:
For Yojimbo and MarsEdit I manually imported the Application Support folders, just like I had with LaunchBar and Keyboard Maestro. OmniFocus and 1Password both sync with the cloud so I just logged in and let them do their thing. For Transmit and Coda I simply exported their keychains from the my previous system and installed it onto the Air.
The only other files I needed to manually move over were my music, all my fonts, and a few document folders. Previously I’d been storing my iTunes library on an external drive because my MacBook Pro’s 120 GB SSD wasn’t big enough to hold my music and movies. Since the Air has a 256 GB SSD, I was able to bring my music back to the local drive.
All in all, it took me a whole work day to buy the computer and get it set up and ready to use. I’ve since installed a few more apps, such as iWork and Adobe CS3. And the grand total ads up to 68 applications currently installed and 86 GB total in use.
Nothing beats a new machine running clean.
The New 12-inch PowerBook
After using the 13-inch MacBook Air for almost two weeks, it has been difficult to pinpoint exactly what it is about this laptop that makes it so great. I don’t think it’s so much in what the Air is, but rather what it is not — or rather, what it doesn’t have. The Air doesn’t have an optical drive, it doesn’t have many ports, it doesn’t have a removable battery, and it doesn’t have much weight.
It’s the subtraction of all these things that adds up to make the Air such an attractive and incredible computer.
Everyone I know who has owned a 12-inch PowerBook G4 looks back with fondness about that being the best Mac they have ever owned. It was a perfect blend of power and portability, and it invoked an affinity from its owners that few Macs in history have.
A few years from now, I believe we’ll look back and say the 12-inch PowerBook was the best laptop we ever owned until our MacBook Airs. The MacBook Air is the new 12-inch PowerBook — the new blend of power and portability that also invokes a fondness that few Macs in the lineup can.
- Lest you think my math is wrong: the aluminum 15-inch MacBook Pro has a viewable area of 15.2 inches, the unibody has a viewable area of 15.4 inches. Since they both have the same number of pixels it means the pixel density of the older model is just slightly higher than that of the newer model. ↵
✚
Diary of a TouchPad Owner
Thursday, June 30, 2011
10:27am: Just called Walmart and Best Buy to see if they would be selling the TouchPad tomorrow.
The lady in Walmart electronics had no clue what I was talking about. She apologized that they would not have them, and that perhaps later they would and I could call and check again in a week or so.
The guy at Best Buy told me they had one on display already, that they had none in stock and that it would be a few days before they got any. I had a sneaking suspicion he didn’t realize that tomorrow was the official launch day of the TouchPad, so I say to him: “Since tomorrow is the day they officially launch, can you look to see if any Kansas City Best Buys will have them in stock?”
He replies: “Oh. Well if they go on sale tomorrow, then we will have them. It’s just not showing up in our inventory yet because it’s not on sale.”
So that settles it. Tomorrow morning I’ll be heading to Best Buy. Will there be a line?
Friday, July 1, 2011
7:15 am: Should I head over to Best Buy now, or wait until they open at 10:00 am? I cannot imagine that there will be more than a few people there at opening to pick one up. Unless there are other tech writers or nerds in Kansas City. Are there any?
Going early to stand in line for an iPad or iPhone has always been fun. You know there’ll be a group of folks there whom you can talk to, and so getting there plenty early is never an issue. Getting to Best Buy plenty early seems more like a faux pas rather than an event. I think I’ll wait.
9:30 am: Leaving for Best Buy. I decided that even if there is a line, I don’t want to stand in it. Standing outside of Best Buy just seems awkward to me, rather than fun.
9:58 am: I drive in to the Best Buy parking lot, and there is no line. As I am parking I see a manager walk out of the store and wave his arms in the air with a “come on in” motion. About a dozen folks all get out of their cars and begin walking toward the door. I think to myself how amazing it is that all these people are here for the TouchPad. Though once we all got into the store, only two of us were looking for TouchPads.
I am one of the first to walk in the doors, and the first display I see is for iPods. The electronics section of the store is toward the right, so I head that direction. I pass the cell phone counter, a display for iPhones, then the Apple section of Best Buy and a display for iPads and MacBooks. Then I pass the display for a Kindle and a PlayBook. Then, the TouchPad. It’s display looks no fancier or newer than any of the others. It’s just there.
Next to the TouchPad was a plastic, fake display version of the Veer. I looked around the display but did not see any TouchPad boxes available to pick up and purchase. Moreover, the display was in pretty poor condition. It was a 3×5-foot table with a display in the center.
It’s just me and one other guy interested in the TouchPad (I sped-walked for nothing). A customer service guy asks the two of us if we need help. I ask him to get me a 16GB version, and my new friend wants a 32GB. We also ask about covers but apparently they are already on back order. (I think in Best Buy when they don’t have something, the default answer is that it’s on back order because it makes the item sound more popular.)
While we’re waiting for the TouchPads, the other guy and I small talk about the TouchPad versus the iPad. His wife has an iPad and there’s no way she’d give it up. He loves webOS and he’s very excited about the TouchPad; he’s owned an iPhone before and didn’t like it as much as his Pre.
I say nothing about how I’ve owned every iPhone and iPad and that I am only here because I want to see if the TouchPad stacks up.
The Best Buy employee returns with our TouchPads. I go check out and return home.
11:04 AM: I have now set up my own WebOS Account so that I can activate the TouchPad and begin using it.
11:37 am: I’m recording some rapid fire thoughts into a voice memo.
- Trying to find a Twitter app. The only one I can find is SpazHD for Twitter.
- Everything is slightly annoying, just a little bit slow.
- The card view is killer. Love it.
- The time is right next to the battery icon, but I thought it was the time left in the battery. It is now 11:38, but that means 11:38 in the morning not 11 hours and 38 minutes left on the battery.
- Typekit does not work on my site. (Note: I found out later from Typekit that they intentionally blocked the TouchPad until they could do proper testing to ensure that their fonts would not cause usability issues on the webOS Browser.)
- The keyboard has little emoticons.
- When taking a screenshot you see a giant yellow orb.
- It appears that instances of a browser are not isolated to the browser app.
11:54 am: Text selection bugs me; Cut/copy/paste is awkward at best.
Something that I love is that I am always just one tap from common settings like turning on/off Wi-Fi, adjusting brightness, etc.
3:01 pm: Attempting to add Instapaper to the bookmarks list. I can’t add it from the Instapaper website, so I try emailing myself the Instapaper javascript URL, pasting that into the address bar and then adding that as a bookmark. But that does not work.
3:04 pm: Go to browser help, and discover there is a place for live help chat. So I jump on, and only have to wait for 1 minute. I start a live chat with “Seth” trying to figure out how to add the Instapaper bookmarklet. (All typos in the transcript are [sic].)
- Seth: Hello.
Thank you for contacting HP webOS customer support.How can I help you today?
- SHAWN: Hi seth. I’m trying to create a bookmark in the browser, from a URL that is not a webpage.
- Seth: Okay.
- SHAWN: Is there a way to manualoy add or edit the adreses es of bookmarks?
The examples are for adding a website’s rss feed to Google reader, and adding a url to Instapaper.
- Seth: Follow the steps to create a Bookmark.
Can I have 3 minutes to work on the issue?
- SHAWN: Of course.
- Seth: Thank you for staying onhold.
Open the page you want to bookmark.
Open the application menu and tap Add Bookmark.
- SHAWN: The trouble is that these are javascript bookmark lets. They dont open like a standard website does.
Does that make sense?
- Seth: Yes, I got it.
- SHAWN: I tried pasting the address cor the bookmarklet, but the page has to load in order to add it as a bookmark, and the browser treats it as a Google search.
- Seth: Can I have 2 minutes to work on the issue?
- SHAWN: Of course.
- Seth: Thank you for staying on hold.
We can only add the Bookmark it it is a webpage.
- SHAWN: That is unfortunate. And there is no way to edit the URL of a bookmark once it has been created?
- Seth: Yes, we can edit the bookmark once it is created.
Open the application menu and tap Bookmarks.
Edit the bookmark name: Tap i to the right of the bookmark name. Enter the new thumbnail, title, or URL and tap Save Bookmark.
- SHAWN: Okay, can I try that real quick?
- Seth: Sure.
I will stay connected.
- SHAWN: Hmmm. I was able to edit a bookmark once it was created, but it will not take the javascript url as a valid address for the bookmark.
- Seth: May I know the complete Javascript URL that you are trying to add?
- SHAWN:
javascript:function%20iprl5()%7Bvar %20d=document,z=d.createElement('scr'+'ipt'), b=d.body,l=d.location;try%7Bif(!b)throw(0);d.title='(Saving...) %20'+d.title;z.setAttribute('src',l.protocol+'//www.instapaper.com /j/WnlMKBaHBm1w?u='+encodeURIComponent(l.href)+'&t=' +(new%20Date().getTime()));b.appendChild(z);%7 Dcatch(e)%7Balert('Please%20wait%20until%20the %20page%20has%20loaded.');%7D%7Diprl5();void(0)This is for a web app called Instapaper http://www.instapaper.com
- Seth: Did you try editing this webpage and open from the bookmark?
- SHAWN: Yes. I was able to get the address stored, but was then given an error: "Cannot open MIME type"
- Seth: I'm sorry we cannot open the javascript URL from the bookmark.
- SHAWN: Okay. Can this be filed as a bug?
- Seth: This is not a Bug. We cannot open the Javascript URL from the bookmarks any webOS devices.
However, I will put forward your concern to the development team.
- SHAWN: Okay. Thanks, Seth.
- Seth: You are welcome!
Can I be of any further help?
- SHAWN: Nope. Thanks though.
- Seth: My pleasure!
Thank you for contacting HP webOS customer support and feel free to contact us for further assistance.
Bye!
Take Care!
3:54 pm: Downloaded Paper Mache. I can at least use it to read my Instapaper queue. Ryan Watkins gets it. This is a classy app that serves Instapaper well.
5:29 pm: Attempting to get music onto the device. You can run it in USB mode and add DRM-free MP3s. Or you can download HP Play and sync music from your iTunes account to the TouchPad, just like you would on iTunes.
6:44 pm: After plugging it in and ejecting it a couple times from the "USB mode" something changed about the OS. The background turned to a grey slate, all my open apps went away, all my downloaded apps that were in the Launcher disappeared, and certain bits of functionality stopped working.
7:02 pm: I can not figure out how to power down the device. I assumed that you simply hold down the lock button, like you do on an iPad, and that it would power down. However, it's not working for me.
Reading through the instruction manual there are no obvious instructions about powering the device off. Though, I did finally read that I was attempting to power the device off correctly. Alas, my attempts to power it off are not working. There must literally be a bug in the OS that won't allow me to power the TouchPad off.
Fortunately, Martin Dufort reminded me that perhaps there is a way to force reboot the device. I held down the lock and home buttons and it forced a reboot. Afterwards things came back to normal.
Saturday, July 2, 2011
4:41 PM: Log into Mint to check my site stats. It seems that the browser on the TouchPad is the fastest and most responsive app in the whole device. Though Web pages load a bit funky at times, they do load quickly and are very responsive.
4:59 pm: Friends will be arriving for the BBQ birthday dinner tonight, so I grab the iPad to go hook it up downstairs and stream Pandora. But I remember that I’m committing to use the TouchPad for the next week. So I search the HP App Catalog for a Pandora app.
Lo and behold there is one, but it is not TouchPad optimized. No matter, I download it because it’s free.
I heard that some apps that are not TouchPad optimized may not run on the TouchPad. Since Pandora is free, I figure why not give it a shot. It downloads and runs just fine.
When Pandora is running, you get the typical Pandora controls on the front of the TouchPad’s Lock Screen. However, you can’t control the music with those buttons. How odd.
In fact, this is something that is a bit frustrating. Though the Lock Screen displays notifications (such as new emails, Twitter replies and DMs, new IMs, etc…) you cannot act on those notifications.
10:01 pm: After running Pandora radio for 5 hours the battery only drained 13-percent, from 86 to 73.
10:23 pm: perhaps a better Twitter client has arrived? Check the App Catalog. Nope, Spaz HD is still the only one.
10:32 pm: Hey, what's that magazine I heard about? The one that showcases apps? It's not advertised on the Catalog home page, nor is it listed in the featured section of the Catalog.
Ah, I read here in this paragraph of text that the magazine is called Pivot. I guess I have to search for it on my own...
Hmm. Apparently it's not in the catalog; a search for Pivot brings up no results.
Sunday, July 3, 2011
9:00 PM: In an attempt to test the limits of webOS’s multitasking capabilities, I begin opening as many apps and web pages as I can. I launch 15 cards (5 browser cards, email, the App Catalog, pondNotes, Paper Mache, Memos, Spaz HD, Photos & Videos, Music, Video and Voice calls, and Calendar) and then a blank notification appears in the top-right of the screen along with an accompanying alert sound and slight buzz.
I assume this blank notification has something to do with alerting me that there are a whole lot of apps open and I should do something about it. But it’s blank, so I ignore it.
One thing I do like about this notification is that I can continue to use the TouchPad even while the notification is showing. In iOS things come to a halt when a notification appears. Though, never has iOS notified me that I should be a little more prudent in my app launching endeavors.
I go into the Twitter app, Spaz, and find a link. Tapping on the link normally would have opened a new browser window. However, in this case it slides me all the way to the far-left browser card and brings it up. And then the blank notification pops up again… And that Twitter link never did open.
Monday, July 4, 2011
8:30 am: Marinating some BBQ chicken for grilling later tonight.
9:30 am: With a hot cup of coffee in hand, and a relaxing July 4 holiday ahead of me, I'm ready to do some reading. I've searched many times for an RSS reader in the HP App Catalog but there are only a couple, and so far as I can tell none of them sync with Google Reader.
I launch google.com/reader but am greeted with the standard view, which is literally unusable on a touchpad. Is this how it works on the iPad, too? I use Reeder so I actually don't know, but surely there is a way to read your RSS feeds from a touch screen.
I launch google.com/reader on my iPad and am redirected to the mobile version: google.com/reader/i/. Returning now to the TouchPad I manually type in the mobile URL and am greeted with a usable version. (In some ways, I'm a bit bummed that I won't be forced to read my RSS feeds on the iPad.)
10:45 am: Since the Kindle app is still unavailable, I am curious about how the TouchPad handles reading. I do a lot of reading on my iPad through Instapaper, Reeder, iBooks, and a few magazine apps like Wired and The New Yorker. I remember there being demos on the HP TouchPad website about their reading apps, so I go there to see if I can find something.
The whole website has changed. Now there is far less information about the TouchPad and instead lots of links to go buy one.
Side note: Those Russell Brand advertisements are horrendous.
The only reading app that I see advertised is Time Magazine. So I pick up my touchPad, launch the App Catalog and search for Time. It's free to download and you can subscribe to it for $2.99/month which includes both the print and HP TouchPad Edition delivered each week. The first 4 weekly issues are free. If you like, you can just get the digital version for the same price.
Honestly I do not feel like signing up for this. I have a gut feeling that it will be a poorly rendered PDF version of the magazine, and that navigating and reading it on the TouchPad will be more maddening than entertaining. However, for the sake of science, I feel that I must. Maybe later...
10:52 am: I am still wanting to get ahold of their App Catalog app, Pivot. It still does not appear in the search results when trying to find it in the App Catalog. I decide to launch Help and start a live chat with a service rep asking if they know.
The Help screen is taking a while to load; perhaps the TouchPad needs a reboot.
I go out to the card view and begin closing some apps. There are a few websites open that I want bookmarked so I email them to myself. Suddenly, the screen goes blank and I see the glowing HP logo.
10:53 am: I just crashed webOS.
10:57 am: Okay, back to the App Catalog. Well hey, would you look at that! Pivot is now front and center on the App Catalog app. How did they know?
11:04 am: Pivot is a great idea. It's a magazine all about app discovery, which, since Friday morning, is something I have had a hard time with. In theory it looks like you should be able to buy the apps from within Pivot. However, the purchase links are all stuck to the top-left corner of the screen, and you have no idea which purchase link is for which app.
I thought I was re-downloading the Kindle app (because based on Pivot it seems that the app is ready and available), but I actually ended up downloading Royal Opera House. Whatever that is.
11:07 am: I download HP MovieStore (which is powered by Roxio). This is apparently where you can download movies and TV shows right to your TouchPad. Alas, it seems to have the same development team as Kindle...
Now I'm curious if the Software Manager is supposed to notify me when updates are available or if I have to hunt them down myself. I launch Software Manager and am presented with a list of all the Apps I have installed. About 10 seconds later a green button appears at the bottom of the screen letting me know I have 3 updates available.
11:43 am: Okay, I take back what I said about being able to read feeds on the TouchPad — I can't. Sure, I can get Google Reader's mobile version to load, but it doesn't exactly work like it should. Loading more items pops you back to the top of the list, and marking all the currently viewed items as read does just that but without a refresh of new unread items.
The TouchPad may tout that I get the full web because it's Webkit-based browser supports HTML5 and Adobe Flash. But it does not appear to ever want to render the full web in a usable fashion.
11:45 am: I found a good use for Flash: Rdio.
11:57 am: A notification appears informing me that Paper Mache, the Instapaper app, is syncing. I don't even have Paper Mache running. My first thought is, hey, that's fantastic! My second thought is, wait, how much is this affecting my battery?
3:08 pm: Trying to watch the latest episode of Put This On. The Vimeo flash player isn't working well. So I bust out the iPad, because it's about time there was a head-to-head competition between these two. The iPad pulls up the .MOV file splendidly, and plays it in full-screen with no trouble whatsoever. Thank you, iPad.
Tuesday, July 5, 2011
10:41 am: The Internet just went out. Delightful.
2:19 pm: With no Internet, I've decided to start writing the review itself.
6:45 pm: Wrote a little over 3,000 words today. Maybe the Internet should go out more often.
Wednesday, July 6, 2011
8:41 am: Still no Internet.
8:45 am:I transferred over some old Superman cartoons because that’s about the only DRM-free video I have around here. (One day, if I ever own a Mac Mini I suppose I’ll get around to turning all my plastic video media into digital).
The video transferred over just fine, though the low-resolution cartoon looks pretty crummy. But hey, that’s half the fun, right?
12:58 pm: There are still some final bits of research I need to do and I need an Internet connection. So I am heading over to my local coffee shop to work. The second-half of this review may come across as more caffeinated than I originally anticipated.
10:26 pm: Internet's back!
10:56 pm: Finally published my review. I am a bit surprised by the conclusion I ended up with. I truly did expect the TouchPad to be more than it was. But that’s why I titled the article “The HP TouchPad 1.0”. I think webOS has a bright future. The operating system does seem mostly suited for a tablet device, and I think that with more refinement the TouchPad could be the number two tablet. But, that is not what it is today. It’s buggy and awkward.
Thursday, July 7, 2011
10:18 am: Time to either return or sell this thing.
In the Settings pane there's a way to do a secure erase. I erase the TouchPad, power it off, and put it completely back in all its original packaging and plastic wrap.
Before posting it to Craigslist I decide to call Best Buy. I let them know I bought it last week, but that I don't like it. They have no problem whatsoever with me returning it. So I do.
✚
OS X Lion
Lion is the finest version of Mac OS X to date. It’s the sort of operating system nerds would go stand in line for… if they could. But instead you can download it right now (assuming you haven’t already).
Over the past several months I have been using the early developer previews of Lion. For me, it is not the headline features of Lion that make it such a compelling and noteworthy release. Rather, it is the thousand little refinements that all add up to what is, in my opinion, the most attractive and usable operating system on the planet.
There are some big things in Lion that stand out as the hallmark features — such as Launchpad and Mission Control — but these are not so much features as they are usability enhancements. And to me, that is what Lion is all about: enhancements.
There are a thousand subtle changes that all add up to something fine. Scrollbars have been removed and now only subtly appear when you are actually scrolling. Buttons are now a more classy square shape. Many icons are now monochrome. For the next several months you’ll be stumbling across all sorts of things that look or act better than they did in previous versions of OS X.
Even Safari’s default page for “You are not connected to the internet” has been massively updated. The old version was jarring; the new one is gorgeous. How many thousands of times have you seen that stark white page because a server wasn’t responding or the public wi-fi was acting up? It has always been jarring to me, and it’s been that way for years. But now, in Safari 5.1, you see a classy, well-designed error page. It is much more inviting and friendly. The former was ugly, but the current is art.
Here’s how Safari 1 looked when you reached a page that wasn’t responding, or if you tried to load a site while your computer wasn’t connected to the Internet:
And Safari 2:
Safari 3 and 4:
And now, Safari 5:
This “You are not connected to the Internet” design is, in a way, the quintessential example of what is different between Lion and all the previous versions of OS X before it.
There are many things like this sprinkled all throughout the OS. There are many subtle refinements which, when experienced, you don’t just think I’m glad they added this, because this is cool. Instead, you think how is it that OS X never had this before? This is the way it should be.1
And so, herein is a list of miscellaneous thoughts and observations about the greatest operating system on the planet:
Launchpad
Perhaps the single most notable new feature of Lion is Launchpad.
With the advent of Launchpad in Lion there are now three built-in application launchers in Mac OS X: The Dock, Spotlight, and Launchpad. It just goes to show what a hurdle it is to handle application installation, organization, and access. In conjunction with the Mac App Store, Launchpad is, in my opinion, a fantastic way to store and access applications.
But do I actually use Launchpad? Nope. Primarily because Launchpad is mouse friendly and I live and die by the keyboard. To activate Launchpad you take four fingers on the trackpad and pinch them together. It is awkward at best on my 2008 MacBook Pro even though I bought a Magic Trackpad to use with Lion. I much prefer to Command+Space into my application launcher of choice: LaunchBar.
Mission Control
The second most notable feature of Lion is Mission Control. Mission Control is sort-of like Exposé on steroids, and I use it because there is no way not to use it if you use Exposé. But, I don’t think to myself how happy I am about Mission Control.
Mission Control truly shines if you use Spaces — which I do not. I have all my application windows stacked on top of one another in just one Desktop space. And so, Mission Control, while more organized and intelligent than Exposé, is not significantly more useful to me.
If you use hot corners they have been improved as well. The hot corner for showing all the windows of the frontmost application now also displays a coverflow-like view of all recent documents:
The Mac App Store
The more I use the Mac App Store, the more I appreciate it. It is great to have all your apps centralized in one hub. You can download them onto any computer and all you need is your Apple ID. It makes switching to a new Mac or setting up a new install much simpler.
The way it works differently in Lion is that apps you download go into LaunchPad, and then the LaunchPad Dock icon bounces once. This is far more elegant and scalable than the way apps installed in Snow Leopard, which was to download right into the Dock.
Full-Screen Apps
I have a love-hate relationship with full-screen apps. Partly because I love screen real estate. But full-screen apps seem to have been made with laptops in mind. Most of the apps look great on the smaller screen of a laptop, but not so great on a larger display.
I have this not-so-special theory that Apple’s flagship Mac is the MacBook Air. Full-screen apps scale best on smaller screens. I believe that Lion has been, in a way, specifically designed for the Air.
Some changes to an operating system are instantly welcomed, while others take time to get used to. Mail is in the latter camp. It goes without saying that this new look for Mail on the Mac has a very big nod back to Mail on the iPad. I did not like this all-new look at first, but now I have grown to appreciate it.
There are a few bits that I still do not appreciate, however. Such as: (1) the way a new reply message “bounces out” from the original message; and (2) the way a message window slides up and off the screen when you send it.
For those who cannot handle the new look of Mail, there is a setting to go back to the original layout under Preferences → Viewing. Note, however, that even when reverting to the previous layout, the aforementioned annoying animations will still be there.
Perhaps my favorite new feature in Mail is the enhanced search capabilities. When searching for a particular email you are offered suggested search terms — not unlike Google suggestions — that recommend people, subjects, attachments, etc. These search suggestions are both intelligent and useful.
And my favorite new design element in Mail is the look of the popovers you see when adding an event or creating a new contact — both of which are very nice.

Auto-Saving and Versioning of Files
Not all apps auto-save just yet. And for those that do (specifically TextEdit and Preview), I haven’t yet decided if it’s a service or a burden. It’s nice that you can quit without worrying about saving or choosing a spot to save, but I primarily use TextEdit as a scratchpad, not as a writing tool. I am always tossing bits of text into TextEdit that usually have a short lifespan. So, whenever I quit TextEdit, I have to CMD+W and then CMD+Q.
Quitting doesn’t prompt you to save, but closing a window does. I find this behavior to be equally great and maddening. If you don’t want to restore windows when you’re quitting and re-opening apps, you can turn it off in System Settings → General. Though, there is not an option for asking you to save on quit. If you quit with unsaved documents, then they are restored when you open the app again.
Version control, however, is fabulous. Not that I use it often, but it is done so very well. You get to it by hovering over the top titlebar in an application and clicking on the triangle that appears.

You are then presented with some options to revert to the last time this document was saved, lock this version, duplicate it, or compare versions.
Comparing versions launches you into a TimeMachine-esque zone where you have the current version on the left and a pile of previous versions on the right.
Various UI and UX Changes
Miscellany
The Apple logo on the boot-up screen is more “letterpressed.”
When launching an app, the window launches from the center of the screen and opens up outwards, like an app does in iOS.
The classic stop-light buttons in the top-left corner of all windows are now a more muted red, yellow, and green.
The icons in the Finder window sidebar are now all monochrome. Personally, I like the new color scheme of more muted colors in some areas and the monochrome in others. To me, it all feels more refined and less frilly.
Plug and Play with an External Monitor
I adore the way Lion manages laptops and external monitors. I find it much more user-friendly than the way previous versions of OS X have managed it.
The tried-and-true behavior of how OS X deals with a laptop and an external monitor has been this:
With the laptop lid closed and the computer asleep: Plug an external display, wake the computer, and the external display will be the only working display. If you were to then open your laptop lid while an external display is running, the laptop’s screen stays off.
With the laptop lid open and the computer awake: Plug an external display in and you have two working screens. If you were to then close your laptop lid, the computer would go to sleep.
In Lion, this behavior has been greatly improved:
With the laptop lid closed and the computer asleep: Plug an external display in, wake the computer, and the external display will be the only working display. If you were to then open your laptop lid, the laptop’s screen would turn on and you have two working monitors.
With the laptop lid open and the computer awake: Plug an external display in and you have two working screens. If you were to then close your laptop lid, the laptop’s screen turns off and the external monitor becomes the only working monitor.
In short, opening and closing your laptop’s lid is like adding or removing a second display, and does not affect putting the computer to sleep.
It may sound silly, but this is perhaps one of my favorite new features in Lion.
Rubber-Band Scrolling
Once you get used to the rubber-band scrolling of list views and windows there is no going back. As I mentioned above, I have been using the Developer Previews of Lion since March. When switching over to Snow Leopard, the lack of rubber-band scrolling was the most annoying “missing” features. It is one of those things that once you get used to it, it feels completely natural.
Dashboard
The Dashboard got an unfortunate makeover. Ever since OS X 10.4 Tiger I have found the Dashboard extremely useful. Partly because I use the Mint web-stats widget, but also because I keep a calculator, the calendar, weather, and a few sticky notes there. Hitting F4 to invoke the dashboard is nearly second nature. But now, instead of zooming into focus like it has since 2005, the Dashboard is its own space that slides over from the left. And it brings with it a new dotted background texture which I find highly unattractive.
If you want to return your Dashboard to its previous look and behavior, you can do so by unchecking the option to “Show Dashboard as a space” within the Mission Control settings in System Preferences.
Application Windows
Application windows now have rounded window corners all around. Previously, only the top-left and top-right corners were rounded. Now all four are. And, speaking of application windows, there is less window chrome in general. Thanks mostly in part to the new scrollbar.
The new, minimalistic scrollbar is copied and pasted right out of iOS. It only appears when the window you’re in is moving, and it’s intelligent enough to be a dark color on a light background and a light color on a dark background.
Other tidbits include:
The ability to grab any edge of an application window and resize it. (Try holding Shift or Alt while doing so.)
The toolbar in the Finder window no longer has that dotted division line that you can put into a Finder window tool bar.
Auto Correct
Lion implements iOS-style auto-correcting of spelling. It literally looks just like on the iPhone / iPad:

It is great at catching misspellings, but I find that often times it will auto-correct to the proper spelling of the wrong word I was originally trying to spell.
If the new auto-correct really irks you, you can turn it off within System Preferences → Language & Text → Text. I appreciate it, but it needs a bit of babysitting from time to time.
The Hidden Library Folder
The ~/Library folder is now hidden. If you want to see it, a simple terminal command will unhide it:
chflags nohidden /Users/YOUR USERNAME/Library
The Dock
In the Dock you can choose to not display the blue icon orbs that glow to show that an app is active. In Dock Preferences there is an option to show indicator lights for open applications. These are turned off by default. Apple wants to eliminate the concept of an app running or not.
This concept won’t be fully realized until Macs are running SSDs and applications launch in split seconds, which means the option to not display the indicator lights for open applications is good news for all of us.
Roar
Lion is what OS X was meant to be: refined, attractive, and user-friendly.
As we’ve heard so many times from Apple, this is a “Back to the Mac” operating system. But Lion is more than just elements that pull from what we see and know on iOS. It is also full of hints that point to the future of Apple hardware and the amalgamation of iOS and OS X. It is exciting to see this big picture slowly coming into focus.
- However, one glance at the hideous new iCal UI and my theory is shot to pieces. ↵
✚
The HP TouchPad 1.0
After nearly a week with the new HP TouchPad and webOS 3.0 my overall impression is that the TouchPad is less than the sum of its parts. There is nothing the TouchPad does that the iPad cannot except play Flash video (sometimes). I could not find one feature or function that was significant or compelling enough to take the TouchPad seriously compared to the iPad.
What webOS has that iOS doesn’t is not so much found in a feature comparison as opposed to functionality differences. webOS has some very clever approaches to common tasks and needs: such as the popular card view approach to fast-app switching, global notifications, and a few other things. And though I consider webOS to be very clever in certain areas, I do not find it to be fun.
Packaging
The TouchPad comes in a high-quality box with much attention paid to the packaging. It feels exactly like the box an iPad would come in. The cardboard is the same type of thick semi-gloss board. In fact, it is so similar to the iPad box that on the back of the TouchPad box it even says, “Designed by HP in California.”
When opening the box you don’t lift off the top, you slide out a drawer. The TouchPad itself is wrapped in plastic and underneath it you find a sunken cardboard “pouch” with a thumb tab to pull it out — just like you would find underneath your iPhone or iPad. The cardboard pouch says, “Now comes the fun part.” Inside there are a few documents, including the users manual, and a microfiber cloth with the HP logo embossed in the corner. The only thing missing are a couple of white HP stickers.
Next to where the TouchPad sits is a compartment holding the micro USB cable and the charging wall wart. They are both black and high quality. The wall wart is a round spherical shape with prongs that fold in and out.
Hardware
When I picked the TouchPad up from its box the first thing I noticed was how much heavier it is than my iPad 2. Though, by the numbers, the TouchPad is nearly the same weight as the original iPad and less than a third of a pound heavier than the iPad 2.1
After using an iPad or iPad 2 for the last 18 months, the plastic back of the TouchPad instantly felt cheaper and flimsier. The whole shell is bendable and flexible. If I were to hold the device in landscape mode with one hand on each of the two sides I am confident that I could twist and crack it.
There are some cases when the friction of the plastic back is welcomed. Since it provides more friction than the aluminum back of the iPad the TouchPad is easier to hold or carry without fear of it sliding out of my hand. However, due to the TouchPad’s weight, it is not any easier than the iPad is to hold in portrait orientation using one hand while reading.
Buttons, etc…
On the top of the TouchPad there is a Lock button on the right and a headphone jack on the left. The right side of the device has a volume rocker at the top, and at the bottom is a small pop-out tray with the devices serial number. The bottom of the TouchPad has a micro-USB input. The left side has stereo speakers — one on each edge.
There is no toggle for mute/orientation lock. However, you can quickly access both of those options via a settings pane which is available from anywhere at any time. But more on that in a bit.
On the front of the TouchPad is a camera at the top and the Center Button (Home Button) is on the bottom. The center button is not round, it’s a thin rectangle with rounded edges — the size and shape of a long Tic-Tac. What I like about the Center Button is its thin LED bar which slowly pulses when you have a new notification. Pressing the Center Button will turn on the screen if the TouchPad is locked, enable the Launcher if you are in Desktop/Card view, or it will take you to Card View if you are in an app at full screen.
The screen itself is the same Gorilla glass as the iPad and is just as prone to fingerprints.
To power the TouchPad on or off you hold the Lock button. If the device completely freezes up on you (which has happened to me once) you can hold the Center and Lock buttons simultaneously to force a power-down.
A Landscape Disposition
My TouchPad loves to be in landscape mode. If I’m holding it in portrait orientation I have to watch out because it will rotate into Landscape at the hint of a tilt. Trying to get the screen to then rotate back into portrait usually takes several seconds. Sometimes I shake it up and down to see if that will help but it never does.
USB Mode
Plugging the TouchPad into my Mac via the USB cable brought up a prompt on the device. It told me that for optimum charging I should plug it into the wall. Or, if I wanted to use the device in USB mode then I could. If the latter, you have to tell the TouchPad to go into USB mode.

While in USB mode, the sceen shows a giant USB logo and your computer shows a device named “HP TOUCHPAD”.
USB mode gets you access to certain files and folders on the TouchPad: A PDF titled “Open Source Software Information”, and 5 folders titled: downloads, wallpapers, screencaptures, ringtones, and DCIM. A sixth folder will show up if you download the HP Play app to your computer in order to sync iTunes music to your TouchPad’s library. But more on that later.
Moreover, you can add your own files and folders here (such as a folder with DRM-free music and videos, as well as documents, and/or photos) and the TouchPad will find them and they’ll appear in the relevant apps to display or use that media.
Software
This has been my first extended experience with webOS. The software feels far more engineer-y than I expected it to. This is a broad generalization, but I think it gets the point across: if webOS sits somewhere in between the utilitarian appeal that is Android and the emotional appeal that is iOS, then it is certainly closer to the utilitarian side than I expected it to be.
Highlights of webOS include notifications, multitasking, and a quick access pane to common settings. Lowlights include maddening performance on the TouchPad, a shortage of fine apps (built-in apps included), and several dark corners which need refinement to the user interface and user experience.
I have heard so many good things about webOS that I was truly expecting to be impressed by the TouchPad and to enjoy webOS. Alas, using the TouchPad for the past week has not been impressive or enjoyable. And it’s not for a lack of apps — I was able to find a native TouchPad app for nearly all my “killer app” needs.
There is a significant difference between missing features and broken ones. Features do not a user experience make. In the back of my mind all the while I was using the TouchPad, I kept thinking to myself, “so close, yet so far.”
webOS has an amazing fast-app switching functionality out of the gate. The system-wide notification system is very nice — there is an addicting little settings pane which is available at any time and lets you adjust brightness, etc… But just because there are features of webOS that I would love to see find their way into iOS, I would rather use the iPad and iOS of 2010 than the TouchPad of today. Because webOS — as clever as it may be — is not a delight to use. It is slow, awkward, and requires a great deal of determination.
Or, put another way, webOS is clever but not fun.
Start Up
Booting up the TouchPad takes about 1 minute and 10 seconds. (For comparison: my original iPad boots up in 26 seconds; my iPad 2 in 24.)
While the TouchPad is booting up the HP logo sits centered on the screen. As webOS gets closer to being fully loaded the logo begins to pulse with a white glow coming from behind it. The closer it gets to being loaded the quicker and more radiant the logo pulses. When the TouchPad is finally booted it chimes and vibrates.
Activating
When you start up the device for the very first time you activate it without ever connecting it to a computer, though not without connecting it to Wi-Fi. During the initial setup you are asked to sign in with a pre-existing HP webOS Account or else create a new one.

Setting up my new HP webOS Account was very easy. I was given the options to add email accounts and calendar accounts to my TouchPad.

webOS offers MobileMe as an option for email, but it won’t sync with my MobileMe calendars or contacts. It does sync with Google calendar, contacts, email, and documents but, alas for me, all my calendar and contact info is in MobileMe. You can also sign in to an Exchange account, Yahoo, your own IMAP server, or look for other services.
Once you’ve set your first email account up, you can add more. Or if you want to add more later, you can do so from the Launchpad → Settings → Accounts.
Cloud Backup
Having a webOS account means your TouchPad will automatically back itself up, over the air, once a day. My most recent backup was completed this afternoon at 2:26 as the TouchPad sat in my bag while I was working on this article at a local coffee shop.
From the Backup settings page on the TouchPad:
Your HP webOS Account and other personal data (including potentially sensitive data that may be provided during the use of the device and its features) are backed up automatically every day. This data is stored on secured servers used solely for recovery purposes.
HP hosts a web page listing exactly what does and does not get backed up. Some notable things include the apps which you’ve downloaded via the App Catalog but not their settings and data. Website bookmarks and cookies are backed up, as are memos, and messages and conversations via SMS, MMS, and IM. Photos, videos, and music are not backed up and no passwords are backed up, just usernames.
In short, if you dropped your TouchPad in a lake and had to start over with a new one, certain media would not be recoverable (music, photos, videos) unless you had it backed up on your computer, but the overall setup of your TouchPad (apps, accounts, and some settings) would be restored.
For the paranoid at heart you can disable automatic backing up. And if/when you do, all your backup data that is stored on HP’s servers will be erased. You can, of course, turn backups back on again at your convenience.
Web Browsing
The webOS browser is based on WebKit. It supports HTML5 and has a working version of Adobe Flash.
Web sites without a lot of Flash load very quickly. And there is virtually no lag when scrolling around on a web page. On several common websites that I visit, once the page had loaded I had no trouble scrolling down as fast as the TouchPad would let me and I almost never saw checker boarding.
However, the TouchPad’s browser does not render all sites perfectly. I noticed on a few sites where header divs seemed to get cut off a bit too soon on the right-hand side. Moreover, the TouchPad does not render TypeKit fonts; though shawnblanc.net still looks quite handsome on the TouchPad.
Another oddity is that the TouchPad does not support javascript bookmarklets, such as the one Instapaper uses for adding pages to your queue and the one Google uses for adding feeds to Reader. Which means that when browsing the web, if you find something you want to read later in Instapaper you have to email the link to your Instapaper account.
After visiting my site with the TouchPad and then checking my analytics, Mint logged the TouchPad’s browser as “Safari 534.6″ and the Platform as “Linux”.
Flash
Flash works better than I expected but worse than I’d like.
I was unable to watch a 720p video on Devour’s home page, but I was able to watch some shorter, lower resolution videos from YouTube and Hulu. I also was unable to watch the latest episode of Put This On without it stuttering and downsamping to a lower resolution. So, while waiting for the episode to buffer on the TouchPad, I pulled out my iPad, navigated to the site, and watched the the show in full-screen at 720p resolution. Stay classy, Flash.
In the browser’s settings you can disable Flash if you like, or you can choose to not have it autoload and play when you visit a site. However, the device requires a reboot for the preferences to take place. I had selected to disable Flash yet Flash videos were still viewable and even Rdio worked.
On the iPad, which doesn’t have Flash at all, most video sites serve you the native video file with no trouble. On the TouchPad, when Flash is disabled, you get nothing:

In theory, the TouchPad gives you “the full web”. In reality you get less.
Apps
The 5 apps that come in the Dock are Web, Email, Calendar, Messaging, and Photos & Videos. Additional apps that the TouchPad ships with are Memos, Maps, Contacts, Phone & Video Calls, and Music.
What the Home screens are to iOS, Launcher is to webOS. You can bring up Launcher three different ways: (1) by tapping the arrow icon found in the right-hand side of the Dock; (2) by clicking the Center Button when in Card view; or (3) if you enable “advanced gestures” under the settings for Screen & Lock then the Launcher can be brought up at any time by swiping up from the bottom of the screen no matter what orientation the device is in.
The Launcher has four tabs across the top: Apps, Downloads, Favorites, and Settings.
The Apps tab contains default system apps. Downloads contains a link to the HP App Catalog and is where all the applications you download from the App Catalog go. Favorites is empty and waits for you to populate it, though if you save a Web page as an “app” then it will appear in the Favorites tab. The Settings tab is where the all the different mini-apps are kept for managing accounts, backup, bluetooth, sounds, software updates, etc.
You can move the apps into any tab and into any order you like by tapping and holding them. A grey box appears around the icon and then you can move them as you see fit. And apps you have downloaded from can be deleted by tapping the “x” that appears.
The App Catalog
Finding and downloading an app from the App Catalog is simple enough. You can search on your own, or look through lists of the most popular, or most paid for, etc.
As of this writing, the vast majority of apps in the Catalog are designed for the Pre, not the TouchPad. Fortunately, above the button to buy/install an app it will say “For TouchPad” if it’s optimized for the tablet. According to HP there are over 300 TouchPad-ready apps in their Catalog.
When buying an app you have to enter your HP webOS Account password and then confirm that you do in fact want to purchase the app. If you are downloading a free app you are not asked to authenticate with your password.
When you download an app it installs behind the scenes without kicking you out of the App Catalog. This is quite nice. As the app is downloading the “install/buy” button turns into a loading bar, and once it’s installed it turns into a “launch” button:

I very much appreciate this behavior and would love to see something similar in the iOS App Store. One common hit against webOS is that its App Catalog has far fewer offerings than Apple or Android. My “killer apps” on my iPad are: Instapaper, Simplenote, OmniFocus, Twitter, and Reeder. I was able to find 3 of these apps in the HP App Catalog, along with a few others:
For Instapaper: Paper Mache is the Instapaper app for webOS. The developer, Ryan Watkins, is clearly an Instapaper fan. The app has all the functionality of Instapaper on the iPad, plus it is able to sync in the background. Even when the app itself is not running.
For Simplenote: pondNotes is the Simplenote app for webOS. Though it is not as elegant or quick as Simplenote on iOS, it is functional and so at least you can have read/write access to your notes.
For Twitter: Spaz HD is currently the only Twitter client for webOS. I wish there were other options. And, alas, for some reason I was unable to log in to twitter.com and try the mobile version of the site on the TouchPad.
For RSS: There is not yet an RSS reader that syncs with Google Reader. And using Google Reader’s mobile web app on the TouchPad is nearly useless. It does not render or operate properly in the TouchPad’s browser. And so, the first significant workflow problem I encountered with the TouchPad was an inability to read my RSS feeds.
Pandora: They have a native webOS app, but it is built for the Pre. However it does work on the TouchPad. Pre-sized apps run in their normal size inside the outline of an HP Pre.
Kindle: The Kindle app is coming, but right now it is just a placeholder. You get the familiar launch screen as the Kindle iPad app, and it tells you thanks for downloading and that they’ll let you know when the app is actually available by sending a notification through the Software Manager.
For Writing: TapNote is a very nice writing app, and perhaps the nicest app I’ve downloaded from the Catalog. It cost me $5 and is a bare-bones plain text writing app that syncs with Dropbox and has full-screen mode. I found it much more appealing and usable than pondNotes. If I were going to do long-form writing on my TouchPad it would be in TapNote.
Other apps:
Exhibition: This is one of the default apps that ships with webOS 3.0 and it is also one of the finer bits of good design on the TouchPad. It is a simple, full-screen app that displays the time, upcoming agendas items, or photos. I’ve always been a fan of the flip-style clock design, and the TouchPad’s looks great.

Dropbox: There is not a Dropbox app in the Catalog, but rather a system-level sign-in for Dropbox. You go to the Launcher → Settings → Accounts → Add an Account → Dropbox.
To set up your DropBox account you simply type in your login credentials. It doesn’t authenticate at the time of adding because I added my account without a problem despite the fact I had no Internet connection at the time.
Your Dropbox account can then be accessed through the native apps on the TouchPad. Though the only app that I know of which accesses Dropbox is QuickOffice. It will let you view your documents and photos, but you cannot save them to your TouchPad, nor can you edit them. In fact, so far as I can tell, there is no way to edit documents or spreadsheets on the TouchPad.
Cards and Fast-App Switching
The way webOS handles app switching with its card view is one of the premier features of webOS. I like it, and the more I get used to it the more I understand why some users don’t want it any other way.
Switching between apps by seeing the current screen rather than the icon feels much more natural and user-friendly. If you’ve ever wished that fast-app switching on iOS was more akin to the way you switch between multiple “browser windows” in Mobile Safari then you’ll know why card-view switching in webOS can be so pleasant.
If you are working between two apps, or you open a new app and want to switch back to the previous one real quick, it can often mean scrolling several cards over. iOS attempts to solve this automatically for you by sorting the apps in the task switcher by the order in which they’ve been opened. In webOS you can solve it manually by rearranging and even stacking your cards. You do this by tapping and holding on a card — it will go semi-transparent and then you can move it around.
Multitasking
webOS will let you open as many apps as you like until you reach the limits of your nerves or the TouchPad’s hardware — whichever comes first.
In my own attempt to test the limits of webOS’s multitasking capabilities I was able to launch 15 cards (5 browser windows, email, the App Catalog, pondNotes, Paper Mache, Memos, Spaz HD, Photos & Videos, Music, Video & Voice calls, and Calendar). At this point a blank notification popped up in the top-right corner of my screen along with an accompanying alert sound and a quick vibration.

I assume the notification had something to do with alerting me about the amount of apps I had open. But it was literally blank so I had no choice but to ignore it. It disappeared after a few seconds, but when I tried to launch a website from within Spaz, the Twitter app, I was taken to the leftmost browser card and then the same blank notification popped up, and the Twitter link did not open in the Web page.
However, when not connected to the Internet the TouchPad handles multiple apps much better. When not online I was able to have 23 cards open without a problem or a blank notification.
Apps remain open until you quit out of them. You do so by flicking the card up and off through the top of the screen. When you toss a card away it makes a nice “whoosh” sound.
Something fun: if held in portrait orientation with the speakers on top, pulling down on a card makes a “crunching” sound, and then if you let go at the last second the card flies up and off the screen while shouting, Weeeeeeee! Here’s a homemade video of this in action.
Another perk of webOS’s multitasking capabilities is that apps can update in the background if they want, even if they are not launched at all. Paper Mache, for example, can update its Instapaper queue so that it’s always up to date whenever I launch it.
Scrolling
There is no way that I have found to quickly and simply scroll to the top of a page or a list view. In iOS you tap and hold the top of the status bar. In webOS if you’ve reached the bottom of a website or are 30 deep in your email inbox, you have to scroll, scroll, scroll all the way up.
Secondly, you know how in iOS when you start scrolling down on a web page then the scrolling will “lock” in and it only scrolls down and up no matter if you move your finger left or right? The TouchPad doesn’t do that. The web page follows the movement of your touch pattern to the letter.
Here is a chart illustrating those differences in scroll behavior for iOS and webOS:

Music and Videos
To get music onto my TouchPad I started by launching the music app. It told me to go to hpplay.com or copy music to my device while it is in USB mode.
So I put the device into USB mode (as discussed above) and since there was nowhere to put the music I decided to create a folder titled “Music”, put some DRM-free MP3s in there, and assumed that the TouchPad would find them. And it worked — once I had ejected the TouchPad from my laptop the songs appeared in my Music app and I could play them in stereo.
Next I add some protected M4P files that I’ve bought from iTunes. I put the TouchPad back into USB mode and the files copied over just fine and they even showed up in the TouchPad’s music library. But the tracks would not play. No errors or anything; they were simply unresponsive to the play button.
So then I downloaded and installed HP Play (which is currently in beta) onto my MacBook Pro. (HP Play looks like what an app would look like if someone built an iTunes clone using Adobe Air while imagining the year was still 1998.) I transferred over those same DRM M4P files from before as well as some m4a songs, but this time by syncing them via HP Play. The M4A files played just fine, the DRMed M4P files would not.
HP Play does not sync video to the TouchPad. Which means the only way to get video from your computer to your TouchPad is to transfer it manually with the device in USB Mode or buy it from HP’s Movie Store app. I copied over some video files and they showed up in the Photos & Videos app just fine. The title of the video is the name as its parent folder. Protected videos, such as those I’ve bought from iTunes, will not play on the TouchPad.
And the HP Movie Store app? Well, like the Kindle, it is also MIA.
System Notifications
System-wide notifications are the other premier feature of webOS. They work the way a notification should, by being simultaneously useful and unobtrusive.
Because just about any app can hook into the notifications, you can be notified about anything: new email, new mentions on Twitter, new Facebook messages, instant messages, the current song playing, and more. If you Pre is paired with your TouchPad then you can also get text and MMS messages on your TouchPad. Only apps that are running will send notifications.
When a notification comes in, the text of it scrolls across a small area at the right-side of the status bar. Then, a small icon is left behind to remind you that you have a notification. If it’s an email, then there is a small envelope, if music there is a note icon, if a Twitter mention then it’s the star that Spaz HD uses in its unique icon.
Tapping on the notification icon brings up a minimal popover. From there you can read the subject lines of your recent emails, and either slide them away to discard or tap on them to open your email and read that message. You can also control music playback via the notification popovers.
Notifications will also appear on the Lock screen. They look exactly like their minimal popover counterparts found under the status bar but they are not interactive (save the Music notification which lets you pause, rewind and fast forward).
You also get notifications about actions you’re currently performing, such as when an email has been sent or text has been copied. The same way a new email’s subject line will scroll across the status bar, webOS will tell you that you’ve successfully copied some text or that Paper Mache is syncing.
The Quick Settings Pane
There is a settings pane which you can access at any time, in any app, by tapping the top right corner of the screen. I am very fond of this little guy.

The settings pane tells you the day and date what percent of battery life you have left.
You can also:
- Adjust the screen brightness.
- Turn on/off Wi-Fi as well as pick a wireless network.
- Turn on/off VPN.
- Turn on/off Bluetooth.
- Toggle Airplane Mode.
- Lock the screen rotation.
- Mute the sound.
Though I welcome the ability to toggle Bluetooth and see the exact battery percentage, I think the average user would do just fine with a more simplified set of options. Perhaps Richard Kerris meant it when he said the target audience for the TouchPad is enterprise customers. (But if enterprise is their audience then why the horrible the Russell Brand commercials?)
Screenshots
You take screenshots the same way as on the iPad: hold the Lock Button and the Center Button down at the same time.
When you take a screenshot there is a large yellow orb that appears in the center of the screen. Presumably it is meant to imitate a camera flash or something, but it is very gradient-y and pixelated. It’s ugly.
It is very easy to accidentally lock up the device or freak it out if you happen to hit the volume rocker at the same time you are trying to hit the Lock Button and Center Button. This happened to me a few times, and once there was a several-minute stint where every time I hit the Center Button it would take a screenshot. One thing I like about the screenshots is that they get their own photo album, and all screen captures go into that photo album by default.
When the TouchPad is in USB mode, you can easily transfer screenshots over to your computer. They are in a top-level folder titled screencaptures. And when you see them, you find that they are named using the name of the app you were in, the date, and the time. For example, the aforementioned screen grab of shawnblanc.net that I took from the webOS browser is named browser_2011-01-07_114048.png.
This is clever, but in some ways it backfires. The screenshots are sorted alphabetically, and so if you take a screenshot and then want to attach it to an email (you can do that in webOS) it very well could be in the middle of the album rather than at the end.
Just Type…
Just Type makes for a nice one-stop-shop for quickly launching a Google search or getting a note or email started. It just works, and it works well.
Using Just Type as my go-to for starting an email, composing a tweet, or launching a Web page takes some getting used to. But, when I do remember to use it (rather than launching the app first), it is faster than launching the browser, tapping into the address field, and then typing out the URL.
Typing
I found typing on the TouchPad just as easy (or just as difficult) as typing on the iPad. There is the familiar click, click, click that accompanies the typing on the keyboard, and the keys are pretty much the same size. The layout is slightly different, though.
For one, the keyboard has a number row at the top. I regularly found this fifth row to be very useful.
Secodly, you can adjust the height of the keyboard between XS, S, M, and L. It would be nice if the height settings were orientation-specific. If you prefer the small keyboard height when in portrait orientation but medium when in landscape, you have to manually adjust it each time. I just leave it on medium at all times, and rarely do any typing when in portrait.
So, what did HP do with the extra keys they gained by adding the number row? They added some text-emoticons. How lovely:

As for typing with a Bluetooth keyboard, I didn’t buy HP’s Touchstone accessory and keyboard because I already own a Bluetooth keyboard of my own. Alas, I was not able to pair my Apple Bluetooth keyboard with the TouchPad. It literally took 5 minutes of refreshing the Bluetooth search on the TouchPad before it saw my keyboard, and that was followed by another 5 minutes of failed attempts to pair them. And so, no, I did not type this review on the TouchPad.
Cursor Insertion, Text Selection, and Cut/Copy/Paste
The way webOS does cursor insertion, text selection, and Cut/Copy/Paste are all nearly identical to the way iOS does them. There are a few differences:
You don’t get the magnifying glass when trying place the cursor in an exact spot. It is hit and miss. If you miss you can try again or else use the backspace key to delete all the text to the left of where you actually wanted the cursor and then retype it. My advice: aim a little to the right.
The text highlight color is yellow in webOS.
Once I’d selected a word or a letter I found it nearly impossible to grab the little handles and adjust my selection. The touch targets must be too small or something, but it always takes great care and usually several tries before being able to get hold of a handle and select more text.
To get your cursor to the very end of a document, it would appear that you literally have to tap in that exact spot. On iOS if you tap anywhere below the last line of text the cursor is automatically placed at the end of the document as if you hit page down. webOS does in fact work the same way, but the cursor doesn’t actually appear to be in place. You have to trust that it’s there at the end and simply begin typing.
In short, text selection is near the top of my list of things that bug me most about the TouchPad. Yes, the features themselves are there, but the functionality is only just passable. It can almost be less frustrating to settle the fact that you can’t do something rather than to have the hope of being able to do it yet never fully realizing that hope.
Fonts
The system font for webOS is Prelude.
If you visit this page which John Gruber set up 4 years ago to show the iOS system fonts, you’ll see that nearly none of the iOS system fonts are included with the TouchPad. The ones which do render are: Arial, Courier New, Georgia, Times, Times New Roman, and Verdana.
In Paper Mache, the Instapaper app for webOS, the font options it offers you are Prelude, Arial, Verdana, Georgia, and Times.
Dark Corners and Inconsistencies of the UI:
In most of the various application settings the toggle buttons are blue and square:

However, in some apps (such as in the Backup settings and the Text Assist settings) the toggle buttons are round:

What we would call the Home Button is called the “Center Button” on webOS. If you enlarge a Flash video to full screen then the TouchPad tells you “Tap the Center Button to return.” However, in the settings for Screen & Lock, the TouchPad lets you know that “The center button blinks when new notifications arrive.” In once instance “Center Button” is capitalized, and in another instance it is not.
There are times when certain screens or apps look just barely out of focus. Like a Photoshop document that is zoomed to 95-percent — it’s almost in focus but not quite. Part of me can’t help but wonder if the out-of-focus bits are simply scaled-up graphics from the phone-sized version of webOS.
In the Music app there are four sub-categories under the main Library listing: Songs, Artists, Albums, Genres. If no songs are in these sub-categories then a message appears where the track would otherwise be listed. The message has a large monochrome icon above it. For Songs, Albums, and Genres the icon and the message are centered on the track listing are. For Artists, however, the icon and message got left up into the top left corner on accident.
The App Catalog home page, when in portrait orientation, is quite off balance.

You can see how the description bubble above Categories is a few pixels higher than the other three. The margin to the left of the 4 center boxes is less than the right margin, and there is a different left margin width for heading, the top-level paragraph, and the center boxes.
However, it only looked like this for a few days. On Monday the Catalog home page was replaced with the cover of Pivot, the app discovery magazine put out by HP. I had been unable to find Pivot in the App Catalog until it arrived on its own, and so my guess is that Pivot and the App Catalog are one and the same. You will always see that month’s issue of Pivot every time you open the App Catalog, and since you cannot launch the App Catalog without an Internet connection neither can you read Pivot offline.
For icons, there is not the same standard “form” for all icons like there is on iOS. As such, they feel very loose and non-unified. Not to mention that some icons are pixelated, some are not. That is not to say that every icon in iOS is beautiful — far from it. But the unity and consistency of iOS icon shapes at least add to the overall aesthetics of the Home screens.
Conclusion
Why would someone buy the TouchPad rather than an iPad? I can think of a few reasons:
You have a Pre and you are desperate to use the advantages that come with the unified operating system.
Being able to say that your tablet has Flash is more important than being able to use Flash.
You are Apple-averse.
You take great delight in webOS and have great faith in its future. So much so that you’re willing to tolerate the annoyances, frustrations, and dark corners of the TouchPad in hope that they will get ironed out.
As a tech writer it was great to be able to use and live with the TouchPad for a while. There are many things I appreciate about webOS, and I’m glad I was able to spend some time with a non-Apple device for once. But, alas, the TouchPad is far less likable than I expected it would be. As it is I would not recommend it to anyone I know — even my friends with webOS phones.
- Actual weights: TouchPad: 1.6 pounds; original iPad: 1.5 pounds; iPad 2: 1.33 pounds. ↵
✚
Off-Site Backups
It’s amazing how one thing will lead to another.
A few weeks ago there were some serious tornado warnings in my neighborhood for the first time since I moved here in 2001. The tornado alarms were going off, the AM radio stations were awry with the latest storm warnings, and Anna and I were hunkered down in the basement.
As we sat there listening to the radio and tweeting about the current weather outside, the thoughts that were going through my head were of those families just 2 hours south of us in Joplin, Missouri, who had lost their entire homes just a few days prior.
Thank God, our afternoon tornado scare never turned into anything more. But it left me thinking about the what if.
What if our home was destroyed and we lost all our belongings? Or what if someone were to break in and rob us? Apart from one another, the only irreplaceable things in our house are the priceless memories, work, and other information that we keep on our computers.
In short, if I woke up in the middle of the night and our home was on fire then I hope Anna and I would have enough time to put on some trousers, grab the external hard drive, and get outside.
But in moments like that the less stuff you have to think about the better, because what’s most important is staying alive and safe. And once we have kids that hard drive suddenly gets a serious demotion on the priority list.
If there ever were a situation where grabbing the external drive on the way out the door wasn’t an option, or if it were destroyed by a tornado, or if it were stolen, then we would lose years worth of photos and music as well as access to much of our livelihood, including the documents and passwords related to our business, finances, etc.
If what’s on your computer is important and irreplaceable, you should have an off-site backup.
When I was the Marketing Director for the International House of Prayer I kept an external drive at my work office. I would clone my laptop to that drive once or twice a week. However, when I quit my job as Marketing Director to write this site full time, my off-site backup came home with me.
My philosophy for backing up has always been this: keep it simple, keep it safe.
A backup system that requires very much personal attention will never make it in the long run. And a backup drive that isn’t safe is only slightly better than no backup at all.
I already have a system in place for keeping my current data backed up here at my house:
- Using SuperDuper! I back up my laptop to an external Lacie hard drive every night.
- I have a TimeCapsule that I run Time Machine to.1
- I keep all my daily “working files” in Dropbox.
The above backup setup is actually quite common amongst the nerdy. As it should be. It is extremely simple to maintain, it is redundant, and at any given moment if my laptop’s internal SSD were to suddenly suffer a fatal loss of all my data I would like only lose 60 seconds or less of my work.
But, what if something broke beyond just my laptop? What if my external drives were destroyed or stolen? The only data I would be able to recover would be the the handful of files which are in Dropbox. And that is precisely why an off-site backup is a good idea.
Off-Site Backup Options
There are many people who, like I did, keep a 2nd external hard drive at another location. ‘Such as:
- Rent a PO Box and store your 2nd external there
- Rent a safety deposit box and keep it there
- Keep the 2nd drive at a friend’s house
- Keep it at your office
I used to have my off-site backup at my office, but like I said, now that I work from home that 2nd drive is here with me.
The idea of keeping it in a Post Office Box or a safety deposit box is clever but seems like far too much work. It may be safe, but it most certainly is not simple. It means, that the longer between visits to the bank or the Post Office the less up-to-date that off-site backup is.
Moreover, PO Boxes and safety deposit boxes are not free. If you’re going to pay to store your data somewhere else then why not pay for a more simple and useful solution?
Why not back up to a cloud server? That’s what I decided to do.
The way I backup now looks like this:
- Nightly SuperDuper! clones of my laptop to an external drive.
- Time Machine running to a TimeCapsule.
- All “currently working files” stored in Dropbox.
- Automatic cloud backups of all my irreplaceable documents, photos, music, and application support folders.
If all the hard drives at my home were completely destroyed, Anna’s and my most important and irreplaceable data would be safe.
However, as I have found out, not all cloud-storage backup services are created equal. Over the past several weeks I have looked into and used a few different options and services. Here’s a look at each of the off-site backup services I have looked into.
Backblaze
This all started — as most things do these days — with a poll on Twitter. I asked for suggestions for a cloud backup solution, and the two most popular recommendations were CrashPlan and Backblaze.
They each have their own unique pros and cons, but at the core they are pretty much the same: they run in the background on your computer and they back up files to the cloud, and they both offer unlimited storage for a monthly fee.
I decided to go with Backblaze primarily because it was the more popular recommendation and Backblaze has a native Mac app that runs as a system utility. (As you’ll see later, CrashPlan is a Java app.)
When I first installed Backblaze and let it begin uploading, I was surprised to see that it was only going to upload 36 GBs of data from my laptop. I assumed it would do a backup, similar to how SuperDuper! does, and “clone” my laptop to the cloud. I also assumed that if I ever needed to recover my data from Backblaze and I asked them to send me the hard drive with my data on it, then I would simply be able to restore from that drive as I could with the external drive I have sitting on my desk right now.
Instead, I discovered that what Backblaze copies is just about everything but your Operating System and your applications.
Certainly the documents, media, and application support files which are in your home folder are the most important files to back up — they’re the ones which are most the irreplaceable. However, even if I wanted to backup my entire computer I couldn’t. Backblaze will not allow the backing up of any of the folders in your root directory, such as /Applications/, /Library/, /Developer/, /System/, or /Users/.
In many ways this makes sense. In an ideal scenario you’ll never need to use Backblaze to restore your data. So why spend extra bandwidth and CPU cycles to backup anything but the most crucial files? But that doesn’t mean I don’t like to have the option.
Backblaze will also back up external hard drives. I keep my iTunes library and Photo albums on an external media drive, and Backblaze uploads that to the cloud as well.
Data Recovery from Backblaze
Supposing my computer and hard drives were destroyed or stolen, how would I get back to the way things were?
Well, I’d start with buying a new computer, syncing my Dropbox files to it, and re-downloading and authorizing my applications.
Then I would have a few options from Backblaze for how to get my data: (a) download it; (b) have them send me an external HDD; or (c) have them send me a DVD with the data.
To download it is free; to have a physical drive or disc sent costs money. Since I have less than 100 GB of data and media, downloading it would not be all that horrible of an experience.
Backblaze Summary
The disadvantages with Backblaze are that I don’t get as much control over what files get backed up as I’d like, and that it doesn’t provide the greatest level of security encryption. If you’re nitpicky and paranoid, Backblaze might not be for you.
The advantages to Backblaze are that it’s affordable, fast, and native to your Mac. If you want a simple and affordable way to make sure your pictures, music, documents, and application support files are backed up then Backblaze is probably perfect for you.
CrashPlan
The second most popular suggestion was CrashPlan.
At first I thought CrashPlan was an identical service to Backblaze. They both do off-site backups of your computer and they both offer unlimited storage for $50/year. Since CrashPlan is a Java app, I picked Backblaze because it’s native.
However, as I did some digging around with CrashPlan I learned that it has some very cool features.
For one, CrashPlan lets you upload any folder on your computer. If you want to upload the folders in your root directory you can.
Secondly, CrashPlan has several options for where you can back up to:
- An external drive that’s connected via USB or FireWire.
- The CrashPlan cloud servers.
- A hard drive connected to a friend’s computer across town or across the world.
You only pay if you back up to CrashPlan’s cloud servers. This is obviously going to be faster and more reliable than backing up to someone else’s house, for some people they would much rather keep physical control of their data.
Backing your data up to drive connected to your friend’s computer is actually quite simple. They install CrashPlan onto their computer and then the app will give them their personal “backup code”. You enter that code into CrashPlan on your computer and then the two get linked. No fancy nerdery needed.
If your folks have a Mac or PC with a decent Internet connection, you could take a hard drive over next time you visit, plug it in, and convert their home into your off-site data center (something you never thought you’d say about your parents’ place).
Data Recovery from CrashPlan
If your data is at your folks house, you can just ask your dad to send you the drive. If you need to recover your data from CrashPlan’s data center they offer the same options as BackBlaze does: download, hard drive, DVD.
CrashPlan Summary
The advantages to CrashPlan are:
- You only pay for it if you back up to their cloud servers.
- You can back up any file or folder on your Mac, and you have complete control over picking those files.
- You have several options for other locations to back up, and you can chose more than one options, which means you can use just CrashPlan to manage your on-site and your off-site backups.
The disadvantage to CrashPlan is that it’s not a native app; it’s Java. Though, to be fair, you rarely interface with the app itself once you’ve set up the folders you want to back up and where you want to back them up to.
If you’re going to go with an off-site backup service and use their servers, CrashPlan would be a fine choice. But if you are wanting to keep your off-site backup in a location you control (like your office or your friend’s house) then that is where CrashPlan would truly be ideal.
Arq
There is, however, another backup option which is new to me: Arq. The more I learn about off-site cloud backups the more I like Arq.
Arq is not an App + Cloud service like Backblaze or CrashPlan, it is just an app. You buy it and connect it to your own Amazon S3 account. There are advantages and disadvantages to storing your data on Amazon S3.
At first glance it’s easy to think that putting your data on S3 would be significantly more expensive than the unlimited storage options that Backblaze provides. However, since Backblaze only uploads certain documents, and the general consensus for cloud backups is that you only back up the most irreplaceable files, the cost differences are may not be as extreme as you think.
Of course with Amazon S3 you not only pay for data storage, you also pay for data transfer. Which means my initial upload of 36 GBs would cost me $5 to upload and then $5/ month to store (or $3.35/month using the Reduced Redundancy Storage). If I upload all my music and photos (another 60 GB) to Amazon S3 as well then my monthly storage costs would be around $13 (or $9 if I used RRS).
(You could use Amazon Cloud Drive to store my music and photos since those are mostly static files and the Cloud Drive storage is cheaper than S3 at only $1/GB/year. But you definitely wouldn’t want to use Amazon Cloud Drive to keep your backups because you have to manually upload everything to it.)
So yes, Arq and Amazon S3 are a little more expensive than Backblaze or CrashPlan, but you get quite a few advantages. For one, you have complete control over the security and selection of your files that get uploaded to Amazon. Unlike Backblaze where your data gets decrypted on their servers, Arq keeps the decryption local.
Moreover, Amazon has several world-class data centers. If you keep your stuff on their Standard Storage they could suffer a simultaneous loss of two centers without losing any data. On the less-expensive Reduced Redundancy Storage they could lose one data center without losing your data. (Backblaze has one data center, CrashPlan has several.)
What I also like about Arq is that it gives you very granular control over what does and does not get backed up. By default, Arq recommends that you back up your home directory not including your ~/Library/ folder. But you can add or remove folders as you wish.
The way Arq does backups is similar to the way Time Machine does. Meaning it only backs up files that are new or have changed and it keeps past versions of old files as well. You can set a monthly storage budget so that your version storage does not grow your S3 costs out of control. When you hit that budget, Arq will delete the oldest versions of files in your S3 account, keeping only the latest copies.
I also like how Arq handles the network preferences for adjusting upload speeds. You can chose between maximum transfer rate, automatic, or fixed.
CrashPlan lets you set a transfer rate cap depending on if you’re at your computer or not. And though Backblaze lets you set a cap, those speeds are independent of what you are doing on your computer. For example, if I chose a lower transfer rate in Backblaze then it will use that lower speed even if I am not doing any network heaving work on my computer. And the opposite is true: if I chose a higher transfer rate then it will fight for that rate even if I am doing a lot of network heavy work.
Arq’s automatic transfer rate however adjusts to your Internet usage, as it should. So if I’m downloading a movie, Arq throttles back; if I’m casually web surfing, Arq speeds up.
Data Recovery from Arq
Restoring from Arq means downloading from your S3 account. You can chose to restore individual files, folders, or download all of it.
However, since Arq works similar to Time Machine, you can go back and see versions of your files and restore individual files or folders. So it’s not just for catastrophe recovery.
Arq Summary
The only disadvantage to Arq is the price. Of course, for some people the superiority of Arq’s encryption and Amazon’s reliability may make the price worth it. And for others, depending on the amount of data being backed up, the price may be inconsequential if not equal to other services.
The advantages to Arq are that it’s a well-built Mac app. It offers very granular control, versioned backups, and it stores your data in Amazon’s reliable data centers.
Using Arq I feel much more in control and confident about what is getting backed up and just how safe it is. It even just feels more safe than the other services.
The short of it
All this to say, it is a good idea to have an offsite backup, and I recommend using a cloud-based service because it’s easy to set up and easy to keep up to date.
Backblaze and CrashPlan both work well and are very affordable. If you have lots and lots of irreplaceable data (more than 100 GBs) then you may want to use these guys because the monthly costs will be lower and they’ll send you a drive with your stuff on it to recover.
However, if you care about having granular control, better data centers, higher encryption of your data, and/or you don’t have that much to back up, then Arq is a great solution.
I currently have a one-year subscription with Backblaze, and I’m glad I do. But if I had known what I know today one month ago then I probably would have bought and used Arq instead.
An Aside About Time Warner Cable
The biggest hurdle with off-site backups is the very first upload.
When I first installed Backblaze, it calculated 36 GBs of data to be backed up. I began backing up at 2:00 pm on Wednesday, May 25. Eight days later, on Wednesday, June 1, only 23 GB had been uploaded — an average of 2.875 GBs/day.
This all got me thinking that something was seriously slow about my internet. I had heard that a SURFBoard modem would help open up my upload throughput, and so I picked one up at Best Buy but it did not affect my upload or download speeds at all.
What I discovered was that upload throughput is no longer throttled at the modem level anymore, it is throttled by the ISP (it’s been that way for years). And so, after talking to Time Warner I found out that they had a new service called Road Runner Extreme and it uses DOCSIS 3.0. I of course ordered it, and they came out a few days later to set it up.
As of Friday, June 3, at 10:00 am, my Backblaze upload was up to 28 GBs and still had about 10 GBs to go. That’s what time the TWC guy showed up and hooked up my new broadband. Once the new DOCSIS 3.0 service was set up, it only took 13 hours to upload the final 10 GB.
My original Time Warner service (Road Runner Turbo) was rated at 7 Mbps down and 1.5 up. The new, DOCSIS 3.0 service (Road Runner Extreme) is rated at 50 Mbps down and 5 up.
With the new service, my Backblaze uploads went from an average of 2.8 GB/day to 1GB/hr — almost 10 times the upload speed. (Worth bragging about is that I now get average upload speeds of 500 Kbps into Dropbox and 350 Kbps into Amazon Web Server.)
Speed Comparison Chart
Here’s a look at the speedtest.net results of my before, middle, and after with the new service and different modems:
| Modem & Service | Avg. Ping (ms) | Avg. Up (Mbps) | Avg. Down (Mbps) |
| Old modem with Time Warner Turbo | 55 | 0.49 | 22.76 |
| SURFBoard Modem with Time Warner Turbo | 50 | 0.47 | 20.43 |
| SURFBoard DOCSIS 3.0 modem with Time Warner Extreme DOCSIS 3.0 service | 58 | 4.52 | 22.83 |
- A note about TimeMachine, people complain that when it kicks in it brings your computer to a grinding halt. Well, that’s only true if you’re on an HDD. It does that because the needle is moving back and forth between the data that’s being read to be backed up to the drive and the data that’s being read for your use. With a Solid State Drive, read/write speeds are exponentially faster and you don’t even notice Time Machine kicking in. ↵
✚
Dialvetica
Dialvetica is the best way I know of to find contacts on your iPhone. It’s like the whole app has been built for a single purpose: get to a contact fast.
The way Dialvetica works is that you type in letters of a name — type them out of order if you like — and you’re presented with the most relevant search results. To call my mom, Bea Blanc, I tap on Dialvetica, tap the letters B, E, and then tap her name. That’s just 4 taps from Home screen to phone call.
Dialvetica’s custom interface is designed for this sole purpose, and so is the way it works under the hood. Searching for a contact within Dialvetica is far superior to searching within the Contacts pane of the iPhone’s Phone app.
In fact, Dialvetica has its very own keyboard; built to maximize your ability to search for and find a contact quickly.
It’s a custom keyboard designed to take up the least amount of space possible so you can see more contacts in the list. Also, the keyboard acts differently than the system keyboard: it highlights each letters you’ve typed, which acts as an aid to show you what letters you’ve typed already without having to take up space with a text field. It’s quite clever, really.
Dialvetica’s keyboard is 270 pixels tall. The default iOS keyboard is 431 pixels tall. And if you use the default keyboard, Dialvetica needs a text field (which takes up an additional 78 pixels) to be able to show you what you’ve typed.

(The names above have been blurred to protect the innocent.)
If you use Dialvetica, you’re silly not to use the custom keyboard that comes with it.
But it’s not just the keyboard that has been customized. The list of the names is a little bit “tighter” than the default contacts list view in iOS. You can see 7 contacts plus the keyboard in Dialvetica with its custom keyboard. You can see 4.5 contacts in Dialvetica with the system keyboard. Comparatively, you can see 8 contacts in the iPhone’s favorites pane which has no keyboard. And in the contacts search pane of the default Phone app you can see just about 5 names when the keyboard and searching field are all brought up.
To make it a customization trifecta, Dialvetica also has its own unique function for tapping on a contact. Instead of drilling down to a contact’s card, Dialvetica gives you 3 tap targets: one for making a call, one for text messaging, and one for email. Which means calling, texting, or emailing is just one tap away. If you do want to drill down to a contact’s card, swipe on that contact’s list item.
You can adjust the “default” behavior for your preferred tap targets within Dialvetica’s settings (which are found in the settings app). If your most common behavior is to search for someone in order to text message them, then you can set the default of tapping on their name to launch the SMS app. Or if your most common behavior is to search for someone to call them, then you can set that as the default. Likewise with emailing. My default is set to text message.
If the person you are calling or texting has multiple phone numbers then Dialvetica will ask you which number you’d like to call. You can pick a number and tell Dialvetica to always use that number, or you can be asked every time.
If you contrast Dialvetica with the iPhone’s Contacts pane in the native Phone app, you begin to see just how awkward the native app can be. Calling a contact through the Phone app’s Contact pane means that once you’ve launched the Phone app you have to tap on the Contacts tab, scroll to the top of the contacts list in order to reveal the search field, tap into the search field to select it and bring up the keyboard, then type the name of who it is you’re searching for, tap their name to open their contact card, then tap which way you want to contact them (call, text, email). Altogether you’re looking at upwards of 8 taps; 6 if you’re lucky. With Dialvetica it was 4.
Moreover, if you don’t type the name in exact spelling order then you get no results or wrong results. And the results you do get are listed alphabetically rather than by order of importance. The iPhone knows I call my mom several times a week, but it still puts that other person whom I haven’t called or texted since 2008 at the top of the list.
Dialvetica, however, does weigh your search results. Over time who you call and text with the most get pushed to top of the list. After you’ve experienced the way Dialvetica handles searching for contacts, when you try to find someone through the native contacts list pane it can be downright maddening.
But Dialvetica isn’t just good at search and find. It makes a pretty good replacement for the iPhone’s Favorites pane as well because Dialvetica also weighs the default list of displayed contacts. This means that whenever you launch the app you get an auto-sorted list of contacts, and those whom you are in touch with the most get pushed towards the top of the list.
And this is where my love/hate relationship with Dialvetica comes in.
When you launch the app is when it sorts your contacts list. Which means that every time I launch Dialvetica I’m greeted with the spinning loader wheel and my list of contacts shifts around just slightly. Yes, there is a great advantage to having an auto-sorted list of names. But there is also something about the timing and shifting of the auto-sorting which makes me anxious every time I launch Dialvetica.
In part, it’s that my “favorites” list is always a little bit different. The very top few names usually end up staying where they are, but the rest of the names have more flexibility. Granted, the more you use it then the more those names settle, but it is still not a hard and fast list and thought I love it, yet it irks me a bit.
Secondly, the sorting begins after you’ve launched the app. Which is a really bad time to tell the user to hold on a minute. I don’t know if this is possible but having the list sort in the background after you’ve made a call would be much better. Then it’s ready and waiting for you once you launch the app.
Since it seems to be re-calculating all the time it feels unpredictable, and I never know what my contact list is going to look like. And that, for whatever reason, throws me off and makes me a bit anxious.
Conclusion
Dialvetica has found a place on my iPhone’s Dock, where the native Phone app use to live. Though Dialvetica isn’t a replacement for the native phone app because it doesn’t show you recent and missed calls, and it doesn’t have access to your voicemail. Which means that there is still reason enough for me to keep my iPhone’s Phone app on my first Home screen.
Since Dialvetica replaces only 3 of the 5 functions of the native Phone app (Favorites, Contacts, and Keypad) it’s still an app that has to be used in conjunction with the native Phone app rather than in its place. And that is unfortunate because there are so many things Dialvetica does better than iOS, yet you can’t fully cut loose from the native Phone app.
✚
An Ode to Software
At any given moment of the work day my monitor probably looks something like this:
Most of the applications I spend my time with throughout the day are the usual suspects: MarsEdit, NetNewsWire, Instapaper, et al. Below is a look at how these apps get used and why.
Safari
I usually have a dozen or more tabs open at any given time. I send a lot of stuff to Instapaper, and read a lot in the browser. Usually I’ll scan RSS or Twitter, open up lots of links at once, and then comb back through and read them. I also spend a significant amount of time reading on my iPad, but more on that below.
Instapaper
Instapaper has become as much of a business tool as it is a reading and entertainment app. I send at least a dozen articles to Instapaper every day because there is always something new flying across my browser, feed reader, or Twitter stream.
I do read quite a bit out of Instapaper but not as much as I put in. And I’m okay with that because, in part, Instapaper works as a placebo for me. Saving it to read later relieves me of any stress about having to deal with the article that minute, and I’ve also found that articles which seemed important at the time are no longer important when I get around to my Instapaper queue. So in that regard Instapaper saves me peace of mind as well as time.
Apple Mail
I have turned into a bit of a poor correspondent. I do read all my incoming email. I get a lot of great feedback from you guys, and many of you send in links to things you’ve built or written. I love that stuff, it’s just that I’m not always able to respond back.
I feel like as I am still finding my rhythm as a full-time writer and blogger so I’ve been more or less ignoring most other things until I get the pace of my day settled. Then, I’ll add things back in — such as better email correspondence.
Something I did not expect is to find such a huge amount of value from Twitter.
Before I was began writing the site full-time, Twitter was a distraction when I should have been getting work done. Or it was a spot to spend some free time. Now, it is a tool.
I’m an extrovert and a verbal processor, and I love using Twitter to bounce ideas and questions around. It’s a great way to get feedback and input that I don’t otherwise get since I’m working alone in an office.
On my Mac and iPad I use the official Twitter clients. On my iPhone I use Tweetbot.
Notational Velocity and Simplenote
I do a lot of writing, random jotting, and note taking in Notational Velocity. I use Simplenote on my iPad and iPhone quite a bit, and so all three are synced.
Some people are super fancy with how they use Notational Velocity. I don’t really tag items or any fancy meta stuff like that. I like that the latest work is always at the top and it’s quite easy to search for things that may be buried.
A great many blog posts start in Simplenote or Notational Velocity when I have an idea for something but it’s not fully formed yet. It goes into this app because then that idea is available to me wherever I am. If inspiration strikes while I’m at the hardware store or in the yard it matters not.
Yojimbo
Yojimbo is the one application on my laptop that is always running. And, aside from the utility apps that live in the Menu Bar, Yojimbo is the only app that launches on startup.
There is no set rule for how I use Yojimbo — it is just the app which I use to toss anything and everything into that may not have a more logical place to be stored. I use it for passwords, bookmarks, quotes, tips, recipes, directions, and more. And I have Yojimbo’s search field set to activate globally whenever I hit Command+K — I search for items in Yojimbo nearly as often as I put them in there.
One question I often get is how I use Yojimbo differently than Notational Velocity / Simplenote. Rest assured that there is a marked difference between what goes in Yojimbo and what goes in Notational Velocity/Simplenote. Primarily it’s that the former is for anything I want to keep long-term; the latter is for anything that is short-term or in-process.
LaunchBar
My application launcher of choice is still LaunchBar. I use it primarily for switching to and activating apps of course, but also for running a few scripts, and looking up words in the Dictionary. And the clipboard history… my, how I love the clipboard history.
TextExpander
I use TextExpander primarily when writing and replying to email. Mostly it helps me with signatures and common replies to common types of emails I get. The big aha moment for me was when I realized that though I could use it to help automate my responses to certain common emails I get, that automation didn’t mean my replies were any less personal.
In the six months or so that I’ve been using TextExpander, I have expanded 568 snippets and saved 55,423 characters.
Droplr
My link shortener and file uploader of choice is Droplr. I share a lot of screenshots and files and text with people via DMs and iChat throughout the day and Droplr is what I use for that. I have the Droplr hotkey set to Control+Option+Command+D. Also, in case you’ve ever noticed and were curious, I use Droplr to create RSS-standards-compliant URLs if I am ever linking to a web page that has a question mark within the web address.
Fantastical
Now that I have a bit more open schedule I don’t need a full-fledged calendar application running all the time or taking up icon space in my Dock. I’ve been using Fantastical for a while now and love how easy it is to use, and how it can pretty much replace my day-to-day usage of iCal.
Keyboard Maestro
I am a newcomer to Keyboard Maestro, but it only took a few short hours before I was converted to a junkie. It is, by far, one of the most powerful, interesting, and helpful apps I have ever used. It is hard to explain in brevity, but as best I can describe it it’s an app for power users whom understand the power of AppleScripts, Automations, and hotkeys — yet who don’t know how — or don’t enjoy — to write AppleScripts.
OmniFocus
I use OmniFocus differently now that I am writing full time. I still add all my to-do items into OmniFocus, but it’s not always the primary to-do list that I work from during my day. There are often things which I want to do for the site that I don’t have time to do now and so I’ll set them as due in a week or two. But — as usually seems to be the case — I am just as busy a week or two later as I was when I was too busy to do that item the first time. Therefore, OmniFocus is primarily full of things that should get done but which are not vital to the survival of this site. I review the list every day (usually on the iPad) and will re-arrange what has shown up as due that day down to only what is necessary and what is reasonable.
However, I usually don’t review my OmniFocus task list until later in the day — often times preparing for what is needed to do tomorrow rather than today. The reason for this is that in the morning when I am first starting out, I usually write down onto paper what I want to get done that day: is there anything I especially want to link to, are there any emails I know need my attention, etc.
The Web is always moving on to the next thing. Something that is hot right now will be cold in a few hours. An article I’ve spent days or weeks working on is only exciting for a day or two, and may not bring any new traffic or readership to the site. There is a constant turning over of projects and goals — things move fast online.
Because of this rhythm I’ve noticed that it is easy to look back at a day spent writing and reading but feel as if I didn’t actually accomplish anything that day. Which is why it’s important for me to have a short list of the things I wanted to do and when I feel as if my day was unproductive I can look at the list and see that I actually accomplished all that I wanted to.
Put another way, writing a weblog full time is not unlike farming. Lots of chores and lots of busy work that take up time every single day, but the fruit of that labor is seasonal. My daily to-do list helps me stay on track, and OmniFocus helps me keep the long-term, seasonal goals from slipping through the cracks.
NetNewsWire and Reeder
I have been rocking back and forth between my usage of Twitter and RSS for finding news, stories, and information. Though I am prone to look for news and content via Twitter, I am finding that it is not the best place for link-worthy content. Sure, I find lots of things that are interesting and easy to spend my time on, but most of the time they are things which are not worth linking to from shawnblanc.net.
The vast majority of link-worthy content I find in my RSS feed. On the Mac I still use NetNewsWire. However, I am most successful at combing through my RSS feed when I’m on my iPad. And on the iPad I use Reeder. Unless I’m really focused on a project I try to take at least one or two breaks in my day to sit down and comb through RSS feeds.
For the curiously nerdy, I am currently subscribed to 152 RSS feeds.
WireTap Studio
I do all my recordings for Shawn Today with WireTap Studio. I have the metadata for file name and audio type and quality pre-set so that once I’m done recording I just add the album artwork and upload to the S3 server.
MarsEdit
By far, the most essential app to my life as a blogger is MarsEdit. This is where I write my site.
I write in Inconsolata, 13 pt, light text on a dark background. I have the custom keyboard shortcuts for markdown all set. And MarsEdit has a helpful bookmarklet which lets me take the current URL in Safari and then throw it into MarsEdit as a link post. And thanks to MarsEdit’s “live preview” ability, I can see exactly how the post will look when published on my website without having to write live to the site.
The iPad
A side-note for the curious: my iPad gets very little use as a writing tool. If and when I write using my iPad it is with Simplenote. However, the iPad is primarily used for reading: reading my Instapaper queue, reading RSS feeds, and reading eBooks. Also, as mentioned above, I use it to review and scrub my OmniFocus lists because OmniFocus on the iPad is killer.
The Missing App
There is one glaring hole of an app that would make my professional life much easier: MarsEdit for iOS. Or something like it. I am not so much in need of a full-fledged blogging app for my iPad and iPhone so much as I am in need of a way to post links to my site from my iPad or iPhone.
I find a lot of link-worthy content away from my laptop. Either when I’m reading on my iPad or surfing the Web on my iPhone. What I need is an app that takes the current Mobile Safari URL, title, and any highlighted text and then populates a post editing window with those items. From there, if I could adjust the title and the slug and hit publish, I’d be happy.
There have been hints of this in various forms, such as modified versions of the WordPress “Press This” bookmarklet and other plugins, but there is nothing ideal just yet. I’ve added it to my to-do list to spend a good amount of time fiddling with the Press This bookmarklet to see if I can turn it into something useful, but I haven’t gotten there yet. I have yet to find a best-of-breed blogging app for the iPhone or iPad that meets my narrow and specific needs.
✚
Fantastical Preview
For the past several weeks I have had the privilege to beta test the soon-to-be-released Mac calendar app, Fantastical. It is still in private beta, and is due out later this month.
The developers over at Flexibits have given me permission to share a little bit about Fantastical with you guys, and I’m honored to do so because I am really loving this app.

There is a fine line between not enough and just enough — between usability and unnecessary lack. That line is defined in part by the developer but also by the user.
We, the users, define what is too much, not enough, or just right for the software we use. Often times, the best of developers will be able to aptly build in the appropriate features for all sorts of users. So that those users with less needs do not feel overwhelmed and those with more needs do not feel any lack.
In many ways I think Fantastical has hit that sweet spot.
Fantastical started out with the intentions of being a counterpart to your current calendar app. It syncs with iCal, Entourage, BusyCal, Google Calendar et al., and it works quite well as a nimble access point for viewing and adding new events.
Other plugins and utilities have sought to do this in the past. However, in all my years of experimenting with those various “helper” apps for iCal, none have ever stuck with me. Fantastical is the first one that has.
After daily usage for the past several weeks I have found that Fantastical is near wholly a stand-alone calendar app. The only thing it doesn’t do (yet) is allow you to edit an event once it’s been created. If you’re not always editing events, then Fantastical very well could replace iCal for most of your day-to-day calendaring needs. It has for me.
What I like most about Fantastical is how quick and accessible it is. It lives in your Menu Bar and you invoke it via a global hotkey (I use command+option+c), or by clicking on the Menu Bar icon, and it appears instantaneously. It is both keyboard and mouse friendly. The power users in the room will be glad to know you can navigate and operate the app without leaving the keyboard — if it were not so then I certainly would not find the same amount of utility from the app.
And what blows me away every time I use it is the entry panel for an event — Fantastical uses a natural language parser in addition to the standard new-event, iCal interface. So far, in my usage, the natural language parsing has been superb; the best I’ve ever used.

The parsing is not only good at actually understanding what I’m entering it also makes me feel quite confident that it understands me. There are some clever visuals that come to life as you type in the title, time, and location of your event. The words move to their corresponding spot in the date and time list, letting you know that the event is being created.
Fantastical is set to launch later this month. You can sign up on the teaser site if you want to be notified via email once it launches.
✚
Tweetbot’s Got Personality
Using an app by Tapbots feels like a privilege.
There is this addictive cleverness and playful uniqueness to the way Mark and Paul build their apps. The sounds, the animations, and graphics don’t feel or act like a standard app, they feel more like a toy. A toy you get to use for work.
They say a man buys something for two reasons: a good reason and the real reason. And I have always thought that with Tapbots their apps cater to that. There is a good reason to buy an app from Tapbots, but there is also another (and perhaps, more real) reason. And the real reason is that you want to play with the app. Because, like I said, to use it feels like a privilege.
For the previous Tapbots apps the function of the apps has been very niche. Weightbot is for people who want to lose weight; Convertbot is for folks who want to know how many ounces are in a liter; and Pastebot, well, Pastebot is for nerds.
These are niche markets when it comes to iPhone apps. Weight-tracking applications, unit converters, and clipboard managers are not exactly in high demand on the app store when compared to games, news aggregators, or even Twitter clients.
Today, however, Tapbots has taken a plunge by making a Twitter client amongst a pre-existing sea of them. It’s called Tweetbot, and it is everything you would expect it to be.
There are too many Twitter apps to count; what is it that makes Tweetbot better than any other? Well, in some regards you could say that nothing makes it better. It doesn’t really do anything that [insert your favorite Twitter client of choice] doesn’t already do. I mean, it’s a Twitter client, right? It shows you tweets, lets you reply to them, save links to Instapaper, upload pictures, and generally get distracted.
However, you could also say that everything about Tweetbot makes it better. Tweetbot has more personality than any other Twitter client out there. Every single pixel has been hand crafted in order to build the most custom looking UI of any Twitter client I’ve seen. Moreover, the sounds, the animations, the actions — everything has been thought through with intent, care, and fun. It all adds up to create a Twitter Experience Extravaganza.
Using Tweetbot
When I launch Twitter from my Mac, iPad, or iPhone these seem to be the most common things I end up doing or finding:
- Discover links that get sent to Instapaper for reading later
- Discover news
- Eavesdrop on conversations
- Reply to someone
- Post a tweet of my own
- Direct message people
I have been using Tweetbot since its early stages of alpha development and all that time it has been my exclusive Twitter client when on my iPhone. Now, I don’t beta test that many apps and having one find its way to my home screen and wiggle its way into my daily life is not common behavior. More often than not, when I am helping to test out an app I use it enough to provide feedback to the developer, but it doesn’t become one of my most-used apps.
There are three reasons Tweetbot has wiggled its way into my life: (1) I use Twitter far too often; (2) it seemed a disservice to nerds everywhere to not use Tweetbot when I had the opportunity; and, most importantly, (3) many of the ways which I most use Twitter have been extremely well integrated into Tweetbot.
Below are a few of the reasons why I find Tweetbot so fantastic.
Tap and hold a tweet
When you tap and hold on an individual tweet, a list of options comes up and you can instantly send to Instapaper, email the tweet, etc…

This is great because far and away I populate my Instapaper queue in Twitter more than any other place (such as my RSS reader or browsing the web). But this is bad because it is so easy to add items to Instapaper in Tweetbot that I get ahead of myself and am sending more items to Instapaper than I have time to read. And so, alas, my Instapaper queue is longer than my arm.
Using lists as the main timeline
Tweetbot does something that, so far as I know, no other Twitter client lets you do. It lets you use a list as your main timeline. Any list that you have created or that you follow can become your main timeline. Simply tap the center of the top bar in (where it says “Timeline”) and you’ll be presented with a screen showing all the lists you have created or that you follow.

For example, I have a list of sites who’s RSS feeds are available via Twitter. I tap that list and it becomes my main timeline.
This is also a great feature as you find yourself following more and more people on Twitter. Simply create a list — funny folks; best friends; awesome writers; etc. — and set the list as your main timeline. In short, you’re curating your own mini-timeline within your larger, Master Timeline.
Every other Twitter client I have used has treated lists as second-class citizens. But, thanks to Tweetbot’s treatment of lists, I’ve begun using them and am wanting to use them even more than I already am.
Moreover, you can edit your lists from within Tweetbot via Tab Bar. The two right-most buttons are customizable and can be set for bringing up the lists editor as well as your favorites, saved searches, or retweets.

Swiping left to right for a conversation view
This probably happens to you as well. I will often “walk in” on the middle of a conversation that is happening in Twitter between people whom I follow and I want to read the rest of the conversation thread. In Tweetbot you simply swipe an individual tweet from left to right and it will load the conversation view. I do this enough that having such a simple and accessible gesture for it has proven to be extremely useful.
Similarly, swiping on a tweet from right to left will show you all the replies to a tweet.
A Few of My Favorite Things
It’s the little things that make a good app great. As you use Tweetbot those little details pop out and give Tweetbot its personality. The animations are beyond cool, and as I said earlier, every single pixel is custom. There is nothing that is not custom except the keyboard itself, and yet it all feels familiar.
Below are a few of the little things about Tweetbot that really stand out as being extraordinary.
The falling dialog box: When you go to sign in to your Instapaper account, try using the wrong email address or password.
Finding a user: When you type the “@” symbol while composing a tweet a small little user profile icon appears. Tap on that icon and you’ll be brought to a list of all the people you follow and you can quickly search for and find users.

I absolutely adore this feature because I for one do not have all the usernames of the people I follow on Twitter memorized.
Direct Messages: The Direct Message threads are top-posted like your Twitter timeline, rather than bottom posted like Instant Messenger or the official Twitter apps. (Though the Twitter website has top-posted DM threads rather than bottom-posted.)
Technically, bottom posting the DM threads is the proper way to do it. However, I am jarred by it every time. I spend far more time in my main timeline and my @replies list than I do in the DM pane, and all the rest of Twitter has the newest tweets on top.
Success!: When using Twitter there can be a lot going on in the background, such as your tweets being posted or your links being saved to Instapaper. Most Twitter and even RSS reader apps will have a small, somewhat opaque box that spins while the link is being saved and then gives a check box once the link is saved successfully.
Tapbots already has their own version of this sort of feedback box that was designed and implemented in Pastebot. For example, when making edits to an image you get the little spinning lines while the iPhone processes the edits and then a checkmark and a ding once the edits are completed.
In Pastebot a success notification looks like this…

…and so I assumed that in Tweetbot the exact same element would be used for letting me know when my tweet had been posted or a link successfully saved.
However, Tapbots rethought even this bit of their Twitter client and instead of a box getting in your way and sitting over the top of your Timeline, a notification slides down from the top letting you know that your tweet was successfully posted or that your link has been saved to your ever-growing Instapaper queue.

Extraordinary
For me, what makes a good app great is the little things — the small areas where attention to detail was given and where something that could have been normal was instead made extraordinary.
✚
Instacast
There is a problem with subscribing to podcasts on your iPhone, and it has to do with iTunes. Here’s how it works:
You discover a podcast you like via one of many ways. Perhaps you are simply browsing the multitude of shows in the iTunes Podcast directory. Or perhaps you’ve come to a website promoting their podcast, or a friend told you about a certain one.
Once deciding you want to subscribe to that podcast, you end up on that show’s page in iTunes and you subscribe for free.
The show is added to your own podcast subscription list and the most recent show is downloaded onto your computer.
You are now subscribed to a podcast.
Now, if you want to listen to that podcast on your iPhone, iPod touch, or iPad, you must plug your device into your computer and sync it. Making sure that your new podcast has been hand-selected to be one of the ones which sync to your iPhone.
Up until this point it all is fine. However, the frustrating part of subscribing to podcasts on your iPhone happens once you’ve synced the podcast and its episodes to your device. Because at that point the content on your iPhone becomes static — as if podcasts are treated like albums and episodes like songs.
Treating music or movies that you’ve synced to your your iPhone as static content is fine. I listen to the same album many, many times and only have my favorite albums and artists synced to my iPhone. But for a podcast, it’s like a radio or television show — I listen to it once and that’s it. With a podcast there is always something new to add and something old to get rid of.
We don’t listen to podcast episodes over and over. We listen to new ones as they get published. Out with the old and in with the new. However, when the podcast you are subscribed to publishes a new episode there is no easy way to get it.
The two ways to get a new podcast episode onto your iPhone are either: (a) tap “get more episodes”, be taken to the iTunes app and then pick a single episode to download to your iPhone, wait for it to download, return to the iPod app and play the episode; or else (b) sync your iPhone to your computer and transfer any new episodes which have downloaded to your computer onto your iPhone.
(If you are subscribed to more than one podcast, you have to repeat step “a” for each individual subscription, and manually download each new episode.)
When at my desk working I either listen to music or silence. There are only a few podcasts which I listen to on a regular basis, and when I do listen to them it is usually during some activity which has me away from my computer. Such as driving, mowing the lawn, or working in the garage.
Since I use MobileMe to keep my contacts and calendars in sync I rarely have need to sync my iPhone. Which means that up until a few weeks ago my Podcasts were virtually never up to date. If I was in the car and wanted to listen to the latest episode of The Pipeline I either had to plan ahead and sync or just listen to the most recent version I had on my iPhone. Which meant that in reality, I just rarely ever listened to podcasts.
Now, I realize that to have already written almost 600 words may seem like a lot to simply describe the awkwardness of trying to keep a podcast up to date. But: (a) I think we’ve all figured out by now that I have an affinity for writing about these types of things in detail; and (b) I’m trying to paint a picture for why I hardly ever listened to podcasts — up until a few weeks ago there was just no simple way to keep up with them.
A Better Way
What some people may not realize is that a podcast feed is just like an RSS feed. Which means that, when it comes to podcasts, iTunes is just a fancy (and bloated) feed reader.
This also means that apps other than iTunes can subscribe to podcast feeds. Instacast is one such app.

Instacast is not the first iPhone app dedicated to managing your podcasts, but it is the first I have ever truly liked. Its most notable feature is that it offers over-the-air updating of your podcasts.
You can update all your podcasts at once, or just one subscription, or even just one episode at a time. It will update the listing of all the new shows their descriptions, length, and more. From there you can stream the episode right away or download it for listening to when you’re not online. Instacast even remembers your spot for each episode you’re listening to and you can resume where you left off — even if you were streaming.
To fill Instacast with your favorite podcast subscriptions you may want start by rescuing your current podcasts directly from your iPhone’s iPod app.
Tapping the + button at the bottom-left corner of Instacast’s home screen (the screen which shows your complete list of subscriptions) will open up the area of Instacast where you find and add new broadcasts. Tap on the iPod icon and Instacast will look up all the podcast subscriptions you’ve been syncing over to your iPhone from your computer and will then pull the feeds for those and subscribe to Instacast for you.
Moreover, you can search for a specific podcast, browse the directory of Popular1 or Just Added podcasts, or thumb in the URL of a podcast feed which is not public. Instacast even supports authenticated feeds.
Thankfully Instacast not only acts the way a dedicated podcast app should, it looks like it was designed in Cupertino. And once you use it a bit, it really begins to make the native podcast section of the iPod app look as if it was even less thought through. Meaning, Instacast not only works better than the native podcast functionality of your iPhone, it looks better too.
Side-by-side comparison of the all-subscriptions list

Side-by-side comparison of an individual subscription

After using it for a while it’s clear that it was thought through with this sole functionality in mind. Instacast has a much more elegant design for podcasts than the iPod app does, and it’s made the native iPod app feel bulky to me.
Another great feature is the price: just 2 bucks in the App Store. Which should make it a staple for even the most casual of podcast listeners.
Conclusion
I am as nitpicky about user interface as I am about user experience. There are some apps which, even though they offer a great service, I just never use because I don’t like to look at them. And on the other side you have those apps which look cute but are not very useful.
Instacast, however, is of my favorite breed of apps: one with pitch-perfect design and that does one thing and does it very well.
- The popular podcast list is populated by the podcasts most subscribed to via the other users of Instacast. It more or less reads like the What’s Hot list in iTunes for technology. Clearly, the iPhone-toting podcasts junky demographic is full of nerds. ↵
✚
The Best New Mac and iOS Software of 2010
A lot of great software shipped in the past 12 months. There were many new apps for the iPhone and iPad, and many great updates to some already stellar Mac apps.
Here is my list of the best software that shipped in 2010. These are apps I use regularly and which were brand new or received an X.0 update at some point in 2010.
OmniFocus for iPad
OmniFocus for iPad was released in July. It is, without a doubt, the best of the three-app suite of OmniFocus software.
It seems to be a common practice that for apps with a strong presence on the desktop, their iPhone and iPad counterparts are portals, or lighter versions, of their desktop apps. Not so with OmniFocus on the iPad; it is the current king of the OmniFocus hill. Moreover, it is one of the most robust, feature-rich, easy-to-use apps on my iPad.
The two most-addicting features of OmniFocus on the iPad are the review and the forecast views. This app is one of the few which have justified my iPad purchase.
Reeder
Reeder for iPhone 2.0 and Reeder for iPad are my two preferred apps for reading feeds. When Reeder 2.0 shipped in March it answered all of my quibbles about what I wanted from an iPhone Feed Reader.
Reeder for iPad, shipped in June, and it is superb. I enjoy the UI and the top-notch readability it presents. By far, my favorite feed reading app for the iPad.
Canned
Canned is an iPhone app that came out in August. I had the privilege of helping Sky Balloon beta test it, and it’s been on the front of my iPhone Home screen ever since.
Canned lets you pre-write the content of those text messages you send often, and even pre-assign those to the individuals and groups whom you often send that same text to.
I used to have a folder in Pastebot for these types of texts, but Canned is much better suited for the task. The app is simple and blazing fast. Buy it in the App Store for the price of a soda.
Instapaper Pro for iPad
If there ever was a piece of software that was like a good cup of coffee it would be Instapaper. Unlike other software and services where describing the ins and outs and use-cases gives others a very good understanding of the product, Instapaper is much too simple for that.
So in short, Instapaper is the best way to read the Internet. And the iPad app (which launched in April) is the best way to read your Instapaper articles.
And, if you want to get my starred articles in your Instapaper queue, my username is “shawnblanc”.
MarsEdit 3.0
MarsEdit is one of the most-used, most-important, and most-beloved applications I own. I can’t imagine writing shawnblanc.net without it. Version 3.0, which was released in May, added quite a few features to an already rock-solid application.
A highlight feature of the 3.0 release for many was the WYSIWYG editor. However, the most notable for me was the added support for WordPress custom fields, which — when combined with this Linked List plugin — makes posting links on my site a breeze.
Simplenote 3.0
Simplenote is an iPhone and iPad app that offers a minimalistic writing and note-taking interface and over-the-air syncing. Version 3 shipped in August, and is the sort of app adored by those who pride themselves in their use of beautiful and uncomplicated software.
Simplenote is also an app for people with ideas. It’s for those who need some way to jot an idea down, build on it, and refine it until they’re sick and tired of it, regardless of where they are or if they brought their laptop.
And as a writer, Simplenote could very well be your principal writing app. It has a straightforward design that makes it effortless to use. In Simplenote there is no text formatting, it’s just plain. There is no document titling — when you create a new note, the first line is the title. There is no saving a note — you just write and your note is backed up in real time, and even synced with any other other devices you use: iPad, iPhone, and Mac.
Dropbox 1.0
The most common misconception about Dropbox is that it’s solely for file syncing between multiple computers. Well, I only own one computer and I use Dropbox all day long.
Because Dropbox syncs your files to the Web, I use it to keep all folders for my current projects. This means things I am working on at the present moment are always backed up to the Web.
Also, by using Symlinks, I have the Application Support Folder for my most-used apps (MarsEdit, Yojimbo, 1Password, OmniFocus) sitting in Dropbox as well. Which means if I didn’t back up my laptop for a week or two, chances are good I would hardly lose anything important. And if I drop my laptop out the car window on the way home from work, I for sure wouldn’t lose anything from the day.
Dropbox finally hit version 1.0 in December, adding some stability issues and, most notably, options for selective syncing of folders.
Instagram launched in October and by the end of 2010 had over 1,000,000 users. It’s part iPhone app, part social network, all fun.
It’s an iPhone-only app that works somewhat like Twitter but with photos. You take a quick snapshot, apply a filter, and share it with your followers. You can also send those photos to your Flickr, Tumblr, and/or Posterus accounts, as well as sharing them on Twitter and Facebook.
Instagram is low friction, and high-fun. And now that Twitter displays Instagram Media inline, it’s not unlike using TwitPic to post photos to your Twitter account. You can find me on Instagram as “shawnblanc”.
✚
A Sledgehammer Called OmniFocus
Despite popular opinion, I do not prefer ultra-powerful task-management tools. I would rather keep my running to-do list inside of Simplenote. Many a weekend I hand write my to-do list onto a sticky note and place it on the fridge or next to my keyboard.
Because the tools — in and of themselves — are not what make me productive. And simply having a to-do list is not the same as doing things.
Unfortunately, low-fi task management is a luxury I cannot afford. In my role as Marketing Director at the International House of Prayer I am personally managing and working on upwards of a dozen projects at any given time. Some of these are personal projects (slowly advancing our approach towards communication and design) and some are group projects (like a website re-design).
One of the things I love about my job is taking complex and/or broken systems and simplifying them. I also enjoy taking nebulous ideas and turning them into clearly defined goals. In many ways, my work is like a giant puzzle I get to solve, and the end results are things like a well-run office, clear pieces of information, and non-complicated designs.
In the office, my team uses Basecamp. At any given time we have as many as 40 active projects — some are print, some web, some editing, and some are all of the above. However, I personally spend very little time in Basecamp. Often my time is spent thinking things through, having meetings and conversations, or doing research before the project is ready for the team to take it on in Basecamp.
Of the several projects I am personally managing at any given time, usually only two or three are truly exciting to me. When a project is the top idea in your mind you don’t need help thinking about it and staying on top of its priorities. But when you are responsible for additional projects which don’t excite you, you need help keeping on track.
Simplicity is not just about whitespace or having the least amount of features possible. It’s about having what you need. A “minimalist” would not do demolition work to their home using a small, lightweight hammer. For that sort of work you need a sledgehammer.
And this is why a powerful task-management tool such as Things or OmniFocus is so helpful to me. I lean towards the feature rich, powerful task managers because it is an area where I am in need of a sledgehammer.
When contemplating the minutia of a task management app it’s important to root out the false notion that a task list in and of itself will make you more productive. Task lists are not your boss; they are more like your assistant. OmniFocus is something I can talk to and tell what I need to get done, and then it assists me in doing that task.
But the tools and systems are just one side of living a focused life. Productivity as a vehicle for getting things done is more like a pair of running shoes: on your left foot is your system and tools, and on your right foot is time management. And you need both feet to run the marathon.
For me, the biggest hinderance to staying focused and productive has never been the tools I use. For the most part I have my “system” down. And so my greatest hindrance for living focused is staying away from the multitude of available distractions. It is amazing how easy it is, in a moment of feeling un-focused, to simply check Twitter or email real quick for anything new (this is why Inbox Zero is not about email).
And so, admittedly, reading in great detail about my sledgehammer of choice will not make you a better worker. But, if, like me, you feel as though you are trying to demolish a house every day, then perhaps you too are in want of a better hammer…
In Praise of Sledgehammers
Finding the right tool to keep track of your projects sometimes feels more like a journey than a destination. Many task-management apps have come and gone (some of us have tried them all). But in the past few years, as task-management software has increased its footprint on the Mac, the one app which has stayed in active development and which continues to grow and improve is OmniFocus.
Everyone in the GTD fraternity knows how easy it is to incessantly fiddle with our systems yet never actually work. And that is the trap door with an app such as OmniFocus. It is so powerful, so robust, and so tweakable that it’s easy to spend more time fiddling with our action items than it is to actually do them.
This is one of the obvious praises for simple and straightforward task managers: they seem to lend themselves to better productivity by the sole virtue that there’s nothing there to fiddle with.
However, my to-do list is sacred ground. I interact with many projects, tasks, notes, and clippings all day long — it doesn’t matter if I’m at work, at home, on the go, or at the amusement park. Which is why this nerd needs a to-do list manager with both brains and brawn. So yes, OmniFocus is a behemoth of an application. It is, in fact, one of the most feature-rich apps I own (second only to the beloved Creative Suite (how ironic!)).
Long-time readers know this is not how I usually roll — I much prefer light-weight, simple apps which do one thing and one thing well. OmniFocus can do so much it’s virtually overwhelming to get your mind wrapped around it. You’re sitting there, staring at all those options, knobs, levers, and buttons, and thinking: I just want to write out a to-do list. And that is a valid feeling. With OmniFocus it can be difficult to feel as if you actually have control over your action items — almost as if there’s a fear that once they’ve left the inbox will you ever seem them again?
This is why simple and straightforward apps like TaskPaper are so popular. Or why folks just keep their to-do list in a plain text file or even a Moleskine journal. I believe it is the same reason the average computer user keeps all sorts of stuff on their computer’s Desktop. They fear that if they can’t see it, they may never find it again.
But what I have found with OmniFocus is that once you’ve taken the time to learn it and get acclimated to its features, it just may be the best thing that ever happened to your task list.
An Aside About Things
It should be noted that I have used and adored Things for more than two years. It is a beautiful and powerful app which worked quite well for me, and so a dissertation in praise of OmniFocus is in no way an indictment against Things.
In my review of Things almost two years ago, I said:
Each of us has our own way of dealing with responsibility and our own expression of productivity. Tinkering and then switching is usually not the fault of the software. We’re not looking for the best app, but rather the best app for us.
Or — to continue with the hammer analogy — my reason for switching to OmniFocus from Things is not the same as buying a new hammer because my old hammer broke. Things still does exactly as promised on the tin. But for me, today, some of the features are no longer powerful enough. That does not imply Things is broken, simply that I now have a different sort of house in need of demolishing.
OmniFocus: A Brief History
The Omni Group has been around over over 20 years. Wil Shipley founded it in 1989 as a technology consulting firm, and at the very beginning brought on Ken Case (who is now the CEO) and Tim Wood. Omni used to build custom software for NextSTEP users until Apple bought NeXT in 1997. Now Omni builds their own software for OS X.
OmniFocus was sort of built by chance. It’s roots are in an add-on to OmniOutliner Pro called Kinkless (kGTD), which was built and developed by Ethan Schoonover. Though it was incredibly clever, Kinkless was really just a hack. It was a bunch of AppleScripts that sat on top of a single OmniOutliner document with some custom buttons and even some Quicksilver actions for quick entry.
In 2006 the Omni Group asked Ethan along with Merlin Mann to help take the ideas and functions of Kinkless and turn them into a bonafide Omni Task-Management Application.
After more than a year of private development with a group of about 500 alpha users, OmniFocus went into public beta in November 2007. At that time they also began pre-selling licenses and OmniFocus pre-sold over 2,500 seats in the first 5 days.
And finally, on January 8, 2008, version 1.0 was launched.
What Kinkless GTD looked like:
The first publicly displayed mockup of OmniFocus:

OmniFocus 1.0:
OmniFocus today (version 1.8):
As you can see, not much in the UI has changed from the original Kinkless implementation of 2005 to what OmniFocus is today in 2010. You could say that OmniFocus is Kinkless 2. And though the front end is still quite familiar, the back end has been significantly supercharged.
The User Interface
Though I confess I am not very familiar with the design and development team at Omni Group, but it seems to me, more or less, that OmniFocus was primarily built by thinkers and developers. Which is why it works so well, but still looks a little rough around the edges.
In a way, it reminds me of the early days with Instapaper. Marco confesses to being an engineer and not a designer, and for a while Instapaper was not exactly the most attractive app on your iPhone. But the functionality and ease-of-use blew any ill feelings towards the UI right out of the water. And over time the UI of Instapaper has been refined into the piece of art that it is today.
So it goes with OmniFocus on the Mac. In fact, I think the biggest hinderance to using it is the user interface. At times I find the interface for the actual list of tasks somewhat difficult to navigate. After a bit you become familiar with it, but I usually have this feeling that there is too much going on at once and I’m not quite sure that it’s all staying together.
In part, this is why perspectives are so important and useful. They allow you to drill down into the right lists at the right times and only see what makes sense to you.
The UI has certainly been refined from that initial mockup, and yes you can refine bits of the UI yourself by using custom icons in the menu bar and custom colors, fonts, and spacing for the lists. But overall the app’s interface could still use some refinement and some breathing room.
And as I’ll talk about later, interacting with the iPad version only reinforces that. The iPad app feels much more “held together”, if that makes any sense, and the design of the iPad app is part of what makes it the best version of OmniFocus out there.
But so long as we’re discussing the UI, one fun feature of OmniFocus on the Mac is the ability to customize the style for your lists. From the application’s Preferences window choose the Style tab. From there you can tweak the colors, line height, and fonts of all your projects and lists. No doubt, many procrastinators have wasted some time fiddling with these options. I know I have.
But in addition to fiddling, you can load and save themes. There are websites which have themes posted for download, or you can download my simplistic theme if you like.
Using OmniFocus
Many of the task-management apps available today are a just another designer’s unique approach towards the same fundamental functionality: the ability to add tasks, organize them by project, assign a due date, etcetera. Put another way: a lot of today’s to-do apps are, more or less, the same app but with different skin.
Of the five areas of Getting Things Done are capturing, processing, organizing, acting, and reviewing, you want the least amount of friction. OmniFocus doesn’t just let you capture, process, organize, and review — once you’ve captured and processed an idea, OmniFocus almost does the rest of the work for you.
This is why OmniFocus is different. It was built from the inside out, meaning it’s a database first and a UI second. It may not win the beauty contest, but in my experience, compared to other to-do apps, OmniFocus handles your projects better than any other tool I’ve used.
For capturing tasks and information, OmniFocus leaves little to be desired:
- There is a quick entry box you can bring up at any time on your Mac.
- If you email yourself items and use OmniFocus’ Mail Clip-O-Tron 3000 you can pull messages from your email into OmniFocus. OmniFocus will even write Mail rules for you.
- You can add files and clippings to your action items.
- There is a bookmarklet which works on your desktop, iPhone, and iPad to send whatever website you’re viewing to OmniFocus.
- It is scriptable.
- And more…
But once you’ve captured your tasks and ideas they need to be processed and organized so they can be done. And the area in OmniFocus with the most friction is processing.
OmniFocus forces you to process your actions. Items just sit mercilessly in your Inbox until you’ve at least assigned them a context or a project (but preferably both). It doesn’t stop there. You can assign a start date and due date, you can flag it, you can mark it as being on hold or delegated, and a then some.
At times, the need for processing your stuff can be frustrating. But the truth is it’s good for you. It’s like your mom reminding you to brush your teeth before you go to bed. Taking that time will mean much better results in the future.
A properly processed Inbox is what leads the way to the two most addicting and powerful features of OmniFocus: the review and perspectives.
The Review
I love how OmniFocus helps you review your projects. Again, like a good personal assistant, OmniFocus brings to your attention each project, one at a time, and lets you review the tasks in that project. This is your chance to refresh yourself on what you’ve committed yourself to and make sure it is all still relevant and accurate.
Moreover, OmniFocus keeps track of your reviews for you. It knows when you last reviewed a project and only brings it to your attention when it is time to review it again. And, like everything else, your reviews sync over the air. Which is fabulous news, because the best way to review your projects is with OmniFocus on the iPad (but more on that in a bit).
In Things, I had to review manually. I would sit down at my laptop and scrub the Today List. Then, if I had the time or energy I would manually go through each project to see what tasks were in there and if any were in need of being done soon, or were no longer necessary. Because everything in Things was centered around the “Today” list in a way, managing my to-do list felt like I was perpetually processing. And since reviews had to be done manually I rarely ever got to them.
Perspectives
Perspectives is a backbone feature in OmniFocus. It is one of many ways to sort and present your action items in a meaningful manner. But perspectives are so powerful, it is as if OmniFocus were thinking for you.
It’s through the perspectives that give OmniFocus a much more robust approach towards that final and all-important stage of getting things done: doing.
As I mentioned earlier, getting actions into OmniFocus is easy. But processing of those actions is where the most friction exists. But that is because the organization and output of your tasks is what makes OmniFocus so powerful. I’m not exaggerating when I say that OmniFocus pretty much organizes your lists for you. It will take your relevant tasks and intelligently order them for you so you only see what you need to see without worrying about other stuff. After years of keeping a to-do list, I just may now be finally understanding what people mean by a “trusted system”.
As Tyler Hall wrote:
It’s hard to describe how incredibly powerful Perspectives are until you actually spend a few days with them in your workflow. Other task managers have smart folders or dedicated “Today” lists, but they absolutely pale in comparison to the flexibility that Perspectives afford.
The perspective I live in the most is one I made myself. It’s called “Today” and only shows me available actions which are due and any flagged items. What I like about having flagged items appear in my Today perspective is that sometimes I know a new action item needs to be done today but don’t want to fiddle with assigning a context or project or due date (especially when entering it via my iPhone or iPad). Thus, flagging the item is the quickest way to get that task into Today’s list.
Defining custom perspectives is easy. You can start by manipulating your “View”. Then from the Perspectives menu chose to Show Perspectives. From there, clicking the gear icon allows you to save your current OmniFocus window as a new perspective or update a currently defined perspective.

While in the Perspectives Menu, you can also adjust unique Status settings only available from this pane, and you can set custom icons by dragging them into the icon box. This is how my “Today” perspective is built:

Once you’ve got your very own perspective you can add it to the toolbar and it will sync to your iPhone and iPad. From the iPad, if you star a perspective it will show up on your home toolbar (a feature I’d like to see come to the iPhone).
Over-the-Air Syncing
Despite all that OmniFocus as a task-management application can do, for me, one of the hallmark features is its ability to sync over the air.
One thing that’s important to understand about why over-the-air sync is so vital to my day is that I don’t spend my whole day working in one location. I spend part of my work day at home, part of it in my office, part of it in meetings, part of it on the go commuting between campuses, and part of it in our on-site coffee shop. Sometimes my location and the device I’m using will switch by the hour, and so I need my tasks and references to be available to me regardless of where I am or what I’ve got with me.
This is partly why I keep a folder of all my current projects and files — “Currently Working On” — in Dropbox. Not only does this keep those files in real-time backup, but it also gives me access to them from my iPhone, iPad, and Mac.
As I said in an aforelinked post about 1Password, apps that don’t sync are becoming increasingly arduous to use and maintain. And it truly did reach the point where Things was nearly useless to me. I would throw tasks in there to get them out of my head and to save them for later, but between my iPhone, iPad, and Mac my lists were so out of sync just by lunchtime that I rarely went to Things when it was time to actually accomplish anything.
Instead I would keeping urgent tasks in my email inbox (horror of horrors!) and would do a daily mind sweep of anything I knew needed to be done that day and build my to-do list in Simplenote / Notational Velocity so I would have access to it throughout my day.
As I said an the outset of this article, in a simpler world I would be delighted to use Simplenote as my task list. But I wear too many hats and have too many plates spinning at the same time for such a low-fi system. And that is ultimately why I switched to OmniFocus from Things.
Clippings and Attachments
When on your Mac you can clip a file to your task. For example, suppose you get an email from your boss asking you to do something. If you’re a clever employee you will do what your boss asks right away. But, perhaps you would rather ignore your boss for the moment and continue reading about Inbox Zero.
You can take that email message from your boss and send it to OmniFocus. Simply hit the Clippings Shortcut key (which can be defined in the Clippings Preference pane) to bring up the quick entry pane with your email message attached as a note. Now you can define the action item your boss needs, and save the email as a reference for later when you get around to doing it.
A clipping is basically an alias to a file on your Mac. You can clip just about any file you want: photos, videos, documents, audio… anything. In fact, I don’t know of any file type that you cannot clip to OmniFocus.
Some clippings — such as email messages and website URLs — get synced to your iPhone and iPad as notes. Other clippings — such as images or files — are treated as aliases, and thus can only be accessed from your Mac.
By default, OmniFocus on the Mac does not embed files you attach to your items. It simply links to them. This offers a tremendous gain of speed for syncing your database between multiple devices. However, if you do have a file that you want to embed in your database from your Mac so it will sync to your iPhone and iPad, then you have to embed it manually.
To embed a file into an action item select the item and click Edit → Attach File…, then from the file picker choose the file you want and pick the option to embed the file in the document (rather than create a link to the file).

Now the embedded attachment exists within your database and will sync to all your devices.
In the iPhone and iPad apps, however, there is no such thing as clippings; there are only attachments. From the iPhone or iPad you can attach a photo (by taking a new one or pulling one from your device’s photo library) and you can attach audio.
There seems to be no limit as to how many photos and audio tracks you can attach to an item. And though the process and feature is overall very polished, I do have a few quibbles.
Recording Audio: To record an audio attachment on your iPhone you tap “Record Audio”. But then, all you’re presented with is a blank white box. If you’re not familiar with how the UI changes you may be wondering (as I did) if the audio recording is actually taking place.
In the iPhone’s native Voice Memos app you get a big red bar on top of your screen letting you know you are now recording. In OmniFocus you see nothing, until you begin talking. The you see a green line which is a volume-level indicator.

Surely a pulsing red UI element signifying “now recording” would be more helpful? It wouldn’t even have to replace the volume-level indicator, it could sit right on top of the “Stop” button.
After you’ve finished recording your voice note in OmniFocus it will sync to your database as a
.caf— Core Audio Format — file, which is an audio container file used by Apple. The sound quality of a synced audio track is actually quite fantastic and clear.Attaching Photos: When adding a photo attachment from your device’s image library the iPad has the right approach. It says “Image added Today, 2:46 PM”. The iPhone however says “Picture taken Today, 12:14 PM” (or whatever time you added it). On the iPhone, for image attachments that are added from the iPhone’s photo library, it should say “Image added” not “Image Taken”. (And to get especially nit-picky, why is “Today” capitalized? I see no reason.)


The only downside to attachments is wireless syncing. Aside from being able to sync over-the-air the next most important thing is to be able to sync quickly, and big file attachments hinder that.
In day-to-day usage I rarely need to attach audio or photos to a task when adding it on my iPhone or iPad. It is much more common for me to add a clipping to an action item when on my Mac. But since these files are usually are only needed for a project I’m working on when I’m actually at my computer, I don’t attach the clippings I simply link to them. By keeping attachments to a minimum, it helps my database sync quickly when I’m launching OmniFocus on my iPhone or iPad.
Worth pointing out is that when syncing your OmniFocus database, only what is new and/or what has been changed gets synced. This means when your desktop app syncs to the cloud, it only pushes tasks that have been updated since the last sync. And when you launch the iPhone app, it only downloads the tasks which have been created or updated since the last sync. It does not download the entire database every time.
This is, of course, standard operating procedure — it’s the same way programs like SuperDuper, Time Machine, and Dropbox work.
The Omni Sync Server
On the iPad’s sync options you are given the opportunity to join the Omni Group’s beta Sync Server. It is, more or less, their own WebDAV server. The iPad is the only one of the three apps which recognize this as Omni’s own sync server. On the desktop and iPhone versions of the app you have to set up the service under the Advanced WebDAV settings.
Currently all the Omni Sync Server does is sync your data. Though my perception is that it does seem to respond much quicker than the MobileMe sync I used for the first month. Hopefully Omni Group has some exciting features in the pipeline for their sync server beyond just syncing (the ability to email directly to your cloud-based database would be one such feature).
A Few More Miscellaneous Observations About OmniFocus’ Over-the-Air Sync Options
Changes to your database don’t get pushed to the desktop app, nor are they pushed to the server in real time. The desktop app syncs on a schedule every 60 minutes; however you can manually initiate a sync anytime you like and it always syncs when quitting.
On the iPhone and iPad you cannot sync if OmniFocus is not running in the foreground. Unlike sending an email or a text message, where once you hit send you can lock your iPhone or iPad and the message will still be sent, OmniFocus must be open and running to complete its sync.
Likewise, if your iPhone is locked it will still fetch new emails. OmniFocus however, just like other iPhone apps, can only sync when it is open. And alas, it does not have “sync completion” — this means if you initiate a sync and then exit out of the app the sync will lose its connection to the server.
This lack of non-background syncing can be especially annoying when you’ve completed a task, checked it off on your laptop, but then later it beeps your phone reminding you the task is due. The only way around this is to turn off reminders for OmniFocus on your iPhone. This is done in the Settings pane from the OmniFocus home screen on your iPhone.
OmniFocus on iPhone
In the beginning, the best way have your OmniFocus task list while on the go was to print it out. The first version of OmniFocus for iPhone was an iPhone optimized Web interface.
On July 10, 2008 the native iPhone app launched. Unlike the printout or Web interface before it, the iPhone app was a full-featured, stand-alone task management app. Meaning you didn’t need OmniFocus on your desktop to use OmniFocus on the iPhone. But if you did have the desktop counterpart then you could sync your tasks with your Mac. And you could sync them wirelessly, over the air via MobileMe or your own generic WebDAV server. Syncing over the air is something that many applications have still yet to implement, yet Omni Group had it done right out of the gate.
And even before the iPhone app was available in the App Store it had already won an Apple Design award. The iPhone app has come a long way in the past two years, but it’s that initial hallmark feature of OTA syncing that caused me to switch to OmniFocus in the first place.
Perhaps the most clever and thought-through feature on the iPhone (and iPad) app is the ability to quickly enter a task even when the app itself is syncing and updating. The nature of over-the-air sync means the app has to check for changed data and then update itself every time you launch the app. During the updating process the iPhone app’s database is momentarily locked out. Yet you can still add an action item to the inbox via the Quick Entry button.
This is a dream feature for the many times you are launching OmniFocus for the sole purpose of jotting something down.

And so long as we’re discussing the Quick Entry button, it’s worth noting that there is a functional difference between the plus (+) button and the quick entry button. The quick entry is for something to simply go directly to the inbox (hence why the icon is an arrow pointing into an inbox). The plus button will add a task with your currently viewed project or context pre-populated (though you can change it).
As mentioned above, in the settings of the app this is where you can turn off notifications of due items. It’s also where you can set your badge count (I keep my badge count off; I’m already aware that I have things to do). I also have all the current “Experimental features” turned on. Such as Landscape Mode, Undo Support, and Perspectives. The latter is one of the backbones of OmniFocus, so being able to sync your perspectives between your iPad, Mac, and iPhone seems like a requirement not an experiment.
OmniFocus on iPad
The iPad app was released on July 30, 2010 and is, without a doubt, the best of all three versions. Moreover, it is one of the most robust, feature-rich, easy-to-use apps on my iPad. $40 is big ticket compared to many other iPad apps, but you are getting what you pay for.
It seems to be a common practice that for apps with a strong presence on the desktop, their iPhone and iPad counterparts are portals into the desktop app, or light versions. But OmniFocus on the iPad is the current king of the OmniFocus hill. Ask anyone.
Every successful computing platform has to have a “VisiCalc moment” — the moment it goes from fun toy and technology demo to “holy crap this thing is useful.”
I don’t think there’s a single VisiCalc moment that everyone will have for the iPad — but, for me personally, it was OmniFocus. That’s when my iPad went from toy to indispensable tool.
Before OmniFocus, my iPad wandered around my desks without a real place. Now it has a place right next to my dev machine’s keyboard.
OmniFocus [on the] iPad is the best of the three. It is indeed, but I’ll go one further: it’s the best task management tool that I’ve used. Period.
This is partly due because the platform itself is present — and usable — on the three main devices I use. But I must profess my love for the Forecast feature that was added to this client. It is not present on the Mac or the iPhone clients.
After a couple of days of using the Forecast ‘view’, I asked myself, “Why has no other Mac task application used this exact interface?” Indeed, even the Mac client for OmniFocus pales in my usage. The ability to quickly see a timeline of what’s coming down the pipe, no matter the project or context — has been a boon to my tool belt. To have all overdue items available in one quick glance is also beneficial.
In particular, the iPad version soars in two areas: (a) Reviewing your projects; and (b) the Forecast view.
Review
As mentioned earlier, one of the most splendid functions within OmniFocus is the way it helps you review your projects. You currently cannot review them in the iPhone app, but that’s okay because once you’ve done your weekly review with your iPad there’s no going back.
In perfect form the Review pane comes equipped with a coffee cup-bearing icon. Tap that and OmniFocus brings up all the projects you have not reviewed in the past week. (If, perhaps, you need to review more often than once a week you can set your time allotment of choice from within the settings.)
Once in the Review pane you see one project at a time. On the left sidebar is your list of all projects pending your review, and on the bottom are some attractive buttons to let you chose what sorts of projects you want to review (active projects, those you’ve put on hold, those you’ve completed, or those you’ve flat out dropped), and your stamp to mark the project as reviewed.

The review pane on the iPad app is a textbook example for why good design is important. The functionality on the iPad app is no different than the desktop version, yet the interface is so well designed it makes the review process faster and significantly more pleasant.
Forecast
The Forecast view is just that, a high-level look at upcoming tasks for the next 7 days; also included is everything past due and everything with a future due date. I second Chris’ statement above: why has no other task manager implemented this view? I use it more than my custom-defined “Today” perspective.

Since switching to OmniFocus I’ve had many people ask me if the iPad version is worth getting in addition to the desktop version. I would argue it’s the other way around: is the desktop version worth getting in addition to the iPad?
By nature of how I work, I use the desktop version of OmniFocus significantly more throughout the day than either of the mobile apps. But I prefer and enjoy the iPad and iPhone apps over the desktop. And I especially prefer the iPad version.
Hopefully OmniFocus for iPad will be leading the way for future versions of its iPhone and Mac counterparts and the Omni Group will take what it’s learned on the iPad back to the Mac.
Conclusion
I switched to OmniFocus because of its ability to sync. I’m staying because of its ability to do everything else.
More software reviews can be found here.
✚
All You Need is Simplenote
Simplenote is a note-taking app for your iPhone and iPad that syncs with the Web. It is the sort of app adored by those who pride themselves in their use of beautiful and uncomplicated software.
It is also an app for people with ideas. It’s for those who need some way to jot an idea down, build on it, and refine it until they’re sick and tired of it; regardless of where they are or if they brought their laptop.
As a writer, Simplenote could very well be your principal writing app. It has a straightforward design that makes it effortless to use. In Simplenote there is no text formatting, it’s just plain. There is no document titling — when you create a new note, the first line is the title. There is no saving a note — you just write and your note is backed up in real time, and even synced with any other other devices you use: iPad, iPhone, and Mac.
This humble application began a few years ago in response to two big needs of iPhone users: (1) the need for a notes app that synced over-the-air; and (2) the need for a notes app that didn’t use Marker Felt.
In some respects the app has barely changed since 2008. In fact, arguably the most obvious changes have been to the icon. The original icon was as a yellow sticky note taped to the front of a locker. That changed into a grey note card resembling a garage door, which then changed to a white notecard with a blue wi-fi bubble, which changed again to what you see today.
![]()
To say the app has barely changed since 2008 is, of course, not to say that Simplenote is the same as it was two years ago. It has been refined, polished, and updated with taste. Only a handful of new features and UI improvements have been added over the years, with many of the most notable changes just recently emerging in version 3.
Compare for a moment Simplenote to Apple’s two text and note-taking apps for the iPad, Pages and Notes. Pages was one of the first apps I bought for my iPad. It was touted as having most of the features of Pages for Mac, but on the iPad. For me, after a bit of use, Pages was quickly relegated to nothing but a full-screen typing app. It is a great showcase for what sort of apps the iPad is capable of running, and for those who need to edit Pages documents on their iPad it is a necessity. But it is somewhat difficult to get documents in and out, and the document syncing process is flat out ridiculous.
Notes is Apple’s other in-house note taking app. It ships with iOS and is quite simple (in fact, much of the foundational user experience that Simplenote has is parallel with the built-in Notes app). As it is with Pages, the biggest downfall with Apple’s built-in Notes app is, again, sync. Though the system for syncing in Notes is better than in Pages (your notes sync into your IMAP email account), nobody I know actually uses the IMAP sync.
The Simplenote developers actually beat Apple at their own game. They made an app with a better design (Helvetica!), better functionality (over-the-air sync), and they proved that less (compared to Pages) is, in fact, more.
Version 3
The latest update to Simplenote sports a slew of new toys. But, as Charlie Sorrel said in his review on Wired, “if you don’t want them, you won’t even notice.”
The most notable for me is the full-screen writing environment on the iPad app. When writing on the iPad I prefer to use Simplenote. But at times, I may want to see just the page with no list of notes next to it. Up until now, I would copy my text out of Simplenote and paste it into Pages. But now there is a subtle, full-screen button at the bottom-right corner of your note — tap that and Pages on the iPad all but becomes obsolete.

Perhaps the most clever of the new features is sharing notes with others. When in a note, tap the icon that resembles a phone with an arrow pointing out. From there you can enable note sharing and email the person whom you want to share with. This is a great way to empower team collaboration and keeping others in the loop with information and ideas.
One of the many thing I keep in Simplenote is meeting agendas — especially talking points for 1:1s. Now for my 1:1s I can share those talking points in a note with the other person I’m meeting. This way he or she can see what’s on the docket, and even add items of their own. Furthermore, with the addition of version history, we can drill down within the same note to see what last week’s agenda items were.
Additional cleverness comes in to play here: if my friend doesn’t have Simplenote installed then I’m going to bug him to get it. And I’m going to bug him to use it so that our collaborating is actually useful. Which means not only is sharing notes useful and helpful for users like me, it is indirectly word-of-mouth marketing for the Simplenote crew. Nicely done.
This is just one example of how the more you use Simplenote the more you find new ways you to use it. People are using it for recipes, ideas, lists, blog posts, chapters of books they’re writing, and more. And for all those power users who are finding themselves with a list of notes longer than there arm, a way to organize may be in order. But a folder structure could slightly hurt the simplicity of Simplenote. Tags on the other hand are a great way to add structuring to your notes if you want.
And one way that I see tags as coming in especially handy is in regard to the aforementioned shared notes feature. Since Simplenote does not label who is sharing a note with you, you can tag that note using their name. Which means someone you’re sharing a lot of docs with, you can see them all at once using a tag filter.
What’s in my Simplenote?

So what do I actually have in my Simplenote at this moment? All sorts of things. Some are notes of importance which I want synced on all my devices. Others are completely trivial and are in Simplenote by sheer virtue of it being my note taking app of choice.
Meeting agendas and talking points: mostly for upcoming 1:1s. These meetings are usually informal and quick. And, in fact, the very point of a 1:1 meeting is so the two of you only have to connect and meet once a week — saving all your conversation topics for that one meeting. Being able to jot down questions, ideas, and the like using Simplenote has long been my workflow.
Ideas for businesses, software projects, and other things.
A list of gift ideas for friends and family.
Blog posts in all stages: I usually write them in Simplenote or Notational Velocity, and finish them in MarsEdit.
Recipes: well, actually only one recipe: Grilled Artichoke with golden mustard dipping sauce.
Reminders of things to order next time I’m at a restaurant I don’t regularly visit.
And other simple notes: such as cool quotes, shopping lists, miscellaneous data, and the like.
For a wider look at what is in other people’s Simplenote, check out Patrick’s community listing on Minimal Mac.
Other Reviews
If you liked this review of Simplenote, there are more like it here.
✚
Go Gowalla
Several months ago I began checking in to places on Gowalla.
What first turned me on to Gowalla was its design. The website and mobile apps are beautiful, and Gowalla’s use of cute icons and graphics throughout makes for a great experience.
But it’s not just the design that I like about Gowalla. It’s fun, and it’s meant for people who like to get out, whatever the reason. Errands, dates, local events, road trips, and the like — if you like to get out you might like to Gowalla.
And this focus on travelers (adventurers?) is what makes Gowalla so interesting and fun for me. I don’t have to have a metric ton of “friends” on to make it worth using. And though I suppose it would be more fun to use if more of my friends Gowallad, chances are good that even the 30 friends I do have aren’t paying much attention to where I check in. And that’s okay. Because what is most enjoyable about Gowalla is the cataloging of your own journey.
I just returned from a two-week vacation in Colorado. On the first day of our trip I put the Gowalla iPhone app right on my home screen and decided that while I was traveling around the Colorado Front Range and the Rocky Mountains I would check in at every spot I could.1
Also, in preparation for my Colorado vacation I created a Gowalla trip called “Classic Castle Rock“, which features some of the premier spots around my home town. I built most of the trip on the Gowalla website before I even left Kansas City. There were a couple spots I wanted to be a part of the trip that weren’t created already, so once I got in to town last week I spent one of my mornings driving around and creating the final few spots.
It’s unfortunate that creating new locations and checking in at spots is limited by my connection to the internet. If I’m not connected I can’t check in. And this is particularly unfortunate because some of the most fabulous, visit-worthy locations are in areas with no cell service and no wireless internet.
For instance, my family and I spent a few days in Pine Grove staying at my grandparent’s cabin. It’s an old, red cabin that sits right by Elk Creek. And a half-mile upstream is the Bucksnort Saloon, home of the Buck Burger. We also spent one morning in Bailey to have breakfast at the Cutthroat Cafe and visit Coney Island’s new location. Sadly, my AT&T-connected iPhone couldn’t get a lick of signal at any of these fabulous spots.
It just so happened that on The Big Web Show last week, Jeffery and Dan interviewed Josh Williams, the founder of Gowalla. And they discussed this very issue of mobile connectivity versus spot check-in and creation. Josh is hoping that the Gowalla team will find a way to store GPS location data on your phone even when you don’t have cellular service. Then, once you’re connected to the internet again, you could use that stored GPS location data to check in and/or create the spots you were at.
This would be a great solution considering the situation, but ultimately we just need better cellular coverage. You see, it’s one thing for me to be able to create the Bucksnort Saloon 48 hours after being there, but that won’t necessarily help someone in the area use Gowalla to find the Bucksnort when they’re out in the middle of No Network Land looking for great burger joints.
It has taken me a while to decide how I use Gowalla (though I’m still not sure exactly what that is). At first I had to check in as soon as I arrived at a spot — as if I was punching in on a time clock. If I didn’t check in right away, I wouldn’t check in at all.
Now I check in when I have a few spare minutes. But there are some people who check in to spots they don’t even walk into but that they just walk by and notice. Is that breaking the rules? What are the rules, even?
For me, I prefer to only check in at places I’ve actually walked into and spent at least a little bit of time. But even then there are times I am on the go and don’t have a few spare minutes to check in with Gowalla.
And this is perhaps the most frustrating part of using Gowalla. It usually takes at least a minute or two to fully complete the check-in process on my iPhone. And that’s assuming the spot I’m checking in to has already been created, and I have good 3G coverage. It takes an extra couple of minutes if I also need to create the spot I’m at.
I would love to see a part of Gowalla’s future solution for checking in at places where you don’t have service to also include a way to check in quickly, or even in the background. If my wife and I are out on a fancy date you bet I want to check in at J. Gilbert’s. But giving my wife the attention she deserves is significantly more important. Which is why I want Gowalla to let me check in for my hot date at the best steakhouse in town while also letting me ignore my iPhone and have a great evening out.
Coming back to my question, I don’t think there are any rules. Much of what makes Gowalla so cool is that it’s still being defined and discovered by its developers and users. Every day I seem to discover a new use for Gowalla, and as it grows the more useful and fun it will be.
- This check-in behavior is different than what I normally do here at home in Kansas City. Here, I normally only check in to a few spots per week. Though that is mostly because I forget or else don’t make too much of a point to check in to the same place more than once. ↵
✚
A Brief Review of iOS 4
iOS 4 is now available, and it is fantastic. But as a long-time iPhone user some old habits die hard.
The unified inbox is great. But I still find myself tapping the “Mailboxes” header on the Inboxes view in attempts to go back one more screen, despite the fact there is no button there.
Folders are great. But I now have to re-learn where my apps are. I used to know where on the screen they were located, now I have to remember which folder I put them in.
Multitasking is great. But double tapping the Home button doesn’t get me to Phone favorites anymore — a function I have used dozens of times a day for the past three years (I’m one of the few who uses my iPhone to make phone calls). In earlier iOS betas you could at least double tap and hold the home button to launch favorites. But alas, that function didn’t make it into the Gold Master.
But eventually I will acclimate and the above quibbles will be non-issues.
Apple’s new mobile OS is the most feature-rich and robust one to date. Just as the iPhone 4 is the biggest leap forward for the hardware since the original iPhone, iOS 4 is the biggest leap forward for the software.
iOS 4 is packed to the brim with features and functions we only dreamt about in 2007. Yet in spite of all the new, nearly everything about this OS is expected. Not because we’ve seen pre-release demos, but because the features are implemented so naturally. There are no new features that require much, if any, explanation. And, save but one, no new features do anything mind blowing.
That is exactly how Apple rolls. The implementation of a feature is just as much a feature as the functionality which it provides. Apple didn’t just add the ability to now create folders, they built the best possible user experience around that functionality that they could.
Current iPhone and iPod Touch users who are able to upgrade to iOS 4 will have no trouble using all the new toys found in iOS 4 without missing a beat. Even the most “hidden” of the new, highlighted features, fast-app switching via the Tray, is easily discoverable to the average user since activating the Tray is now tied to one of the most common functions of double tapping the Home Button.
The New Look
Every major update to the iPhone’s operating system has mostly only provided feature enhancements. iOS 4 is the first to sport a significant change in the look. And it’s beautiful.
Earlier this year I jailbroke my iPhone to install a different GUI and add a Home screen wallpaper and custom icons. But many of the graphical changes in iOS 4 negate my reasons for wanting to jailbreak. From what I’ve noticed, all of the new graphical elements are fantastic. Well, all but one: the default water drops wallpaper is bizarrely ugly. I’m currently using the fun but unobtrusive Pictotype Purple wallpaper from Veer.
I was never, ever, keen on the 3D Dock introduced in Leopard, but on the iPad and iPhone it’s great. For one, it’s much more open than the ‘grid’ Dock in previous iPhone OSes. This makes for a cleaner looking, more simple Home screen. Secondly, the square icons don’t look at all awkward while sitting on the 3D dock, which is not always the case in OS X.
Additionally, I’m a big fan of the scratched fabric texture which shows up in the background when drilling into a folder or when fast-app switching via the Tray. It’s a darker version of what you see behind the Google map if you click on the bottom-right page curl. And it’s the same background Reeder uses for its iPad app.
Folders
Folders are swell, but I suck at naming them.
Choosing a proper and usable name for a folder is proving to be more difficult than I thought. Also difficult is remembering which folder has which apps.
Thanks to folders, my first Home screen now has the apps which used to occupy my first two home screens. These are the apps I use daily or weekly. And the OCD in me decided it would be best to name each folder with names that were five characters long. So: Tools, Photo, Stats, and Sweet.
On my second Home screen, I have seven folders: Rare, Reference, Utilities, A Games, B Games, Misc, and Tools. But off the top of my head I couldn’t even tell you what apps are in each of those folders.
The Rare folder holds all the apps which previously lived on the very last Home screen wasteland. A Games and B Games are just that — except I hardly ever play games on my iPhone so I don’t really know which games are the more or less favorites. And the difference between Reference, Misc, Tools, and Utilities is (embarrassingly) a bit lost on me. I chose those names because I was trying to avoid having four folders with the same name, Utilities. But unfortunately my current solution is just as confusing as the alternative.
Once I’ve nailed down some proper names, my only gripe with folders will be the spacial arrangement of the individual apps. As Lukas Mathis points out, the placement of an app’s icon is in one location in the folder’s icon view, but it’s in another location when you open that folder. (Similar to the same spacial issues the iPad has when you rotate the device from landscape to portrait.)
The Tray and Multitasking
But Apple doesn’t really intend for users to navigate through folders for the apps they use regularly. Instead, they’ve given us the Tray and multitasking.
It used to be that when you were done using an app and you pressed the Home Button you were quitting that app. Some app developers were smart enough to build state persistence into their app. Which meant when you came back to that app, it would load itself at the same spot you left it, but it still had to load.
Now you are no longer quitting the app when you press the Home Button. Instead the app is put into the background and its icon gets slotted into the Tray. You access the Tray by double tapping the Home Button and from there you can swipe through all the apps you’ve recently used. But the computer-savvy geek in me wants to quit out all the apps that I’m not using. It pains me to see an app in that tray which I know I only use once or twice a month. That app is taking up precious memory.
Neven Mrgan wisely advises:
This is not the multitasking you’re used to. The sooner you accept this, the better.
And so I’m learning not to play the Tray because iOS 4 is clever and responsible enough to quit apps on my behalf. The least-recently-used app gets the boot once the system actually begins to run low on memory. And with iPhone 4 rocking twice the memory my 3GS has, there will be even less reason to manually monitor which apps are running in the background.
John Gruber explains the new multitasking quite well:
The new model [of multitasking], [...] is that apps are not quit manually by the user. You, the user, just open them, and the system takes care of managing them after that. You don’t even have to understand the concept of quitting an application — in fact, you’re better off not worrying about it.
The Tray and its fast app switching are just one element of multitasking in iOS. There are also a handful of background APIs which 3rd-party apps can now take advantage of. The most heralded have been the APIs for background music, location, and VoIP. Respectively: Pandora can play music while in the background; GPS apps can give directions while in the background; and Skype can host a phone call while in the background. I don’t use Pandora, GPS apps, or Skype, so these new features, while great, do not really change my life for the better at the present moment.
The API which I am most thankful for, in that it affects my day-to-day usage the most, is task completion. Now I don’t have to wait while Twitter uploads my latest tweet or Simplenote syncs my latest note. But unfortunately, the other side of the coin to task completion, background updating, is not baked in to iOS 4. When you open apps like Simplenote, Twitter, or Instapaper, even if they’ve been running in the background, they will not have been able to update. They still have to wait until they are the frontmost app before they can download any new data.
✚
Diary of an iPad Owner
Saturday, April 3, 2010
7:00 am: Ben, Terry, and I are driving down to the Leawood Apple store to stand in line for an iPad. Well, technically it’s me who’ll be standing in line to buy an iPad — the guys are coming along because I convinced them it’d be fun.
7:30 am: We are here. Coffee in hand. And only 75 people in line ahead of us. I talked to the first few folks who apparently arrived the night before around 8:00 pm (a group of them, too, yet only one guy who’s actually buying the iPad). I guess the next group showed up around 2:00 am, and all the rest of us have been trickling in since 6:00.
7:32 am: A young guy and his mom get in line behind us. The guy is wearing a “WWSJD” t-shirt. I like to think that I’m less nerdy than he is, but the fact is I am ahead of him in line.
7:39 am: We are awkwardly interviewed by a young college student, and then a lady comes by handing out menus for breakfast pizza from California Pizza Kitchen. CPK will deliver to us while we wait in line. It’s a clever idea, but nobody orders (I know I’d rather spend that $10 on a few apps).
7:46 am: The WWSJD dude sends his mom to get Starbucks.
8:11 am: The couple in front of us share some of their donuts. (This would have been better 30 minutes ago when my coffee was still hot.)
8:55 am: The store is about open. There have been random bursts of cheering and clapping coming from inside for the past half hour.
Our line (which has grown to about 200 people by now) is directed to split into two groups: those who pre-ordered their iPads, and those who did not. Those of us who didn’t pre-order outnumbered those who did at least five to one. Yet those in the pre-order line were served by the Apple sales team about four to one versus those of us in the non-pre-order line. Considering I’m stuck in the non-guaranteed-to-get-one, slow-moving iPad line, this is seriously annoying.
And now that the line is moving rumors are running amuck that the store is already approaching sold-out status. All of us who came so early to share donuts and buy iPads may have to come back at 3:00 pm to share sandwiches and fight for the leftover iPads (if there even are any).
10:19 am: It’s been nearly three hours in line. The store is not sold out of iPads, and I am finally next to go in. I am equally excited to get out of the cold and into the warm store as I am to actually drop 500 bucks on the iPad. Linda, a nice older lady, greets me and lets me in. She helps me gather my order, charges my Visa, and then sends me on my way. I buy the 16GB iPad, Apple’s black fitted iPad case, and a bluetooth keyboard.
11:00 am: I am back home and ready to unbox. Terry and Ben went home — they had their fun playing with the iPad at the Apple store while I was spending money. Now it’s my turn. Just me and my iPad.
My wife loves me, so she humors me and joins me for the unboxing.
I love her too, so I humor her and let her be the first to click the home button. Hmmm… oddly the thing is already powered on. As Anna clicks the home button the iPad brings up the “plug me into iTunes” display. Well, okay then.
It takes me over an hour to sync it for the first time and fine tune the placement of the icons. But the wait is worth it. In the meantime I surf iTunes and spend next month’s coffee budget on Apps.
12:49 pm: Oh my goodness… my iPhone is so crowded and small and slow and tiny.
1:12 pm: My sister calls me asking what Anna’s and my plans are for Easter dinner and if she can join us.
“Of course you can,” I tell her.
She asks me what I’m up to today, and I tell her I’m playing with my new iPad. “What’s an iPad?” She asks.
2:04 am: My bout against the iPad’s battery has failed. I can barely keep my eyes open and this thing is still running bright.
Sunday, April 4
7:20am : Holy battery. Last night I plugged this thing in to my MacBook Pro with 11% battery life and five hours later it’s only at 62%. Clearly I need a dedicated wall charger.
8:25 am: I am so taking the iPad to church. What a great use-case scenario… I mean who needs a Bible, a note pad, and a pen in your pocket when you’ve got an iPad? It’s the future!
9:17 am: So I’m embarrassed to actually use the iPad for anything. I’m leaving it under my seat because I don’t want to attract any attention. This reminds me a lot of when I bought my iPhone. When the iPhone first came out they were so rare and exotic for the six months or so that every time I’d pull it out people would be like, “Woah! Is that an iPhone?!” And so using my iPhone in public felt like bragging.
11:29 am: I wish Amazon would gift me a free Kindle version of all the new, hard-cover books I’ve ordered lately. Instead of carrying Linchpin, REWORK, and Your Marketing Sucks in my backpack all at the same time it would be ergonomically glorious to have them on my iPad instead. I may never buy a physical book again.
Monday, April 5
7:00 am: The week begins, and I am spending my daily coffee and reading routine downstairs and on the couch this morning.
This is also when I scrub my to-do list and plan my day. And though Things for the iPad is beautiful, it is not nearly as robust as its Mac counterpart. There are so many features on the Mac desktop version that I use regularly. Such as linking emails inside of to-do items and re-shuffling tasks to another due date which I know I won’t get today. But Things on the iPad is more akin to the iPhone version and so a lot of this I can’t do.
But perhaps I don’t necessarily mind the division between work and play. It’s actually a bit nice to do my reading with coffee from the living room and then scrub my email and to-do list from the office.
And speaking of reading: the Wall Street Journal app sucks. It’s slow and will not relent in up-selling me to a subscription. I would consider a subscription if this non-subscriber’s experience were not so horrendous.
9:52 am: So I was going to bring only my iPad to work today, but I wimped out. I will try to do all I can to see if I can get by with just the iPad today, but I’ve got my MacBook Pro with me just in case…
10:19 am: Just met with Jono in a side room to show off our website’s glorious lack of video compatibility on an iPad. For some reason, seeing our website in 1024×768 instead of 480×320, the need to get a non-flash video solution becomes much more real.
12:00 pm: Combing through my email at work for pass number two today. Email on the iPad is easy and delightful, but my workflow and systems are kinda broke now. All the weekly reports that get sent to me on Monday mornings couldn’t be saved to their folders on my Laptop (which means I have to just delete those emails, or process them again later).
12:14 pm: An email from Isaac with the PDF mockup of this month’s Partners Journal. The Journal looks fantastic on this display. But the 12-page, 6MB file is not easily flicked around in quick view.
12:59 pm: I bring the iPad to our first meeting together. Other than passing it around the table for my directs to check out, it gets no use at all. I write my notes down on the meeting handout as I usually do, and when I do need some info that is digital it is resting with my MacBook Pro and not my iPad.
3:10 pm: Sitting down at my desk and thanks to the florescent lights in my office the iPad is virtually unusable in here. I plug in my laptop to my 23-inch cinema display and work as I have every other day — with a mouse and a keyboard.
7:00 pm: I am done for the day at the office and am heading home. The battery is still at 60% — looks like the iPad got more use today than I’ve let on.
Tuesday, April 6
11:55 am: On my way to a noon meeting. I stop at the coffee shop for a lunch-time Americano. Eddie is walking by sees the iPad under my arm as I head in. He jumps in line with me and I give him a guided tour of some apps: Pages, Sketchbook Pro, and others. The presence of the iPad commanded the attention of everyone in line, even the cashier and barista (I should have asked for a discount).
Noon: Just like yesterday, the iPad’s only use in this meeting was to it show the fellow attendees.
One of the iPad’s best apps is Safari — especially when showing the big touch-screen display to people. It’s a great demo app because it gives them a chance to see something they’re familiar with (a web site) but experience it in a whole new way. Even for iPhone owners it is great to watch people take some time and hold the Web in their hands. Unfortunately the wi-fi in this back office is lousy. So I show them Mail and iBooks instead.
2:51 pm: Back at my office I walk across the hall to show Phil the iPad. He says he’s not getting one for a while because he doesn’t like to buy first-generation gadgets (as he pulls out his first-generation iPhone).
Phil’s wife, Alison, comes in to pick him up while we’re chatting over the iPad. He slides it over to her so she can check it out. She opens up Notes and begins typing away with no trouble at all. “Alison is awesome”, she taps.
It is a tense event to let someone play with your iPad. There is nothing which i want to hide, but it is quite personal to freely let people look at your email inbox, read your notes, and see what web page you were last viewing.
3:21 pm: Just downloaded WeatherStation Pro. It’s a good thing apps are a tax write off I keep telling myself.
4:29 pm: I’ve got a meeting in one minute with Jarrod. I walk out to grab a print out and leave the iPad on my desk. As I walk back in Jarrod’s in my office waiting and perusing the apps on my iPad. Later I open the Notes app to discover a new note: “Jarrod is awesome, too.”
10:15 pm: Up until now it’s always been at my desk where I spend so much of my time. It is where I work and where I create. I write, design, pay bills, share pictures, and more. Something the iPad has really helped me do is disconnect work from play from entertainment from incessant nagging that all exists on my computer.
Unlike my laptop, the iPad is not a do-all, be-all device. Its limited scope helps me stay connected to news and others things which I enjoy but without the distraction of all those things I could be doing at that time.
Wednesday, April 7
6:00 am: My morning routine hits the iPad again. The iPad is great for reading and replying to email, but it’s not great at processing email. At least not the way I process it. I can’t send an actionable email into Things as a to-do item when I’m using the iPad. I can’t save a file from the email into a project’s folder in Dropbox. All this means that checking and processing email on my iPad is about as productive as checking email on my iPhone (though it certainly is a better experience).
Checking email on my iPad is, more often than not, an interim checking. I reply to conversations or other threads but can’t really do much else. And so I have to come back to many of some of those messages a second time when I am at my laptop so I can fully process them into my workflow.
7:00 am: The iPad should have shipped with fingernail clippers and a screen cleaning cloth made of denim.
8:19 am: It’s interesting how some apps, like Pages, require use of the devices orientation for certain functionality.
1:15 pm: Reading in Instapaper. Again. This app has become one of the most-used on my iPad (I use it much more than I use it on my iPhone). It’s a gift to guys like me who have a very hard time doing only one thing at at time. And I love it so much I’ve even started sending articles to Instapaper which I want to read right at that moment, but would rather read in Instapaper on my iPad than in Safari on my MacBook Pro.
1:32 pm I wish iPhone OS shipped with Menlo. But more than that, I wish there was an iPad-version of MarsEdit. Currently I’m unable to post links on shawnblanc.net with the iPad due to some lame limitations in the WordPress Web interface, and because the WP app does not support custom fields. And speaking of writing: All this typing and I have not yet used that bluetooth keyboard. Primarily I guess because it’s not with me most of the time (right now it’s sitting on a shelf above my home office desk).
9:01 pm: Ay caramba. I wish “spp” would auto-correct to “app” instead of “spa”.
Thursday, April 8
7:40 am: Today begins the first real-life, 4-day test of my iPad. I am fairly certain that my iPad can’t replace my laptop. But it could replace my iPhone as the new Command Central for times like today.
This afternoon begins a four-day conference which we are hosting. And so this weekend my normal work schedule and tasks all get put on hold while we host 2,000 conference goers. There will be a lot of communicating via emails (though not as much as through phone calls and texts), and a good deal of short pow-wows.
For the past three years I’ve used my iPhone as Command Central when running marketing at our conferences. This weekend it will be interesting to see if and how the iPad holds up as a replacement for my laptop and an addition to my iPhone.
8:38 am: Test failed: the Monoprice Power Station portable iPhone battery backup dongle does not charge my iPad.
12:15 pm: Sitting in the back room with the rest of the Web team. They’re updating the website, and I’m checking my email. Nick comes in to say hello. He’s my only other friend who owns an iPad and I haven’t seen him since last Friday. So I make him sit down and we geek out over our favorite apps.
I show him some of my embarrassing finger paintings from SketchBook Pro, and he asks me to help him figure out one of the puzzles in Labrynth 2. We’ve officially established ourselves as the nerdiest two in the room.
4:40 pm: I bump into Mark in the main auditorium. He heard I got an iPad and wants to check it out. I hand it to him and he wimpishly peruses it. And so I’ve realized that when showing the iPad to someone, it helps to walk them through how to use it. Or at least show them which apps to tap on, and what do do from there. A lot of people like to see it and hold it, but would rather that I demo it for them.
5:30 pm: So I’ve been thinking a lot today if this iPad could actually replace my MacBook Pro or not. There are certainly some great advantages to it. Like how small and lightweight it is, and the incredible battery life. Some other things I don’t mind:
The screen size: Perhaps it’s because i’m used to software like this running on a 3.5-inch screen instead of a 10-inch one, or perhaps it’s the single-app view versus my MacBook Pro’s multi-window view, but the smaller screen (compared to my 15-inch laptop and my 23-inch Cinema Display) really doesn’t bother me.
The software keyboard: It certainly takes some getting used to, but for casual use it is perfectly fine. In no way does the software keyboard make me want to chuck this iPad like a frisbee. Sure, I can’t type long-form papers or articles on it, but that’s okay. That’s what the bluetooth keyboard is for.
Friday, April 9
7:40 am: With my iPhone (or just about any other gadget for that matter) it’s not uncommon for the battery life to affect the workflow and interaction I have with the device. But it’s always a negative issue: crappy battery life interrupts and hinders my use of the device.
But with do to the iPad, this is the first time ever that incredible battery life has affected my workflow and usage of a device. Since the iPad’s battery lasts so long I rarely need to plug it in to charge it. Moreover, since it won’t charge through my USB hub, when I do plug it in I rarely connect it to my computer. Thus, I have to make a concerted effort to remember to connect my iPad to my computer and sync it. Why I can’t sync via Wi-Fi (like Cultured Code does with Things) is beyond me.
8:03 am: Every Friday morning Josh and I go get coffee at Einstein Bagels. He just got a new Audi so normally he drives, but today I do so he can play with the iPad. He teases me about the email in the Notes app that I sent to John Gruber pointing out some typos. It’s a little embarrassing, but not really. But clearly I am going to have to start using 1Password for notes that i don’t want other folks to see. People will fiddle around on your iPad and find stuff much more easily than they would if they were fiddling around on your laptop.
10:40 am: I comb through this morning’s fury of new emails related to the conference and yet I’m still thinking if the iPad could actually replace my laptop or not. The blaring hurdles for that to happen are:
To-do management: maybe I’m complicated, but it bugs me that I have no way to send tasks into Things. And I have no way to sync over the air so that my iPhone and iPad are in sync without needing my Mac as the mediator.
Blogging: Yeah, I still don’t have a way to post links to my website…
No Dropbox: all of the files and projects I am currently working on are kept in Dropbox. This keeps them backed up and secure in real time, but also makes them available for viewing and emailing if I’m away from my computer. No doubt the Dropbox team is working on an iPad app, which will be lovely (since this other app called GoodReader sucks), but even still it will only be a useful app for viewing files which are already in my Dropbox and not for syncing or transferring files to and from my iPad.
No file storage or management (I have to leave emails in my inbox if they contain files I want to save)
No document syncing: Well, no good document syncing, that is. I want the document I’m writing to exist on my Mac and on my iPad (and why not my iPhone, too?). Krikey… I am dying for Simplenote to make its way to my iPad (but even then, it would just be for plain text files). I spent $10 on Pages… really wish I could have some of those documents synced without the nightmare of USB and manual version control.
The size, weight, and battery life of the iPad make me want to leave my laptop at home forever. But the above unordered list necessitates that I don’t. My next laptop could be a MacBook Air.
2:08 pm: Watching a video in a sun-lit room… Oh yeah, this is why I hate glossy displays.
Sunday, April 11
8:39 am: I take the iPad to church again; my confidence to use it in public has grown. Also, Anna and I sit in a row occupied by nobody else.
I try to tap out notes from this morning’s sermon, but I can’t keep up — my tap typing is too slow. The iPad’s auto-correct turns my would-be notes into fragmented sentences less understandable than my own chicken-scratch hand writing. At least I can email them to myself for decoding later.
✚
iPhone’s Missing Feed Reader
I spend a prodigious amount of time reading on my iPhone.
Half the apps on my iPhone’s Home screen alone involve reading as a predominant, if not exclusive, feature. Mail, Messages, Safari, Tweetie, Instapaper Pro, Simplenote, and Reeder: these are my most-used apps, and each one is used for reading in some way or another. And yet the app which serves no other purpose than to read, seems to be the most frustrating to use for said purpose.
- In Mail I read and reply.
- In Messages I read and text.
- In Safari I read and surf.
- In Tweetie I read and tweet.
- In Instapaper I read and drink coffee.
- In Simplenote I read and write and edit.
- In Reeder (or any other feed reader app, such as Byline, Fever, Google Reader, NetNewsWire, NewsRack, MobileRSS, etc.) I read.
The predicament with feed reading apps is most certainly not in the quantity of the selections; rather, the quality. This is not to say that most of the legitimate feed reading apps on the iPhone have not been developed with care — but as agents of delivery for my favorite authors, and as contrivances meant for enjoying lengthy bits of text, I prefer a simple app that does less and does it better.
In total fairness asking for the “best feed reader app” is like asking for the “best shirt”. Just as John Gruber so aptly laid out last April when writing on the the UI playground of Twitter clients. John said:
[D]ifferent people seek very different things from a Twitter client. TweetDeck, for example, is clearly about showing more at once. Tweetie is about showing less. That I prefer apps like Tweetie and Twitterrific doesn’t mean I think they’re better. There is so much variety because various clients are trying to do very different things. Asking for the “best Twitter client” is like asking for the “best shirt”.
It is my safe assumption that readers of this website also prefer apps which do less, but do it well. And so read on for a high-level look at some of the more popular iPhone feed readers, what I find good and not-so-good about them, and my suggestions for amelioration.
Reedie
As of this writing the iPhone App Store has nearly 4,000 apps in the News category. This is where all the RSS reading apps are listed. If you search for just “RSS” you’ll get over 700 results, or roughly 18% of the 4,000 news apps. Searching for “RSS Reader” nets you 203 results, and if you get even more specific and search for “Google Reader”, you get 50 apps.
But now compare this to the Social Networking category. It has 2,600 apps, and searching for “Twitter client” returns only about 65 results. There are over three times as many RSS reader apps than there are Twitter Clients in the App Store (based on search results).
Of the 4,000 news apps, the most downloaded are the dedicated apps provided by popular news sources such as the New York Times, USA TODAY, the Associated Press, NPR News, Wall Street Journal, and etc. The first RSS feed reading app you listed amongst the most popular News apps is “Free RSS Reader“; with NetNewsWire Free right on its heals. Surely “Free RSS Reader” is the most downloaded RSS reader by virtue of name alone.
In the most popular social networking apps, the first Twitter client listed is the free version of Twitteriffic. Over its life in the App Store it has received 139,000 reviews, mostly positive. Now compare that to Free RSS Reader which has about 17,000 reviews (mostly negative).
And thus we find a conundrum: the amount of RSS readers for the iPhone that of Twitter client apps, and yet the tables are turned when it comes to quality.
According to a small poll I conducted via Twitter, the app people spend the most amount of time reading from while on their iPhone is Instapaper, followed closely by Tweetie and then Mail.
Tweetie and Instapaper are two classy apps. They are easy to read from, easy to get around in, and a ton of fun. But tweeting and reading things later should not be the only place where all the action is. I would love to see a top-notch, Tweetie-level, RSS reader for the iPhone…
Reedie.
Why? Because when Tweetie 2 blew every other Twitter client out of the water it also sunk a few apps that were in a different part of the pool, and it’s time for a comeback.
There are tons of nerds who were using Twitter way before Ashton was and who have been riding the RSS train for years and years. And since nerds are the pickiest of all when it comes to usability and interface design, they are the ones most in need of a great feed reader app for their iPhone.
Secondly, what Twitter has done for Twitter clients, so has Google Reader done for feed reader apps. As Loren Brichter said during his interview with Macworld:
One of the fantastic things about Twitter clients is how easy it is for users to jump from one to another. Just type in a username and password and off you go. It’s possible for anyone to write a Twitter client nowadays and have the opportunity to completely blow everyone else out of the water.
Granted, the initial set up of a new Twitter account is really simple compared to the same for Google Reader. Twitter asks for your name, desired username, and password, and then you’re free to follow friends and strangers at will. A process significantly more straightforward than creating a Google account, activating Reader, and then finding and populating it with RSS and Atom feeds.
But the type of people that would use a feed reader (nerds!) are also the types of people who already have Google accounts (we’ve been beta testing Gmail since 2004), and who are even more likely to have an OPML file sitting around ready to be imported.
Up until today, all of my software reviews have been about programs which I find fantastic. But today I’m trying to get out there that I see a chance for improvement in the iPhone App market. But the only way I know how to pinpoint the opportunity is to highlight those who are trying to meet it, and (in my opinion) not quite hitting the mark. It’s not that I have only negative things to say about the following apps, it’s just not all moonbeams and rainbows. Also note that I hold Brent, Sean, Milo, and the other developers all in the highest regard. They are busting their butts to make great software; thank you, guys. Please keep it up.
Google Reader (Mobile Web App)
The online RSS feed reader that took over the world. It was a big day when they began offering public APIs for developers to sync to and from G-Reader, and it was a smart move for NewsGator to abandon their home-brewed syncing platform to allow NetNewsWire (on desktop and iPhone) and FeedDemon to sync via Google Reader.
The mobile version of Google Reader is not too shabby. More than one well respected nerd uses it instead of any number of native iPhone apps which sync to it. And I actually prefer the mobile version over the full web version. However, the mobile version doesn’t support many of the favorite features found in a native iPhone app such as emailing articles and links, saving to Instapaper, and a few others. But it is a classy, speedy mobile web app. And it’s free. Hello.
Byline
Version 1.0 came out in July 2008. It cost a whopping $10 and sported a much more Mail-like UI. Three months later Milo release Byline 2. Then version 2.5 came out in July 2009, and now 3.0 is due for release soon (and will be free for existing users).
Version 3 will finally support Instapaper and Twitter, as well as a few other cool new features and UI refinements. But for the most part it will still look and feel just like the most current version. If you’re not already sold on Byline, version 3.0 will surely not be Just What You Always Wanted. But for the many, many fans of Byline that already exist this next release is sure to be a home run worth waiting for.
There’s quite a bit to like about Byline. For starters, it’s been around for nearly two years — it was one of the original iPhone feed reading apps and has continued to see forward movement. What makes Byline stand out is its caching of your feeds. If you do a lot of offline reading (or if you live in New York or San Francisco) a huge motivation to use Byline may be its ability to store the text and images of your feeds, as well as linked-to Web pages, right on your iPhone. It will also remember stars and unread/read state, and it all syncs back to Google Reader when you’re next online. (The 3.0 version will even have the ability to cache your feed content while the screen is locked.)
However, my biggest quibble with Byline is the GUI. I know that Milo has to develop graphics that look good on many different generations of iPhones and iPod touches, and that he is proud of the look and feel of his app. But in my opinion the heavy gradients used throughout the app are too much, and give an overall impression of immaturity to the app. If it’s not a delight to look at and read from, it’s less of a delight to use.
Since most people voted that if they were reading, chances are they were in Instapaper or Tweetie, I thought it would be interesting to contrast the heavy gradients used in Byline to the subtle gradients used in Tweetie to to the complete lack of gradients used in the iPhone’s Mail app:
(FYI: Even though Instapaper won the “most read from app” question, since it uses the same no-gradient design as Apple’s own Mail, I chose Mail for the comparison so as to have a native Apple app in the mix.)
NetNewsWire
Though NNW is arguably the best desktop RSS reader on the planet the iPhone version is not quite as mind blowing as its older brother.
NetNewsWire for iPhone is quick, reliable, and just the right balance of feature-richness versus simplicity. One of its most clever feature by far is the option to choose which feeds are downloaded and synced by your iPhone. Especially handy for those crazy folks that like to sit right in front of the RSS fire hydrant. However NNW feels more like a utility program built for accessing feeds, rather than a contrivance for enjoying them.
Mobile RSS Pro for Google RSS
Here is a clever app. Clearly the developers have put a ton of time and thought into this. And though a few of the features are simply re-works from some of Loren’s popular Tweetie 2 user interactions (such as swipe to reveal options below a listed item, and pulling down a list to refresh), they’ve got some additional great things going for them:
- MobileRSS Pro saves state perfectly (better than any of the feed readers listed here).
- It’s fast.
- It’s got a good-looking, ‘dark’ theme (it’s called “Black” but it’s actually blue).
- The way they implemented the unread badge count for each feed as a little tag that hangs over the edge of the feed list columns is very cute.
But despite all this, the app just doesn;t feel right due to a handful of little things which make it feel unbalanced:
- Such as the way my gmail account in shown large type at the top.
- The large vector icons for “All items”, etc., contrasted against the small favicons for the each feed.
- I only have one folder, and at the bottom of the root screen it says, “52 Feeds, 1 Folders” (oops).
- On the item view list of any given feed it has my gmail account name crammed into the back; arrow, with the title of the feed somewhat off center, and then a little “info circle” icon pushed to the right-hand side.
- It uses the familiar “share” / “export” icon at two different places in the app, yet for for two completely different things: (1) when viewing an individual article, tapping the icon brings up options to email the article’s link, save it to Instapaper, etc.; (2) when viewing an entire feed with its list of articles the same icon is there, and tapping it in this context gives you the options to sort by oldest/newest or to mark all as read.
With a little bit more polish and attention to detail, MobileRSS Pro could be a much more classy app.
Fever
Shaun Inman’s Fever is the best dressed web-based feed reader out there. (I wrote about it at length when it first came out last June.) And the mobile-optimized version of Fever is just as great. It is a delight to use, easy to read from, and is always in sync with itself (duh!).
The downside to Fever’s mobile version is the same as any other mobile web app: no state saving, no caching for offline reading, and little to no sharing/saving features.
I stopped using Fever about four or five months ago when I took a break from RSS feeds all together. Through the holiday season I hardly ever checked my feeds. Similar to the olden days I would visit individual sites on occasion by typing the URL in by hand; and I was happy.
So happy in fact I decided to slash my OPML and only subscribe to that small handful of sites which have a history of enriching my day.
I wanted to keep Fever fully loaded so as to make use of the Hot list on occasion, but I didn’t want the bloat of loading all those feeds in a browser every time I wanted to check RSS. So about six weeks ago I came back to NetNewsWire on my desktop and populated it with only 25 time-worthy feeds.
Now, my current RSS setup is Reeder on my iPhone and NetNewsWire on my Mac — all synced via Google Reader.
Reeder
Reeder’s approach to their app design is brilliant. They’ve sought to bring back some of the nostalgia of reading while on a digital device by virtualizing the look and feel of an old, trusted book. And they did this without sacrificing the ‘touchability’ of a well-designed iPhone app.
The custom GUI goes beyond just the torn-paper markers and off-white background. The pop-up menu for sharing an item unique, being more akin to what you may see on Android OS instead of using the standard buttons on iPhone OS. And there are a few custom, intuitive swipe gestures which can be used to mark individual articles as read, unread, or starred.
In his review of Reeder on Download Squad, Nik Fletcher aptly wrote: “Reeder balances the familiar with custom elements, and as a result the interface looks great when browsing (and reading) content.”
So yes, Reeder is more unique than any of the aforementioned feed reading apps while still feeling familiar and friendly. It is by far the best feed reader app available in the App Store right now. Yet some of its cleverness feels too clever, and since Reeder is so close to being beyond great, its shortcomings seem so much shorter.
For instance, the status bar takeover is neat, but is it necessary? I find myself distracted by it every time open the app. It always makes me think of the stoplight countdown before a Super Mario Kart race begins: Beep. Beep. BEEEEEEEP!1
Secondly, the GUI is not contrasty enough. I love the texture and the vintage, off-white coloring, but it can be difficult to quickly see the difference between a read and an unread item, as well as the lighter colored text which makes it not quite as easy to read on. But this is a subtle quibble…
My primary gripe is the lack of saving state. Regardless of where you are in the app when you quit out of it you will always start back at the beginning when you re-launch it. Compare this against the convenience of state saving found in Instapaper. Instapaper actually saves two types of states: (1) those of individual articles: if you are reading an article and then return to the item list view, and then come back to that article later, it will open in the same place you left it; and (2) overall state: upon a re-launch of Instapaper you will always find it just as you left it.
Reedie
A good feed reader is quick, reliable, and readable. But a great feed reader has to be all of those and more. It has to be clever, very polished, and, of course, fun.
My ideal feed reader app would look like some sort of marriage between Tweetie 2, Instapaper, and Reeder. It would have the sounds and UI elegance of Tweetie 2, the typographic and state saving bliss of Instapaper,2 and the uniqueness of Reeder. (For bonus points it would swipe the swipe-top-navigation-bar-to-go-home feature from Tweetie 2.)
I don’t want another iPhone feed reader, I want a better one. Because apps like Tweetie, Twitteriffic, Birdhouse, and Birdfeed are all outstanding Twitter clients — each one is clever, polished, and fun. And who says feed reading can’t be as enjoyable as tweeting?
✚
Pastebot: A Copy and Paste Playground
The best way to describe the handsome apps from Tapbots is as half tool and half toy. Mark and Paul have taken three straightforward utilities and converted them into three delightful apps for your iPhone. This third and most recent app, Pastebot, is perhaps the most useful and most delightful so far.
Pastebot is more powerful and versatile than its siblings, and it comes with all sorts of tricks and surprises floating around. To get the most out of it requires a minimal understanding of how the app works. When you first launch Pastebot you are guided through a cute and succinct tour. Later, when you find yourself in various screens within the app, little help tips will pop up to point out functionality.
Using and mastering Pastebot borders on entertainment.
Daily Usage
Other than the clipboard history in LaunchBar, I have never used a true clipboard manager. My ‘clipboard manager’ is Yojimbo. That’s where I throw random bits of info, web clippings, text, images, PDFs, and more — some to be stored indefinitely, some to be deleted when I don’t need them anymore, and some which will no doubt be forgotten.
Using a clipboard manager on your iPhone for boilerplate management is an obvious solution. At times it can be easier and quicker to copy and paste a canned response to a text or email than to thumb one out. And this is what most clipboard managers in the app store boast about: their ability to store text snippets for quick access. But very few brag about their ability to capture bits of info from your iPhone…
An app that auto-populates itself with the contents of your clipboard is surely the simplest way to throw bits of info into an app on the iPhone. Which is why a clipboard manager is, in my opinion, a foundational functionality for an attractive, capable Anything Bucket app for the iPhone. And Pastebot is the closest I’ve seen for this type of app.
On my Mac, the key to a good anything bucket is its ubiquity — that at any time, in any application, you can throw something into it. On the iPhone however, you can’t run 3rd-party apps in the background. Which is why the most important feature of Pastebot is launch time. In my usage with a mostly-full clippings folder littered with text, images, and other paraphernalia, Pastebot loads (and pairs with my Mac) in less than a few seconds.
Once running, whatever you last copied on your iPhone appears at the top of the Clipboard list. And if you’ve got the Pastebot Sync utility installed, anything you copy on your Mac pops right into the Pastebot app while its open.
From there it’s a copy and paste playground. You can sort, edit, add, delete, use, transfer, and more.
Miscellaneous Observations From Copying and Pasting Various File Types Between my Mac and my iPhone Using the Pastebot Sync Utility
Text: Even thousands of words copy over quickly, and text is the only data type that you can copy from one mac and past to another using Pastebot as the middle-man.
Images: Copying a photo from within iPhoto will send the actual picture. Though the title of the image from iPhoto does not transfer.
Copying a whole slew of images from iPhoto gives Pastebot a datatype that it doesn’t recognize:
However, it still maintains the data. For example, I copied 9 images from iPhoto, they showed up in Pastebot as unknown Mac data, but from there I was still able to paste them onto my Desktop.
Also, copying an image from Preview will get the full image onto your iPhone and allow you to use it on your iPhone. But copying the image file from the Finder only sends the file-type icon.
Audio and Video: Copying an audio or video file from iTunes sends the metadata to Pastebot. But it’s metadata based on where in iTunes the file was copied from. For example, trying to copy Star Trek to Pastebot from my Recently Added playlist sends this info:
Star Trek 2:06:47 J.J. Abrams 11/18/09 7:48 PM(The same info that is shown in the playlist’s columns: Name, Time, Artist, and Date Added.)
But trying to copy Star Trek from the Movies playlist sends this:
Star Trek 2:06:47 Sci-Fi & Fantasy 2009
The greatest adventure of all time begins with Star Trek, the incredible story of a young crew’s maiden voyage onboard the most advanced starship ever created: the U.S.S. Enterprise. On a journey filled with action, comedy and cosmic peril, the new recrui
Star Trek – iTunes Extras Sci-Fi & FantasyOn the other hand, if you copy an audio or video file from within the Finder it sends that file’s relevant icon to Pastebot. And if you then paste that icon back to the Finder, it will paste the audio or video file; pasting it when in a plain text document will paste the filename; pasting it in a rich text document or an email will attach the file; and trying to paste into iTunes does nothing.
Folders & Zip Files: You can copy an entire folder or zip file. It shows up in Pastebot as a folder or zip icon, but pasting it back to the Finder the whole folder, with all its contents, shows up unscathed.
You can email a file that Pastebot itself doesn’t recognize but it gets sent as an icon file. Sending a ZIP file you copied into Pastebot will only send the 512×512 icon titled as filename.zip. Similarly, sending a folder sends the icon of a folder named after the folder you had copied.

PDFs: Copying a page of a PDF document from within Preview will send that actual page. You can then paste it into the finder and you’ll get the page as if it were dragged out from Preview.
Transferring Data from one Mac to another using Pastebot and the Pastebot Sync utility
Using Pastebot Sync you can pair Pastebot on your iPhone with as many Macs as you like. But as far as I can tell, the only data you can transfer between multiple Macs using Pastebot as the mediator, is text clippings. If any file or image originates on Mac #1 when it gets copied into Pastebot, it won’t paste to Mac #2.
Although anything that was added to Pastebot from within your iPhone can be pasted to any synced Mac.
They say a man buys something for a good reason, and the real reason. You buy an app from Tapbots because it does something useful, but in truth, you just wanted to play with it.
What Loren has done in his design of Tweetie 2 is similar to what many of the best authors do in their writing. Some authors lay out plainly points 1, 2, 3, and 4, so we, the readers, are sure to be with them when they reach the height of point 5.
But, in my estimation, only the best writers have the skill to skip 2 and 4 while still bringing us to 5 — their prose alludes to the missing pockets of plot just right so that we figure it out on our own. And this they do without us realizing, because though we were actually led by the writer, we feel like smarter readers.
It is in this regard that software developers are not unlike writers. But instead of a plot they have a feature set, and instead of prose, a UI. The developer can lay out the whole of their feature set before the user with menus, sub-menus, and more. Or they can hide pieces of it hoping that each feature will be discovered, but knowing that perhaps they won’t.
But ignorance can still be bliss, because in my book a simple, well-written application that delights is far better than a feature-rich one which overwhelms. And this is why Tweetie 2 is not just my favorite Twitter application on any platform, period, it may also just be my favorite iPhone app.
✚
Yojimbo, and The Case for Anything Buckets
Four out of five of you are nerds. On your computer exists your hobbies, your current and/or future career, and the rest of your daily life. You don’t own a snowboard, but you do have a blog, a Twitter, an RSS reader, and a pirated copy of Photoshop.
You, my friend, need an Anything Bucket.
This is not the same as your tried and true System for saving and finding things. The System is for everything. Your Anything Bucket, however, is for everything else. And you need both.
There are lots of options out there. Off and on for years I tried to use Yojimbo, but it frustrated me because I treated it as a replacement for the Finder. On more than one occasion I endeavored to replace my tried and true System of filing things with this single piece of software — attempting to save nearly everything in Yojimbo. That is a horrible way to live, and it’s why I always abandoned the app.
Yojimbo is not an Everything Bucket. A more fitting description, I think, is Anything Bucket.
Because apps like Yojimbo are not where you should keep everything, but rather, where you can throw anything. They are not replacements for the Finder – nor the opposite – you should use them both.
John Gruber lays this out ever so clearly in his article, “Untitled Document Syndrome“. The gist of John’s article is that apps such as Yojimbo are successful because they’re simple. He says: “When you don’t have to do much before (or after) doing what you want to do, you do surprisingly more.”
Summing up Mark Hurst’s advice about simple computing, Andrew White says: “Use the simplest, sanest application that will get the job done. Avoid extraneous clutter in menus, on desktops, in applications. Pick the utilities that will give you the most — ahem — utility, and use and learn the crap out of them.”1
Anything Buckets should be more about ease of use than about depth of features. The very best ones lend themselves to perpetual use. And if you use them, depth will come from breadth.
The info we throw at them can be permanent, temporary, important, or trivial. It doesn’t matter. Regardless of who, what, when, where, or why, the best Anything Bucket is ready to receive any bit of information that threatens to elude you.
My Favorite Anything Bucket
Yojimbo. Hitting shelves in January 2006 it has sat on four different Mac operating systems and has gone virtually unchanged since its initial release. It is a simple and charming piece of software that packs a lot of punch.
The previous version of Yojimbo, 1.5.1, was released on February 2, 2008. The 2.0 release shipped on September 1, 2009, nearly 19 months later (longer than most of the previous major OS X release cycles). The 2.0 update to Yojimbo came with a new icon, a database upgrade, a few new features, and a lot of refinements.
Yojimbo 1.5 is to OS X Leopard what Yojimbo 2.0 is to Snow Leopard. Which is to say version 2 is an attestation to the charm and punch Yojimbo 1.0 came out of the gate with. Even though version 1.5 sat there for over 19 months, it was still whispered about at the water cooler as people fiddled with their Evernote iPhone app. And that, my friends, says something profound about the quality of this simple piece of software.
Looking at version 2 and what Bare Bones Software decided to add, and what they decided to leave out, says a lot about Yojimbo. I couldn’t help but imagine the 2.0 release as being similar to the scene in 300 between King Leonidas and Xerxes’ messenger.
In the scene, a messenger from King Xerxes arrives at the steps of King Leonidas’ home. As they walk through the streets, the messenger calmly demands that Sparta submit itself to the will of King Xerxes and begin giving offerings or else face war against the King’s vast army. The scene climaxes in one of the most memorable and quotable moments of the movie as Leonidas kicks the messenger into the city’s well, defying the demand to submit, shouting, “This! Is! Sparta!”
Sure, it’s a little over the top to compare a software release to an epic war movie, but the plot line in this scene is analogous to the current Anything Bucket market and the path that Yojimbo has taken. Not to say other apps have taken the wrong path and Yojimbo the right one, but in the midst of many options — and many requests for features that other apps have — Yojimbo’s feature scope has remained unwavering.
The latest Yojimbo, as I see it, is not fighting the same way their competitors are. After 19 months without an update, many were looking at the Bare Bone team: Choose your next features wisely. And but so, when 2.0 finally shipped Bare Bones Software chose not to lay new tracks, but instead, grease the current ones. “This! Is! Yojimbo!”
Yojimbo’s most powerful feature won’t be found in the release notes. In this regard it is very similar to Quicksilver. At first glance, when you look at Quicksilver and see it’s an application launcher, you think, Cool. But so what? I have Spotlight and the Dock. Why should I learn a new app?
Even if you read the support documentation and learn about the plugins and the extensibility that Quicksilver offers, it’s not until you use it that Quicksilver becomes a part of you in a way you can’t explain. Nor could anyone have done it justice in explaining it to you.
Input: A Juggernaut for the Onslaught
It is likely that many people confuse a tried and true system and a system they use as being the same thing. In my experience, it is one thing to have a clear and organized structure for where you put quotes, notes, passwords, and the like. But it is another thing altogether to actually fill that system’s folders with content.
Like I said earlier, this confusion was the reason I tried and abandoned Yojimbo so many times — I completely misunderstood the purpose and advantage of an Anything Bucket. Yojimbo is great not because it replaces your organized filing system, but because it encourages perpetual capture of all sorts of information.
Put plainly, Yojimbo is the simplest way possible to save any bit of spontaneous information. No matter how indispensable or arbitrary that information is.
As Patrick Woolsey of Bare Bones Software said, “The intent of [...] all of Yojimbo’s input mechanisms is to make entering info as easy as possible, so that you’re more likely to do so.”
And Yojimbo’s input mechanisms aren’t just easy, they abound. You can get info into Yojimbo just about any way you can imagine: quick input windows, drags and drops, bookmarklets, javascripts, AppleScripts, and more. Choose your own adventure.
With input options around every corner, my rule of thumb for getting the most out of Yojimbo is to dump as much in as possible. Here are some of those ways, listed in order of what the author uses most:
Scripts: Getting my other most-used apps to help me toss stuff into Yojimbo via AppleScripts is surprisingly easy. There are ample scripts available to help you create new Yojimbo items from Safari, Mail, NetNewsWire, Mailsmith, and more.
My Safari and Mail scrips (invoked by FastScrips) are by far my most used methods for sending info to Yojimbo.
The Quick Input Panel: A close tie with the scripts is my use of the Quick Input Panel.

There is a whole lot of cool when it comes to this thing. It can be brought up at any time, in any application, via a keyboard shortcut (so long as Yojimbo is running). And it is the perfect place to drop notes, ideas, passwords, images, and more, without having to bring Yojimbo to the frontmost window.
If you have text copied to the clipboard when you invoke the Input Panel, Yojimbo will automatically populate the new item with that content. It’s even smart enough to know if it’s an image, an URL for a bookmark, or text for a note. Moreover, if you close the Input Panel before creating your item, Yojimbo keeps that info in there.
When you invoke it again, yet happen to have new content saved to the clipboard, Yojimbo gives you the option to keep what you used to have or fill the panel what you’ve currently got in your clipboard.

Similar to the Quick Entry HUD in Things, Yojimbo’s input panel is an easy and ubiquitous way to capture info on the fly. Unlike the HUD in Things, however, is the Quick Input Panel’s frustrating behavior with click-through. I am a big fan of how the Quick Input HUD from Things handles click through: when HUD is frontmost you can navigate, click, select, drag, and drop all around your Mac without the HUD closing. The Yojimbo input panel operates the opposite: when creating a new item, clicking outside of the input panel will instantly cause it to disappear. The info isn’t lost, you just have to re-invoke the panel to get to it again.
My only other gripe is need to press the Enter – not Return – to create a note item after entering some text. Though the reason for this makes perfect sense because the Quick Input Panel supports rich text editing (hit cmd+r while inputting text and you’ll see what I mean), it is still a keyboard shortcut I haven’t gotten used to.
Saving PDFs: One of the features updated in version 2 is the “Save PDF to Yojimbo” option that shows up under the PDF button in the print dialog box. You can now change the items’ title and add tags, labels, comments, and/or flag it.

Dropping Stuff Onto the Dock Icon: Typical to most apps in the Dock, you can drag any Yojimbo-supported file and drop it over the Yojimbo Dock icon to import it as a new item.
Similar to the way Mail will launch and create a new message with the file you dropped as the attachment, Yojimbo will open and display a new item with whatever it was you just dragged and dropped. (You can even take iTunes URLs right out of iTunes for albums, apps, and movies that you want to revisit some other time.2)

Drop Dock: I have gone back and forth with using Drop Dock, but its new feature set in 2.0 has made it worth another look.
For one, when dropping an item into a Tag Collection that is in the drop dock, the respective tags for that Collection will be automatically assigned to the new item. Secondly, you can now choose what collections show up in the Drop Dock. Honestly, I can’t think of two more useful feature additions to the Drop Dock.
Storage and Organization
Yojimbo is the only app I use tags with. I don’t use them in Things, Mail, or even on my own website.
And I don’t just use them, I use them religiously in Yojimbo. So much so that I added tag-input dialogs to the Mail and Safari scripts I use so often. Though ironically, I don’t know that I’ve ever found a file in Yojimbo exclusively thanks to its tag. What I do use tags for is smart Collections (especially when working on a project).
The reason I don’t tag my to-do items in Things is because bothering with them on the front doesn’t ever prove useful on the back end. But in Yojimbo tagging an item is a big contributor for how information gets organized (assuming you even want it so), and for how it gets found later.
You can have folders (called Collections) and smart folders (called Tag Collections). Standard Collections only get populated by manually dropping a Yojimbo item into them. Whereas Tag Collections auto populate with every item in your Library that contains one or more of the tags you’ve assigned to that Collection. If you drop an item into a Tag Collection all the tags assigned to that Collection are added to the item, and, obviously, that item gets pulled into the Tag Collection.
It used to be that a Tag Collection would only hold items that matched an exact list of tags. But now I am very grateful that you can populate with items that match either all or any in a list of tags.

And if you’re not a huge fan of the default icons used for collections you can change them. Just find a folder who’s icon you do like, and copy/paste it from that folder’s info panel into Yojimbo’s info panel for your (now attractive) Collection. This can be especially helpful for regular / smart Collections you keep around indefinitely.
Output
Bill Bryson once said: “The remarkable position in which we find ourselves is that we don’t actually know what we actually know.”
And this is the very reason Yojimbo is so remarkably helpful — getting information back out is nearly as easy as getting it in.
Since the fastest way to find something in Yojimbo is to search for it, I’ve set a global hotkey to bring Yojimbo frontmost and put the cursor in the search box. And searching for something in Yojimbo is outlandishly quick. Results never hang, and I’ve never been unable to find what I was looking for.
Moreover, all of the Library items are indexed by Spotlight. If something you’re looking for in Spotlight exists in Yojimbo, you’ll see it there. Or you can do an app-specific search by prefixing your Spotlight query with “kind:yojimbo”.
In addition to finding what you know you are looking for, the new Tag Explorer helps you find what you don’t know you’re looking for. It is a great way to delve into the random things you’ve thrown into Yojimbo that you may have forgotten about. In a way, it is a similar concept to Shaun Inman’s Fever feed reader, in that, the Tag Explorer can help you aggregate the contents of your Yojimbo library. You never know when you’ll find some long, lost gem you had forgotten about. It may just be the funnest addition to version 2.
Sans-iPhone
Back to the beginning: the greatest feature of an Anything Bucket is simplicity that leads to regular use. For me, I don’t see what good is it to have my files synced across my laptop, my phone, and my friend’s Web browser if I am rarely putting any files in. I’m not concerned about using an app that will cover my butt for that one day when I might need to access that one bit of info when I’m not at my laptop.
Rather, I want an app that will actually get used… a lot.
It’s not to say, though, that simple cannot be married with mobile. It just means if Bare Bones does launch an iPhone app there is a lot for them to consider. Primarily: syncing and accessing the database, and iPhone app development.3
Syncing and Accessing the Database
If I were to sync my entire Yojimbo library to my iPhone, it would be a little less than 1,000 items with a database of 86 MBs right now. Even for someone like John Gruber, who has been using Yojimbo since the beta days, it wouldn’t be a massive chore to get his Yojimbo data onto his iPhone. John’s total library is 5,500 items and 375 MBs. Not that big of a file for just about any given iPhone. A single movie easily takes up three or four times that amount of space.
(An interesting tid-bit of info: Patrick Rhone, who recently migrated his data from Evernote back to Yojimbo, went from 1,220 items and a 1.3GB library in Evernote, to 1,432 items and a 403MB library in Yojimbo. His database weighed in at one-third the size after the migration. Obviously none of his audio or video attachments were able to be transferred into Yojimbo, but that’s not the only reason the database was shored up. Evernote treats text files as HTML and uses WebKit to render notes. Patrick and I agree that, because of the way Evernote handles even basic text notes, extra size gets added due to the code which is wrapped around even the simplest of notes.)
If Yojimbo offered multiple syncing options, such as over-the-air, same-wireless-network (like Things), and USB, it could allow for a user’s first sync to be over USB. Thus getting the initial heavy lifting of the data over to the iPhone that way, and then allowing wi-fi and/or over-the-air sync as the default.
Ultimately, without over-the-air syncing Yojimbo would not be the world’s best info-management mobile app. The biggest need for me wouldn’t be having my notes with me all the time, but having them with me at an unanticipated moment.
This is exactly why Apple’s iDisk app for the iPhone isn’t that exciting for me. It meets a perceived need, but not a real-life need. If I know ahead of time what documents, songs, and images I will want on my iPhone then hooray for me that I can drop them onto my iDisk and find them later. But it’s virtually impossible to plan ahead for all the items I may want access to when away from my computer. Let alone, just the files that I would only want to view, listen to, or share (since iDisk files are read only on the iPhone).
App Development
Functionality isn’t all that Bare Bones has to consider. Designing an iPhone version of a desktop app requires much to be reconciled. As I wrote about in my review of Things, when creating an iPhone version of a desktop app you can’t just drag and drop the code and click the “iPhoneitize This” button. You have to completely start from scratch.
There are two dynamics to successfully building two versions of the same app onto two unique platforms (one for iPhone and one for the Mac).
Both apps need to feel native on their respective platform. The iPhone app needs to feel like it belongs on the iPhone, and the desktop app needs to feel like it belongs there. This doesn’t just mean the GUI should be different. It also means the layout and display of core functionality, along with the flow of navigation and the user interaction within the application all have to pull together to form a well developed iPhone app that still has striking familiarity to its desktop counterpart.
Both apps need to feel like they are one in the same. Meaning, the Bare Bones team will have to reconcile the two-fold need for their iPhone version of Yojimbo to feel like a native iPhone app while also feeling like the very same application they’ve made for the desktop.
Not only would the Yojimbo iPhone app need to stand on its own for those who only use it on the iPhone, it must also feel like a natural extension of the desktop version for those who will use both.
Reconciling these goals is the same issue Apple had to tackle with apps such as iCal and Mail. iPhone’s Calendar app feels great all by itself, but if you also use iCal on your Mac you don’t necessarily feel like you’re working with two different programs. They are simultaneously the same and different.
Moreover, the problem of Plain Text versus Rich Text notes would have to be solved. iPhone OS doesn’t have native rich-text-editing features. Yojimbo’s iPhone app would have a handful of possibilities for how they would let users make edits to a rich text note:
Strip all formatting, turn the note into plain text, and let the user edit;
Keep formatting, but any text that is added/edited would be unformatted;
Not allow edits of notes, only appending of new text (this is how Evernote handles it);
Build an in-app rich text editor (see: Documents to Go [iTunes link]).
Based on how I most use Yojimbo, I would be happy to have a “convert to plain text-only” option that would allow me full read/write access in sacrifice of rich text notes.
In the mean time, however, I get along just fine without an iPhone Yojimbo app. When I think of an idea or something that I know I’ll want in Yojimbo I usually just email it to myself. Otherwise I throw it into Simplenote.
Though I did have this crazy idea of using Evernote and Yojimbo. Not sure if it’s feasible, or worth the trouble, but I had this thought about scripting Evernote to export all its notes as RTF and then have Yojimbo import them. It could be set to run once or twice a day automatically, and that way I could use the Evernote iPhone app for capture and the note would automatically end up in Yojimbo. It simultaneously seems cool and over the top; it may be easier to just set up a Mail rule and a script instead.
Final Miscellany
Reliability: I can’t think of one time Yojimbo has even beach balled on me, let alone crashed. It is a solid, fast, and well-made app. It is one thing to complain that a feature is missing, and quite another to complain that an implemented feature is busted. Anyone can do the former, but in Yojimbo the latter is hard to come by.
Security: Perhaps Most important of all, your data is safe. Not only does Yojimbo use industrial strength encryption, it also doesn’t jack with your data. The data and files you import stay untouched, making it just as easy to pull your images, PDFs, and what have you, out as it was to put them in.
The New Icon: Not a fan of the new gear box.

Web Archives: If I archive a Web page, Yojimbo provides no easy way to go back to the original permalink of that archived page.
Moreover, I don’t often use Yojimbo to archive for the sake of reading later, but for the sake of usefulness later — archiving articles which I may need as references one day. Having an easy (or at least obvious) way to return to the permalink of archived Web pages would be most appreciated.
Update: I just discovered that the URL for a Web archived item exists in the Comments section of the item and there is are contextual menu items to copy and visit the original URL in your default browser. (Thanks Steve!)

Jon Hicks 3-Panel Widescreen Hack: Changes the default layout of the Yojimbo window and turns it into a three-panel widescreen layout, not unlike the one found in NetNewsWire. (Currently only works in 1.5.1)
Better Keyboard Navigation: By far and away, the keyboard navigation is the most frustrating user interaction in Yojimbo for me.
There is no easy way to move around in the Yojimbo UI using the arrow keys. This is what I adore most about NetNewsWire — how easy it is to move left, right, up, and down between groups, feeds, and items using nothing but the arrow keys. Having this capability within Yojimbo would be a dream. Especially the ability to quickly get from the search box to the list of returned search items without having to use the mouse.
A Preference Option for New Notes to Be Created as Plain Text by Default: Nine times out of ten when I’m dropping in copy/pasted text as a new note I don’t want the former stylizing that came with it. This is how I do email, and I’d be delighted to see the same in Yojimbo.
- Some may note the irony of referencing Mark Hurst at the beginning of a glowing article on Yojimbo, as he advises people to keep everything in plain text files because “plain text is the simplest possible format for storing text data.” However, Mark also says: “When you spend so much time in an application that doesn’t work well, it’s painful, it’s like a stone in your shoe. [...] People should think about the time they spend in any one application, then think about the tools they can use to maximize efficiency.” ↵
- Thanks to Beau Colburn for this iTunes tip. ↵
- I have no doubt that an iPhone app (iJimbo?) is the most requested feature. Nearly everyone I know of that switched from (or passed by) Yojimbo for Evernote did so because of the iPhone client and Evernote’s ability to sync across many platforms. I, too, gave Evernote a college try, but it just didn’t work for me. Getting items in was too tedious.
Lately, I seem to be averaging about a dozen new items into Yojimbo every day. If those bits of info can’t go flying in just right, and with minimal effort, I’ll skip it. And granted, twelve new items a day is a lot. But even if it were just one or two, the easier the better. ↵
✚
Snow Leopard Miscellany
When first tinkering in a new OS you don’t always know what is actually new and what is just something you’ve been oblivious to for the past who-knows-how-many years. But one way or another, here are some miscellaneous thoughts, observations, and the like, regarding Snow Leopard — most of which I am pretty sure are related to new features.
Listed in order of noteworthiness to the author:
-
Quicksilver: Version B56a7 was posted Friday, and though it’s labeled as Snow Leopard compatible, I couldn’t even get it to launch at first. I was only updating the Quicksilver app in my Applications folder, but that wasn’t enough. I also had to delete Quicksilver’s application support folder (~/Library/Application Support/Quicksilver) before replacing the app itself.
The horror of having to delete the app support folder was the loss of all Quicksilver’s “learned behaviors” — years of Quicksilver learning and memorizing my workflow just thrown in the trash. So I decided it was time to mix things up and give LaunchBar a shot.
LaunchBar runs faultlessly on Snow Leopard. What I like most about it is how well it blends in with the OS — it very much feels like a native app (though I wish it didn’t appear up top by the Menu Bar), and in only a few days of use LaunchBar has mostly acclimated itself to my most-used apps and files.
After using LaunchBar, I realize that what I liked most about Quicksilver wasn’t so much its power, but rather its mystery. As if every time I used it I wasn’t just launching an app, I was doing a magic trick. To truly dive deep into a relationship with Quicksilver isn’t to become a power user, but rather, a magician.
Which is to say, what I like least about LaunchBar isn’t its smaller feature set compared to Quicksilver, but rather its lack of mystique and awe.
Truly, the difference in feature scope is not a big deal. Because what LaunchBar lacks in its support of custom keyboard shortcuts for triggering AppleScripts, applications, and more, can easily be amended with Daniel Jalkut’s notorious FastScripts.1
The shortcut triggers I used in Quicksilver were to launch apps, AppleScripts, and Javascript bookmarklets that I frequently use. For instance: instead of hitting cmd+space, followed by the letter ‘m’ and then return, I could just hit cmd+shift+m to launch (or switch to) Mail.
But now, a simple three-line AppleScript takes care of the exact same workflow. I just tell FastScripts to run this script whenever I press cmd+shift+m and I’m as good as gold.
Tell application "Mail" Activate End TellAnd although it’s hard to tell for sure – it may be due to Snow Leopard or something else – but I think FastScripts has a better trigger-to-launch response time than Quicksilver did.
Automation and Services: Compared to how big of a breakthrough this is for OS X, I really haven’t toyed with it enough. Services and automation are such fantastic and powerful features of OS X, but up till now they’ve mostly been ignored or treated as annoying second-class citizens. Just the fact that this got so much T.L.C. from Apple makes a lot of us very happy. And there are so many ways to use these new features, and they are so easy to use and implement, Snow Leopard is sure to make partial nerds such as myself feel like full-fledged, bona fide nerds.
EPS Files and Quick Look: The actual EPS image is now visible in Quick Look instead of the pixelated EPS icon we’ve been spacebaring into for the past two years. Designers, et al. rejoice.
Seriously Snappy: In Snow Leopard launching apps, moving files, compressing folders, booting up, shutting down, waking from sleep, and more, are all noticeably faster.
Exposé: The subtle layout and GUI tweaks, along with better integration with the Dock, have made it feel much more sturdy and easy to use. I very much appreciate how Snow Leopard differentiates a minimized window with one that is not, by displaying them smaller and at the bottom. It used to be that minimized windows didn’t show up in Exposé at all.
The Dock: Speaking of minimized windows, they can now shrink into their application’s icon in the Dock, rather than becoming a new addition by the trash. This is an option that can be selected under Dock in the System Preferences.
And two of my favorite new GUI designs (not that there are many to choose from anyway) are the new contextual menu you get when you click and hold an icon in the Dock, and how the whole screen gets dim except for the clicked-on icon.
Though it’s not all roses. As Pat Dryburgh pointed out, clicking and holding on the Trash icon in a left- or right-aligned Dock that’s pinned to the bottom will display its contextual menu about two icons above the Trash.
The Installation Process: I always prefer to install a major new OS release onto the blank canvas of an erased hard drive. It’s an ideal time to shake my feet from the dust of unused apps and preferences.
In previous releases it has been easy to choose to erase and install. This time, not so much. There was no clear option to “Erase and Install”. Once I had inserted the install disc I had read a PDF that listed the info on how to erase down towards the bottom — as if an afterthought. Basically, there is no standard option to Erase and install anymore. You have to to do it the old-fashioned way by re-starting your computer, launching Disc Utility, choosing to erase your hard drive, and then begin the installation process. No doubt too many people were innocently wiping their hard drives clean. Apple wants to make sure you are really aware of what you’re doing. So much so, that it even made me second guess the whole process.
In the past, once I have my fresh OS installed, I have only ever imported my user preferences during the initial startup process. Then, I setup .Mac (now MobileMe) and sync from the cloud to my computer. Next I would re-download and install any applications – from memory so as to only install the ones I knew I used – and import their app support and library files from my backup.
But this time was different. Before the install as I was sifting through my applications folder, I only found ten apps I don’t regularly use. So instead of re-installing everything from scratch this time, I simply deleted the ten and after installing Snow Leopard imported everything from my old user account. (This is more or less the exact same thing as doing an archive and install, except that it takes twice as long.)
Dictionary: This oft-used app now remembers – and keeps open – any previously looked-up words until you actually close their window. Meaning, if I look up synonyms of creative in the thesaurus, quit, and then later highlight ignominious from Safari and choose “Look Up in Dictionary” from the contextual menu, there will be two windows open when Dictionary launches: the previous one with the synonyms of creative, and the new one, with the definition of ignominious. Currently I find this is simultaneously helpful and annoying.
Also new to the Dictionary app is a Chose the Right Word tailpiece. It’s a semi-brief snippet of text meant to “show fine distinctions in meaning between closely related synonyms to help you find the best word.” It isn’t there for every word, just some. Like creative:
Choose The Right Word
creative, inventive, original, resourceful, imaginative, ingenious
Everyone likes to think that he or she is creative, which is used to describe the active, exploratory minds possessed by artists, writers, and inventors (a creative approach to problem-solving). Today, however, creative has become an advertising buzzword (creative cooking, creative hair-styling) that simply means new or different.
Original is more specific and limited in scope. Someone who is original comes up with things that no one else has thought of (an original approach to constructing a doghouse), or thinks in an independent and creative way (a highly original filmmaker).
Imaginative implies having an active and creative imagination, which often means that the person visualizes things quite differently than the way they appear in the real world (imaginative illustrations for a children’s book).
The practical side of imaginative is inventive; the inventive person figures out how to make things work (an inventive solution to the problem of getting a wheelchair into a van).
But where an inventive mind tends to come up with solutions to problems it has posed for itself, a resourceful mind deals successfully with externally imposed problems or limitations (A resourceful child can amuse herself with simple wooden blocks).
Someone who is ingenious is both inventive and resourceful, with a dose of cleverness thrown in (the ingenious idea of using recycled plastic to create a warm, fleecelike fabric).The Addition of Four-Finger Gestures for All Multi-Touch Trackpads: I’m on a previous model MacBook Pro and keep forgetting I can use these now.
Menlo: The cool new monospace font that ships with Snow Leopard. I would compare it to Panic Sans in that it seems great for writing code, but not to Inconsolata in that Menlo stinks for writing lengthy amounts of text (in MarsEdit). Moreover, since Menlo comes with four weights it’s great for writing and editing AppleScript.
TimeMachine:
The first backup after installing took over 24 hours (6:00pm Friday until 7:00pm Saturday). First it calculated changes, then erased my entire TimeMachine backup, did an entirely new backup, and once done told me my backup disk was almost full.- This is now the default instead of 1.8. This is the same default as Windows, and means the graphics have more contrast. It’s most noticeable with dark images / backgrounds.
- Noteworthy is that when Daniel rolled out the 2.4 version of FastScripts this past June, he merged the full and light versions into one. Now you can use the full-powered version for free, but if you want more than ten custom keyboard shortcuts, it’s only $15. ↵
By far and away my favorite thing to write is an in-depth review. And based on feedback, they are also, by far, your favorite thing to read.
Currently, there are nearly 30,000 words worth of software and hardware reviews hidden on this site. And until today there wasn’t a one-stop-spot for all the reviews I’ve written. Which is why I felt it was high-time these articles became first-class citizens by receiving a dedicated table of contents page.
✚
Fever Really is That Hot
Shaun Inman has taken the problem of individual RSS overload and solved it with a brilliant, beautiful web-based feed reader called Fever.
I had the honor of helping beta test Fever over the past year, and six months ago I actually switched away from NetNewsWire and now use Fever exclusively.
It really is that hot.
The reason I switched is because the selling point of Fever (subscribe to as many feeds as humanly possible, and never feel stressed about not being able to keep up with all of them) actually translated to my experience. Fever is much more than a good idea with a pretty face — Fever really works.
Up until now feed readers have pretty much had only one function, and that is to collect all your unread items. Which is why the only solution to feed-reader overload is to slash and hack your subscription list.
Naturally, Fever works splendidly as a standard feed reader. You can group and browse your feeds just like you always have. But it doesn’t stop there, and neither should you.
Suppose you want to simply check in quickly and see if anything new or exciting is going on. In any other reader you would have to scan through all your feeds, and mentally assess what’s going on. That’s a lot of thinking, and it certainly doesn’t happen quickly. Which is why people are constantly feeling the need to cut back on feeds.
Yet this is the main point of Fever.
As Shaun put it, “Fever takes the temperature of your slice of the web and shows you what’s hot.” Which means the more feeds you’re subscribed to, the better Fever works. Go nuts! Subscribe to as many feeds as you can.
All these extra feeds are called “Sparks”. Once you subscribe to them, you never have to look at them, sort through them, or worry about them again. But you DO get to use them to help keep your Hot tab alive and active.
It’s Hotter in a Site-Specific Browser
The way I check feeds in Fever is the same way I used to check feeds in NetNewsWire: using the arrow keys exclusively to find new articles, but reading the articles on their respective websites. This is why I prefer to run Fever in Fluid.
In Fluid’s preferences, under Behavior, I checked the box for links sent to default browser to open in the background. Since I like to read articles in their perspective author’s site, when I right-arrow out to an article or a link it then opens up in Safari, and in the background. Once I’ve opened up the small handful of things I want to read, I close Fever and begin reading.
If Fluid is opening an additional tab or window every time you arrow out to an article then go to Fever’s preferences (not Fluid’s), and de-select “open links in new window/tab”.
Hot Tips
- Make sure you put the Feedlet into your browser’s bookmark bar. You can’t set Fever as your default RSS reader in Safari’s preferences, so clicking on the RSS icon in the Address Bar won’t subscribe you to the feed in Fever.
- The main keyboard shortcuts I use are “a” (for marking an entire feed as read), and “s” (for saving an article). Fever has a slew of keyboard shortcuts; you can find them in Fever’s main menu.
- Selecting “Show Unread” from the menu, or pressing “u”, will show you only the feeds that actually have unread items in them. Removing the clutter of lots of feeds that have old articles you already read last month.
- Though the iPhone interface of Fever is extremely slick, it can get a bit borked when you visit a webpage. A quick tilt of the phone to change the orientation will fix it.
- Fever installs automatically, and its updates are pushed automatically (not unlike WordPress’ in-app update feature).
- In Fluid’s General Preferences I’ve checked to show the dock badge. This way you can see your unread count in the dock (assuming you want to).
If you need some help getting Fever populated, here is my current OPML file, which includes about 200 feeds altogether.
More Reviews
This is just one of a handful of winded and entertaining software reviews.
✚
A Review of Two Things: One For the Mac and One For iPhone
How many task-management apps have you used in the past six months?
Finding that single piece of software which does exactly what we need when we ourselves don’t actually know what it is we need can be a pain. It’s a Tinkerfest.
Task-management apps are multiplying faster than you can say “get this done.”1 And the nerds that use them are moving to each new release in hopes of relieving the clutter and stress that is their life. It’s also a Switcherfest.
I don’t think the new spins on productivity software are because we have yet to witness the creation of the Ultimate App and Workflow. These unique and diverse apps are being written because people are unique and diverse.
Each of us has our own way of dealing with responsibility and our own expression of productivity. Tinkering and then switching is usually not the fault of the software. We’re not looking for the best app, but rather the best app for us.
Chris Bowler wrote, “One cost of consistent tinkering is that you never spend the time digging deeper in an application.”
I am not a GTD guru, but I do take being organized seriously. I have been using Cultured Code’s task-management apps, Things, for quite a while, and I have had nothing but fantastic user experiences and have witnessed un-anticipated scalability.
Also I am an evangelist of great software. If I have to use it all day every day it had better not be crap. And Things is not crap.
I Used to Just Worry About my Comic Book Collection
When I was a kid my cousin used to visit every summer, and our first job was working at a greenhouse.
It was my parent’s greenhouse so Nate and I got paid a very generous four dollars-per-hour. In cash (we didn’t have bank accounts), which was convenient so we could leave immediately after work to buy comic books and rare coins.
In those younger days we had just two things to be responsible for: (1) Be to work by 9:00, and (2) keep out of trouble the rest of the time.
Wow. It’s not like that anymore. But I wouldn’t want it to be…
In Benjamin Franklin’s autobiography, he says, “When men are employed, they are best contented; for on the days they worked they were good-natured and cheerful, and, with the consciousness of having done a good day’s work, they spent the evening jollily; but on our idle days they were mutinous and quarrelsome.”
Having responsibility can be fantastic. When there is a job that needs accomplishing, it makes a person want to get out of bed in the morning. It’s good for the soul.
When you are in charge of your own self, there are many things that need to get done simply to keep up with the pace of life. It’s not the same as when you were 12. It’s also not the same for every person.
Some people only need 10 minutes in the morning with a cup of java, a pen and a piece of scratch paper. They think for a moment, then they jot down all that needs to be done that day. And that’s the end of it.
For others of us the things we place on our to-do list carry all sorts of intricate details. We don’t live our life one day’s to-do list at a time. We have multiple projects, jobs, and responsibilities all spinning at once. They span over weeks, months, and years. They involve multiple people and multiple areas of life.
A system for Getting Things Done is much more than just a place to dump the multitude of tasks and responsibilities as opposed to absorbing them until you explode. David Allen knew that responsibility is good for you but that it can also totally stress you out. But with a cool head, a good tool, and some focus, you too can live a stress-free and productive life.
Things
Things came on the scene when Version 0.8a was released as a private alpha to 12,000 users on December 10, 2007. It later went public beta, until the spit-and-polished version 1.0 was released at Macworld on the 6th of January 2009, and went on to win the Macworld Best of Show award.
If you missed some of the development process of Things along its journey, I highly recommend you read through Cultured Code’s weblog archive. Some fantastic stories of how key features came about (such as the repeating task dialog box, or the iPhone app’s UI). And if you really want to geek out, you can peruse the release notes for versions 0.8a right on up to the latest.
Something that makes Things such a great task management tool is that it seamlessly scales to suit any person’s productivity.
From his interview with MacApper, Jürgen Schweizer, the president of Cultured Code says:
Right from the beginning we wanted to create a tool that was easy to pick up yet powerful. It is no exaggeration, with Things it is possible to manage thousands of to-dos, but Things is also the application with the most modest learning curve.
Things not only scales horizontally — working transparently for the light GTDer and the guru alike. It also scales vertically, easily allowing you to create massively-long lists, multiple projects and detailed notes. Or, if you prefer, very few.
When I first began using Things, I only had a handful of to-do items each day. I had no projects and only a few areas of responsibility.
Currently I have 8 projects, 6 areas of responsibility and close to 100 individual to-do items logged. 16 of the to-do items are in my Today list and there is one straggler task waiting in my Inbox.
As my dependance on Things has increased over the months, I have yet to hit a learning curve. Not once did I stop and reassess what the heck I was doing with the thing. It just flowed. And it’s as helpful and organized for me now as it was when I had much less to do.
The reason I’ve grown so fond of Things is that it helps me to set it and forget it.
A Forgetful Task App
For better or for worse, I am a naturally organized person, and my brain is always thinking things through. Which means I don’t very much want a task management app for the sake of remembering something, but rather for the sake of forgetting it.
I need a place to dump all the ideas, projects and to-do items that come my way so I can happily live in the here-and-now rather than in the what’s-to-come. And Things’ ability to handle vast amounts of tasks while keeping them in order with lists and notes is better than any other app I’ve used.
Since I am always thinking things through, the most important feature for me has to be an easy and ubiquitous way to input my thoughts. This is common practice for productivity, so Things isn’t breaking the mold here. But the way it helps you capture your thoughts are smart and out of the way.
On the desktop version there is the HUD interface. Like Quicksilver, the HUD can be brought up at any time, in any application, via a keyboard shortcut (so long as Things is running in the Dock).
On the iPhone version there is a plus (+) symbol that lives in the bottom left-hand corner at all times (unless the on-screen keyboard is active). Regardless of what screen you are, on adding a new task is only a tap away.

Both of these core features shout, you can jot down that pesky to-do at any moment it strikes your mind.
Notice how these two identical features have a completely different implementation? It’s a testimony to how well each individual app was thought through and developed. Not only are the two applications parallel to one another, they also hold their own as individual apps and are best-of-breed for their respective platform. But more on that later.
Ubiquitous capture is a great start, but it is just the start. Things also needs to work with me as I process and organize those tasks.
Using Things
Other than the quickies, entering in a task usually involves three parts:
- The Task Title. No rules. I jot down whatever is on my mind so I can get it out of my mind.
- Task Notes. Many of my daily responsibilities revolve around sending and replying to emails, so I get a lot of action items via my email inbox. Often there are files attached to the email, or other valuable info which may be relevant for when I get to that task. The email gets linked in the ‘Notes’ box of the task, and then moved to the Action folder in Mail. Links to email are dynamic, so if you drop the email link into Things while the email is in your Inbox, but then you move it to another folder, the link in Things follows the email. Even to the trash.
- Due Dates. I don’t want to leave all upcoming projects in the Inbox, nor do I want them in the ‘Today’ view. But it can be easy for a few important tasks to get lost in the sea of all the other tasks. Especially if it’s not related to a current project. I usually assign a due date to the task and then drop it into its area of responsibility or the project it belongs with. If it’s a loner task, I pick the due date based on my schedule and current priorities for my job. There are a few times in my week that I have large chunks of time blocked out with no set agenda. These are my “Open Work Times” and they are when I work on my to-do list. Usually. By setting due dates, I know that my own computer will bring the task back to my attention by shooting it into the “Today” list at its appointed time. And if the task becomes a priority before the due date I gave it, I have no doubt someone will be sure to let me know.
The elephant in the room that I continue to ignore is tags. Not because I don’t see the use for them, but because I never felt that bothering with them on the front end would prove useful to me on the back end.2
Using tags in Things could make a lot of sense if my day was constructed in such a way that I could sit down at my desk for 30 minutes with a single focus of, say, returning phone calls. In this situation bringing up all the tasks pinned with the ‘Phone’ tag (ha!) would be genius. But I don’t work that way in real life. So I don’t bother with tags.
One way I might see myself using tags for would be to mark priority. However, priorities are relative. What may be a priority today, may not be a priority tomorrow. And vice-a-versa. Thus, I rest my case.
Quick Entry HUD
About 90% of my tasks get put into Things via the quick entry HUD; even when Things is the forefront window already.
I have the keyboard shortcut set as SHIFT+COMMAND+SPACE. Since it’s the second most used keyboard shortcut for me I set it to be nearly identical to Quicksilver’s (CMD+SPACE), which is the first.
Inbox Management
I don’t worry about keeping my Things inbox at zero.
There are rarely more than a handful of tasks sitting there at any given time, and it’s usually because I don’t have a spot to put them yet. Or because it has been a long day.
Usually they are not something to be done today and just need some info and a due date before I slot them into a current project or area of responsibility (both of which will also add the task to the master ‘Next’ list).
If it is a very contrite task it gets left as-is and put into the ‘Someday’ list. About once a week I peruse through the ‘Next’ and ‘Someday’ lists to see if anything needs doing. I usually take care of one or two tasks just to feel good about myself.
This process is nearly the exact same way Chris Bowler cranks through his Inbox as well:
The great feature that I feel separates Things from other task management applications is the differentiation between projects and areas (areas of responsibility). I receive a lot of tasks that are not projects. And they fall under one of my areas I am responsible for. Things makes this a real ease and pleasure to document. Seventy percent of the time I add items to Things, it is done through the Quick Entry panel and added to the Inbox. So I usually organize these tasks once a day, near the end of the day. Tasks are dragged to specific areas or added to existing projects. And when needed, new projects are created.
Moreover, when processing a task there is a clever feature which comes in handy if the task you wrote down should have been a project. By dragging a task out of its list, into the sidebar and dropping it over “Projects” will take the name of the task and create a new project automatically.
This is very handy feature indeed. Especially if you’ve created a single task which you realize may need to be broken down into multiple, smaller tasks…

Projects
Benjamin Franklin, a productivity and time-management mastermind, said, “Little strokes, fell great oaks.”
When building a task-list for a project, keep each task bite-sized. Each task should be something with a clear and tangible goal, helping lead to the end of the completed project. A good comparison is a tried-and-true technique my father-in-law teaches for those seeking to get out of debt — technique Dave Ramsey refers to as the “Debt Snowball”.
You gather all your debts, and put them in order of amount owed. Nothing else. While paying the minimum on all current debts, you focus all extra money to pay off the debt with the smallest balance first. Once that debt is paid, you take the left-over money you’re not putting towards it and apply it to the next smallest. And so on until all your debts have been paid.
It’s great financial advice, and it has practical application in other projects beyond financial.
Breaking down a project into easily definable steps (“little strokes”), you are able to work with focus on a single goal at a time. Procrastination is easier to avoid when there is no ambiguity, which makes completing the project (“great oak”) on time with less stress a reality.
Printing a List
To keep the memory of old-fashioned lists alive, Things offers the ability to print your to-do list.
This can actually be very helpful if a project has multiple to-do items that need to be reviewed with your team and then farmed off to the poor sap who decided to sit in the corner.
Unfortunately, the printed version of a task list doesn’t look nearly as pretty as the screen version. Though I don’t want (or even expect) all the fancy UI elements to print out, I do want the list to be well-formatted. A cleaner layout, use of a serif and more white space would be a good start.
Things on iPhone
I use both versions of Things, and am very impressed at how much the two apps work and feel identical to one another. This may seem like a “well duh” observation, but think about the back-room thought that had to go into developing the iPhone version of Things.
When creating an iPhone version of a desktop app you can’t just drag and drop the code and click the “iPhoneitize This” button. You have to completely start from scratch. In this situation, the result was a fine-tuned, highly polished iPhone app which doubles as a fully functional, stand alone GTD tool. Not bad for one month’s worth of work.3
Those who use both the desktop and the iPhone version may not have considered that the iPhone version of Things had to hold its own since many of its users do not own a Mac or do not use Things on their desktop.
There are two dynamics to successfully building two versions of the same app onto two unique platforms (one for iPhone and one for the Mac).
- Both apps need to feel native on their respective platform. The iPhone version needs to feel like it belongs on the iPhone app, and the desktop version needs to feel like it belongs there. This doesn’t just mean the GUI should be different. It also means the layout and display of core functionality, along with the flow of navigation and the user interaction within the application all have to pull together to form a well developed iPhone app that still has striking familiarity to its desktop counterpart. It’s like the difference between Clue the board game, and Clue the card game. Same game, completely different implementation and interaction.
- Both apps need to feel like they are the same app. Meaning, the Cultured Code team had to reconcile the two-fold need for their iPhone version of Things to feel like a native iPhone app while also feeling like the very same application they made for the desktop.
Reconciling these goals was the same issue Apple had to tackle with their own programs such as iCal or Mail. iPhone’s Calendar app feels great all by itself. But if you use iCal on you Mac as well, you don’t feel like you’re working with two different programs. They are simultaneously the same and different.
And Cultured Code did it…
The desktop version of Things is very much Macintosh-esque. A great piece of software in terms of functionality and design. Mac users have high standards for their software beyond just that they work.
Similarly, the iPhone version of Things is very iPhone-y. All the functionality of a fully loaded task management app married to the ease of use of what feels like a native iPhone app.
In and Out
Things on the iPhone is only about as good as it is fast.
The sheer virtue that Things for iPhone is an app used on a mobile device means it will be used mostly by people when they are on the go. This is why the ability to create a new task from anywhere in the app is so important.
Something clever with Things on iPhone is that the “plus” (+) icon is dynamic. Meaning if you open up the task entry screen from the main window, the default location for that new task is the Inbox. But if you are working within an area of focus and tap the “plus”, then the default location for that new task is your current area of focus.
What I also like about adding new tasks to Things on the iPhone is that the keyboard slides up automatically and instantly, when the “New To Do” screen is launched. Though unfortunately it is not quite as refined as Mail on the iPhone where after tapping to create a new email message the on-screen keyboard slides up at the very same time as the blank email.
If you want to add a new task to a particular list or area of focus rather than the Inbox it is best to tap into the list you want to add the new task to first, and then create the task. Rather than creating the new task from the main screen and then selecting your desired location.
Choosing to create a new task from the home screen that you want to end up in the “Someday” list, the order would go something like this: (1) Tap the plus to invoke the New To Do window; (2) type in the task name; (3) tap the “Create In” box; (4) select from the lists, and finally; (5) Save.
That’s five total taps, not including the amount of letters and spaces in your task’s title.
If you add the new to-do from the already appropriate list you save yourself one tap: (1) Select list; (2) tap the plus symbol; (3) type in task name; (4) save.
Ubiquitous
I do not use Things on my iPhone to manage my shopping list when out on errands. I use it almost exclusively as my parking lot. Regardless if I’m in a meeting, at Wal-Mart, or waiting for the oil to be changed, there is no way to tell when a thought will pop into my head. When it does, I need a place to drop it.

I used to jot those thoughts onto the palm of my hand.
Then I bought a Palm Pilot. Then a pocket Moleskine, then a notepad. But through all that, the only thing I ever had with me all the time was my cell phone. I’ve had a mobile device of some sort ever since my first pager in 7th grade. It’s 2nd nature to check my pockets as I walk out the door. Keys. Phone. Wallet. Let’s go.
Once I owned a cell phone that sent emails too, I had two spots to drop my ideas: one was my to-do list manager of choice at the time, and if that wasn’t handy I would send myself an email. Then later, the email would get turned into a to-do item.
Though I originally bought Things for my iPhone based on the novelty of having a to-do list app that worked on both platforms and would sync between the two, I have found that I rarely use its full features. It has primarily become my input collector, which I then just sync to my Mac.
Syncing
To sync Things on your iPhone with Things on your desktop simply make sure they are both on the same wireless network, then launch them both. If they have not yet been paired, a you’ll be asked to enter a 4-digit pin onto your phone. It is a cinch to set up and virtually no trouble at all to keep the two in unity.
When a sync is in progress your iPhone goes into “don’t touch me I’m syncing” mode, with a large black screen and a spinning “ticker-wheel”. At the same time, on the Mac, this progress bar appears:

If you want to force a sync, simply open the preferences pane on the desktop version, select iPhone and click “Sync Now”.
I find it interesting that the only way to sync Things’ iPhone library to the desktop’s is through a wireless network. You can’t plug it in to sync, and there is no cloud server offering over-the-air syncing like MobileMe does.
If you are not near a wireless network, you can still sync by using your computer’s airport card to create a network. Click the airport menu icon, and choose “Create Network…” Then join that network on your iPhone, via the Wi-Fi menu under Settings.
Additionally, Things does not currently sync between two desktop Macs. Trying to use the iPhone as a mediator or carrier of info between two computers is doable, since each Mac must be paired to the iPhone individually for over-network syncing.
Since I only use one computer, this is not an issue for me. But for those of you who do use multiple Macs, Cultured Code has documented a work-around which uses Dropbox to keep your Things library in sync, and which many people seem to be doing successfully.
More Reviews
This is just one of a handful of winded and entertaining software reviews.
- Without much work at all, I was able to pick out 10 task-management apps for the Mac (not including Things): iCal and Mail (on Leopard), iGTD, OmniFocus, Midnight Inbox, TaskPaper, Kinkless GTD, Anxiety, The Hit List, What’s Next, and The Action Method. ↵
- Not just for Things, but for all the applications I use. ↵
- And currently enjoying the #1 for-pay productivity app in the iTunes App Store. ↵
✚
The iTunes Genius
The most significant feature introduced with iTunes 8 in September was Genius: the automatic playlist generator. John Gruber describes Genius as being “like the shuffle feature but with a hint.”
Genius is, in fact, so clever that I now have a hard time listening to music any other way.
Once Genius is enabled1, your computer anonymously sends information about your music library and listening habits to Apple’s iTunes Store where it is combined with the information of millions of other iTunes users and then processed. The results are continually sent back to your computer in order to “update” your personal Genius’ algorithms—effectively making the Genius feature smarter every single day.
By having the updated algorithms downloaded, it also eliminates the need for Genius to be constantly connected to the Internet to function. Also, these Genius algorithms are synced with your iPod and/or iPhone.
To create a new Genius playlist you have two options: you can start a song and then click the Genius icon located in the bottom right corner of the iTunes window, or CTRL+CLICK a song and choose “Start Genius” from the contextual pop-up menu.
Once you’ve effectively created your Genius playlist there is a info/menu bar near the top of the iTunes window. From there you can select how many songs you want in the playlist, you can refresh the list and save the list. Refreshing builds a new mix of songs which are based on the original first song you began with; saving will create a new Genius playlist titled after the song-title the playlist is based on.
What’s interesting is that you still have the option to “refresh” a playlist even after it has been saved as its own list, though you cannot re-save a saved playlist even if it’s been refreshed. It seems to me that perhaps the point of saving a Genius playlist is not to keep the order of songs in tact, but rather to quickly access the song which the playlist was built on. If this is the case, it would make sense to build a handful of Genius playlists based on your favorite songs from the different genres in your library.
Something I discovered today – though I am sure it is not a new feature – is the ability to “gift” somebody a playlist via the iTunes Store. When a playlist is selected the “iTunes Store arrow” appears. Clicking the arrow gives you the option to gift the playlist or create an iMix.
When I was a kid, gifting a playlist meant creating a mix-tape through hours of play/pause recording on a dual tape deck.
Genius also gives you the option to buy more songs from the iTunes store to ‘complete your playlist’. Regardless of what context you are listening to music in, if the Genius sidebar is open you will see related music available for sale on the iTunes store.
Michael Mistretta summed up his thoughts on Genius by saying, “…in the end, it will simply be used to sell you more music.” And rightly so.
Through iTunes, Apple is in the music selling business. And what better way to capitalize on permission and word of mouth marketing, then by brilliantly recommended songs and albums right from the familiarity of someone’s own computer?
Additionally, as Dan Philibin said in the comments of the aforementioned article, “Genius is only possible because of the amount of people that use iTunes, something that’s taken years to improve and perfect.”
The Genius engine not only exists as part of iTunes 8, but also as part of every new iPod and every iPhone or iPod touch using iPhone OS 2.x.
Building a Genius playlist on iPhone’s mobile version of iTunes works exactly opposite of the desktop version of iTunes, though it is never confusing in context. On the desktop version you create a Genius playlist by selecting the song first, whereas on iPhone you select the song last.
To build a Genius playlist on mobile iTunes you start by selecting “Playlists” and then “Genius”. iTunes then asks you to choose a song to create a Genius playlist and shows you a list of all your songs in alphabetical order. If that is not how you want to pick a song, you can still select “Artists” or “Albums” from the bottom navigation menu without leaving the Genius song-selection state. What you cannot do is rotate your phone to cover-mode and select a song that way.
UPDATE: So, apparently you can start a Genius playlist on the iPhone by selecting the song first. When a track is playing, and you tap the cover art to reveal the timeline bar, there is the Genius icon right in-between the repeat icon and the shuffle icon. Tapping the Genius button builds a playlist with 25 songs in it. From there you can Save, Refresh or build a new Genius playlist.
On my iPhone, with just a little over 5 GB of audio from 65 or so albums, Genius has no trouble creating a fantastic playlist which is always delightful for airplane rides or waiting while getting an oil-change. My point being, Genius doesn’t need a whole ton of songs to build a good playlist.
Now, when I want to listen to music I find the one song that I most want to listen to, and let Genius do the rest. The success rate of a great playlist via Genius is better than simply shuffling all songs, and the amount of thought which goes into building a quality mix is virtually zero when I let Genius build it for me.
After several weeks of use, I have more confidence in Genius than in myself to build a good playlist. I have so much confidence in fact, that when I was asked to provide the music for a friend’s wedding reception a few weeks ago I simply chose one good jazz song from my iTunes library and let Genius do the rest, un-monitored.
It is simultaneously humbling and fascinating that Genius is a better DJ than I am. Even without a massive music library (25.52 GB), Genius has no problem finding all the songs I had forgotten I owned and am delighted to hear again.
What makes Genius so fantastic is not so much the algorithms it builds behind-the-scenes, but the fact that it is what it says it is: Genius is a genius.
Thanks to the massive success and user-base of iTunes Apple now has the ability to tell people – with surprising accuracy – what they want to listen to.
- Genius is not automatically enabled in iTunes. You have to turn it on under the “Store” menu.↵
✚
Three Generations of Macs (Unofficially) Benchmarked
Stats and info are always interesting, so naturally I read the benchmark tests before I bought my new MacBook Pro. But once I had the computer in my own hands I wanted to do some benchmark testing of my own.

I wanted to do my own personal, “real-life” benchmarks to see how the three current Macs in my office compare to one another. Also, I was secretly hoping to discover an excuse to sell the Mac Pro, keep the laptop, and move to a one-computer work-flow. (Let’s face it, syncing sucks.)
And please note, these are by no means official benchmarks — I timed everything with my iPhone for goodness’ sake…
Technical Specs
Each computer is currently running OS X 10.5.2.
| Computer | Processor | Memory | Hard-Drive | Screen |
|---|---|---|---|---|
| MacBook Pro | 2.4 GHz Intel Core 2 Duo, “Penryn” | 4 GB | 200 GB, 7200 RPM | 15.4-inch LED backlit display with 1440×900 resolution |
| MacPro | 3.0 GHz Quad-Core Intel Xeon, “Woodcrest” | 4 GB | 250 GB, 7200 RMP primary hard-drive; 500 GB, 7200 RPM backup hard-drive | 23-inch Apple Cinima HD Display with 1920×1200 resolution |
| PowerBook | 1.33 GHz Power PC | 1.25 GB | 100 GB / 7200 RPM | 12-inch Display with 1024×768 resolution |
1. Video Encoding
Using Handbrake 0.9.2, I encoded the “The Three Amigos” (a classic). I turned the 1:42:16 long DVD into an iPhone friendly 635×346, 1.16GB MPEG-4 Video on each of the machines.
| Computer | Time to Encode “The Three Amigos” |
|---|---|
| MacBook Pro | 1 Hour, 14 Minutes, 21.5 Seconds |
| MacPro | 45 Minutes, 17.8 Seconds |
| PowerBook | 2 Hours, 58 Minutes, 16.1 Seconds |
As you can see the Mac Pro was nearly 30 minutes faster at encoding the movie from disc, but I am quite sure the speed there is primarily due to the 16x SuperDrive, versus the MBP’s 8x.
2. Booting Up
The time it took from when I pressed the power button to when OS X had fully loaded and Quicksilver’s icon finally appeared in the menu bar.
| Computer | Startup Time |
|---|---|
| MacBook Pro | 1 minute 19.8 seconds |
| MacPro | 1 minute 5.6 seconds |
| PowerBook | 1 minute 11.1 seconds |
3. Zip Compression
I had each machine take a 272.2 MB folder and compress it into a 108.9 MB ZIP archive.
| Computer | File Compression Time |
|---|---|
| MacBook Pro | 24.2 seconds |
| MacPro | 22.1 seconds |
| PowerBook | 43.6 seconds |
4. The Infamous “Open All Apps” Test
I selected every application in the Applications folder (except for Spaces and Front Row), and hit CMD+O. I then waited until all the icons in the dock stopped bouncing.
| Computer | # of Apps | Time To Open All Apps |
|---|---|---|
| MacBook Pro | 85 | 2 minutes and 34 seconds |
| MacPro | 80 | 4 minutes and 29 seconds |
| PowerBook | 57 | Beachballed and had to be force-restarted after 12 minutes |
5. FTP File Upload
Using Transmit, I uploaded an 8 MB folder, which contained four images, onto my server.
| Computer | FTP File Upload Time | Internet Connection |
|---|---|---|
| MacBook Pro | 2 Minutes, 27.8 seconds | Wireless |
| Mac Pro | 2 Minutes, 24.4 seconds | Ethernet Cable |
| PowerBook | 2 Minutes, 22.9 seconds | Wireless |
6. The Nitty Gritty
Day in and day out, the apps I have running while working are Mail, Safari, Photoshop and Illustrator. This is my “real life” test.
With Mail and Safari both open, and iTunes playing some hits, I opened a 1.1 GB Photoshop file to manipulate it (turning it into a 1.42 GB file). I then re-saved it, and then exported it as a TIFF.
| Computer | Open a 1.1 GB File in Photoshop | Save the new 1.42 GB File | Export as TIFF |
|---|---|---|---|
| MacBook Pro | 38.5 seconds | 51.9 seconds | 13.6 seconds |
| Mac Pro | 25.2 seconds | 42.7 seconds | 14.3 seconds |
| PowerBook | Adobe only allows you to have two computers authorized at a time, and I already de-authorized the G4 | N/A | N/A |
Conclusion
As I mentioned in my review earlier this week, I have decided to sell the Mac Pro and move to a one-machine setup. It’s true that the Mac Pro won nearly every benchmark, it wasn’t by a lot (in most cases). The time I may lose in performance with the MacBook Pro, I will gain back by not having to sync files and worry about which machine has the latest version of a project I’m working on. Additionally, the idea of owning two, expensive, “pro” machines is a bit against my nature.
And for those wondering why I would keep the laptop and sell the tower: It is because I travel quite a bit and do a lot of work outside of my office. Having a portable is a necessity for me.
✚
Pro Portable: A Review of the New MacBook Pro
As far back as I can remember I have been fascinated with laptops. Primarily for what I considered to be the coolness factor: they were portable and foldable. Growing up I would cut out and save ads from magazines selling laptops at Best Buy or Wal-Mart.
After high school I took all graduation money and bought my first computer: A Dell Inspiron 3800 (laptop). Five years later I bought my next laptop: A 12-inch PowerBook G4. And two weeks ago I purchased my third laptop: A 15-inch MacBook Pro.1
Last spring, as my PowerBook began to show its age due in the graphics work I was using it for, I decided to buy a tower instead of a new laptop. The idea behind buying the Mac Pro was that (1) it would last for years: I had already been using my PowerBook for more than two years, who’s specs were far below the Mac Pro’s and it was still chugging along well. And then, (2) the ease and affordability to expand the Mac Pro’s specs would make it all the easier to make sure it lasted even longer.
Therefore the PowerBook became my secondary computer. I used it when traveling and when not in the office – which was still quite a lot – and the Mac Pro became my primary work machine. Then, about a month ago my wife got a new position at work and now needed her own laptop. She hooked me up big-time by taking the PowerBook and letting me get the new laptop. (I owe you big-time, babe!)
I ordered the new 15-inch, multi-touch MacBook Pro with a 2.4GHz processor and the 200 GB 7,200 RPM hard drive. I watched FedEX as they picked it up in China, swung by Alaska, and finally dropped it off at my place a week ago.
When you use two computers you have to pick one that will be the “primary” computer; the home base. It’s your only hope for any sort of syncing sanity (if there is hope).
The point of picking one main machine is that you now know where to keep all the most recent versions of files, it’s where all your iTunes purchases are done, and it’s what everything syncs with.
While I was had the PowerBook it was a no-brainer that the Mac Pro would be home base. And even still, when I purchased the MacBook Pro I fully expected that it too would be my secondary computer, just as the PowerBook had been.
However, it quickly became obvious that the MacBook Pro should be the main computer. It just made sense. For several reasons:
- The PowerBook had a 100 GB hard drive, which was enough to keep many important files, some songs and some photos, but not enough to keep all the data I have. The MacBook Pro, on the other hand, can hold all my data. The 200 GB 7,200 RPM hard drive is plenty big enough to store all my files with room to spare.
- The entire reason I purchased the Mac Pro was because the PowerBook couldn’t keep up with the graphics-intensive work I was doing. The PowerBook couldn’t be my “work” computer anymore, and therefore became my “write, email and surf the web, while away from home” computer. However, the MacBook Pro has better benchmarks than the G5 Power Macs, and is even quite comparable to my Mac Pro’s performance in many of the most common tasks I do every day. The MacBook Pro is clearly a capable work and road machine.
- The biggest pain in the butt when using two computers is keeping them synced. Whenever I needed to go on a trip while also in the midst of a major design project I would have to transfer all the relevant files over to the PowerBook. Additionally, I never knew if the one or two other projects which I just finalized may come back to haunt with some pre-print, last-minute emergency; so I would have to transfer them over as well. With the MBP as my main computer I can just put it in my backpack and go to another city without worrying about forgetting an important photoshop file. And that is an ease of mind is worth its weight in gold.
Although I originally didn’t intend it to, the MacBook Pro now has become my primary computer. Which naturally leads me to the next logical question: Do I even need to keep the Mac Pro? The answer is no.
I don’t need the Mac Pro. The loss in horsepower is negligible for what I do, and the gain in simplicity cannot be expressed with words. I’m selling the tower and going back to being a one-computer consumer, and connoisseur of fine laptops.
If I had known this would be the outcome before I ordered the MacBook Pro I would have ordered the mid-level, 2.5GHz processor which has the higher 6MB of L2 cache, the faster bus speed and the better graphics card.
But even still, this thing is a fantastic machine and herein is my review:
Packaging
I very much appreciate the minimum amount of items included in the MacBook Pro’s box. Aside from the computer, the box only contained the power cord, a DVI to VGA adapter, the remote control I paid $19 for and a small black “Designed by Apple in California” box.
In the small black box were two things: One labeled “Everything Mac” and another labeled “Everything Else”. Everything Mac is the user’s manual, and Everything Else is a cardboard sleeve holding the install discs, the bluetooth info sheet, the obligatory Apple stickers and a very nice screen cleaning cloth.
What I love so much about the small amount of peripherals and paperwork included is that it gives more attention to what comes in the box. The concept is similar to a printed flyer: If the flyer is covered in text you won’t read any of it. But if it has just a few phrases you will read those. When un-boxing the MacBook Pro it was like each piece was there for a purpose – not “just because”. Less is more.
And along these same lines is the size itself of the MacBook Pro’s box. It is quite a bit thinner than my PowerBook’s was. Though I remember when un-boxing my PowerBook, there was a great deal of open space underneath the computer.
It’s almost as if the boxes themselves communicate the form factor of the enclosed laptop: Wider and thinner versus shorter and “stubbier”.
Form Factor
After using a 12-inch PowerBook for so long I still haven’t adjusted to the bigger look of the 15-inch when I’m using it. It’s not so much the screen that throws me off as it is the extra space next to the keyboard where the speakers are. I’m used to looking at a bigger screen, but not used to typing on a laptop with an extra inch-and-a-half of hardware on either side.
When I see other people using their 15-inch laptop it doesn’t seem large at all, but when I’m sitting right in front of mine it seems huge. Though a quick glance at the “airplane wing” style 17-inch, and the 15-inch seems quite proportionate again.
Otherwise the size difference is most welcome. The larger footprint makes the MacBook Pro feel safer and more comfortable on my lap. And since it weighs nearly the same as my old PowerBook, it’s a win/win situation for me.
Other differences – such as the better speakers and the extra input jacks (Finally: FireWire 800!!) – are great. I’ve quickly become a fan of my $19 remote control, but the IR sensor on the front of the laptop is a serious eye sore.
And of course, some old habits will die hard – like trying to put CDs in the right-hand side.
Unchanging
Apple’s professional laptops have gone virtually unchanged for nearly 5 years. The new MacBook Pros looks nearly identical to the original aluminum PowerBooks that came out in fall of 2003. I could just imagine a conversation along these lines:
“Hey, is that Apple’s newest laptop?”
“No. It’s my 4 year old PowerBook.” 2
Not that any of you would ever ask that question, but you see my point, don’t you? The above conversation reveals two things: That (a) Apple’s laptop hardware is still attractive and appealing; and (b) that it is not uncommon to see someone still using their four or five-year-old PowerBook on a daily basis. Even though 5 years is a virtual eternity in computer-land, the previous generation of Apple’s laptops – the aluminum PowerBooks – are still hearty machines.
I’m sure that much of the PowerBook’s longevity is due to the fact that Apple fully controls the development and engineering of the operating system and the hardware it runs on. Simply put: Apple doesn’t need to conform to the lowest common denominator.
Set-Up
After un-boxing the first thing I did was install 4 GB of new memory. There’s no reason not to max out your RAM; it’s the single most affordable and effective way to minimize any cases of beach-ball-itis. Laptop memory is just about as cheap as tower memory nowadays, and swapping out the two 1 GB sticks for two 2 GB sticks was just as easy as adding RAM to the Mac Pro (a machine that’s famous for being easy to upgrade).
Migration
With the new memory installed I booted up and migrated my data.
Ideally I would have done a clean install of all my applications, manually transfer the documents and let .Mac sync the rest, but I wasn’t in the mood for the extra time and attention it would take. I had a few meetings to go to that afternoon and I wanted to come back to a ready to use laptop; therefore I used the Migration Assistant instead.
Instead of using the Mac Pro, I used my external FireWire drive which holds a bootable clone of my Mac Pro via SuperDuper. This way my tower wasn’t out of commission while I transfered files, and I saved the time it takes to do a Time Machine restore.
Migrating roughly 180 GBs of data over the FireWire 800 port took about 2.5 hours. And once all the files were successfully migrated the thing booted up perfectly and was ready to roll. Well, except for a few oddities…
Network Settings
Once I had the machine up and running the first thing I had to do was make sure the internet worked. I mean, without internet what good is the thing? Seriously…
I hadn’t been thinking and I had the migration assistant transfers network settings. Regardless of the network capabilities of the old machine verses the new machine, it just sets up the new network settings to be identical to the old ones. Which means since I was transferring from the Mac Pro, laptop’s Airport option now read as “Ethernet 2″, even though it had the radar icon next to it.

Additionally, the Airport icon up in the menu bar was displayed in the “empty” state, as if it was turned off. Clicking on it said the airport was not configured. But the MBP was getting signal from my wireless network because I had internet with no cables.
The weirdness was easily fixed by simply re-configuring everything using the location setup assistant.

The Keyboard
I have always been jealous of the backlit keyboards. I think they’re brilliant and my 12-inch PowerBook didn’t have one. Naturally, one of the first things I played with was my new keyboard’s backlighting. But, it was broken. At first I thought the mapping for the hardware keys (F5/F6) was broken because in normal light I was totally unable to manually turn on the keyboard’s backlight.
When pressing the adjustment keys this would appear:

I assumed the unresponsive lighting had something to do with the same migration trouble I had with the Network Settings. I repaired the disk permissions, reset the PRAM and still had no luck. After searching online with no results I called Apple..
The general technician was clueless on how to fix it. He assumed I would need to re-install the OS due to the hardware mapping problem from the migration. But before making that giant executive decision, he transfered me to a product specialist.
I again described the problem, and he too was unsure about a solution. I noted how the lights came on when it was dark in the room (or when I put my palms over the speakers), and then, at that point I could adjust the brightness level. But I could not manually turn the backlights on if they weren’t first turned on by the ambient light sensor.
The product specialist concluded it must be a new feature in the latest MacBook Pros since they have the new F1 – F12 keyboard layout and what-not. And that was the end of that.
Those of you who have a 15-inch Mac are probably rolling right now. Since I’ve never owned a laptop with backlit keyboards I had no clue, but apparently this has been the standard function all along! (Read: over four years!)
To recap: You can’t adjust the backlit keyboard unless it’s dark in the room.
Now, as far as real keyboard changes go, there are quite a few (Apple Care phone support, take note):
- As expected, the F1 – F12 layout in the MBP is now the same as the slim keyboard’s, the MacBook Air’s and the MacBook’s.
- The Enter key to the right of the spacebar has been replaced by the option key.
- The num lock key is gone, as are the keypad style numbers.
- The “speed tap safety feature” for the caps lock key (a.k.a. the antiCAPSLOCK campaign) has been implemented. The reason it exists only in the new laptops, and not in all of our computers via some software update, is because as Rentzsch discovered: “The activation delay occurs in the keyboard itself, before the operating system even sees the key-down.”
Point being: all of Apple’s keyboards are now the same. The only differences are the F5 and F6 keys: on the MacBooks and the slim-desktop keyboards those two keys are blank, whereas on the MBPs and MBAs they have the icons for the keyboard’s backlight adjustment.
The Screen
The LED screen is gorgeous. Naturally I got the matte screen, since (no offense, but) glossy is synonymous with cheesy to me. The display is bright, clear and sharp. And even though it’s not quite as bright as my Apple Cinema Display, it is a very satisfactory alternative when not at my desk.
The 1440×900 pixel resolution is the same as the old 17″ PowerBooks used to have a few years back. And it is in-fact a higher pixel per inch density than my 23″ ACD is (114 PPI for the MacBook Pro versus 98 PPI for the Cinema Display). One of the primary advantages of a higher density screen is font-rendering — especially on the Web. If you like to read on the web, the MacBook Pro makes great companion.
Of course, when working at my desk the Cinema Display is still more pleasant – on the eyes and the neck – which means I’ll be diving back into the world of connecting to an external display on a regular basis. I’m reminded of how fantastically my PowerBook handled external monitors. As John Gruber put it:
The PowerBooks’ support for external displays is quite clever. When the PowerBook wakes from sleep (or starts up), it detects which displays are available and uses them. This means you can walk around using the built-in display, set it down, connect an external display, and it automatically recognizes the just-connected external display and uses it. If you keep the PowerBook open, it uses the external display in addition to the built-in display; if you keep the PowerBook closed, it uses the external display instead of the internal. Disconnect the external display, and the right thing will happen, where by “right thing” I mean that any windows which were open on the no-longer-available display will be moved to the internal display, and resized, if necessary, to fit.
Moreover, it seems the MacBook Pro now has instant monitor detection. I’m not sure just how new this is, but it’s new to me. When I plug in an external monitor while the MBP is open and running it detects the new monitor right away and adjusts accordingly with only a few seconds of light-blue-screen down time. Likewise, if I unplug the external monitor the MBP adjusts, and, as John says, “does the right thing.”
Next is the ambient light sensor. It’s a nice feature, but I can’t seriously imagine anyone leaving it on for the internal display. I often have my left hand off to the side of the keyboard (and therefore over top of the left speaker) keeping my thumb on the CMD key and my middle finger on the tab key, and I often bring my right hand up and it would dim the screen every time – not too much, but just enough to make you feel crazy. It only took about 45 seconds of use before I realized I would have to turn it off.
Otherwise, my only gripe about the MacBook Pro’s display is the amount it will tilt back, or rather, won’t tilt back. Compared to my PowerBook the difference in angle is substantial, and I miss it. I’m not sure, but from what I can tell the primary reason for the tighter angle is the slimmer form factor of the new MacBook Pro. Meaning if the screen did tilt back any further I think the outside edge of the display would actually lift the back end of the laptop up.
Multi-Touch
Like I do when almost any of Apple’s new products are announced, I didn’t think of the multi-touch as necessary to my everyday laptop use. That is, until it actually was a part of my everyday laptop use. Sure, I knew it would be nice, and if I could choose between getting a laptop that had it or one that didn’t, I would choose the one that did. But for the most part, I was impartial.
Now, after a week with the multi-touch, I am hooked. Not only are the old multi-touch features (two-finger scrolling) new to me, but the newest features (three-finger swipe, pinch, and etc.) are brilliant.
Just like on the iPhone, the multi-touch gestures make perfect sense in context. Which means I don’t have to think about them. Once I settled that three fingers swiping from left to right means “next” I find myself naturally using it in places I hadn’t even thought about, without thinking about it. It already feels natural.
In iCal the three-finger swipe takes you to the next or previous day/week/month in your calendar. In Apple’s Mail the swipe takes you to the next email message. In Preview, you get the next page. And it’s the same with pinching: On the desktop, pinching enlarges or shrinks your icon sizes. In Preview, it enlarges the image or document. And, more…
Even the short tutorial videos in the trackpad preferences pane are brilliant. What a perfect way to demonstrate how to use all the different options.
Right now, multi-touch to the trackpad is what keyboard shortcuts are to the the keyboard. But But it’s apparent that multi-touch to the trackpad can be what Quicksilver is to the keyboard.
Since multi-touch is really only helpful inside apps which are primarily designed as mostly mouse-input apps (iCal, Safari, iPhoto) versus keyboard-input apps, if you’re in an app that is mostly a keyboard-input app, forcing yourself to use multi-touch instead of keyboard shortcuts is a little more trouble than it’s worth. But, if you’re fingers are already on the trackpad then multi-touch features can be great.
Clearly, multi-touch won’t be able to replace all the keyboard shortcuts. But certainly the most common ones.
To see how multi-touch would work with some of the 3rd Party apps I use regularly, I installed the beta of MultiClutch.
MultiClutch takes keyboard shortcuts and maps them to trackpad gestures for certain applications. I honestly haven’t found it indispensable, since the applications that I find myself using multi-touch functionality already support it: Mail, iCal and Safari. But I have been able to set a couple new convenient gestures.
The MultiClutch setup pane is pretty straight forward. You add an application to the list, select the multi-touch gesture and then pick the keyboard shortcut you want accompany it and.

When I’m in an app that I wish had some multi-touch functionality I can go to MultiClutch, add the gesture, and the new mapping works instantly. As of now I’ve only added four gestures in MultiClutch. Two in NetNewsWire and two global shortcuts.
In NNW I wanted to map three-finger swipe to the space bar — this makes sense because the swipe means “next” and pressing spacebar takes you to your next unread feed. But MultiClutch doesn’t allow me to map the spacebar as a shortcut key.
Fortunately, pressing CMD+/ also takes you to “Next Unread”, and pressing CMD+’ takes you to previous unread. I mapped these to the three-finger swipes for previous and next, respectively. This actually works better though, because CMD+/ takes you directly to the next unread item, whereas spacebar also scrolls down the article until it gets to the end, and then takes you to the next unread item. I can use the swipe shortcut and the two-finger scrolling to read a bit easier in NNW than what just spacebar alone offers.
For the two global shortcuts, I mapped “Swipe Up” and “Swipe Down” to “Page Up” and “Page Down” respectively. This has been great for Safari, and other similar situations where I want to get to the very top or very bottom of the page.
Unfortunately, Adobe CS3 doesn’t get any love from MultiClutch. It would be great if pinching in or out would zoom respectively, and three-finger swiping would take me to the next page in InDesign, but gesture mapping through MultiClutch doesn’t work with Carbon apps.
Obviously multi-touch has a bright future. I think it’s a privilege to be around from the start, so one day I can say something like, “I remember when I had to click on the sidebar and drag down to see the rest of the page.”
Hard Drive
I am determined not to be a digital pack-rat. I delete anything and everything I can and try to keep around only the files which I am quite confident I will need again in the future. I simply hate keeping something on my computer simply because I might, maybe, possibly need it one day.
Needless to say, upgrading the hard-drive’s speed instead of capacity was a no brainer. I paid the $100 upgrade to get the 200 GB 7,200 RPM hard drive. Looking in the System Profiler, I found the drive is from Hitachi.
The MacBook Pro’s hard drive is as quiet as my PowerBook’s used to be before I manually replaced the drive in the G4 a few months ago. (I took out the stock Hitachi 80 GB 4,500 RPM drive it came with and put in a Seagate 100 GB 7,200 RPM drive I bought from NewEgg.) The first thing I noticed with my PowerBook’s new drive was the hum and even some vibration.
The Mac Pro tower currently has two hard drives: The 250 GB Western Digital drive it came with and an additional 500 GB Seagate drive I added later. The drives are quiet, but it’s the fans that make so much noise.
All this to say I am very impressed at how quiet the MacBook Pro is: The fans and the hard drive.
Sleeping
If I leave the MacBook Pro alone for awhile and the screen goes to sleep, the white LED comes on, but at full-strength (not pulsing or breathing). I am not quite sure what the point of that feature is, though. I suppose it’s so I can instantly tell the state of my Mac if the screen is off.
This feature also comes in to play when closing the lid to put the Mac to sleep. The white LED will come on right away at full-strength, but won’t start “breathing” until the laptop actually goes to sleep. I’m used to waiting until the LED comes on, but now I have to watch it and wait for it to start breathing before I can pack up the laptop. I wish they would have left that alone.
Unfortunately, putting the MacBook Pro to sleep takes 30-45 seconds. This is a long time to wait when you’re ready to go. But the reason it takes so long to sleep is because your computer is writing all the information that’s in RAM to your disc. This way you won’t lose any info if your battery dies, or falls out while in sleep mode. But with 2 to 4 GB of RAM it can take quite a while.
There’s a short terminal command (via Paul) to change the sleep-mode from the default “3″ to “0″ which fixes the slow sleep frustration:
sudo pmset -a hibernatemode 0
You’ll be prompted to enter your administrator password, and then you’re good to go. And make sure you logout before quitting terminal or the change won’t keep.
What this command does is change your laptop’s sleep-mode from “safe” to “instant”. That means if your battery dies while your laptop is sleeping you’ll lose all your session data.
But I always save – and usually quit out of – everything anyway, so it would be no loss if the battery died. And now the laptop sleeps in about 5 -7 seconds instead of 30 – 45. Hallelujah.
UPDATE: SmartSleep.
Proper Baggage
Finding the right bag seems to be a never-ending venture. I knew I would miss my little Brenthaven bag for the 12-inch PowerBook, but Brenthaven’s 15-inch MBP version was a bit too clunky. I found a slick Burton Bandwidth Case from Turntable Labs. It’s slim, has very little extra storage, and is perfect for the times I just need to take my laptop and nothing else.
That case is not my everyday bag, though. For everyday use I’ve decided I need a backpack: One that doesn’t look like it belongs in a sci-fi movie; one that holds my laptop safely; And one that is the right size (not too big, but not too small).
I’m currently using the Case Logic XN Backpack, and so far, it seems to fit the bill. Granted, I have a pretty bad track record of keeping bags. I’ve been through about 8 in the course of my three laptops, but with each one I get closer to perfection.
Odds and Ends
- There has been a lot of hub-ubb about the new battery-life claims on Apple’s website. Are the new computers getting worse battery life or are the claims actually realistic? From my own experience so far I’m quite sure the claims are dead-on. I haven’t done any legit testing, but earlier today the battery lasted nearly four hours with the power settings on “Better Performance” and the screen at full brightness — all while typing, surfing the web, listening to music through the built-in speakers, and I downloaded a 1.13 GB movie from iTunes. I have no doubt with more caution I could squeeze 5 hours out of the battery.
- The new Penryn processor runs much cooler than my old PPC G4. Even on processor intensive apps, with the MacBook Pro on my lap it stays cool and the fan runs virtually silent.
- The MacBook Pro shipped with it’s own build of OS X 10.5.2 — Build 9C2028. (My PowerBook and Mac Pro are both running Build 9C31.) I imagine this has something to do with the new trackpad new multi-touch features.
- The MagSafe power adapter is a brilliant invention. Aside from the “safety” factor it’s much easier to connect and disconnect. But the orange or green indicator light only comes on about once every four plug-ins, even though the battery icon in the menu bar indicates charging. I’ll probably take it into the genius bar some-day to get it replaced.
- When reading on the Apple website I just noticed they refer to the computer as MacBook Pro, not the MacBook Pro. Like iPhone.
- Something else I’ve noticed about the MacBook Pro’s internal display is that when dimming the screen the increments seem rather far apart. Instead of a gradual dimming, each step is a bit jarring. Though I honestly don’t know for sure, I assume this has something to do with the way an LED display is lit, verses the older CCFL technology.
More Reviews
This is just one of a handful of winded and entertaining software reviews.
- Ironically all three machines are still in the family: I passed the Dell on to my dad a few years ago, and my wife just inherited the PowerBook. As you’ll see in another post with some benchmark stats, even though the PowerBook is much slower than the MBP, my wife insists that what is most important is that her laptop is the “cutest” computer in the house.↵
- Not unlike the original VW Beetle’s body style: “Is that a 1968 VW Bug?” “No. It’s a ’91.” ↵
✚
SuperDuper, Time Machine, and Bulletproof Backups
My advice for a good backup strategy? Keep it simple. Keep it safe. Don’t stress the details.
The “you should backup regularly” argument needs little coaxing. Everybody “knows” they should backup the problem is they don’t. A backup plan is only as good as its followthrough – which is why Time Machine is so epic. It backs up every hour for you. You don’t even know it’s running but you hear the hard drive spinning, and watch your system slow down for a few minutes.
Once people jump on the backup regularly bandwagon, the sinkhole that many fall into is to stress the details: the absurd fear that some day there will be some file that they will absolutely have to have. And when that day does come they will discover that they have deleted the file – or overwritten it, or something else catastrophic – and thus, by not having that one file at the theoretical moment of truth they will not impress their fellow nerds in a, “Look what I kept for all these years. What do you mean, “so what?”” moment of glory.
Of course, there are those who do need multiple backups, archive history and the ability to roll back, and you know who you are. But for the average user here is my advice: keep it simple; use SuperDuper to keep a bootable copy of your main startup drive, and let Time Machine do its thing to archive stuff. And hope you never need to use either.
Backing Up
With the advent of Time Machine backup awareness went through the roof. So far I have only used Time Machine once since Leopard came out…
It was while working on the NetNewsWire review. I made a folder with some screenshots and had it sitting on my desktop for a day or two. I moved the folder, and a few weeks later when I was ready for the screenshots I couldn’t remember where I had moved the folder to or what it was even called. What I did remember was that the folder had been on my desktop. So I launched into outer space and found the archived version and restored it.
To recap: the only time I have ever used Time Machine was to find a misplaced folder.
My point? Time Machine makes a better archive system than it does a catastrophic events solution. Not that Time Machine is not a good backup solution, but it’s not the best answer to every data-loss problem. Which is why SuperDuper is the ideal companion to everyone using Leopard and an absolute necessity to everyone on 10.4 and below.
On page 14 of his epic Leopard review, John Siracusa talks about Time Machine and shares some (pre-Leopard) backup stats of Mac users based on a poll Apple took:
Eighty percent of Mac users said they knew they should backup their data. (This is scary already. Only 80 percent?) Twenty-six percent said they do backup their data. That actually doesn’t sound too bad until you get to the next question. Only four percent backup regularly. In a nutshell, this means that if you could snap your fingers and make one Mac user’s main hard drive disappear, there’s a 96 percent chance that you just destroyed files that are completely unrecoverable.
Now, for those of you that know you should backup regularly, but don’t, I’m guessing there are two main reasons:
- Negligence – You just haven’t gotten around to buying a backup hard drive, or if you have you don’t feel like plugging it in to your laptop every. single. night… Ugh.
- Ignorance – I don’t know the real numbers, but before Time Machine came along I’m sure the vast majority of the average Mac user had no idea where to start in regards to setting up a backup plan. I know most of you reading this are much more tech savvy than the average user, but think of how many people you know need help just to sync their iPod. It’s those people who saw backing up as an intimidating venture they didn’t have the energy to figure out, if they thought of it at all.
Time Machine is creating a new mindset for the average user that backing up is important and it can be done without as much effort as they think; arguably making Time Machine the most significant addition to an operating system ever. But not without drawbacks…
SuperDuper’s tag line brags that their software is for “mere mortals”. Meaning people like you and me and even our iPod challenged friends. SuperDuper is not difficult or intimidating. In fact it’s just about as easy to use as Time Machine. But what’s more is that SuperDuper offers some data recovery and emergency response solutions which Time Machine doesn’t.
An Aside About Hardware
To have backups you have to have hard drives. I own four. One in my laptop, two in my Mac Pro and one external firewire.
The HDD in my laptop doesn’t get backed up. It’s my secondary machine, and any important files I may create on it during the day get moved to the Mac Pro. If my laptop dies on me I’m not afraid of losing any vital data. If I do happen to lose some vital file that only exists on my laptop I don’t know what it is anyway, so I’ll let ignorance be bliss.
Of the two HDDs in my tower, one is a 250GB boot disc and the other a 500GB drive for Time Machine. I purposefully bought a smaller backup drive for Time Machine as a way to “hem myself in.” At 500GB it looks like i will get about 6 months worth of archived info, which is more than I need (or want). I don’t want years and years of old files waiting around never to be used like a room in the basement filled with boxes of potentially important keepsakes that most likely belong to my great-aunt twice removed anyway.
My fourth and final hard drive is the most important component of my backup hardware: a Lacie 250GB FireWire400/FireWire800/USB drive dubbed “The Wardrobe”. It sits on the floor behind my Mac Pro and holds the nightly build of my Mac Pro’s boot disc. This is the drive I use with SuperDuper. It will plug into any Mac to give me instant access to my files and operating system. You can buy your own from Amazon.
What I like about the external drive holding the clone of my boot disc is that I can take it with me wherever I want and have an exact copy of my main machine that I can plug into any other Mac. I hardly ever do this, but it’s important to me for two reasons:
Since my laptop is my secondary machine there can be times when it doesn’t have a file I need. Usually it’s not a problem, and I just get the file later in my day when I go home. But if I”m on a long trip I need a different plan. Since Back To My Mac is not exactly reliable yet – and even when it does work it’s less than speedy – having an exact clone of my main hard drive readily available eliminates the possible stress of “client emergencies”.
Secondly, having all my data cloned on the external drive means if I ever sell my Mac Pro, send it to the repair shop or lose it, I am not out of my data. And I’m not sure how you lose a 60 pound tower, but I’m just sayin’…
The Right Tool for the Right Job
For the most part, there are only a few situations when you will be glad you have a backup:
- When you realize you’ve deleted something that was extremely important.
- When your hard drive takes a nose dive and all your info is gone, and you don’t want to pay $2,000 for the guys in space suits to extract your data with tweezers and chewing gum.
- When something else on your computer, unrelated to your hard drive brakes and you have to send your whole computer in for repair, and it conveniently comes back with a clean install of OS X.
- The latest software update or some new application suddenly barfs all over your system and everything is now buggy and unusable. (We’ll get more into this particular situation with SuperDuper’s “Sandboxing” later on.)
Only one of the above four scenarios is best solved by Time Machine; leaving SuperDuper as the ideal solution to the other three.
Time Machine
Like I said earlier, Time Machine makes a better archive system than a backup solution. There are several great reviews of Time Machine already, and there is clearly no need to go into detail on the ins, outs, whats and hows of Time Machine. But for the sake of context here is a brief, laymen’s terms overview of what Time Machine does…
When you first plug in your 2nd hard drive Time Machine asks if you want to use this as your backup drive. You say yes and it copies all your files over to the backup. From that point on Time Machine works in the background.
Every hour it takes a quick look at your whole computer to see if any file, setting or program is new or has changed. If something is new or changed Time Machine backs up those files — thus making “snapshots” of what your computer looked like at any given point in time. (So that’s where they got the name!)
At the end of the day Time Machine will fold your hourly backups into a single backup “snapshot” of that day, and at the end of the month it folds the daily backups into single snapshots for the week.
Time Machine keeps old backups as long as there is room on your backup drive. When the drive gets full, Time Machine starts replacing the oldest snapshots with the newest ones.
So this all comes in to play if you lost, accidentally deleted or (in my case) misplaced a file. You simply open up time machine to get instant access to all the archives. Then use the big arrows to go backward and forward in time, or use the tick marks on the right to select a specific snapshot.
One look at the finder-based interface and it’s clear to anyone that Time Machine’s main purpose is to go back in time to recover lost or missing files.

The biggest problem with Time Machine will arise if and when your startup drive becomes unusable for whatever reason. If all you have is your startup disc and your Time Machine backup then you will need to get a new hard drive, and restore your backup onto it. Even if you can run out to the store and be back lickety-split you’ll still be spending several hours waiting on Time Machine to restore its backup to your new drive.
What then if you need to keep working? Well, if you have a recent backup via SuperDuper you can easily re-start your computer using the backup drive and carry on as you were in a matter of minutes. Minutes! And even suppose you were working on files this morning that you need but you backed up with SuperDuper last night? Once you’re re-booted from your backup, you can then access Time Machine and restore the archived files that Time Machine automatically backed up earlier.
On the Shirt Pocket Watch weblog Dave Nanian explains more on how SuperDuper compliments Time Machine:
Our tagline, Heroic System Recovery for Mere Mortals, tries to sum up the whole idea: SuperDuper! is designed to provide excellent failover support for the all-too-common case where things fail in a pretty catastrophic way, such as when a drive fails, or your system becomes unbootable. We do this by quickly and efficiently creating a fully bootable copy of your source drive. Perhaps more importantly, recovery is near immediate, even if the original drive is completely unusable, because you can start up from your backup and continue working. You can even take your backup to a totally different Macintosh, start up from it, and work while your failed Macintosh is in the shop… then, when it comes back all fresh and shiny, restore things and keep working. And even if the other Mac is a different CPU type, you can still open and edit the files on the backup. You cannot do this with Time Machine: Time Machine copies are not bootable until they’re restored. In SuperDuper!, system recovery is done with a minimum of fuss and bother, and with respect for your time. Yes, Time Machine can restore a full system, but that’s not its strength. Doing so requires you to actually start up from the Leopard DVD (which you’ll need to have with you) and then take the time to restore the backup in full, which interrupts your workflow, requires a working, entirely separate destination device, and takes a lot of your time — at the exact moment when you can least afford it.
The Clearly Time Machine has in no way made SuperDuper insignificant or inconsequential. In fact, if I had to choose between the two I’d stick with SuperDuper. Here’s why…
SuperDuper!
Over the past fews months as I have been writing these reviews it wasn’t until I was writing about MarsEdit that I realized each application has something in common: feel and depth.
NetNewsWire, Mint, Transmit, Coda, MarsEdit and now SuperDuper; each one is an applications which feels light and easy to use but has a depth of features and ability. Each of these apps are useful; from the most basic users to the most advanced tech savvy Apple gurus.
I have only ever used SuperDuper for one thing: absolute headache free backups of my system.
Those 7 words are the entire reason I’m writing this article. Each night when I’m done at my computer I quit out of everything and launch SuperDuper. (If I wanted to set a schedule I could, but I prefer to just do it manually – I’m a control freak.)
I double check the Copy from and the to. It looks good, o.k. then, Copy Now. Off to bed, and I know that all the work I did that day is safe.
If I wake up tomorrow to find my start-up disc went kaput I can just boot up from the external drive as if there was no problem and get right to work. Then when I have time I can replace my drive and restore from SuperDuper or Time Machine at my own leisure.
The good news with SuperDuper now being Leopard compatible,1 is that it integrates with Time Machine…
Time Machine and SuperDuper!
There are two ways SuperDuper works with Time Machine: One is the ability to copy your Time Machine backup over to another drive without losing the archived history.
Second is the ability to store a bootable backup via SuperDuper along side the same files on the same drive as Time Machine. This means if you already have an external hard drive with your Time Machine backup, you can put bootable clone on there as well without interrupting anything. Or if you only want to own one backup hard drive you can use it simultaneously as a bootable clone and as the Time Machine archives.
Unfortunately there is currently no documentation on how SuperDuper operates in conjunction with Time Machine other than what’s mentioned in the release notes.
So to make things as clear as I understand them, to create a bootable backup along side Time Machine you have to select your startup volume in the Copy menu, your Time Machine drive in the to menu, “Backup – all files” in the using menu and, most importantly, be sure you choose “Smart Update [Time Machine drive] from [Startup Drive]” in the options tab under the During copy menu.

And even when you do have the correct options set up in SuperDuper and are ready to make your bootable backup onto your Time Machine drive the “What’s going to happen?” text is so poorly written it’s not clear what exactly you’re doing. It even sounds as if you may ruin something:
Pressing “Copy Now” will first repair permissions on Macintosh HD. The Time Machine backups on Time Machine will be preserved. [...] Smart Update will copy and erase what’s needed to make Time Machine identical to your selections from Macintosh HD. The result will mimic “Erase Time Machine, then copy files from Macintosh HD”, but will typically take a fraction of the time.
If not for the second sentence in the first paragraph stating the preservation of the Time Machine backups, it sounds like SuperDuper plans on deleting your whole Time Machine drive to make room for the new backup.
Comparing the “Smart Update…” description to the “Erase then Copy…” description does make the former a little more clear:
Pressing “Copy Now” will first repair permissions on Macintosh HD, and then erase Time Machine. The Time Machine backups on Time Machine will be erased as well. To preserve your Time Machine backups, choose Smart Update.
Despite the copy text not being super duper clear, I have no doubt the process can be trusted.
Sandbox
The “Sandbox” is where SuperDuper shows of some serious backup kung-fu. For those who may not be familiar with what the Sandbox is, it’s easiest to explain with a (simplified) drawing:
A Sandbox is basically an isolated copy of your system files. SuperDuper will create this for you on a local partition of your startup volume or on an external drive. (If you’re using a laptop SuperDuper recommends partitioning your internal HDD to hold the Sandbox because it has to be always accessible as the start up volume.)
SuperDuper creates the Sandbox by copying over all important system files, then setting the Sandbox as the “startup volume”. Now your computer will boot up and use the Sandbox system files instead of your primary system files. The advantage to this is that you can use your computer just like normal with no worries about installing system updates or new applications. The files will install in the Sandbox and not in the primary system folder.
If a system update or application has a major bug it’s no skin off your back. You can just reboot out of the Sandbox and your back to your clean system files then repair the Sandbox. No harm done, rest easy.
The Sandbox feature is a bit too rich for my blood, and I don’t use. But it is a great testimony to the extent and depth of features that SuperDuper offers for what could be considered a simple “copy and paste” backup utility.
Documentation
Shirt Pocket’s documentation notes on SuperDuper are quite clear and exhaustive, with much more info on the additional features. I recommend you look there for more details, although as of now it hasn’t been updated with any Leopard specific information.
More Reviews
This is just one of a handful of winded and entertaining software reviews.
- Am I the only one surprised to not see a 512×512 pixel icon accompany the 2.5 Leopard compatible update? Shirt Pocket is still using SuperDuper!’s original 128×128 icon. Additionally there is no mention of Leopard compatibility features (i.e. Time Machine stuff) in their help files or reference manual. ↵
✚
MarsEdit: Helping the Personal Publishing Revolution
Applications are solutions.
At the very core, the entire point of developing an application is to solve a problem; inasmuch as a program fills a need, it succeeds.
Furthermore, if an application can not only solve a problem, but help the user enjoy the process, it succeeds even more. And often, the most popular applications of all are those which solve problems that didn’t necessarily need to be solved in the first place. These apps provide a solution that is so enjoyable and makes so much sense to the user the app becomes a necessity. And this is where the desktop publisher, MarsEdit, takes off…
Originally, desktop publishers were developed to fix a problem: The ugly, clunky and sluggish integrated editors that were part of blogging applications such as Blogger and Movable Type.
With the advancement that content management apps and their integrated editors have had over the years – along with the advent of high-speed internet (remember when 14.4k was blazing?) – many people don’t see the need for a desktop publisher. The “problem” sorta fixed itself by default.
Desktop Publishers
The most widely assumed purpose of a desktop publisher is so you can “write your blog posts offline.” Well we all know that you don’t need a desktop publisher to write a blog post while you’re on an airplane. (Ironically, I am doing just that right now. Seriously. I’m in seat 12F; next to my wife and a middle aged woman reading some Oprah endorsed romance novel.)
Let me briefly mention here that MarsEdit tackles the “writing offline issue” like nobody has ever tackled it before with a feature called “Perfect Preview”. But I’ll get to that in a bit…
Other advantages of desktop publishers include features like storing login and relevant meta info for multiple weblogs, (and multiple CMS platforms) which gives you the ability to publish to several sites from one spot.
To genuinely grasp the solution a desktop publisher offers, you have to think outside your paradigm of what you think a desktop publisher is. For starters it is much more than word processors with a “send to weblog” button.
You may not have thought about the fact that when you write a post from your CMS’s “Write a Post” browser interface you are typing into a text field. All the tags are black and blend right in with all the text (also black). There are no shortcut keys for custom tags, and you’re subject to the speed of your internet connection and availability of your server. (Have you ever tried posting an update or edit to an article while on Digg’s homepage?)
Not to say that CMS browser interfaces are the world’s biggest nightmare; I have gone back and forth several times…
My first blog started a few years ago with Blogger. That was a clunky publisher to say the least. I later moved to a self-hosted WordPress blog and went in and out between the WordPress interface and another popular desktop publisher, ecto.
Even though ecto was full of features, my user experience never seemed to “settle”, so I went back to using the online WordPress interface. But that wasn’t a long-term solution either, because as I began writing longer posts (specifically interviews which contain quite a bit of markup), WordPress’ lack of editing features and tag coloring became a deal breaker.
I finally landed with MarsEdit as my preferred method for publishing. I think I made a pretty good choice too, because the more I use it the more I feel it’s a Mac app which truly is out of this world. (Get it?)
Daniel Jalkut -
I don’t think anybody doubts that the web (and by extension, the world) is in the midst of a personal-publishing revolution, and most Mac users want to take part in it. I see MarsEdit today as the best-of-class application for achieving that…
MarsEdit
The fact that MarsEdit is still around – let alone in continued development as a fantastic application – is nearly a miracle. It has certainly seen quite a bit of action over the years.
Brent Simmons is the author of MarsEdit. It was originally a feature of the 1.x version NetNewsWire; you could read all your favorite weblogs and publish your own, all from the same application. But the feature (Notepad) eventually split off into its own app.
The name and icon for MarsEdit are actually spawns from another app that never even made it past the drawing board: MarsLiner.
MarsLiner was meant to be the outliner of Brent’s dreams. But alas, the market was too small to justify the time and energy it would take to develop. So instead, Brent took the MarsLiner logo kept the “Mars”, dropped the “Liner”, added the “Edit” and turned it into the stand-alone weblog editing application, MarsEdit.
After its original conception with NNW in 2002, MarsEdit 1.0 was released at the end of 2004. Brent Simmons expounds -
The genesis of MarsEdit was the idea of mitosis, that we could remove NetNewsWire’s weblog editor and create a new, separate weblog editor—and thereby create a better newsreader and a better weblog editor. [...] When we decided to bag MarsLiner and do a separate weblog editor instead, I wanted to use the name “Mars†somehow and use Bryan’s cool icon. Hence the name MarsEdit. We rationalized the name by saying it represents editing at a distance, since you’re not editing local documents, you’re editing documents that live on the web somewhere. But really it was because I like Mars and spaceships and we already had a great Mars icon.
And icon designer, Bryan Bell, was kind enough to show off the stages of the design process:
![]()
Later, NewsGator bought MarsEdit as part of its acquisition of Ranchero Software in 2005, and Gus Mueller got contracted out to work on the 1.1.2 release.
Finally, Daniel Jalkut – who launched Red Sweater Software in 2000 while he was working for Apple as a software engineer until going indie in 2002 – bought MarsEdit on February 22nd, 2007.1
With a talented, and motivated developer, MarsEdit finally graduated to version 2.0 in September 2007. The 2.0 release brought a wave of much needed attention to the app, and highlighted it to a much broader audience; breathing fresh life back into it.
This weekend, Daniel has released the next major update, 2.1, with some great new features and fixes.
Your Very Own Editor
Perhaps one of the finest features of the desktop publisher is that it is also a text editor.
When publishing from your CMS’s online text field you’re using just that: a text field, not a text editor. Thus there’s no tag highlighting, no find & replace, etc… You can get around the text field problem by using a stand-alone text editor to write your posts, copy/paste to the online text field and then publish. But what makes having a desktop publisher for your weblog the better solution is that all the ‘stuff’ involved with writing and publishing is in one dedicated location.
In MarsEdit the default editor window is not quite the ideal layout. Well, at least not for me. It is small and doesn’t display the options I want. Opening the application dozens of time each week and having to adjust the editor window every time sure made for an annoying workflow—thus making my primary turn-off towards MarsEdit the seeming innability to customize the default editor window’s size, layout or features.
Fortunately, after a bit of looking around I found out Daniel actually made it quite a breeze to adjust the default editor’s layout, size and features. I’m just blind sometimes:

So here is how I have customized my editor window:
- I prefer to have the options open at all times. This can be set from the Prefs in the “Editing” tab. Select “Open The Options Pane”.
- With the options pane set, adjust your editing window to the width and length you want, then in the “Window” menu click “Save Default Window Size”.
- I also prefer to name my own slugs for post permalinks. This can easily be done in the “Slug” field, which sits right under the “Title” field. To enable it, click on the “View” menu and check “Slug Field”.

WYSIWYG
Something to note about MarsEdit is the blatant absence of a WYSIWYG editor, which many people might see as a fault.
In all my experience with WYSIWYG editors I have found them a clumsy enemy of fine web typography. Typing a weblog post in a WYSIWYG editor is a bit like laying out a book in Microsoft Word.
MarsEdit’s long-time competition, ecto, offers both a HTML editor and a WYSIWYG editor. Unfortunately, when writing in ecto, you cannot switch between the two editor windows without shooting you markup in the foot. If you begin in ecto’s HTML editor and switch to the WYSIWYG, ecto turns all your hand-coded CSS-friendly tags into HTML spans, which is, to say the least, highly annoying and extremely counter-productive.
If you have spent any time at all tweaking your site’s style sheet, and if you have any pride in your weblog’s type then using a WYSIWYG editor is most likely a crutch, not a tool.
I suspect most of you are at least a bit HTML savvy and prefer the use of monospace type and a HTML editor anyway. But for those who are getting weak in the knees at the thought of having to type your own HTML relax. MarsEdit has combined many of the WYSIWYG concepts and implemented them into the HTML editor making it all very easy to use.
For example, CMD+B will place <strong>strong</strong>
tags around your text; CMD+I places <em>em</em> tags, etc.
Not only can you customize any of your own shortcut keys for markup – such as setting CMD+SHIFT+A as a link tag – MarsEdit 2.1 now offers markup right in the contextual menu.
Just control-click on a highlighted passage of text or a single word and choose your desired markup…

The Feel Factor
The absence of the WYSIWYG editor fits perfectly into context with the overall feel of MarsEdit.
Making an application which at first glance feels thin is always a risk to developers. Folks may try out your program for a day or two, and when they don’t instantly see the exact features they want they assume your app is only half-full, so they leave it untouched and un-registered in their Applications folder to collect little bits of binary dust particles.
But if a developer can successfully create an application that feels light, though in truth is quite capable and feature-rich, they will succeed in the long run.
The more I use MarsEdit, the more I discover it functions exactly how it was intended to. It does not take much time to familiarize yourself with the application and customize it to work precisely how you want it to: with all the features sitting just below the surface, out of the way and ready to be utilized.
This is precisely the way a good weblog editing application should work.
An app like this must have the ability to offer all you want and need to publish your weblog according to the way you have it set-up. It must work seamlessly with over a dozen popular content management systems, and offer an interface for each one in a clean, simple fashion so as not to get in your way, slow you down or distract you while you’re writing. And this is where MarsEdit excels.
This feel of MarsEdit has been there from the very beginning. Even in the initial development and design phases, Brent had it as a part of his vision for the app: “The phrase “maximum elegance†was just a personal reminder to myself to simplify as much as possible. With something as complicated as weblog editing, you have to be relentless about simplification, or it will get away from you.”
I am extremely impressed by how intuitive MarsEdit is and how well it serves the writer.
Perfect Preview
Hands down one of the finest features of MarsEdit is the Preview.
MarsEdit takes your post content and puts it into a preview template so you can read sans-markup. Cool, but not cutting edge.
What does make it so amazing is the ability to edit your preview template which allows you to read your article just as it would appear on your site after being published. You can set the Preview window right next to the editor window to watch changes and updates as you type them.
Daniel wrote a very succinct how-to on the Red Sweater Blog. Additionally you can find directions in MarsEdit’s help menu.
However, to step your “Perfect Preview” up an extra notch you may want to try tweaking the preview template to use localized files instead of your server-based, hosted files.
By doing this, not only will your preview window load and refresh faster, you will be able to write offline and still have the “live” preview of what your post will look on your own website.
If you are online – as you no doubt usually will be – you can preview remote files (such as uploaded images which are part of your post) and the localized files, which makes this desktop publisher all the more enticing.
Tweaking the preview template to become localized is extremely easy if you are even the least bit code savvy.
- Start by following MarsEdit’s instructions for editing the Preview Template. They can be found in the help menu.
- Once your initial Preview template is set up and working, download your weblog’s theme folder, or at least the style sheet.2
- Download each of the images in use on your ‘single post’ page. Place all these files into the same folder as your CSS file, and place the folder somewhere out of the way for safe, long-term keeping.
- If your Masthead image is a CSS background you’ll need to download that image and go in and adjust the the CSS code to point to the local file instead of the remote one.
- Now go into the local folder and control click the CSS file you just downloaded and open it in Safari. Copy all the text in the address field. This is the local address of your CSS file. It will look something like, file:///Users/……../style.css
- Return to the MarsEdit Preview Template, and find the line of code referencing your CSS file. Replace the current
hrefaddress with the local address you just copied. - Scroll through the rest of the template and find the code for each of the images you downloaded. In the
srctags, replace whatever the online address was with the new local address.
Something to keep in mind now that your preview template has been localized is that changes you make to your website won’t be reflected in MarsEdit’s preview window. You’ll have to make the changes your local files separately if you want everything to match.
Media Manager
If you’ve used WordPress’ built-in uploader you know that anything can be better than that. My previous workflow would be to upload any images via Transmit and then code the img tags by hand.
MarsEdit has the ability to upload images to your weblog for you. You can drag an image right into the editor – dropping it in the location you want it to appear in your post. The Media Manager will then pop up, giving you a few options and a button to “Upload & Insert”. MarsEdit then generates all the code for you right where you wanted it.
There is one major drawback which I’ve found regarding the file uploader: There is no way to adjust the auto-generated code. I have custom image classes set in my style sheet that I want to use instead of MarsEdit’s default markup styles. Since I can’t make my own I have to ‘fix’ the code for images I upload through MarsEdit.3
Something you may not know is that the Media Manager auto detects what folder to upload files to. It would be nice to have the option hard code your own custom folder, but that requires MarsEdit to have FTP support which it currently doesn’t.
Right now it simply auto detects what folder to upload to by talking to your CMS. Fortunately, most CMSs allow you to customize the folder yourself. Since I prefer to send any images to my site’s /images/ folder as opposed to the standard /wp-content/uploads/ folder, I went to my WordPress admin panel, clicked on Options, Miscellaneous, and then changed the default uploads folder.
The Little Things…
Post Status
Something new in 2.1 is that you can now adjust the post status of your post.
This gives you the ability to send your post to your weblog as a Draft instead of a Published article. Assuming your CMS handles drafts, and assuming your CMS knows how to communicate draft status. WordPress and Movable Type suck at this right now, but Daniel created a little built-in hack for us:
…add a category “MarsDraft†to any of your posts, and when MarsEdit sees the category, it will automatically assume that the post is to be treated as a draft. So to make sure you don’t accidentally publish something early, just add the magic category, and remember to turn it off when you change the status to Published.
Anyway, the Post Status drop-down menu sits in the bottom of the options pane along with the Text Filter, Comments and TrackBacks options:

I would love to see local draft syncing between multiple Macs. But since that feature is still MIA at the moment one of the cool advantage of the new “Post as Draft” feature is the ability to have (jimmy-rigged) synced drafts between versions of MarsEdit on multiple computers.
Unfortunately this is certainly not the ideal way to sync drafts. When you post the article it goes from your local drafts folder into the main weblog article list. As it sits there, it will eventually get pushed down the list until it disappears if you post too many real articles before publishing the draft. One way to work around this by setting the time-stamp to a date far in the future.
Another problem with remote drafts is that if you open one, edit it and save it (not re-send it), the edited version of your post becomes a local second copy. You have to send the local draft to your weblog to send the edits and get back down to one copy of your post. This is all very confusing and I see lots of potential for accidentally publishing the wrong version of a post or even deleting the right version.
If you use Daniel’s category workaround and my time-stamp workaround, if you want to take a draft and publish it you have to open it, re-adjust the time-stamp, uncheck the MarsDraft category, change the Post Status to “Published” and then send it to your weblog again as a bona fide post. Not exactly the best solution. Ah well.
To recap, I see three options for draft syncing: (a) Create your own workflow based on the workarounds; (b) don’t try to sync your drafts; or (c) wait for true local draft syncing via .Mac/FTP or something else. (Will us dual-computer folks ever get a break?)
The good news is, if you’re not worried about syncing to multiple Macs the draft feature as a draft feature works just fine.
Scriptable
MarsEdit is scriptable. Which means that in addition to having several, intelligent scripts built-in, you can also add your own.

The Text Statistics script may be my favorite, simply because I’m a nerd for stats and info. Though the text counter always seems to be generous; according to MarsEdit, this article weighs in at 4,160 words.
Safari Bookmarklet
MarsEdit has a built in bookmarklet which can be used to generate a brand new post from any webpage. To set it up choose Install Bookmarklet from the MarsEdit menu.
Now if you find a sweet article in Safari, and you want to write about that article on your own weblog, just highlight the text you want to use in your post and then click your new fandangled bookmarklet. MarsEdit will open – if it’s not already – and generate a new post for you.
The webpage’s title will be your new post-title, and the text you had highlighted will show up in the body along with a link back to the article. But that’s just the start…
From the prefs window click the “Attribution” tab to go nuts customizing the markup and the layout you want to be used when you generate a new post with the Safari bookmarklet.
My customized syntax looks like this:
<a href="#url#">#title#</a> -
<blockquote>#body#</blockquote>

What the above code does is put the name of the article as a link back to the web address I’m quoting, and then any selected text into block quotes from there. I usually tweak this a bit but it’s a great starting place for all of my asides and link-posts.
Command, Shift, D
Perhaps the feature that stands out to me the most is the shortcut key-command to publish your post: CMD+SHIFT+D.
It is the same shortcut used in Apple Mail to send an email. It’s a smart feature, and although it’s small it makes the app instantly more coherent and familiar to the Mac user.
Here is a free tip: When I customized my toolbar I took the “Send to Weblog” button right out. I found it is almost as easy to accidentally click the send button instead of save as it is to press command, shift, D when you’re actually ready to publish.
More Reviews
This is just one of a handful of winded and entertaining software reviews.
- There was a great Q&A done by NewsGator with Brent Simmons and Daniel Jalkut, but the origial page has gone missing from NewsGator’s site. Fortunately you can still find it on the Wayback Machine, and if that happens to go gone, I also saved a screenshot of the Q&A webpage here. ↵
- If you’re not sure where your site’s CSS file is, simply open up your homepage and view your source. Look for a line of code that reads something like this:
<link rel="stylesheet" type="text/css" media="screen" href="...style.css" />Copy the href location and paste it into your browser’s address bar, hit return and you should see your style sheet. Save it to your hard drive, and put into a new folder.↵ - Daniel has told me this is high on his list of feature additions.↵
✚
Coda: The One-Window Wonder
Coda is a text-editing, CSS-styling, WebKit previewing, file-managing, FTPing, terminal-accessing, web-site-building and publishing application for the Macintosh.
And, Coda has no duct tape.
All Inclusive Applications
If you are going to write an application that has and does “everything” there are a few key dynamics you have to keep in mind.
First of all you need to make it easy, simple and clear for the user to do all their work in your “one window”. This is where usability and interface make or break the application. And, fortunately for Coda, this is where Panic excels in, and Coda does a superb job as a “one-window application”.
Before Coda I always had at least three windows open at any given time when doing web-design: Transmit, TextWrangler and Safari. And I know that for those who are more web-design and development savvy people than I, only three apps open would be like a vacation.
For the past several weeks as I’ve been writing this article I have used nothing but Coda for web designing, and it has broken my age-old habits of CMD+TABbing between multiple apps.
Using Coda’s one-window interface has been especially wonderful when I am away from my home office and thus coding on my 12″ PowerBook’s 1024×768 screen resolution. But even on my 23″ display at home, I prefer to have Coda’s window sized to about 85% of my screen and make use of the Text Editor and the Preview panes rather than have two apps running side-by-side at 45% screen-realestate each.
Another reason Coda has helped break my habit of multiple-app web designing is the way it saves your previous work session, but more on that later.
Coda’s use of tabbed windows plays a critical part in its claim to fame as a one-window tool. Nowadays tabs come standard with good apps. Therefore, just having tabs is not enough. You have to have tabs that are above the norm of other applications and which meet the user’s expectations. Especially when it’s the tabs which are part of the foundation of your “one-window” application.
There seem to be three major ingredients which make up a good tabbed-window interface. First is design. One of the reasons I have never used NetNewsWire’s built in browser is the slighly odd look and feel of the tabs. They just feel clunky to me. Coda’s tabs are clean, subtle and easily identifiable. They are intelligently placed, and don’t go weird places when you have 20 of them open. (Though if you have 20 tabs open, you probably have bigger things to worry about than tab placement.)
The second ingredient is navigation. If you’re working in tabs you must be able to get from one to the other quickly and easily. Coda’s tabs work identical to virtually all other tabbed interface apps in that you can hot-key between them with the standard CMD+SHIFT+[ or CMD+SHIFT+] keys.
Finally, and most important, is user-interface. This seems like a moot issue, but there are still many apps that don’t utilize it. Coda does utilize it, and utilizes it well.
The most important user-interface aspect of tabbed-windows is the ability to re-order the tabs. A simple click and drag does the trick just perfectly. Moreover, Coda has more than just hot-key commands for new tabs. There is a “plus” symbol just under the toolbar, to the right of the file browser that you can click on to create new tabs. And to the far right is the “split window” symbol. A click on that and your current window gets split vertically or horizontally.
So at the end of the day, Coda’s claim to be a one-window app is valid. Coda is a great one-window application.
But there’s more to it than that…
The second challenge for a do-it-all application is to avoid overwhelming the user with too many options; i.e. “bloating” your app.
Coda is most certainly not bloated. If anything it could be argued the opposite – that Coda’s features are too skimpy.
However, put yourself in the developer’s shoes for moment. You’re going to take a Text Editor, CSS Editor, FTP client and a Terminal app. Then bundle them together, add a WebKit based prievewer and debugger, and offer some good documentation of PHP, CSS, Javascript and HTML. And finally: sell it for less than the cost of just a good text editor.
Panic didn’t set out to make the best text editor, CSS editor, etc… They set out to make one single application that contains all you need to build a website. And Panic has done a great job at keeping each of Coda’s components concise, powerful and focused – giving you the features you need while not requiring you to learn 4 or 5 new applications simultaneously to be able to use Coda efficiently. Sometimes good development decisions are about what you don’t put in.
An Aside Regarding Dreamweaver
When talking about one-window website development applications it’s hard not to mention Adobe Dreamweaver. And though Coda may easily be compared to the features Dreamweaver offers, Coda is much less bloated, much more snappy and infinitely more Macintosh-like.
In his Coda review for MacUser, Nik Rawlinson says,
“[Coda] could teach Adobe a thing or two, as it puts Dreamweaver’s multi-paged dialog to shame, and beats its sidebar-based CSS designer hands down. [...] If you’re…ready to step up from Dreamweaver’s built-in code-based environment, Coda is an excellent choice.”
Coda was developed for people who work at the raw code level to build their websites. In contrast to Dreamweaver there are no pre-fabbed templates or WYSIWYG editors in Coda. Anyone who uses Dreamweaver would do well to look at Coda. Especially those in the market to buy, since Coda’s price tag is 5 times less than Dreamweaver CS3′s.
Starting With 1.0
On Monday, April 23rd, 2007 – exactly 10 years and a day after Panic was born – Coda 1.0 was launched, and it received quite a bit of buzz all about the internets.
- Cabel Sasser –
This was by far the most complicated program we’ve ever built. I realized this when it dawned on me that I had never stopped doing design work for it. With most of our prior applications, I may spend a month or two creating a all-purpose Photoshop layout, cut up any important art, and then hand it over to the guys, possibly coming back to make a tweak every now and then. With Coda, the number of features and the scope of the project meant that even as soon as yesterday I was cranking out some interface pieces as .pdf’s
- John Gruber -
One way to judge the scope of an app is to think about how much time you’re intended to spend using it. There’s plenty of room for apps you use here and there for a few minutes at a time, or which you launch just once or twice a week. There’s hardly any room at all, though, for apps you work in for hours at a time, every day. By this measure, Coda, the new app from Panic, is an epic.
- MacUpdate’s Review Forum is full of ravings –
Wow. Do the folks at Panic ever make a mistake. Everything in Coda is amazing, it’s so intuitive it’s scary. Auto completion works great, the sites page is amazing, inline ftp, preview, all of it amazing. One thing I did notice, doesn’t seem to like flash, but hardly a dealbreaker. Bought and paid for this morning about an hour after release.
Moreover, April 23rd was also the submission deadline for the 2007 Apple Design Awards. And, waddayaknow but a few months later at the WWDC07, Coda won the award for Best Mac OS X User Experience -
Coda is a unique web development environment that offers a complete file browser (both locally and remotely), publishing, full-featured text editor, WebKit-based preview, CSS editor with visual tools, full-featured terminal, built-in reference material, and much more. Coda is the Mac’s first one-window Web development application that integrates numerous modules into one cohesive user experience. Coda is a great Mac OS X citizen…
User experience has always been one of Panic’s fortés, and Coda is no exception. It truly is a beautiful, powerful, intelligently designed, all-in-one website building tool.
However, it’s important to note that there is something interesting I have seen in many of the reviews I’ve read about Coda. There seems to be this relatively universal love/hate relationship with the people who use it.
Even in my own experience with Coda it just doesn’t quite cross over from, “Wow! This is smart, incredible and beautiful!” to, “How will I ever live without this?”.
…it’s like buying your dream car, only to find out that the seats are kind of uncomfortable and there’s no heater. Coda comes so close to being great that its shortcomings are especially annoying. Having tried this way of working, I’m loath to return to having four applications open all the time – and yet I keep running into issues that irritate me almost enough to give it up.
Yet, let’s not forget Coda is still only a 1.x product, it is extremely affordable for the features it offers and Panic has a fantastic reputation for producing outstanding software for the Mac.
Coda’s components are all masterfully crafted and seamlessly integrated. It has all you need to code, debug, validate, stare at, drool over and then publish your website.
Steven Frank says that when the beta-testers were asked what their favorite feature was they all replied: “The integration. The way it all fits together. How everything’s somehow right where you need it when you need it.“
“Sites”
When you launch Coda this is where you start. Coda uses “Sites” the same way Transmit uses “Favorites”, and when opening Coda for the first time you are given the option to import some or all of your Transmit favorites if you like. You can also import them later.
Each “Site” is basically a collection of info and details about a website you’re working on or maintaining. Your “Sites” are represented by taped-up pieces of paper with a picture of your home-page drawn on the front:

Coda gets the icon images by taking a screenshot of your site’s homepage / root URL, which you can designate in the site’s info pane.
Having the visual icons to represent your sites is a nice touch, but a problem may arise if you have more than one saved site for the same root URL. Such as shawnblanc.net and shawnblanc.net/images. Both of those icons would display the same image on the taped up piece of paper. However, I don’t have my /images/ folder saved as a site, so it’s not a problem for me. And I think it’s clear that Coda wasn’t intended to replace your dedicated FTP client, so I doubt it will be a problem for many others.
But if you do encounter that problem the good news is you can choose custom images for each “Site”. To put your own image onto the taped-up paper, simply control-click on the site and “Change Image” to browse your finder for the image of your choice.
When you double-click on a “Site” the page flips around and expands into the full width of Coda’s window, revealing your previous workspace layout. Files, tabs, splits, everything is just the way you last left it and it is all ready to go. (Unless you left it in a mess. Try not to do that.)
The restored work session is one of my favorite features in Coda. It seems that most of the time I am opening up the same files for a site over and over. I can’t describe how wonderful it is to simply open up a “site” and have my previous session restored right the way I left it.
In terms of historical user interface traditions and conventions, Unix and the Mac could hardly be more different, but there is one similar philosophy shared by both cultures — a preference for using a collection of smaller, dedicated tools that work well together rather than using monolithic do-it-all apps. Coda seemingly swims in the face of this tradition, in that it ostensibly replaces a slew of dedicated apps. Coda’s premise, though, isn’t so much that it is one app that obviates several others, but rather that web development can and should be treated, conceptually, as a single task. That you don’t think, I need to download, edit, save, upload, and preview a change to the web site; you think, I need to make a change to the web site.
There is something else that has stuck out to me in my use of Coda, which I don’t quite know where to talk about, so I’ll bring it up here: When using Transmit I always disconnect before quitting. I press CMD+D to disconnect and then CMD+Q to quit out. But the same key combo doesn’t disconnect you from your site in Coda. (Pressing CMD+D or CMD+SHIFT+D moves you to the next or previous symbols within a text document.)
If you want to disconnect from your “Site” before quitting not only are there no hot-keys to do so, you have to click the circle-encompassed “x” next to the name of your site up in the top left corner of the application.

And as many of you “don’t use the mouse if you don’t have to” / “I love Quicksilver” nerds will agree: clicking the disconnect button is too much. Therefore, since I can’t disconnect with a hot-key I find myself just quitting out, and it feels a bit like I’m unplugging my computer without powering it down first.
The Text Editor
For most users the text editor will be one of the two most-used features in Coda. (The other obviously being the Transmit turbo-engine-powered file manager / FTP client.)
Coda’s text editor is not a blow-your-brains-out-the-back-of-your-head kind of text editor. It wasn’t meant to be.
Coda’s text editor is its own licensed version of SubEthaEdit, which is one of few text editors which prides itself in being “a high-performance, sleek editor”; i.e. minimalism. To say the least, Coda’s text editor is powerful, clean and smart. It even comes with its own font, “Panic Sans”.
When it comes to text editors there are those who live and breath inside theirs, and everything else is just details. These people know every feature, every bug, every nook and every cranny of their editor and they use it for virtually everything. And these people just may pull their hair out when they try using Coda and discover it doesn’t have the ability to search within all the files on a site -

What Coda majors on is taking the most important features and implementing them in an intuitive, no-nonsense way.
For instance the bracket highlight feature: When your cursor passes through the beginning or end bracket a little blue beacon pops out at the other bracket, letting you know where the current symbol begins or ends. Simple, smart features like this are peppered all throughout Coda.
And not only are Coda’s little features smart, their interface is beautiful.

Compare Coda’s auto-complete pop-up list above to Dreamweaver’s below:

Not only is Dreamweaver’s box clunky and sports a drop shadow straight from 1997, but it brings up the entire code listing with empty brackets next to each tag. There is way too much going on. Notice how Coda only shows the tags that begin with ‘f’?
CSS Editor
CSS editors are becoming more and more popular. And for good reason. If I could remember everything I would much prefer to write my CSS from scratch by hand. But editing and writing CSS that way requires a bit more jujitsu than I have.
Coda’s CSS editor, much like its text editor, is simple and straight forward. You don’t have to examine it for an hour before you can figure out what you’re doing with it and how to work it.
If you already have a style sheet you’re working with you can open it in the CSS editor. It will display all the style elements on the left column with the built-in editor on the right-hand side. Click on an element to edit its type, margins, padding, color, border, etc… All the CSS properties are available for you to use and master.
You can build a style-sheet from the ground up as well; creating each element as you go. Or if you prefer, use the text editor to hand write all the elements you will be using then use the CSS editor to set the styles of those elements.
With Coda there’s no reason you shouldn’t have a fully-functionable and beautiful style sheet.
In addition to tabbed windows, Coda also allows you to split a window vertically or horizontally, and I’ve found that splitting the window vertically is extremely useful when working on a style sheet. I can then see and edit my CSS file’s text by using the text editor on the right, and then on the left split I put the dedicated CSS editor with a list of all my symbols and the visual style-selector; giving me the best of both worlds in one window.
“Preview”
Coda has its own internal browser so you can view the changes you make to your website right within the app.
It is a WebKit based browser, so your site will look virtually identical in Coda as it does in Safari. But nobody does browser testing in only Safari. To preview the same page in other browsers you simply click the icon to the right of the Coda’s Address Bar and highlight the browser you want to launch.

DOM Hierarchy Inspector
While in a Preview window you can activate Coda’s Document Object Model Hierarchy Inspector by clicking the magnifying glass icon at the bottom of the screen when in Preview mode. You may then scroll over the various modules in your webpage to see them highlighted in blue with their logical structure outlined below.

Not only is the DOM hierarchy inspector fun to play with as you watch blue boxes pop up here and there while you fling your mouse all over the place, but it is also a great way to get a visual grasp on how your code actually plays itself out, and is especially helpful for debugging and finding goofy errors with Javascript and HTML.
FTP Client and File Manager
Coda has Panic’s new “Transmit Turbo Engine”. (Get it?) For basic file transfers Coda actually claims to be quicker. It’s not a dedicated FTP client, but is certainly does the job it needs to do. The file-browser/Transmit combo works so seamlessly you may forget you’re working on a remote server.
When you click on a file either remote or local, that file opens up in a new tab. You can then tinker away to your heart’s content. If you are working on a file from your server, when you save will automatically upload the updated file.
When working on local files you can keep them local or choose to upload them to the current folder you have open on your server. Control-clicking gives you the option to upload, or to “Mark For Uploading”. When a file has been marked for uploading, Coda puts an up-arrow to the right of the file. Clicking that arrow uploads the file to the current folder you have open on your server.
When working on several files that will incorporate interlinked changes across your whole site, it is usually preferable to upload them all at once. Marking them for uploading helps keep them organized for you. Then you can close out the file, but keep it marked and when you’re done, upload all of them together.
The integration of the file manager and the FTP client is so seamless it is easy to take it for granted. The file manager is out of the way, but ready and available when you need to use it. And that, my friends, is the mark of a well-designed feature.
The Terminal
This is where I confess I am not that hard-core of a nerd. I am not a Terminal junkie, and in-fact, have not once used Coda’s built in terminal. Though if I needed to, Coda has made it as easy as possible by taking my “Site” information and using it to log me in via SSH.
Reference Books
Coda includes two books: A PHP reference guide and the “Web Programmer’s Desk Reference: HTML, CSS and JavaScript“, by Lázaro Issi Cohen and Joseph Issi Cohen -
The Web Programmer’s Desk Reference is the only book to serve as a single point of reference for all three primary web programming languages. Each listing includes the latest syntax and functionality, compatibility with other elements, and cross-browser compatibility issues.
The content in these books is comprehensive, easy to understand and very well laid out.
The biggest complaint is that the books are only available when you’re connected to the internet. Their content is hosted by Panic. This certainly defeats much of the purpose of having built-in reference guide. If I can only access it when I am online I could just as easily use Google to find what I need help with.
I would love to see these books saved locally to make them accessible when the internet is not.
The Little Things
It’s the little things in Coda that you may or may not notice that make it worth owning and using. The way a “Site” fades away if you delete it, or the way each of the primary six components in Coda have a numbered hot-key.
In fact, the little things in Coda matter so much it’s why Brent Simmons recently purchased a copy -
I used [Coda] to update NetNewsWire’s Help book for the latest release, and I liked the flow of it. I liked the easy flip between edit and preview modes. I liked having the list of files on the left. I liked the tabs. I liked the keyboard command for closing a tag. Etc. But, most importantly, I liked the overall feeling of the program, and the sense that it would take care of me — that is, I felt like it probably had features I didn’t know I needed, and anything missing would probably be added in the future (things like multi-file find/replace). Part of this is just judging the app, and part comes from considering Panic’s track record.
Here are a few of the little things that stand out to me:
Symbols Quick Navigator
Clicking the brackets at the bottom toolbar underneath the file-manager brings up the Symbols Quick Navigator. It is a funky little table of contents for all the style-sheet symbols in your current open window.

The 3-Pixel Conundrum
If you’re a fan of the new look for selected icons in Leopard’s toolbars you have Cabel and Panic to thank for it. Cabel was un-satisfied with the default selection state in Apple’s toolbar. To make a long story short, Panic’s development team coded their own toolbar to make up for the trouble Apple’s toolbar gave them when trying to get the look they wanted. But someone at Apple noticed and the design became Leopard’s default. (Read the whole story, here.)
Clips
Michael from WordPress Candy points out how helpful Coda’s “Clips” feature is for doing WordPress theme development.
You can save any text you want as a “Clip”. This is extremely helpful for keeping common tags available at all times. And Clips has a Global database as well as a site-specific database. If you are working on a WordPress based site you can save your WordPress tags for that site, and if you are also working on a Textpattern site your tags for that are saved when that site is open.
Double clicking a specific clip paste that text starting at the cursor’s current location. Or you can click and drag a clip to any location in your file.
To open up the Clips use the hot-key CTRL+CMD+C, or navigate to “Window” then select “Clips”.
Miscellaneous
- If you move the location of your local root directory, Coda keeps track of where it goes. Even if it goes to the Trash.
- A dot to the right of the file name inside the file manager, or in the file’s tab tells you the file has had changes since the last save.

- The way the toolbar stays fluid with the file manager’s width. It’s hard to explain, but adjust the width of the file-manager window and watch what happens up by the toolbar. The icons stay fixed above the window, the site name stays centered above the file-manager.
More Reviews
This is just one of a handful of winded and entertaining software reviews.
✚
Briefly on Flow and its Icon
The upcoming contender to Transmit is Flow. I’ve seen the videos and it looks impressive. Mostly though, it seems to be just another interface for the same functions Transmit offers.
One small thing that stands out to me from the demos is the copy to URL function. Say you upload a jpg to your images folder. You can then copy the URL from inside the ftp client, and paste it wherever you like. You can even set Flow to auto-copy to your clipboard for you.
The one thing about Flow that gets me though is the icon. Cameron pointed out Sebastian’s own post about how he designed it.
If the Dock was a voliére (a birdhouse, in good English), the Flow icon would be a paradise bird.
I’m not sure if I’m a fan of the icon or not, but reading Sebastian’s post was fascinating to say the least. It’s obvious Sebastian did a great job concepting and developing the icon.
P.S. Anyone know how I can get in on the beta testing for Flow?
✚
Transmit
Ever since the Pony Express, people have loved special deliveries.
You know what I’m talking about. The brown UPS truck drives down the street and you think to yourself, “Is that the book I ordered off Amazon, the RAM from NewEgg, or the authentic Star Trek Tricorder I won on eBay?” Regardless of what random item is coming today, you’re excited…
Transmit works that same spot in your brain that loves to send and receive. But instead of brown trucks and cardboard boxes with tracking numbers, you’re working with the files and servers and FTP on the internets.
Transmit is the FTP client for Mac users.
And anyone that uses a Mac knows I mean more than, “Transmit is an FTP client for the Mac platform”. Mac users have a high standard for their software. It has to do more than just work; Mac applications have to possess style, class and be enjoyable to use, and work like a charm.
Introduction
To truly appreciate Transmit, it helps to have at least a basic introduction to the dynamic duo that is the Mac software company, Panic, Inc..
Steven Frank and Cabel Sasser co-founded Panic about 11 years ago. Their original essays regarding the launch can be read in full here, with my hand-selected excerpts below:
Steven said:
Another thing that seems to have disappeared is the cool software company. Is there a Beagle Bros. of the 90′s? Most seem really straight-laced and are obsessed with “biz”. There are a few with a sense of humor, of course, but they are seldom seen and often overlooked in favor of the “serious” companies. With the software industry being so huge now, compared to the days of the II+, is it possible for a software company to be as personal as Beagle Bros.? Is it still possible to build a software company that will capture the imagination of the next generation of computer users? I don’t know. But I’d really like to find out.
And Cabel said:
I realize that I have to own and believe in my computer. My computer should give me something to fight for. My computer has to have a culture. [...] we’ll always be Macintosh first, and Macintosh at heart. The users are consistently more supportive, intelligent, less likely to use ALL CAPS in beta reports, and excited about products. The Mac, truly, rules. Any developer that says otherwise has forgotten what it means to love computers.
Panic, Inc. is a trend-setting, software development Dojo. Transmit was the first application I bought and is no less than fantastic.
Transmit Started Sans-M
Cabel and Steven released the first version of Transmit in 1998. It was for OS 9 and was actually called Transit. No “m”.
From the original user’s guide Panic tells us that “Transit was designed from the start to be clean, beautiful, and powerful all at once, just like the MacOS is.”


Later, in version 1.2, Panic added the “m”. (If you read the definitions of transit versus transmit, transit seems to make a bit more sense for an FTP client. I’m guessing they changed the name because they didn’t want their application ending in zit. UPDATE: Scratch the zit theory.)
In 2002, Transmit 2 for OS X came out, and now, over 10 years since its original launch, Transmit is at version 3.6.3. It’s universal binary, Leopard friendly and hailed as the best FTP client for Mac. (“It’s name is not Fetch.”) Among its recognitions Transmit has won an Eddy Award, MacWorld Best of Show, and an Apple Design Award.

Transferring Files
Let’s start at the basics for a second. Such as acronym definition. FTP stands for File Transfer Protocol. Which is basically the way you take files from your computer and put them onto your website, and the other way around. You can put PHP, HTML, MP3, MOV and more. Anything you want, anywhere you want.
For the light-weight users Transmit is a great pick because of its reliability, quick transfers and its dashboard widget. I know many people who use free FTP clients, such as CyberDuck, and have had their fair share of headaches. Like poor Cameron, I too used CyberDuck for a while, but it crashed on a semi-regular basis, and just felt buggy and unreliable.
There is always a free “works just like the for-pay version” of virtually every application out there. But there is a reason the for-pay apps are for-pay. Transmit cost thirty bones. You just install it and go. Making peace of mind and reliability worth their weight in gold.
For the power user, Transmit has all the features you could ever use, making it like the huge dude in the gym that makes everyone else look like 7th graders.
What sets Transmit apart, is that it works great for everyone: the single-blog publisher, to the large-scale website developer. Transmit’s interface and usability is clean, easy to understand and works without fail, time after time. And that’s just the beginning. Transmit is packed to the brim with features you never knew you needed.
Like Panic.com says, “If you manage a web site, need to send a file to a friend running an FTP server, need to post eBay images to a image host, or download a lot of software updates, then Transmit is the perfect program for you: it makes FTP easy and fun”
The basic interface of Transmit is perfectly blunt. You’ve got “Your Stuff” on the left and “Their Stuff” on the right.

Your Stuff is what’s on your computer, and Their Stuff is what’s on the server. I like the idea, but I do think it could be named better. Just because a file is on another server doesn’t mean it’s “theirs”. I would prefer to see these named as “Here” and “There”, or “Local” and “Over Yonder”.
A drag and drop from either location, to either location begins the transfer. But you are not restricted to dragging and dropping from within the application. With an open connection, Transmit still acts just like a Finder window. You can take a file on your desktop, drag it and drop it over the “Their Stuff” window to begin an upload and vice-a-versa… It’s file transfering made obvious.
And more than just obvious – Transmit is powerful. It works with practically any server that uses FTP, SFTP, FTP TLS/SSL, WebDAV, or secure WebDAV. And, it works with your iDisk or Amazon S3 file hosting.
Connections
The one thing I surely use the most is Favorites. I have 14 server locations saved. I use about 3 or 4 of them every day, another 3 or 4 every month or so, and the rest on occasion.
(One thing that would make favorites better would be the ability to add notes. For instance, I have a handful of printers’ login information saved but it would be great if I could have a few notes attached to that info that reminded me who to contact after an upload, and other relevant information. I have that info on my computer somewhere else, but it would be nice to have it all in one spot.)
Working in-line with your Favorites is the Drag-n-Droplets the Widget, and (of course) Quicksilver integration.
To create a Droplet, navigate to an ftp destination, then CTRL+CLICK and select “Save Droplet for Folder…”

A dialog box shows up to save the droplet. You can assign the name, save point of the droplet and choose to save the login password as part of the droplet or to prompt for it.
Once you’ve created your new Drag-n-Droplet, just do like you would think: drag and drop a file. Transmit automatically launches, uploads the file, disconnects and quits.
The Widget is the same idea, but on your Dashboard.

And with Quicksilver’s Transmit plugin you’ve got QS integration as well. Simply get the file you want to upload in Quicksilver, tab over, invoke Transmit, then use the arrow keys to choose the Favorite you want to upload to.
From inside Transmit, another great feature is tabbed connections. You can simultaneously upload/download to and from multiple servers and folders. Even cross-transfer files from server to server. This is great for working on other files while a big upload is raging in the background of a different server.
Data Worry-Warts – Worry Not
Ever since its conception, Transmit has been more than just an application for moving files from one place to another. Additionally, it is an invaluable tool for those who use online file storage and syncing.
From the Version 1.0, user’s guide:
If you maintain a web site, prepare a software mirror, or otherwise frequently maintain remote files, you’ve probably need to synchronize — match or mirror remote files to local files on your hard-drive. But chances are, you either did it painfully by hand, (the “eenie-meenie-minie-moe” system), shouted across the room to co-workers to figure out which files to upload (the “heyPhilwhatsthelatestheaderpic” system), or tried to hand-synchronize files and lost some really important files during the process (we can’t print the name of this one). By using Transit’s built-in synchronization system, you can easily keep remote and local files up-to-date with little effort.
This is great for backing up important data, or syncing entire file folders.
The Little (and not-so-little) Things
- File Editing: Turn to the person sitting next to you, and say “brilliant”. Transmit allows you to edit remote files locally – text files, images, whatever. Control+Click on a file and choose what program you want to edit it with. Transmit then downloads the file into a cache and opens it in your chosen application. When you save it, Transmit automatically uploads the saved version. Gone are the days of downloading a file, finding it, opening it, editing it, saving it and uploading it… Good luck breaking that old habit.
- Transfer Status Notification: When a file or batch of files are being uploaded or downloaded a little status notifier shows up over the dock icon.
A blue up-arrow for uploading, a blue down-arrow for downloading and a green checkmark for completed.
These circle icons also show up in the CMD+TAB application list, and coincide with Growl notification. All of which are extremely helpful for knowing the status of a transfer. I am often uploading large files, and will work on something else while waiting to send an “upload complete” email. - .Mac Favorites Syncing: Yet one more thing that can stay in sync between your multiple computers. Super helpful for when I’ve added an ftp site onto my PowerBook while at the office then come home and need the same info on my Mac Pro. As an aside: Although it wasn’t a Transmit-only problem, I had some trouble with my favorites once I upgraded to Leopard. I had to fix all the login passwords for my entire Leopard keychain. It fixed 99% of my problems but some favorites I ended up having to delete and re-create.
- Speed: A few file transfers onto my (mt) Media Temple (gs) Grid Server via my home office’s 8MB/sec cable internet averaged 59.6KB/sec.
- A 745,968 byte file uploaded in 13.5 seconds
- A 1,826,571 byte file uploaded in 30.2 seconds
- A 7,087,614 byte file uploaded in 117.5 seconds
- A 4,791,477 byte folder with 3 files in it uploaded in 79.3 seconds
- Extras: For more Panic culture you’ve got to visit their Extras page.
More Reviews
This is just one of a handful of winded and entertaining software reviews.
✚
The Full Mint-y
Everyone has that moment when the spark of inspiration hits and they decide to publish a website.
Any sort of website. Perhaps an online cat-food shop, a photo journalism e-school, or a weblog about Star Wars Pizza Hut cup-toppers figurine collections. The options are endless, but the motivation is the same: To give something to the world. (Or to make a lot of money.)
And why not share your passions with people from all across the globe? Back before the internet people had to hand-write by candlelight using feathers and ink on parchment paper. And then if they were even fortunate enough to get their book or article printed perhaps local general store might be able to sell a few copies.
But now you can sit in Starbucks with your cappucino and your iPod while hammering away on your laptop. With one tap of the “Publish” button all the world can read your ideas and comment on your cup-topper collection.
At first you start your website for noble purposes. But after a while when you notice a few new people commenting on your posts you start to wonder, “just how many people read this thing anyway?” And that’s when it starts…
Even though you keep reminding yourself that it’s not about the traffic every time you get a boost in visitors, or a post gets extra comments, or someone new subscribes to your feed your heart skips a beat.
On the other hand, there are many perfectly logical reasons for keeping an eye on your website’s traffic and readership. Such as: Discovering the primary search terms that are driving traffic, or seeing who’s referring traffic in your direction, and more…
You can use whatever reasoning you like, but if you have a website you will use some sort of analytics program. So may I suggest you use one that rocks?
Good Taste
I have often wondered why, but there are some people who will order a steak at Denny’s or Village Inn. They want it cooked well-done, (if it comes any other way) and they coat it in A1 Steak-Sauce (to add flavor). But they don’t even bat an eye. To them, a steak is a steak. It’s the name “steak” that tells them they’re living large. And they seem oblivious to the taste of the overcooked, gritty meat.
And then there are people like my good friend Josh from Texas. He will spend an entire day on Saturday preparing meat for a grill-out on Sunday. He tenderizes and marinates the cuts. Then he cooks it all to perfection, and we all savor every bite because it’s goooood.
And Shaun Inman‘s Mint is a website analytics program for those kinds of people: The people who highly appreciate spectacular (and tasty) things.
In a recent Be A Design Cast Interview Shaun Inman gave a brief explanation of how Mint came to be -
What Mint came from is that I had my own personal site and I never found a stats package that fit my needs. They had the rainbow graphs. All this information I didn’t need, and they took a day to render stats. I started playing around with PHP and MySQL, I took all these things that other people were suggesting and created this thing called Mint and wrapped it up in this nice design package. And really the idea was just to have this stats package that was just barebones, no-nonsense, “give me what I want to look at”. The number of hits I’m getting, where they’re coming from, what they’re looking at… So I built this little application, and I launched it two years ago and it was this cool suprise success.
Version 1
The graphical interface from Mint 1 is very much like the debut of Aqua from OS X 10.0 – in that both were huge breakthroughs in interface design in their respective markets. Both looked completely different and much more appealing than anything else people were using at the time.
I thought it would be fun to reminisce and look at a few screenshots of what Mint Version 1 looked like. So scroll down slowly and enjoy…
And before it was even released the beta testers were singing it’s praises. So while we’re remminiscing, here are some excerpts from a few of the beta testers’ initial reviews.
Rob Weychert, “Mint: A Stats Odyssey” -
I have owned a few web sites in my day, and like anyone who makes their work available to the public, I like to know the whos, how manys, from wheres, and so on, of the people checking out my stuff. Luckily for me and my fellow narcissistic publishers, there are plenty of stats packages out there that can inform us how many hits our sites have gotten, where our visitors are coming from, what browsers they use, and much more. Unluckily, most of those stats packages suffer from shortcomings that undermine their usefulness. Every one I tried either focused on one narrow statistic or presented me with more information than I knew what to do with.
Jason Santa Maria, “Pepper Makes Mint Better” -
…word on the street is Mint even has an Easter Egg. Needless to say, I haven’t touched Refer in all the months of beta testing. Shaun did it, I’m a convert.
Mike Davidson, “Mint: The Flavor of The Month” -
It’s not Urchin, it’s not Analog, and it’s not designed to record every single hit to your website since the beginning of time. But that is its strength.
Form and Function
The initial structure and feel of Mint hasn’t changed much, but it has certaily been spruced up since 2005. In version one the first thing you noticed was Mint’s clean, beautiful look.
And the same goes with version two, but it’s even better. Have a look-see. (With the Dark Pepper Mint style installed.)

And just for fun, let’s compare the daily hits/visitors pane from Mint with the same pane from Webalizer…

Now onto Function….
Mint lives and breathes within the panes. This is where all the information you want to see about your site can be found. Not only are the panes an intelligent implementation of your data, they are full of fine detail.
Talk about form and function: Mint’s panes are a seamless blend of the two.
Each pane serves up a specific class of data. Such as “Visits”, “Referrers”, “Pages”, “Searches” and more. But within each pane is not just a generic list of numbers. There are several tabs to serve these numbers up in different, useful dishes.
For example, take the Referrers pane. Just mash down on any one of the four tabs to see information about referrers to your site in a different, but still very useful way.

Moreover, an additional bonus to the Newest Unique tab is the RSS feed it offers. Here you can subscribe to the newest unique referrers to your site and track them from the comfort of your favorite reader. This provides a fantastic way to keep tabs on new, incoming links to your site. Which ultimately leads to the Mint High-Five, but I’ll get to that later.
Another helpful pane is “Searches”. Here you can see your most common queries that land people to your site. This is more than just “oh, neat” information. By knowing what people are searching for, you are secretly informed on which Star Wars cup-topper is the most popular. It can be extremely helpful if you want your site to be more relevant and visitor friendly.
For me, the light turned on when I saw that there was one particular search that was dominating for keywords: “iPhone Tips”. Over the past few months that search query has sent ten times more Googlers to my site than any other search, and they all are landing on the same page: my iPhone Tips and Tutorials List.
When I saw that thanks to Google my iPhone tips page was the second most popular landing page on my site I decided to put a little bit (emphasis on little) of effort into warming the page up to newcomers.
All these stats aren’t exclusive to Mint, of course. There are certainly other other analytics programs which inform you of searches and visitors too. But when you’re looking at ugly charts your eyes can get blurred and your brain can turn off and you can easily miss out on important information.
In the end though, it’s always the little things that stand out to me. My favorite graphical element in Mint is the transparent cross-hatches at the top of the screen. They sit just under the navigation bar.
They’re discreet, sly and add the finishing touch to an overall superb design.

Now pause, and think about this: How was Shaun able to get numbers and URLs to look so incredible and feel so noble? Thanks to Mint, even our puny site stats still seem stunning and exciting.
Setting Up Mint
To use Mint you need your own hosted domain and your hosting server needs support for MySQL and PHP to setup the database. This is basically the same thing a good CMS needs, and if you’re paying more than $2 a month for hosting you should be fine. (If you’re looking for a good hoster, Mint and I both recommend (mt).)
Installing Mint is a cinch. You fill in your database info, upload the folder and then follow the instructions. If you’re not too savvy with phpMyAdmin, there is a great step-by-step guide for setting up a database and user on the WordPress Codex site.
If you need some assistance configuring Mint with your CMS here are some helpful threads from the Mint forums:
- Configuring Mint for WordPress
- Configuring Mint for Expression Engine
- Configuring Mint for Movable Type
- Configuring Mint for Textpattern
Pepper
Even if all we got were the basic functions bundled with Mint – or a “Thin Mint” install – it would still be worth the cost. But Shaun has opened the app for 3rd party developers to create additional “plugins” called Pepper – as in Peppermint.
By adding Pepper to your Mint installation you are able to expand its capabilities. And thanks to the many 3rd party developers that have produced some fantastic additions, there is a wide variety of fantastic peppers available to widen the scope of your Mintabilities.
I have a pretty small Pepper lineup on my Mint installation. Other than the bundled “Default” and “Backup/Restore” peppers I only have the “User Agent 007″, “Trends”, “Outbound” and “iPhone” peppers installed.
Here’s what they do:
- The Default Pepper covers the basics. It is responsible for tracking the number of page views and unique visitors, where they are coming from and what they are looking at, as well as which search terms led them to my site. These statistics are displayed within four data-specific panes.
Note: It is always a bummer to see the latest 15 referrers to your site as Google Images domains. Ramanan posted a list of all the google images sites to enter in to the Referrers Prefs panell so they don’t show up in your newest unique list. For archive’s sake, I posted the list as a text file, here. Just select all, copy and paste.

- Backup/Restore does not record or display any data in Mint. It is simply a utility to backup and restore my Mint database tables. Though I have yet to need it.
- User Agent 007 goes undercover to uncover who’s using which browser on which platform at what resolution and with which plug-ins installed.
- Trends simply tracks trends across a specified period. Such as which permalinks are up or down in page views compared to last weeks.
- The Outbound Pepper tracks clicks to links on external sites.
- The iPhone Pepper enables single-column mode in Mint when browsing from an iPhone—leaving the default multi-column experience for the desktop. Mint on the iPhone is gorgeous.
You can find a list of all the Peppers at at Mint’s Peppermill or at the Peppermint Tea site.
Junior Mint, The Dashboard Widget
When checking your stats is only an F12 (or F4) away, the the Junior Mint Dashboard Widget can get addicting.
If you’re not using Mint version 2, or your not on OS X 10.4+ there is still a solution for you. You can use the Stale Mint widget for Mint 1, a Yahoo Widget, or a Windows Vista sidebar gadget.
The dashboard widget combined with your Newest Unique Referrers Feed make a great pair. Going hand in hand for discovering and then determining the source of a new traffic spike. When you notice on your Widget that more visitors are coming in than normal you can open your feed reader and check the Referrers List to see who’s sending the traffic.
The Com-mint-ity
More than the design and the functionality of Mint, there is also a community of users. Rob Goodlatte nails it saying,
It’s one thing to have a lot of customers, but it’s an amazing accomplishment to have so many customers who are rabid fans of the product — like everyone I know who uses Mint.
Mint is being worked on, developed and used by people just like you and me. It truly is what Shaun wanted it to be: A simple, fantastic, beautiful, “show me what I want to see” application. It is fun to use, it’s constantly updated, and there is a community of happy Mint users.
Which brings us to the high-five…
One way the Mint community connects is through what I like to think of as the Mint Referrer High-Five. There is something about seeing someone-elses-site.com/mint/ in your referrers list that tells you they were intrigued, and wanted to see why your site was showing up in their referrers list. They wanted to know what you were saying and why you were sending them traffic, so they came over to check things out.
Their …/mint/ referral showing up in you referrer’s list is like a high-five from them to you.
![]()
As long as were on the topic of community, other Minters include Sean Sperte, Panic Software, John Gruber, Ben Gray, Dave Caolo, Kevin Cornell, Glenn Wolsey, Cameron Hunt, Michael Lopp and of course – Shaun Inman.
More Reviews
This is just one of a handful of winded and entertaining software reviews.
✚
NetNewsWire: Just What You Wanted
NetNewsWire is arguably the most popular desktop feed reader on the planet.
That does not, however, mean that NetNewsWire is the most popular RSS reader, period. Far from it, actually. Web-based feed readers seem to be dominating the market share. (Worth noting is Greg Reinacker’s article unraveling part of the mystery behind the growing domination of online feed readers.)
I wasn’t able to find any cut and dry feed reader market share stats that were any more recent than the ones FeedBurner published two years ago. But based on various articles, conversations and website statistics it is pretty clear that online readers are the most popular feed reader. Specifically Google Reader. Just look at your own site’s stats, and I’m sure they’ll concur. (For the most part.)
According to the stats for ShawnBlanc.net, 75% of readers are subscribed to my feed through an online reader. Of that total online readership Google takes up 49%, NewsGator 26%, Apple RSS (various) takes 8%, Firefox Live Bookmarks takes 5%, Bloglines 4%, and various other online readers add up to the final 8%. (With 1% too much because I rounded up.)
The remaing 25% of my subscribers are using desktop feed readers. With NetNewsWire accounting for over 50% of my desktop reader’s market share, or 13% of the total market share for ShawnBlanc.net
In addition to being the most popular desktop feed reader for ShawnBlanc.net, NetNewsWire’s built in browser is the fourth most used browser for viewing this site. Right after Safari, Firefox and IE.

Web-Based Feed Readers
My intention here is not to sway 75% of my readers away from your online feed readers. I am aware that there are many reasons you may use an online reader. Such as:
- Nothing to Download and Install: If you’re reading feeds on not-your-computer on a regular basis this is a convenient feature indeed.
- Universal Uniformity and Syncronization: Your reader looks the same and acts the same and is always just how you left it no matter what computer you access it from. This can be very helpful (or very un-pet-peevish) if you work in a cubicle on a windows machine and then come home to a Mac. The advantages of having your feeds synced between multiple computers can be huge. And if you’re reading feeds on multiple platforms an online feed reader is pretty much the only option. UPDATE: Tom from Evolvepoint mentions that NetNewsWire syncs with the complete NewsGator RSS suite which includes the PC application, FeedDemon. I don’t use a PC so I hadn’t even considered FeedDemon.
- Free: Online feed readers are free feed readers. That’s always nice. The draw of using a free feed reader is a big one. Especially if that free reader is powerful enough to handle all your feed needs and leave you with a smile at the end of the day. But in my experience I’ve noticed two major drawbacks to using free readers: First off is the interface. No offense, but Google reader is not very exciting to look at. And secondly, many of the free desktop readers I’ve tried out are sorely lacking in usability, options and developer support.
If you’re using a web-based feed reader because it’s free, you need to take a look at the upcoming release of NetNewsWire Lite 3.1 (the free version of NNW), because those who refuse to pay for their feed reader are in for a real treat. But more on that in a minute.
Getting The Perfect Gift
Giving someone the perfect gift is not easy. Tons of clueless husbands have botched it up anniversary after anniversary. Countless grandparents have resorted to just giving away cash at Christmas. And why do you suppose the gift card is so darn popular?
My uncle, on the other hand, is a superb gift giver. Every year at Christmas he finds the thing you never knew existed, and most certainly never would have asked for. And when you unwrap it, you realize it’s exactly what you wanted.
Discovering the perfect program is quite a bit like receiving the perfect gift.
But it’s not easy to find a piece of software that is exactly what we want, when we ourselves often don’t know exactly what it is we want.
Sometimes we find it on accident. Sometimes we find it on a hunt for an unknown solution to a problem. Usually we find it by a random combination of both…
Sunday Morning
For me, it started a few years ago on a Sunday morning while I was at church.
My church has wireless internet, which is ideal for downloading the Sunday morning notes. It is also ideal for checking email and reading blogs when I’m supposed to be listening.
Let me back-track a bit…
This would be quiet a different story if I had not been introduced to personal blogs only a few months prior.
Additionally, if it had not been for the illustrious blogroll which inhabited every sidebar, I never would have been introduced to the lives of other people whom I’d never met and who barely knew how to put a sentence together. Within a few short months of reading sites and following sidebar links I had compiled (within a bookmarks folder) well over 15 different blogs!
To keep up with these sites I would open my bookmarks folder about three or four times a week and visit each blog one at a time as I casually checked up on the latest story.
Visiting each site one at a time is more personal and relaxing for sure. But it didn’t take long for my list of 15 sites to grow into the low-twenties. As I began checking in daily, the task of keeping up became more and more tedious. Eventually my reading time turned into Russian Roulette – Blog Style. Keeping up with the new articles was quickly becoming less and less fun. I needed a way to know what sites had new content so I could spend my time reading instead of looking. I needed an RSS reader. And I didn’t even know it.
This brings us back to the Sunday morning in which I casually glanced over at my friend’s PowerBook. He had his feeds pulled up in Safari’s feed reader.
“What in the world?!” I thought.
He was reading news headlines and articles from all sorts of different websites, and they were all put together neatly into one window. Incredible. I didn’t know exactly what I was seeing but I instantly recognized its potential to solve my problem. By the end of the sermon I had subscribe to all my favorite blog’s feeds using Safari and the church’s wireless.
But let’s be honest. Anyone using Safari’s RSS reader as a serious point of entry for information will quickly discover that it doesn’t cut it. And just as Brian had predicted, the Safari RSS reader contributed to the sale of a dedicated feed reader. Because within a week I was already looking for something better.
It wasn’t until after I fumbled around with a few not-so-great readers that I came accross Brent Simmon‘s smash hit RSS reader, NetNewsWire.
I first jumped on board with NetNewsWire Lite 2.1, and I used it for several months until Brent and Ranchero released the 3.0 full version. I downloaded the free trial and was blown away once again. Seriously. The interface, the layout, the simplicity. Everything. I was hooked, and my wallet was 29 dollars lighter.
NetNewsWire has changed my expectation for Mac application development. I’m not a programmer, but Brent and his Eddy Award winning program have been an onramp for me to learn more about the indie Mac Development community, and that is why I’m so fond of this application. NNW has become a marker to me for when my eyes were opened to the many heroes of the Mac community who create amazing software and make our OS X lives that much better.
NetNewsWire
What makes NetNewsWire so great is that it at once appeals to every level of user.
For the basic user who checks a few feeds once a day, NNW provides a familiar and friendly environment. For an average user who has several dozen feeds to keep up on, NNW is quick and effective. And even the power user, who lives and breaths inside their feed reader, will discover that NNW has the horsepower to feed their need for feeds.
From the NNW homepage, Cory Doctorow says, “This is the app that lets me drink straight from the Internet firehose, and I couldn’t live without it.”
At its initial launch, NNW was already in a class of its own. Brent patterned the traditional 3 panel layout after common email layouts, like Mailsmith, Outlook and Apple Mail. The general look and feel of NetNewsWire has been consistent ever since version 1, but it has certainly received a good spit and polish over the years.
Have a look…
Version 1.03

Version 2.0

Version 3.0

Version 3.1beta

As of this writing wersion 3.1 is in the final beta stages of development. And even though it’s not a major x.0 release, Brent sure is treating it like one. (I suppose largely because of the upcoming release of NetNewsWire 3.1 Lite (the next big upgrade for the free Lite version which is currently still at 2.1.1.), and the software updates for compatibility with Leopard.)
When version 3.1 (Full and Lite) does come out of beta I imagine nearly every user will upgrade. Either to the for-pay version (3.1 Full) or the freeware version (3.1 Lite).
For those already using the 3.0 Full version the most obvious changes they’ll see in 3.1 are visual: The new toolbar icons and the Leopard style folders in the subscription list and site drawer.

Those who upgrade from 2.1.1 Lite to 3.1 Lite will discover much more than just spectacular visual changes.
I’m taking a complete shot in the dark, but my guess is that the number of NNW Lite users is more than double the amount of NNW Full users. Meaning that the vast majority of those who upgrade to 3.1 (Lite or Full) in the near future will be upgrading from 2.1.1 Lite or switching from another reader. Meaning a lot of people are all in for a real treat.
Top to bottom, NetNewsWire 3.1 Lite is primed to be the best, free news-reader available for Mac.
A Few of My Favorite Things
The majority of the strong, underlying features available in the current full version will also be available in the new Lite version. Just because it’s a free news-reader doesn’t mean it’s a wuss. Quite the opposite, in fact.
Here are a few of my favorite features that will be a part of the new NetNewsWire 3.1 Lite.
- Syncing: I have a Mac Pro in my home office, a PowerBook that I use out of the office and on the road, and an iPhone that I use, well, all the stinkin’ time. NewsGator’s online feed reader syncs all the feeds and their groups, across Macs and on the iPhone NewsGator web app. All three locations are always in sync. Everyone together now: “Ahhhhhh…” Syncing via NewsGator is not your only option. You can also sync with .Mac or your own FTP server.
- Spacebar: Similar to the “J” in Google Reader is the spacebar in NNW. You use the spacebar to take you to the next unread article and then to page down through the content of that article. If you start at the top of your feeds and hit nothing but the space bar you will work your way all the way down. Voila! I didn’t even know this feature existed until Brent listed it as his favorite in our interview. Although it’s not my favorite, the feedback I’ve heard from other’s tells me it’s popular.
- The Way the Arrow Keys Work in The Traditional Layout: NetNewsWire’s traditional layout is similar to the layout of most email applications. The sites list is in the left hand window, the headlines are shown in the top right window, and the article content is displayed in the bottom right window. This is the layout I use because I read my articles by site, not as a compiled list of headlines.
When using the traditional view, one thing I love is the way the arrow keys work. Using the arrow keys you can navigate anywhere you want. From the subscription list to the headlines, down the headlines to an article. Back to the list and so on and so forth. I don’t know how many times I’ve tried to do the same thing in Apple Mail only to get the error dong noise.
- The Animated Arrow-Out to Permalinks: Sometimes it’s the little things.
As odd as it sounds this was the main reason I bought NNW 3.0. I don’t read websites in the feed reader. I use NNW only for checking up on new content. When an article shows up that I want to read I “arrow out” to the website and read it there.
I like the animated arrow-out for two reasons:
- It gives a visual response to the action of leaving the headline and going to the article. Since I have web-pages open up in the background in Safari it’s great to have that visual feedback.
- It’s very un-selfish. The whole structure of NNW is designed to serve the user and give them exactly what they want without making them feel as if they’re using it for something it wasn’t specifically intended for.
In Brent’s interview with John Gruber in 2005, John asked if Brent had ever considered limiting the number of subscriptions in the Lite version of NNW. Brent’s reply:
For maybe one second. I hate limits like that. It’s one thing to not have an entire feature like the Weblog Editor, but quite another thing to arbitrarily limit the number of subscriptions. Doing that would, in my mind, make the Lite version no more than an advertisement for the Pro version.
The animated arrow is a positive, visual feedback given when leaving the application. And even though it’s just a small element when compared to the whole program, it is a dynamic statement of the way NNW is built: to serve the user.
- The New Toolbar Icons: In previous versions, the toolbar icons were designed by Bryan Bell and John Hicks.
But Bobby Anderson designed the new icons for version 3.1 and I think he did a fantastic job. They’re much cleaner and less clunky.
And simply by looking at the new “Refresh All” button and comparing it to version 2′s, you can see that Mr. Anderson did his homework.

- Rands’ First Law of Information Management Which reads: “For each new piece of information you track, there is an equally old and useless piece of information you must throw away.” (via)
By continually adding new feeds to your subscription list, you’ll eventually reach such a point of information overload that you end up losing the very purpose for which you first began reading websites. (That is of course, unless you want to simply scan the headlines of hundreds and hundreds of articles, in which case you must be very happy about the space bar feature.)
Eventually you have to get rid of some feeds. I clean my subscriptions out every few months. NetNewsWire has made it more than easy. Click on “Window” > “Feed Reports” > “Dinosaurs” / “Most Attention” / “Least Attention” / “Bandwith Usage”.
The Dinosaurs report tells you who hasn’t updated in 30 days, the Attention report lets you know what sites you give the most attention to and what sites you give the least attention to. Bandwidth report tells you which feeds are the bulkiest.
- The Sites Drawer: Click on “View” > “Show Sites Drawer” and you have access to hundreds of sites. Chances are pretty good that several of the sites you’re already reading are in the drawer.
The Pay-For Full Version
NetNewsWire Lite is a fantastic app, and I have no doubt that many people will see no need to pay for the full version. Before I met Brent, I knew very little about the Apple indie developers community and even less about the time and energy they put into their software. But now I’m sure that supporting great software and the people who make it is a worthy cause.
If you want more than just a worthy cause, here are a few of the extra features you’ll find in the Full version of NetNewsWire.
- Flagging: You can flag items and they stay in the reader forever. I use this all the time to highlight articles that I want to come back to for reference.
- Tabbed Browswer: You can open web pages directly in NetNewsWire. And these tabs save themselves even if you close NNW. This is great for opening an article’s homepage within NNW, but coming back to read it later.
- Interface Options: The widescreen, three-column view and the combined view. I prefer to use the traditional.
- Search: You can search the feeds within NetNewsWire, you can search on Google, Google Images, and more. Including the new HTML Archive.
- HTML Archiving: This is one of the new features in the Full version that I suspect most people will not notice, or simply skip over when they upgrade.
In previous versions you could only keep articles long-term if you flagged them, and you could only search feeds that were currently cached in NNW. But that is no longer the case.
From the NNW Beta page Release Notes –
NetNewsWire can now store news items on disk as separate HTML files. The idea is to give people a way to archive and save stuff without having to keep it in NetNewsWire. The fewer news items in NetNewsWire’s storage, the better it performs. This feature is designed to give you a way to keep an archive without having it hurt NetNewsWire’s performance.
The obvious benefit of the HTML archive is that it’s searchable because a local copy of every article is kept indefinitely on your hard drive. This is fantastic if you want to find something that was read several months ago, and you don’t have internet access. A potential issue is that the archive takes up its fair share of disc space. With just the feeds that were in my reader the archive folder weighs in at 12MB. And I don’t even have that many subscriptions.
UPDATE: NetNewsWire is now free. You can download it here.
More Reviews
This is just one of a handful of winded and entertaining software reviews.
✚
A Series of Reviews: Some of The Greatest Software Available For Your Mac
“In Mac OS X, you vote with your dock.” – Michael Lopp
Who doesn’t love great software? I wanted to write these reviews for two reasons: (a) I love to brag on the things I use and enjoy, and (b) perhaps you’ll find something you can spend your lunch money on.
The apps I’ll be reviewing are:
- NetNewsWire – Arguably the best desktop feed reader on the planet.
- Mint – The site stats application for people who love great (and tasty) things.
- Transmit – Yellow Cab, Purple Box, FTP. What more could you ask for?
- Coda – The One-Window Wonder.
- MarsEdit – Helping the Personal Publishing Revolution.
- SuperDuper! – Hard drive backup for mere mortals.
- iCal – People think I actually remember all my meetings.
- Apple Mail – You’ve got mail!
- My Task Notebook – How I get things done every day. (UPDATE: Not any more.)
The first five are related to this site, and I thought it would make sense to “start here” and work my way “out”. The sixth app, SuperDuper!, is sort-of in a class of it’s own within the list, so I thought I’d put it in the middle.
The final three are free apps (heck, one isn’t even an application at all), but since I use them constantly I thought I would share a bit of how I use them.
✚
Apple’s New Wireless Keyboard
As anyone will admit, the new iMacs look stunning. But since I’m not in the market for a new computer, it’s the new keyboard that has my attention.
Since I already have a wireless desktop I didn’t even consider the new wired keyboard. But that doesn’t make the wireless version the obvious choice. Because – unlike white plastic keyboards of yesterday – there is a big difference between these new wired and wireless keyboards.
The wired keyboard connects via USB 2.0 and has a full complement of keys, including document navigation controls, a numeric keypad, and special function keys for Mac features such as brightness, volume, eject, play/pause, Exposé, and more.
The wireless one connects via Bluetooth 2.0, and in the words of Apple -
Giving you the freedom to work or play up close or across the room. [...] Intelligent power management conserves battery life by automatically powering down the keyboard when you’re not using it and turning it on the instant you start typing.
But the big blaring difference between the two is the missing buttons over on the right hand side. Primarily there’s no delete and there’s no number pad; supposedly for the sake of mobility.
Form and Function
What did Apple have in mind when designing the wireless keyboard?
- Mobility: During the keynote Steve told us that a lot of people get the bluetooth keyboard so they can put it on their laps. Say hu? I highly doubt that. I don’t know one person who owns a bluetooth keyboard for use on their lap. Just try it for a minute. It’s uncomfortable and un-natural. You can’t type from there, and the mouse is now 18 inches away instead of 6. It also says on Apple’s website that you can “work from across the room”. I like the ability to move my keyboard around if I need to, but I’ve never wanted to type up a word document from 8 feet away. We all know that the reason we go wireless is so we can be just that: wireless.
- Battery Life: It seems as if this was Apple’s primary influence for the design of the new wireless keyboard. It only needs 3 AA batteries instead of four, and it has a new intelligent power management which conserves battery life by turning off the keyboard when you’re not using it. But honestly, I don’t think battery life is much of an issue. I have Apple’s original bluetooth keyboard and only replace the batteries about once every 6-8 weeks. My bluetooth MightMouse uses more batteries than that.
Same Trick. New Product.
I was actually surprised to see a wireless version of the new keyboard get released today.
I assumed the new keyboard refresh would be the same as when the MightyMouse came out.
If you remember – when Apple introduced the MightyMouse you could only get it as a USB device. It was until a few months later that Apple released the bluetooth version. So if you wanted a bluetooth mouse bad enough then you had to get the original single button.
The new wireless keyboard is just like that single button wireless mouse was. It’s missing some unnecessary features, but who cares?! It’s bluetooth!
✚
Thirty Months with a 12-inch PowerBook G4
In January 2005 I made the switch to Mac. I turned in my Dell Inspiron 3800 and crossed over to a 12″ PowerBook G4. It was like going from olive loaf to Kobe, American to gouda, or Kia to BMW. I was blown away.
I was given a freedom that can only be given from a machine that has been “built by people who get it–and by “it” I mean UI/VI design and industrial engineering.”* In Laymen’s terms: Apple’s hardware coupled with OS X make for a consistently enjoyable and captivating user experience.
Thirty months later I am still using my PowerBook every day. For 28 months it has been my primary machine. Seeing me through emailing, note-taking, web-surfing, graphic designing, web-site developing, AIMing and Quicksilvering.
All this time and no official review? Well, that’s all about to change. Read on, my friends. Read on.
The Specs – Numbers and Acronyms
- 12″ PowerBook G4
- 1.33GHz PowerPC Processor
- 1.25 GB of RAM
- 80 GB HDD at 4200 RPM
- 1024 x 768 Screen Resolution
- CD-ROM Combo Drive
- 13 Stickers featuring an old-school Apple logo, Ableton Live, Ride Snowboards and Dakine.
- Affectionately named Reepicheep
Why the 12″?
It was a toss up between the 15″ and the 12″ PowerBooks. I knew I needed a laptop for portability and the iBooks lacked the punch I needed. I liked the size and feel of the 12″ but also liked the extra pixels on the 15″. But ultimately it was my budget that made the decision.
There have been a few times that I have regretted not waiting a bit longer to save the money for the 15″. But for the most part, I have loved this little guy. He can go anywhere, and the custom fitted Brenthaven bag (which they don’t sell anymore) is one sweet accessory.
900 Days of Consecutive Use
I have used my PowerBook to some capacity nearly every day of the 900ish that I’ve owned it. Virtually every area of my life exists on my computer. Work, home and play. As I mentioned earlier – not only do I use it for standard daily tasks, but also for processor-intensive tasks such as print and web design.
It has held up like a champ and a faithful friend. However, I am beginning to notice some lag and general slow-down. The CPU heats up hotter and quicker than it used to, causing the fan to turn on more often. Also, after getting a Mac Pro as my main computer the G4 now seems much more sluggish than before.
What’s Next?
I plan on running my PowerBook into the ground. When Leopard comes out I’ll clean off my hard-drive and give it a nice fresh OS install, and clean app installs as well. Something I’ve only done once in all the time I’ve owned it.
Knowing that my PowerBook won’t last forever, I’ve already begun saving for another laptop. However, 5 minutes with an iPhone at the Apple store diverted the attention of that savings account. But eventually I will need to get a new laptop and when I do it will be a MacBook Pro. Since there is no such thing as a 12″ MBP, and probably never will be, I expect to get the 15″ model. But even if I had the option of a powerful sub-notebook, I think it would be a nice change to go for something with extra screen real estate.
✚
Pixelated Ecstasy and Breakneck Processors – My Mac Pro Workstation
In January of 2004 I bought my first Mac. A 12″ 1.33GHz PowerBook G4. It was my first step into the world of print and web design. My PowerBook was so sweet and so fast that I never thought I’d buy a desktop. But – like many others accross the world – everything changed when the Mac Pro was announced in 2006.
Recently I began to see that my G4 wouldn’t cut it for much longer. I originally had plans to upgrade to a 15″ MacBook Pro. But since my PowerBook was still working (just not for design work) I started looking at the 24″ iMacs. But as I did the research I realized the Mac Pro was the obvious choice. I worked several extra freelance jobs and pinched my pennies. Finally, just a few weeks ago in May, I bought my dream machine.

Breakneck Processing
- Mac Pro Quad 3.0GHz Intel Xeon – “Woodcrest”
- Two 3.0GHz Dual-Core Intel Xeon processors
- 4GB (4 x 512MB) / (2 X 1GB) memory (667MHz DDR2 fully-buffered DIMM ECC)
- 250GB Serial ATA 3Gb/s 7200 rpm hard drive
- 16x SuperDrive (DVD+R DL/DVD±RW/CD-RW)
- ATI Radeon X1900 XT with 512MB memory
- Affectionately Named “Azlan”
Pixelated Ecstasy
- Apple Cinema HD Display
- 23-inch (viewable)
- 1920 x 1200 optimal resolution
- 16.7 million colors
- DVI Display Connector
- 2 port USB 2.0 Hub
- 2 FireWire 400 ports
- VESA mount compatible

Why This Setup?
- The Mac Pro’s Upgradeability: I can’t imagine needing a more powerful machine. But the ‘upgradeability’ of the Mac Pro is one of it’s most attractive characteristics. Getting more RAM and/or more hard-drive space is extremely simple and affordable if I am ever in need of them.
- The Beauty of the Apple Cinema Display: There is quite a bit of talk out there about what brand screen to buy – Dell or Apple. I went with the 23″ Apple Cinema HD Display for one main reason: I sit at my desk, working at my screen for several hours a day, and I wanted be proud about the screen I was working on and staring at. I wanted it to be worthy of the powerhouse it was plugged into. The idea of setting up a Dell display with my Mac felt odd to me. Sorta like eating a veggie burger – all the components would have been there, but something’s not right. That’s why the extra cost for the Apple Display was worth it. So that my work and play experiences while at my desk would be as enjoyable as possible.

Working on my Mac Pro
Two words: Smokin’ fast.
The speed jump from my 1.33 GHz G4 PowerBook to the Quad Core was outrageous. Like driving a clunky Volkswagon Rabbit, and then sitting down behind the wheel of an 850 Horse-Power Shelby. I cannot imagine a faster, more powerful machine.
It begs to be pushed to it’s limits simply so it can show off – and without even breaking a sweat.
When no apps are running, Photoshop CS3 will start up in about 3 seconds. When I drag a file over the mail.app dock icon, it starts up Mail and opens the new message with the attachment almost as soon as I let off the mouse. I can easily have Photoshop and Illustrator running with several large files open in both programs while smoothly tabbing between them without a hiccup (or beach ball).
When it comes to getting things done, it’s one thing to have a focused work flow and an organized system, but there is something that a Mac Pro will do for your productivity that nothing else could.

P.S. It’s Refurbished
I saved a substantial amount of money by getting my Mac Pro and Cinema Display through Apple’s refurbished online store. I had the money ready to spend, and so I waited. Each day I would check the refurbished page to see what was for sale. Then one day the 3.0 Quad Core and the 23″ Display showed up, and I bought them right away.
I didn’t have to settle on what computer I would purchase. In fact, I was able to buy something better than I had originally priced out for much less than I would have paid for a new model.
The Mac Pro came with 2 Gigs of Ram already installed, so I bought two more gigs through Crucial to finish the setup.


