The Best New Mac and iOS Software of 2010

A lot of great software shipped in the past 12 months. There were many new apps for the iPhone and iPad, and many great updates to some already stellar Mac apps.

Here is my list of the best software that shipped in 2010. These are apps I use regularly and which were brand new or received an X.0 update at some point in 2010.

OmniFocus for iPad

OmniFocus for iPad was released in July. It is, without a doubt, the best of the three-app suite of OmniFocus software.

It seems to be a common practice that for apps with a strong presence on the desktop, their iPhone and iPad counterparts are portals, or lighter versions, of their desktop apps. Not so with OmniFocus on the iPad; it is the current king of the OmniFocus hill. Moreover, it is one of the most robust, feature-rich, easy-to-use apps on my iPad.

The two most-addicting features of OmniFocus on the iPad are the review and the forecast views. This app is one of the few which have justified my iPad purchase.

Reeder

Reeder for iPhone 2.0 and Reeder for iPad are my two preferred apps for reading feeds. When Reeder 2.0 shipped in March it answered all of my quibbles about what I wanted from an iPhone Feed Reader.

Reeder for iPad, shipped in June, and it is superb. I enjoy the UI and the top-notch readability it presents. By far, my favorite feed reading app for the iPad.

Canned

Canned is an iPhone app that came out in August. I had the privilege of helping Sky Balloon beta test it, and it’s been on the front of my iPhone Home screen ever since.

Canned lets you pre-write the content of those text messages you send often, and even pre-assign those to the individuals and groups whom you often send that same text to.

I used to have a folder in Pastebot for these types of texts, but Canned is much better suited for the task. The app is simple and blazing fast. Buy it in the App Store for the price of a soda.

Instapaper Pro for iPad

If there ever was a piece of software that was like a good cup of coffee it would be Instapaper. Unlike other software and services where describing the ins and outs and use-cases gives others a very good understanding of the product, Instapaper is much too simple for that.

So in short, Instapaper is the best way to read the Internet. And the iPad app (which launched in April) is the best way to read your Instapaper articles.

And, if you want to get my starred articles in your Instapaper queue, my username is “shawnblanc”.

MarsEdit 3.0

MarsEdit is one of the most-used, most-important, and most-beloved applications I own. I can’t imagine writing shawnblanc.net without it. Version 3.0, which was released in May, added quite a few features to an already rock-solid application.

A highlight feature of the 3.0 release for many was the WYSIWYG editor. However, the most notable for me was the added support for WordPress custom fields, which — when combined with this Linked List plugin — makes posting links on my site a breeze.

Simplenote 3.0

Simplenote is an iPhone and iPad app that offers a minimalistic writing and note-taking interface and over-the-air syncing. Version 3 shipped in August, and is the sort of app adored by those who pride themselves in their use of beautiful and uncomplicated software.

Simplenote is also an app for people with ideas. It’s for those who need some way to jot an idea down, build on it, and refine it until they’re sick and tired of it, regardless of where they are or if they brought their laptop.

And as a writer, Simplenote could very well be your principal writing app. It has a straightforward design that makes it effortless to use. In Simplenote there is no text formatting, it’s just plain. There is no document titling — when you create a new note, the first line is the title. There is no saving a note — you just write and your note is backed up in real time, and even synced with any other other devices you use: iPad, iPhone, and Mac.

Dropbox 1.0

The most common misconception about Dropbox is that it’s solely for file syncing between multiple computers. Well, I only own one computer and I use Dropbox all day long.

Because Dropbox syncs your files to the Web, I use it to keep all folders for my current projects. This means things I am working on at the present moment are always backed up to the Web.

Also, by using Symlinks, I have the Application Support Folder for my most-used apps (MarsEdit, Yojimbo, 1Password, OmniFocus) sitting in Dropbox as well. Which means if I didn’t back up my laptop for a week or two, chances are good I would hardly lose anything important. And if I drop my laptop out the car window on the way home from work, I for sure wouldn’t lose anything from the day.

Dropbox finally hit version 1.0 in December, adding some stability issues and, most notably, options for selective syncing of folders.

Instagram

Instagram launched in October and by the end of 2010 had over 1,000,000 users. It’s part iPhone app, part social network, all fun.

It’s an iPhone-only app that works somewhat like Twitter but with photos. You take a quick snapshot, apply a filter, and share it with your followers. You can also send those photos to your Flickr, Tumblr, and/or Posterus accounts, as well as sharing them on Twitter and Facebook.

Instagram is low friction, and high-fun. And now that Twitter displays Instagram Media inline, it’s not unlike using TwitPic to post photos to your Twitter account. You can find me on Instagram as “shawnblanc”.

The Best New Mac and iOS Software of 2010

iPhone’s Group Messaging in iOS 4

When the iPhone first came out in June 2007, you could only send one text message to one person at a time. No pictures, no videos, no audio. Only a Short Message (SMS).

Six months later, in January 2008, Apple added the ability for our iPhones to send an SMS message to multiple people. This was a feature of iOS version 1.1.3.

Eighteen months after that, in June 2009, Multimedia Messaging (MMS) was introduced to the iPhone as part of iOS 3.0. However, MMS was only available to people using an iPhone 3G or 3GS, and only to those who were not on AT&T. If you had an original iPhone from 2007, or if you lived in the United States, you could not yet send or receive any MMS messages.

In September 2009, AT&T released a carrier update and iPhone users in the U.S. got MMS messaging.

And the most recent update for group messages came when iOS 4 shipped in June 2010. For those on AT&T sending a group message no longer defaults to many individual SMS or MMS messages. Rather, sending a group message on iOS 4 sends it as a single MMS to many people; even if you are only sending a plain text message.

The easiest way to see the difference between sending a group message that is sent as an MMS instead of an SMS is in the top “Sending” status bar of the message’s window. For a group MMS message the bar steadily progresses until it’s done. For a group SMS message the bar progresses in spurts, as several messages are sent back to back to each individual recipient in the group.

This new functionality by AT&T is called “Group Messaging” and has some benefits for the sender:

  • If you’re sending a group message to other iPhone users it means everyone in the group can see everyone else in the group and join the conversation by replying all. In essence, it’s a group chat.

  • A group SMS can only go to 10 recipients. A group MMS can be sent to 100.

  • Sending a group message as MMS counts as just one message sent. Whereas a group message sent as SMS means you are charged for each recipient in the group.

There really is no disadvantage for sending group messages as MMS from your iPhone.

However, with Group Messaging there can be disadvantages for those receiving your messages:

  • Since Group Messaging means messages are sent as MMS no matter what, if you’re sending to people using Blackberries or non-smartphones then they have to open and download your text message as if it contained a media attachment. They think you’re sending a picture, but you simply sent some words. I’ve been told by my friends and family members who use Blackberries and non-smartphones that this is often misleading and always annoying. They were expecting to get an entertaining image from me and instead they got a bland text message. (Perhaps I should be more entertaining with my texting.)

For recipients on Android phones it’s the same issue. They receive your message as an MMS with the subject “No Subject” (unless of course you’ve turned on the “Show Subject Field” option and you’ve written a subject line).

And nobody sees any of the other recipients in the group you’ve sent to except for those on iPhones. It’s only a “group chat” if it’s iPhone users exclusively.

  • And lastly, if by chance someone in your group message is using a phone that doesn’t accept multimedia messages at all, then they will simply not get your text. Instead they get an annoying note — sent from you but written by the carrier — that says something along the lines of, “Hi! I sent you a Multimedia Message. You can log onto a website and enter this long password to see it.” (Remember, during those years when your iPhone could not send or receive MMS messages and you would get that annoying message telling you to log in to a website to see the message?) So very annoying.

How to Turn Group Messaging Off

If you’re so inclined, your AT&T iPhone has a setting to adjust the manner these group texts are sent.

Even though these group messages are sent as MMS messages, you can still leave MMS turned on while turning “Group Messaging” off. This means: (a) you can still send media-rich MMS messages; and (b) group text messages are sent as many individual SMS messages instead of a single MMS. Consider it a favor to your non-iPhone-using friends and family who don’t like downloading your text-only MMS messages.

Simply go to Settings → Messages → “Group Messaging”.

iPhone's Group and MMS Messaging Settings for AT&T

According to the good folks on Twitter, the option to turn off “Group Messaging” in the Messages Settings is only available to iPhone users on AT&T. For example, here’s what the Messages Settings pane looks like for an iPhone on Canada’s Rogers network:

iPhone's Group and MMS Messaging Settings for AT&T
(Screenshot courtesy of Pat Dryburgh.)

Though iPhone users on the Rogers network cannot turn Group Messaging off, group messages are still sent as an MMS message just like on AT&T.

For iPhone users on carriers other than AT&T and Rogers I am not sure if group messages are sent as a single MMS message, or as multiple SMS messages. If the former, it seems as if the only way to disable group messaging as MMS is to turn off MMS Messaging altogether. Therefore forcing a group message to be sent as several individual SMS messages.

Turning MMS Messaging off in the Settings only means you cannot send an MMS message (no texting of video, images, or audio). You can still receive an MMS message from someone else.

iPhone’s Group Messaging in iOS 4

A Few Apps You May Want to Get for That New iPod or iPad of Yours

  • Astronut. I rarely play any games on my iPhone or iPad, but the funnest one I’ve bought lately is Astronut. The graphics are superb and it’s a lot of fun when you’ve got 5 or 10 minutes and need a break.

  • Simplenote is a note-taking app that runs on your iPod touch and iPad. It’s free and syncs your notes over the air. I use Simplenote all the time and wrote more about it here.

  • 1Password is a fantastic tool for keeping any and all top-secret info available on my iPhone or iPad, and it syncs over the air via Dropbox.

  • Pastebot is a fantastic clipboard manager for your iPod touch. And it will pair with your Mac to make a dead-simple way for transfering text and images back and forth between the two. I wrote more about Pastebot here.

  • Twitter is the free and “official” twitter app for your iPhone and iPad. It also happens to be iOS’s best-of-breed Twitter app.

  • Reeder is a top-notch app for reading your RSS feeds. It syncs with your Google Reader account and has a clever and delightful GUI.

  • NetNewsWire is also a top-notch app for reading your RSS feeds. It also syncs with your Google Reader account. I absolutely adore NNW for my Mac, and the iPad version is fantastic as well.

  • ESV Study Bible + is my favorite Bible app for my iPhone and iPad. The free version is great as well, but this version comes with more content for studying, audio of the Bible, and a significantly better UX for taking notes within the app itself.

  • Instapaper is the best way to read the Internet. If you’re not already using Instapaper then you can sign up for free online, then buy the pro app (though there is a free version) and all the articles you elect to read later will show up in your Instapaper app.

  • Canned is an iPhone app that lets you pre-write the text messages you send often, and even pre-assign them to the individuals or groups of people whom you often send that text message to.

And if you didn’t actually get an iPad for Christmas but you got some cash and now you’re in the market, you may want to check out my iPad Buyer’s Guide.

A Few Apps You May Want to Get for That New iPod or iPad of Yours

Making a Great Cup of French Press Coffee

My uncle Louie, who is recently retired from 40 years as a tech consultant, has acquired a taste for coffee. Just this week he bought a french press, and so he sent me an email asking for advice knowing that I use one every day.

Traditionally, the french press is the finest way to brew a cup of coffee. And despite popular opinion, it can actually be quicker than making coffee with a drip coffee maker. However, the french press is more involved for the person brewing the coffee, as each step is done by hand, but that is something I personally enjoy about it.

Great coffee starts with great ingredients: water and coffee beans. You should use only the best water — filtered, bottled, or (if you’re my dad) reverse osmosisified — whenever possible.

I buy my beans whole and grind them just before brewing them. When coffee beans are ground is when they give out their flavor. To use pre-ground coffee beans is to use them at their worst. To grind them just before you brew them is to use them at their best. Moreover, if you use pre-ground coffee chances are you aren’t using the coarseness for a french press. Pre-ground coffee is almost always too fine for proper brewing in a french press.

To grind your own coffee, I recommend a conical burr grinder. I use this Breville.

What many people do not know is that there is a big difference between a plain burr grinder and a conical burr grinder. In fact, most inexpensive burr grinders do a worse job grinding your coffee than a cheap blade grinder would.

One of the reasons people buy a burr grinder is because it will produce a more consistent grind (the biggest complaint against blade grinders). However, the average burr grinder has flat burrs. And though you will get consistent grind it often comes at the expense of the ground bean.

With conical burr grinders the burrs are shaped like a cone. This means there is a larger grinding area for the same diameter, allowing the conical burrs to spin at a slower speed. And you want your coffee to be ground slowly. Grinding at high speeds (as most regular, flat burr grinders do) heats up the burrs and results in burnt coffee beans and damaged grounds.

For brewing in a press you want an even and coarse grind. I set my Breville to the most coarse setting it has. (Around the holidays I like to add a teaspoon of cinnamon to the grounds before I pour the water in. It gives the coffee a nice spice that goes well with snow and Christmas music.)

French Press Coffee

I use an electric kettle to boil the water. Once the water has reached a boil I let it cool for just a moment to let it stop bubbling, so the water is right around 200°. Then I pour the hot water into a measuring cup to get the right amount of ounces for how much grounds I’m brewing, and then I pour it into the french press over top of the coffee grounds.

Something which is of upmost importance is the ratio of coffee beans to water. Different people have different opinions about this, but I use 2 tablespoons of beans (measured before they’re ground) for every 6 ounces of water. If that ratio results in coffee which is too strong for you then add the hot water to your cup after you’ve already brewed the coffee. If you water down your beans while brewing, then you’ll over extract and end up with bitter coffee.

After I pour the water over the coffee grounds in the french press I let it sit for a few seconds and allow the coffee to bloom. I then give it all a really good stir, place the lid on, and set a timer for 4 minutes.

When it’s time to press the coffee I slowly push down on the filter, and then pour it into a thermos. I like my coffee piping hot and so I drink just a little bit at a time — black — to keep it as hot as possible. This also plays well into my affection for small mugs.

French Press Coffee

Get Equipped

Here is the gear I use, or wish I used, to make my coffee. Equip yourself via these Amazon links and you’ll help pay for my next cup of coffee.

Making a Great Cup of French Press Coffee

Shawn Blanc’s 2010 Professional Gift Guide for That Nerdy, Design-Savvy, Coffee-Loving Writer in Your Life

Welcome to The 2010 Gift Guide for That Nerdy, Design-Savvy, Coffee-Loving Writer in Your Life.

Nerds and coffee nuts can be impossible to shop for. Sure, they know what they want. But you’d be hard pressed to get them to tell you the details of what’s on their Christmas wish list.

If you’re not sure what to get that special someone for Christmas, then let this guide be a guide to you.

  • Has your nerd hinted about wanting a new hard drive for their laptop?
  • Does your coffee nut still use a drip coffee maker?
  • Is your designer friend’s office lacking wall decor?
  • Is your significant other trying to kick off their writing career?

Then look no further, my friends! Below you will find professional recommendations for all these needs and more. Only the finest gifts recommended.

For Nerds

Gifts for nerds

  1. Levenger Bomber Jacket Messenger Bag $199
  2. A Rands in Repose t-shirt $20
  3. Intel X25-M 160GB SSD $415
  4. Amazon Kindle with Wi-Fi $139

For Designers

Gifts for designers

  1. Tungsten typeface $99
  2. Gedy’s social media icons $5
  3. One of Jorge Quinteros’ photos

For Coffee Lovers

Gifts for coffee lovers

  1. Organic Blue Tawar Blend from The Roasterie $13
  2. Breville conical burr grinder $95
  3. Frieling stainless-steel French press $79

For Writers

Gifts for writers

  1. Levenger Circa Notebooks
  2. Writing Down the Bones $13
  3. AquaNotes waterproof notepad $12

Miscellaneous Gifts or Stocking Stuffers

Miscellaneous gifts

  1. Galaxy Trucker Board Game $50
  2. Rework $15
  3. Ugg house slippers $99
Shawn Blanc’s 2010 Professional Gift Guide for That Nerdy, Design-Savvy, Coffee-Loving Writer in Your Life

Reeder and the Keyboard

Something I was curious about with Reeder for Mac was how a desktop app which was first built for a touch UI would favor those who favor the keyboard. I am one who prefers keyboard shortcuts whenever possible, and I suspect most of you reading this do too.

Zach Holmquist has posted a keyboard shortcut cheat sheet for Reeder, where you’ll find that the primary keys for navigation are Space, J, K, Shift+P, and Shift+N. While these are not necessarily bad keys to use as the primary navigation, they’re not exactly easy to use with one hand. Moreover, they don’t do much to tie together the overall information hierarchy of your RSS subscriptions — there is a pair of keys for moving between items (J and K) and there is a pair of keys for moving between subscriptions (Shift+P and Shift+N).

In NetNewsWire I use the arrow keys to navigate within the subscriptions list, throughout items, and to even open up an item in Safari in the background. In fact, the way the arrow keys work is one of my favorite things about NetNewsWire.

In NetNewsWire it is easy to drill up and down between the high-level list of subscriptions all the way into a single item. There is a clear and understandable hierarchy of your subscriptions and items so you always know where you are at within your list.

While the interface design of Reeder for Mac is gorgeous and polished, it seems as if each level of hierarchy stands a bit isolated. It is easy to navigate within the subscriptions list, it’s easy to navigate within a list of items, and the individual item view is big and clear. But getting between one level to another is not so simple (unless you’re using the mouse).

In David Appleyard’s review of Reeder, he praises the way Reeder for Mac feels like its iOS counterpart:

Click up and down your feed categories on the left, and you’ll see the item list swipe left and right, just as if you were swiping on the iPad. […] No actual “gestures” required—everything works perfectly with a single mouse click—but you still feel as through you’re swiping your way around an iOS interface.

However, this is precicely where it seems Reeder’s iOS → OS X transition has found a snag. In an iOS app you mostly ever see one level of hierarchy at a time: a screen full of subscriptions; a screen full of items; just an item.

But in a desktop app, you see multiple levels at once. The subscriptions, the item list, and individual item are all in the same window at the same time. Those levels of hierarchy must not only look properly related they must also act properly related in use and experience for the user.

Update: Dean Mayers points out that Reeder’s keyboard shortcuts are the same as those used by Google Reader itself on the gReader website. I, for one, never use Google Reader’s website because I can’t stand it, but I do see the logic in Reeder mimicking Google’s shortcuts.

Reeder and the Keyboard

Jorge Quinteros’ Sweet Mac Setup

Who are you, what do you do, etc…?

I’ve always found the act of introducing yourself to be very intimidating because it’s something you often wished you had practiced more before being put on the spot but either way, my name is Jorge Quinteros. I’m an avid photographer based in Brooklyn who holds a BFA in Graphic Design and is employed as a manager for a major retail company. Try crunching that title into into a business card.

I’ve always been into the Arts and enjoyed documenting life through pictures and it’s that same natural interest that’s driven me to always want to travel and explore new places. While some prefer to enjoy experiences through their own eyes, I prefer to see it through my viewfinder firmly pressed against my face.

Once you’ve established what your passion is, you’ll find it difficult not using that as a source of inspiration for everything else you accomplish, hence my humble personal photoblog. This is where I share and sell some of my favorite photographs backdropped with a narrative of what when into capturing them. Equally exciting to curate is iPad Decór which is home to photographic wallpaper for your iPad based on personal travels and random outings of mine.

If a person’s stature as a photographer is dependent upon what they can do with any camera, in making the mundane appear interesting and using their imagination, then I confidently introduce myself as a photographer despite not having an official position in the industry. It’s the drive that will get me there.

What is your current setup?

Jorge Quinteros' Setup

Jorge Quinteros' Setup

Jorge Quinteros' Setup

Jorge Quinteros' Setup

Why this rig?

The last time I owned an Apple desktop was back when they were introduced in a variety of flavors. Mine was purple by the way and since then, I’ve happily been working with different laptop versions which began with a 12″ PowerBook to what I currently own now.

Everyone loves to be part of an environment where you have options and laptops offer that choice to pack-up and relocated to a nearest coffee shop for a change of scenery. With the configuration of my setup, I often forget that my computer is a laptop but the popularity of taking your work with you is a feature I’m not willing to give up by feeling tied down to a conventional desktop.

As a a retail manager, only 15% of my role includes working with a computer which has no internet connect and that’s shared by more than 4 people. My only connection to the web in those occasions is strictly through my iPhone 4. This is more of an incentive in takin g pride and effort in sprucing up my own computer space at home.

I’m seeing more photographs of people, specifically Mac users owning more laptops than ever before and utilizing them as if they were desktops by having a keyboard and mouse. I’ve yet to see this trait in PC laptop owners but for me, it’s an arrangement that carries a feeling of sophistication and although I might have added elements to work with, it’s an arrangement that feels as if I had taken something that felt uncomfortable in the first place. It’s probably the uneasiness of using a laptop keyboard and trackpad. I’m not a fan at all although during travels, these are the working conditions I put up with.

What software do you use and for what do you use it?

Lightroom 3: The software was developed from the ground up as a tool for more serious photographers and it’s one that’s served as perfect transition when I felt that iPhoto wasn’t offering much. I think as comfortable as you’re likely to become with a camera you’ve had for a long time, the same goes with sticking with a logical workflow for managing your photographs and to not get excited when something new comes along.

Photographers have special needs when it comes to handling their images and Lightroom has been an invaluable software that’s kept me sane on those days that would have driven anyone crazy in dealing with hundreds of RAW files. As far as processing goes, it’s through experimentation that I’ve managed to generate a decent collection of custom presets that I use if it’s required.

Photoshop: Being a photographer and not owning Photoshop is comparable to a carpenter not having an assistant in that you don’t always need it but it’s at hand when you do. It’s literally used for minor touch ups on images but mostly when I’m resizing photographs to upload at iPad Decór. I almost feel like I’m cheating the software because of how rarely it’s launched. Lightroom is king for me.

NetNewsWire: Upon first learning about RSS feeds, I was entranced with the concept of having news, personal blogs, and other odds and ends instantly materialize in a standalone program and the deal was sweeten knowing that I can retrieve it all straight from my iPhone as well. Hands down a brilliant piece of software although I can’t speak highly of it’s coequal iPhone version because I prefer Reeder as a choice.

1Password: If I were held at gun point and asked to write down the passwords to all my online service accounts, I would simply fold. Who has time to memorize all of them? That’s what 1Password is for. Their slogan should be “Don’t think about it. Just buy it”.

Notational Velocity: Everything I write is written in this software. It’s widespread acceptance among Mac users could never go understated because it’s simply that good. You can’t say enough great things about it without sounding repetitive.

BBedit: I’ll admit there’s far better aesthetically pleasing coding software out there than BareBones’s BBedit. Coda, Expresso to name a few but very much like Lightroom, I’ve stayed with what I know and I haven’t found a need to retrain myself in what I’ve already grasp. I’m far from a coder but from what I recall from Introduction to Web Design in college and from pure allure, I’ve learnt the basics of what’s needed to manipulate HTML and CSS to prettify my site.

How does this setup help you do your best creative work?

I wouldn’t say the setup itself induces a sporadic flow of creativeness because that type of feeling takes place when I’m out shooting, but it certainly helps translating the same comfort I have in using my camera to using my computer.

I don’t consider it something extravagant although friends would disagree but I’m finding that people who have similar configuration have one trait in common. They all have an affinity towards the arts, specifically graphic design, web design, music creation and of course photography. My response to the common question of why I use my laptop as a desktop is “It’s a creative thing.” Needless to say that among my social circle, there’s many that choose to work with what’s in front of them rather than configurate it and make it their own.

How would your ideal setup look and function?

At this point, I’ve learnt there’s no sense in believing you could have the latest of anything with regards to technology because every couple of months something smaller, sleeker and faster is released. With that in mind, I have my eye in upgrading to the newly-enhanced 13″ MacBook Air.

I’ve had my current 15″ MacBook Pro for 5 years and in the past I’ll admit that the ownership of several models of Apple’s top of the line laptop has always been driven in wanting to have the best of what they offer without necessarily having the justification to pay for all that power.

There sheer number of positive benchmark reviews from the new MacBook Air alone is what would make it an ideal setup to migrate to because it has sufficient powerful for supporting the type of work I do without having to pay extra the way I have been in the past for a MBP. I would imagine editing photographs on a 13″ screen could only be tolerated for so long so I would want to add an older generation 23″ Apple Cinema Display which I’m sure I could find for a bargain on Craigslist.

When I’m not managing my photographs in Lightroom, I’m going through NetNewsWire deciding which articles to quickly read or send to Instapaper and/or continuing to build upon the loose thoughts I began typing up on Simplenote for the iPhone to further finish in Notational Velocity while listening to some tunes.

And so, with the exception of dealing with a couple hundred RAW files, my computer usage is not that demanding that it would need a super computer. Which is why the new 13″ MacBook Air along with an external monitor would be an impeccable upgrade to what I have now.

More Sweet Setups

Jorge’s setup is just one in a series of sweet Mac Setups.

Jorge Quinteros’ Sweet Mac Setup

A Sledgehammer Called OmniFocus

Despite popular opinion, I do not prefer ultra-powerful task-management tools. I would rather keep my running to-do list inside of Simplenote. Many a weekend I hand write my to-do list onto a sticky note and place it on the fridge or next to my keyboard.

Because the tools — in and of themselves — are not what make me productive. And simply having a to-do list is not the same as doing things.

Unfortunately, low-fi task management is a luxury I cannot afford. In my role as Marketing Director at the International House of Prayer I am personally managing and working on upwards of a dozen projects at any given time. Some of these are personal projects (slowly advancing our approach towards communication and design) and some are group projects (like a website re-design).

One of the things I love about my job is taking complex and/or broken systems and simplifying them. I also enjoy taking nebulous ideas and turning them into clearly defined goals. In many ways, my work is like a giant puzzle I get to solve, and the end results are things like a well-run office, clear pieces of information, and non-complicated designs.

In the office, my team uses Basecamp. At any given time we have as many as 40 active projects — some are print, some web, some editing, and some are all of the above. However, I personally spend very little time in Basecamp. Often my time is spent thinking things through, having meetings and conversations, or doing research before the project is ready for the team to take it on in Basecamp.

Of the several projects I am personally managing at any given time, usually only two or three are truly exciting to me. When a project is the top idea in your mind you don’t need help thinking about it and staying on top of its priorities. But when you are responsible for additional projects which don’t excite you, you need help keeping on track.

Simplicity is not just about whitespace or having the least amount of features possible. It’s about having what you need. A “minimalist” would not do demolition work to their home using a small, lightweight hammer. For that sort of work you need a sledgehammer.

And this is why a powerful task-management tool such as Things or OmniFocus is so helpful to me. I lean towards the feature rich, powerful task managers because it is an area where I am in need of a sledgehammer.

When contemplating the minutia of a task management app it’s important to root out the false notion that a task list in and of itself will make you more productive. Task lists are not your boss; they are more like your assistant. OmniFocus is something I can talk to and tell what I need to get done, and then it assists me in doing that task.

But the tools and systems are just one side of living a focused life. Productivity as a vehicle for getting things done is more like a pair of running shoes: on your left foot is your system and tools, and on your right foot is time management. And you need both feet to run the marathon.

For me, the biggest hinderance to staying focused and productive has never been the tools I use. For the most part I have my “system” down. And so my greatest hindrance for living focused is staying away from the multitude of available distractions. It is amazing how easy it is, in a moment of feeling un-focused, to simply check Twitter or email real quick for anything new (this is why Inbox Zero is not about email).

And so, admittedly, reading in great detail about my sledgehammer of choice will not make you a better worker. But, if, like me, you feel as though you are trying to demolish a house every day, then perhaps you too are in want of a better hammer…

In Praise of Sledgehammers

Finding the right tool to keep track of your projects sometimes feels more like a journey than a destination. Many task-management apps have come and gone (some of us have tried them all). But in the past few years, as task-management software has increased its footprint on the Mac, the one app which has stayed in active development and which continues to grow and improve is OmniFocus.

Everyone in the GTD fraternity knows how easy it is to incessantly fiddle with our systems yet never actually work. And that is the trap door with an app such as OmniFocus. It is so powerful, so robust, and so tweakable that it’s easy to spend more time fiddling with our action items than it is to actually do them.

This is one of the obvious praises for simple and straightforward task managers: they seem to lend themselves to better productivity by the sole virtue that there’s nothing there to fiddle with.

However, my to-do list is sacred ground. I interact with many projects, tasks, notes, and clippings all day long — it doesn’t matter if I’m at work, at home, on the go, or at the amusement park. Which is why this nerd needs a to-do list manager with both brains and brawn. So yes, OmniFocus is a behemoth of an application. It is, in fact, one of the most feature-rich apps I own (second only to the beloved Creative Suite (how ironic!)).

Long-time readers know this is not how I usually roll — I much prefer light-weight, simple apps which do one thing and one thing well. OmniFocus can do so much it’s virtually overwhelming to get your mind wrapped around it. You’re sitting there, staring at all those options, knobs, levers, and buttons, and thinking: I just want to write out a to-do list. And that is a valid feeling. With OmniFocus it can be difficult to feel as if you actually have control over your action items — almost as if there’s a fear that once they’ve left the inbox will you ever seem them again?

This is why simple and straightforward apps like TaskPaper are so popular. Or why folks just keep their to-do list in a plain text file or even a Moleskine journal. I believe it is the same reason the average computer user keeps all sorts of stuff on their computer’s Desktop. They fear that if they can’t see it, they may never find it again.

But what I have found with OmniFocus is that once you’ve taken the time to learn it and get acclimated to its features, it just may be the best thing that ever happened to your task list.

An Aside About Things

It should be noted that I have used and adored Things for more than two years. It is a beautiful and powerful app which worked quite well for me, and so a dissertation in praise of OmniFocus is in no way an indictment against Things.

In my review of Things almost two years ago, I said:

Each of us has our own way of dealing with responsibility and our own expression of productivity. Tinkering and then switching is usually not the fault of the software. We’re not looking for the best app, but rather the best app for us.

Or — to continue with the hammer analogy — my reason for switching to OmniFocus from Things is not the same as buying a new hammer because my old hammer broke. Things still does exactly as promised on the tin. But for me, today, some of the features are no longer powerful enough. That does not imply Things is broken, simply that I now have a different sort of house in need of demolishing.

OmniFocus: A Brief History

The Omni Group has been around over over 20 years. Wil Shipley founded it in 1989 as a technology consulting firm, and at the very beginning brought on Ken Case (who is now the CEO) and Tim Wood. Omni used to build custom software for NextSTEP users until Apple bought NeXT in 1997. Now Omni builds their own software for OS X.

OmniFocus was sort of built by chance. It’s roots are in an add-on to OmniOutliner Pro called Kinkless (kGTD), which was built and developed by Ethan Schoonover. Though it was incredibly clever, Kinkless was really just a hack. It was a bunch of AppleScripts that sat on top of a single OmniOutliner document with some custom buttons and even some Quicksilver actions for quick entry.

In 2006 the Omni Group asked Ethan along with Merlin Mann to help take the ideas and functions of Kinkless and turn them into a bonafide Omni Task-Management Application.

After more than a year of private development with a group of about 500 alpha users, OmniFocus went into public beta in November 2007. At that time they also began pre-selling licenses and OmniFocus pre-sold over 2,500 seats in the first 5 days.

And finally, on January 8, 2008, version 1.0 was launched.

What Kinkless GTD looked like:
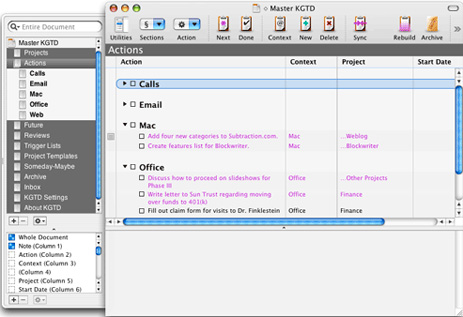
Khoi Vihn's Kinkless GTD Setup

The first publicly displayed mockup of OmniFocus:
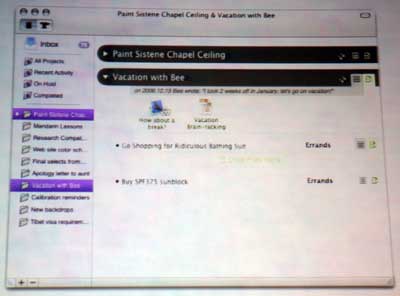
Original OmniFocus UI Mockup

OmniFocus 1.0:

OmniFocus Version 1.0

OmniFocus today (version 1.8):

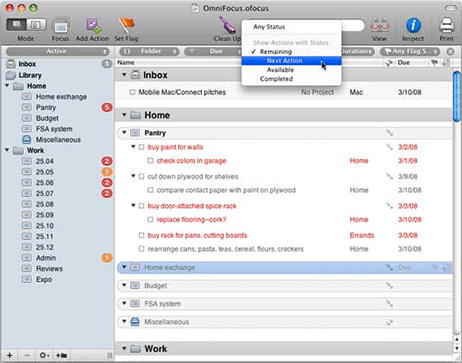
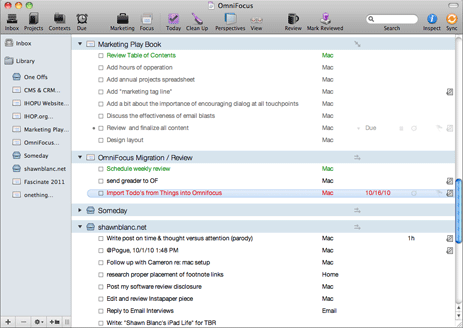
OmniFocus User Interface, version 1.8

As you can see, not much in the UI has changed from the original Kinkless implementation of 2005 to what OmniFocus is today in 2010. You could say that OmniFocus is Kinkless 2. And though the front end is still quite familiar, the back end has been significantly supercharged.

The User Interface

Though I confess I am not very familiar with the design and development team at Omni Group, but it seems to me, more or less, that OmniFocus was primarily built by thinkers and developers. Which is why it works so well, but still looks a little rough around the edges.

In a way, it reminds me of the early days with Instapaper. Marco confesses to being an engineer and not a designer, and for a while Instapaper was not exactly the most attractive app on your iPhone. But the functionality and ease-of-use blew any ill feelings towards the UI right out of the water. And over time the UI of Instapaper has been refined into the piece of art that it is today.

So it goes with OmniFocus on the Mac. In fact, I think the biggest hinderance to using it is the user interface. At times I find the interface for the actual list of tasks somewhat difficult to navigate. After a bit you become familiar with it, but I usually have this feeling that there is too much going on at once and I’m not quite sure that it’s all staying together.

In part, this is why perspectives are so important and useful. They allow you to drill down into the right lists at the right times and only see what makes sense to you.

The UI has certainly been refined from that initial mockup, and yes you can refine bits of the UI yourself by using custom icons in the menu bar and custom colors, fonts, and spacing for the lists. But overall the app’s interface could still use some refinement and some breathing room.

And as I’ll talk about later, interacting with the iPad version only reinforces that. The iPad app feels much more “held together”, if that makes any sense, and the design of the iPad app is part of what makes it the best version of OmniFocus out there.

But so long as we’re discussing the UI, one fun feature of OmniFocus on the Mac is the ability to customize the style for your lists. From the application’s Preferences window choose the Style tab. From there you can tweak the colors, line height, and fonts of all your projects and lists. No doubt, many procrastinators have wasted some time fiddling with these options. I know I have.

But in addition to fiddling, you can load and save themes. There are websites which have themes posted for download, or you can download my simplistic theme if you like.

Using OmniFocus

Many of the task-management apps available today are a just another designer’s unique approach towards the same fundamental functionality: the ability to add tasks, organize them by project, assign a due date, etcetera. Put another way: a lot of today’s to-do apps are, more or less, the same app but with different skin.

Of the five areas of Getting Things Done are capturing, processing, organizing, acting, and reviewing, you want the least amount of friction. OmniFocus doesn’t just let you capture, process, organize, and review — once you’ve captured and processed an idea, OmniFocus almost does the rest of the work for you.

This is why OmniFocus is different. It was built from the inside out, meaning it’s a database first and a UI second. It may not win the beauty contest, but in my experience, compared to other to-do apps, OmniFocus handles your projects better than any other tool I’ve used.

For capturing tasks and information, OmniFocus leaves little to be desired:

  • There is a quick entry box you can bring up at any time on your Mac.
  • If you email yourself items and use OmniFocus’ Mail Clip-O-Tron 3000 you can pull messages from your email into OmniFocus. OmniFocus will even write Mail rules for you.
  • You can add files and clippings to your action items.
  • There is a bookmarklet which works on your desktop, iPhone, and iPad to send whatever website you’re viewing to OmniFocus.
  • It is scriptable.
  • And more…

But once you’ve captured your tasks and ideas they need to be processed and organized so they can be done. And the area in OmniFocus with the most friction is processing.

OmniFocus forces you to process your actions. Items just sit mercilessly in your Inbox until you’ve at least assigned them a context or a project (but preferably both). It doesn’t stop there. You can assign a start date and due date, you can flag it, you can mark it as being on hold or delegated, and a then some.

At times, the need for processing your stuff can be frustrating. But the truth is it’s good for you. It’s like your mom reminding you to brush your teeth before you go to bed. Taking that time will mean much better results in the future.

A properly processed Inbox is what leads the way to the two most addicting and powerful features of OmniFocus: the review and perspectives.

The Review

I love how OmniFocus helps you review your projects. Again, like a good personal assistant, OmniFocus brings to your attention each project, one at a time, and lets you review the tasks in that project. This is your chance to refresh yourself on what you’ve committed yourself to and make sure it is all still relevant and accurate.

Moreover, OmniFocus keeps track of your reviews for you. It knows when you last reviewed a project and only brings it to your attention when it is time to review it again. And, like everything else, your reviews sync over the air. Which is fabulous news, because the best way to review your projects is with OmniFocus on the iPad (but more on that in a bit).

In Things, I had to review manually. I would sit down at my laptop and scrub the Today List. Then, if I had the time or energy I would manually go through each project to see what tasks were in there and if any were in need of being done soon, or were no longer necessary. Because everything in Things was centered around the “Today” list in a way, managing my to-do list felt like I was perpetually processing. And since reviews had to be done manually I rarely ever got to them.

Perspectives

Perspectives is a backbone feature in OmniFocus. It is one of many ways to sort and present your action items in a meaningful manner. But perspectives are so powerful, it is as if OmniFocus were thinking for you.

It’s through the perspectives that give OmniFocus a much more robust approach towards that final and all-important stage of getting things done: doing.

As I mentioned earlier, getting actions into OmniFocus is easy. But processing of those actions is where the most friction exists. But that is because the organization and output of your tasks is what makes OmniFocus so powerful. I’m not exaggerating when I say that OmniFocus pretty much organizes your lists for you. It will take your relevant tasks and intelligently order them for you so you only see what you need to see without worrying about other stuff. After years of keeping a to-do list, I just may now be finally understanding what people mean by a “trusted system”.

As Tyler Hall wrote:

It’s hard to describe how incredibly powerful Perspectives are until you actually spend a few days with them in your workflow. Other task managers have smart folders or dedicated “Today” lists, but they absolutely pale in comparison to the flexibility that Perspectives afford.

The perspective I live in the most is one I made myself. It’s called “Today” and only shows me available actions which are due and any flagged items. What I like about having flagged items appear in my Today perspective is that sometimes I know a new action item needs to be done today but don’t want to fiddle with assigning a context or project or due date (especially when entering it via my iPhone or iPad). Thus, flagging the item is the quickest way to get that task into Today’s list.

Defining custom perspectives is easy. You can start by manipulating your “View”. Then from the Perspectives menu chose to Show Perspectives. From there, clicking the gear icon allows you to save your current OmniFocus window as a new perspective or update a currently defined perspective.

Saving Custom Perspectives in OmniFocus

While in the Perspectives Menu, you can also adjust unique Status settings only available from this pane, and you can set custom icons by dragging them into the icon box. This is how my “Today” perspective is built:
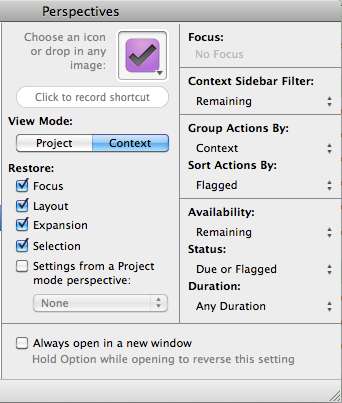
Buildig Custom Perspectives in OmniFocus

Once you’ve got your very own perspective you can add it to the toolbar and it will sync to your iPhone and iPad. From the iPad, if you star a perspective it will show up on your home toolbar (a feature I’d like to see come to the iPhone).

Over-the-Air Syncing

Despite all that OmniFocus as a task-management application can do, for me, one of the hallmark features is its ability to sync over the air.

One thing that’s important to understand about why over-the-air sync is so vital to my day is that I don’t spend my whole day working in one location. I spend part of my work day at home, part of it in my office, part of it in meetings, part of it on the go commuting between campuses, and part of it in our on-site coffee shop. Sometimes my location and the device I’m using will switch by the hour, and so I need my tasks and references to be available to me regardless of where I am or what I’ve got with me.

This is partly why I keep a folder of all my current projects and files — “Currently Working On” — in Dropbox. Not only does this keep those files in real-time backup, but it also gives me access to them from my iPhone, iPad, and Mac.

As I said in an aforelinked post about 1Password, apps that don’t sync are becoming increasingly arduous to use and maintain. And it truly did reach the point where Things was nearly useless to me. I would throw tasks in there to get them out of my head and to save them for later, but between my iPhone, iPad, and Mac my lists were so out of sync just by lunchtime that I rarely went to Things when it was time to actually accomplish anything.

Instead I would keeping urgent tasks in my email inbox (horror of horrors!) and would do a daily mind sweep of anything I knew needed to be done that day and build my to-do list in Simplenote / Notational Velocity so I would have access to it throughout my day.

As I said an the outset of this article, in a simpler world I would be delighted to use Simplenote as my task list. But I wear too many hats and have too many plates spinning at the same time for such a low-fi system. And that is ultimately why I switched to OmniFocus from Things.

Clippings and Attachments

When on your Mac you can clip a file to your task. For example, suppose you get an email from your boss asking you to do something. If you’re a clever employee you will do what your boss asks right away. But, perhaps you would rather ignore your boss for the moment and continue reading about Inbox Zero.

You can take that email message from your boss and send it to OmniFocus. Simply hit the Clippings Shortcut key (which can be defined in the Clippings Preference pane) to bring up the quick entry pane with your email message attached as a note. Now you can define the action item your boss needs, and save the email as a reference for later when you get around to doing it.

A clipping is basically an alias to a file on your Mac. You can clip just about any file you want: photos, videos, documents, audio… anything. In fact, I don’t know of any file type that you cannot clip to OmniFocus.

Some clippings — such as email messages and website URLs — get synced to your iPhone and iPad as notes. Other clippings — such as images or files — are treated as aliases, and thus can only be accessed from your Mac.

By default, OmniFocus on the Mac does not embed files you attach to your items. It simply links to them. This offers a tremendous gain of speed for syncing your database between multiple devices. However, if you do have a file that you want to embed in your database from your Mac so it will sync to your iPhone and iPad, then you have to embed it manually.

To embed a file into an action item select the item and click Edit → Attach File…, then from the file picker choose the file you want and pick the option to embed the file in the document (rather than create a link to the file).
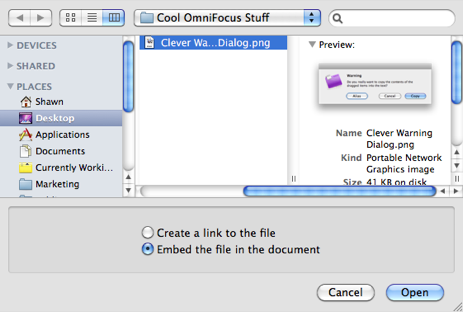
Embedding a file in OmniFocus

Now the embedded attachment exists within your database and will sync to all your devices.

In the iPhone and iPad apps, however, there is no such thing as clippings; there are only attachments. From the iPhone or iPad you can attach a photo (by taking a new one or pulling one from your device’s photo library) and you can attach audio.

There seems to be no limit as to how many photos and audio tracks you can attach to an item. And though the process and feature is overall very polished, I do have a few quibbles.

  • Recording Audio: To record an audio attachment on your iPhone you tap “Record Audio”. But then, all you’re presented with is a blank white box. If you’re not familiar with how the UI changes you may be wondering (as I did) if the audio recording is actually taking place.

In the iPhone’s native Voice Memos app you get a big red bar on top of your screen letting you know you are now recording. In OmniFocus you see nothing, until you begin talking. The you see a green line which is a volume-level indicator.
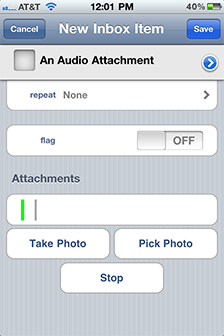
Recording an audio attachment in OmniFocus on iPhone

Surely a pulsing red UI element signifying “now recording” would be more helpful? It wouldn’t even have to replace the volume-level indicator, it could sit right on top of the “Stop” button.

After you’ve finished recording your voice note in OmniFocus it will sync to your database as a .cafCore Audio Format — file, which is an audio container file used by Apple. The sound quality of a synced audio track is actually quite fantastic and clear.

  • Attaching Photos: When adding a photo attachment from your device’s image library the iPad has the right approach. It says “Image added Today, 2:46 PM”. The iPhone however says “Picture taken Today, 12:14 PM” (or whatever time you added it). On the iPhone, for image attachments that are added from the iPhone’s photo library, it should say “Image added” not “Image Taken”. (And to get especially nit-picky, why is “Today” capitalized? I see no reason.)
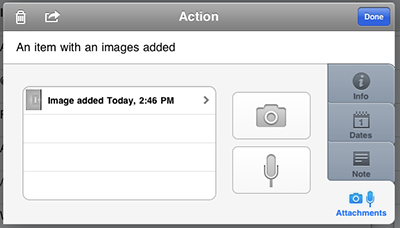
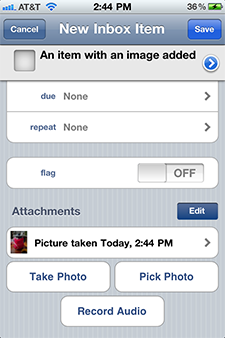
A photo attachment on OmniFocus for iPad

A photo attachment on OmniFocus for iPhone

The only downside to attachments is wireless syncing. Aside from being able to sync over-the-air the next most important thing is to be able to sync quickly, and big file attachments hinder that.

In day-to-day usage I rarely need to attach audio or photos to a task when adding it on my iPhone or iPad. It is much more common for me to add a clipping to an action item when on my Mac. But since these files are usually are only needed for a project I’m working on when I’m actually at my computer, I don’t attach the clippings I simply link to them. By keeping attachments to a minimum, it helps my database sync quickly when I’m launching OmniFocus on my iPhone or iPad.

Worth pointing out is that when syncing your OmniFocus database, only what is new and/or what has been changed gets synced. This means when your desktop app syncs to the cloud, it only pushes tasks that have been updated since the last sync. And when you launch the iPhone app, it only downloads the tasks which have been created or updated since the last sync. It does not download the entire database every time.

This is, of course, standard operating procedure — it’s the same way programs like SuperDuper, Time Machine, and Dropbox work.

The Omni Sync Server

On the iPad’s sync options you are given the opportunity to join the Omni Group’s beta Sync Server. It is, more or less, their own WebDAV server. The iPad is the only one of the three apps which recognize this as Omni’s own sync server. On the desktop and iPhone versions of the app you have to set up the service under the Advanced WebDAV settings.

Currently all the Omni Sync Server does is sync your data. Though my perception is that it does seem to respond much quicker than the MobileMe sync I used for the first month. Hopefully Omni Group has some exciting features in the pipeline for their sync server beyond just syncing (the ability to email directly to your cloud-based database would be one such feature).

A Few More Miscellaneous Observations About OmniFocus’ Over-the-Air Sync Options

  • Changes to your database don’t get pushed to the desktop app, nor are they pushed to the server in real time. The desktop app syncs on a schedule every 60 minutes; however you can manually initiate a sync anytime you like and it always syncs when quitting.

  • On the iPhone and iPad you cannot sync if OmniFocus is not running in the foreground. Unlike sending an email or a text message, where once you hit send you can lock your iPhone or iPad and the message will still be sent, OmniFocus must be open and running to complete its sync.

Likewise, if your iPhone is locked it will still fetch new emails. OmniFocus however, just like other iPhone apps, can only sync when it is open. And alas, it does not have “sync completion” — this means if you initiate a sync and then exit out of the app the sync will lose its connection to the server.

This lack of non-background syncing can be especially annoying when you’ve completed a task, checked it off on your laptop, but then later it beeps your phone reminding you the task is due. The only way around this is to turn off reminders for OmniFocus on your iPhone. This is done in the Settings pane from the OmniFocus home screen on your iPhone.

OmniFocus on iPhone

In the beginning, the best way have your OmniFocus task list while on the go was to print it out. The first version of OmniFocus for iPhone was an iPhone optimized Web interface.

On July 10, 2008 the native iPhone app launched. Unlike the printout or Web interface before it, the iPhone app was a full-featured, stand-alone task management app. Meaning you didn’t need OmniFocus on your desktop to use OmniFocus on the iPhone. But if you did have the desktop counterpart then you could sync your tasks with your Mac. And you could sync them wirelessly, over the air via MobileMe or your own generic WebDAV server. Syncing over the air is something that many applications have still yet to implement, yet Omni Group had it done right out of the gate.

And even before the iPhone app was available in the App Store it had already won an Apple Design award. The iPhone app has come a long way in the past two years, but it’s that initial hallmark feature of OTA syncing that caused me to switch to OmniFocus in the first place.

Perhaps the most clever and thought-through feature on the iPhone (and iPad) app is the ability to quickly enter a task even when the app itself is syncing and updating. The nature of over-the-air sync means the app has to check for changed data and then update itself every time you launch the app. During the updating process the iPhone app’s database is momentarily locked out. Yet you can still add an action item to the inbox via the Quick Entry button.

This is a dream feature for the many times you are launching OmniFocus for the sole purpose of jotting something down.
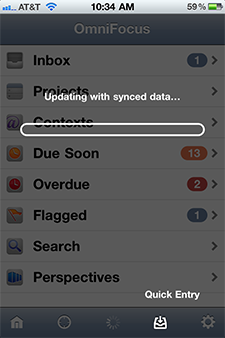
Quick Entry is available at all times

And so long as we’re discussing the Quick Entry button, it’s worth noting that there is a functional difference between the plus (+) button and the quick entry button. The quick entry is for something to simply go directly to the inbox (hence why the icon is an arrow pointing into an inbox). The plus button will add a task with your currently viewed project or context pre-populated (though you can change it).

As mentioned above, in the settings of the app this is where you can turn off notifications of due items. It’s also where you can set your badge count (I keep my badge count off; I’m already aware that I have things to do). I also have all the current “Experimental features” turned on. Such as Landscape Mode, Undo Support, and Perspectives. The latter is one of the backbones of OmniFocus, so being able to sync your perspectives between your iPad, Mac, and iPhone seems like a requirement not an experiment.

OmniFocus on iPad

The iPad app was released on July 30, 2010 and is, without a doubt, the best of all three versions. Moreover, it is one of the most robust, feature-rich, easy-to-use apps on my iPad. $40 is big ticket compared to many other iPad apps, but you are getting what you pay for.

It seems to be a common practice that for apps with a strong presence on the desktop, their iPhone and iPad counterparts are portals into the desktop app, or light versions. But OmniFocus on the iPad is the current king of the OmniFocus hill. Ask anyone.

Brent Simmons:

Every successful computing platform has to have a “VisiCalc moment” — the moment it goes from fun toy and technology demo to “holy crap this thing is useful.”

I don’t think there’s a single VisiCalc moment that everyone will have for the iPad — but, for me personally, it was OmniFocus. That’s when my iPad went from toy to indispensable tool.

Before OmniFocus, my iPad wandered around my desks without a real place. Now it has a place right next to my dev machine’s keyboard.

Chris Bowler:

OmniFocus [on the] iPad is the best of the three. It is indeed, but I’ll go one further: it’s the best task management tool that I’ve used. Period.

This is partly due because the platform itself is present — and usable — on the three main devices I use. But I must profess my love for the Forecast feature that was added to this client. It is not present on the Mac or the iPhone clients.

After a couple of days of using the Forecast ‘view’, I asked myself, “Why has no other Mac task application used this exact interface?” Indeed, even the Mac client for OmniFocus pales in my usage. The ability to quickly see a timeline of what’s coming down the pipe, no matter the project or context — has been a boon to my tool belt. To have all overdue items available in one quick glance is also beneficial.

In particular, the iPad version soars in two areas: (a) Reviewing your projects; and (b) the Forecast view.

Review

As mentioned earlier, one of the most splendid functions within OmniFocus is the way it helps you review your projects. You currently cannot review them in the iPhone app, but that’s okay because once you’ve done your weekly review with your iPad there’s no going back.

In perfect form the Review pane comes equipped with a coffee cup-bearing icon. Tap that and OmniFocus brings up all the projects you have not reviewed in the past week. (If, perhaps, you need to review more often than once a week you can set your time allotment of choice from within the settings.)

Once in the Review pane you see one project at a time. On the left sidebar is your list of all projects pending your review, and on the bottom are some attractive buttons to let you chose what sorts of projects you want to review (active projects, those you’ve put on hold, those you’ve completed, or those you’ve flat out dropped), and your stamp to mark the project as reviewed.

OmniFocus for iPad: Review buttons

The review pane on the iPad app is a textbook example for why good design is important. The functionality on the iPad app is no different than the desktop version, yet the interface is so well designed it makes the review process faster and significantly more pleasant.

Forecast

The Forecast view is just that, a high-level look at upcoming tasks for the next 7 days; also included is everything past due and everything with a future due date. I second Chris’ statement above: why has no other task manager implemented this view? I use it more than my custom-defined “Today” perspective.

OmniFocus for iPad: Forecast View

Since switching to OmniFocus I’ve had many people ask me if the iPad version is worth getting in addition to the desktop version. I would argue it’s the other way around: is the desktop version worth getting in addition to the iPad?

By nature of how I work, I use the desktop version of OmniFocus significantly more throughout the day than either of the mobile apps. But I prefer and enjoy the iPad and iPhone apps over the desktop. And I especially prefer the iPad version.

Hopefully OmniFocus for iPad will be leading the way for future versions of its iPhone and Mac counterparts and the Omni Group will take what it’s learned on the iPad back to the Mac.

Conclusion

I switched to OmniFocus because of its ability to sync. I’m staying because of its ability to do everything else.


More software reviews can be found here.

A Sledgehammer Called OmniFocus

Aaron Mahnke’s Sweet Mac Setup

Who are, what do you do, etc…?

My name is Aaron Mahnke. I’m a freelance graphic designer in the Boston area. I work under the banner of Wet Frog Studios, focusing on identity and brand design, though I do a ton of print design and even a bit of web design as well. I blog sometimes at aaronmahnke.com, and share resources for freelancers on my other site, abetterfreelancer.com.

What is your current setup?

Aaron Mahnke's Mac Setup

Aaron Mahnke's Mac Setup

Aaron Mahnke's Mac Setup

My desktop computer is a 27-inch 2.66 GHz Quad-Core i5 iMac with 4GB of RAM. I recently made the switch from the wired Apple aluminum keyboard to the bluetooth version in order to allow my Bamboo Fun (1st gen, medium size) tablet to sit closer to the center of my iMac, eliminating some unnecessary strain on my right shoulder. I’ve found that the mouse that came with the Bamboo tablet is perfect for my work style, and I can easily switch to the pen when needed.

I have a secondary work station set up beside my red reading chair that consists of a newer 2.4 GHz i5 MacBook Pro (also 4GB of RAM) and a 23-inch Apple Cinema Display. I use it mostly as a hub for three Western Digital 1TB MyBook external hard drives that contain years of video production work, as well as an external Sony DVD burner for churning out multiple copies of client work while I read in the red chair.

When I’m mobile I rely on my iPhone 4 and a 32GB 3G iPad to keep me connected and creating. The iPhone is my main device for task capture (via the Things app), RSS feeds (via Reeder) and reading (via Kindle, iBooks and Instapaper). I rarely use it as a phone, though during the work day it’s docked beside my iMac with a pair of Apple in-ear headphones connected and ready.

The iPad is a fantastic work device for me. I keep it naked at home, but it travels in a DoDoCase outside the house. It goes to every meeting with me, and I rely on a combination of SimpleNote and Penultimate for capturing the information I need. I rely heavily on the Photos app to hold my logo design portfolio and digital samples of my print design work. And the Dropbox app is the perfect tool for presenting potential clients with my logo design service information, my contract and glimpses of in-progress work.

Why this rig?

Power and flexibility are my driving motivations, honestly. I put my iMac to work every day, sometimes running Illustrator, Final Cut Pro, VMWare Fusion and a handful of smaller applications all at the same time. I am in this eternal struggle between wanting to be parked at a desk with extreme power and screen space, and being able to pick up and work from anywhere, so this setup allows me to live with a foot in each world for now.

What software do you use and for what do you use it?

The first piece of software I always tell people about is Dropbox. I have a 50GB account to hold all my design projects, which means I can work whether I’m at my desk or using my laptop away from home. The natural back-up that Dropbox brings to the table also helps me sleep easy knowing my clients’ work is always safe.

The applications I launch every day when I sit down at my desk would be Mail.app, Things, Illustrator, Numbers and Billings. On occasion I have to launch Pages, Keynote, Final Cut. Other applications are always running, though, like Notational Velocity, Yojimbo, MailActOn, 1Password, Littlesnapper and Tweetie. I have a few Fluid instances for things like Basecamp and Rdio, but prefer Propane for Campfire chats. And finally, my menu bar plays host to Droplr, which I use a few times a week at most.

How does this setup help you do your best creative work?

I’ve tried my best to surround myself with tools that help me get the job done faster. I take notes in Notational Velocity, which is connected with SimpleNote, so that I never have to save, rename, or move the files again. I keep inspiration logged in Yojimbo and Littlesnapper, both of which sync across my computers. And I try my best to master hot keys to save time and effort.

Creativity is all about reducing the distance from inspiration to retention. I might not be able to react to a moment of inspiration right away, but if I can capture it properly (via screenshot, dragging into Yojimbo, or typing the idea out) I can come back to it when I’m ready. This isn’t multitasking, though. This is all about knowing your tools and having a solid system.

How would your ideal setup look and function?

Honestly, the Apple ecosystem is getting really close to perfect for my needs. I would love to upgrade the RAM in both computers someday soon, and a SSD in the MacBook Pro would be next on my list after that. I can dream about better app syncing between the Mac and iOS devices, but Dropbox really gets the job done for me. My only other “fantasy device” would be a big fat Drobo, but I think that’s because I’m an external storage junkie.

More Sweet Setups

Aaron’s setup is just one in a series of sweet Mac Setups.

Aaron Mahnke’s Sweet Mac Setup

Sponsorship Opportunities

One of the greatest assets a publisher has is the attention and trust of their readers. It is something cultivated over time as a person or publication slowly becomes a trusted advisor for the things they write about, link to, and share. In short: my RSS Subscribers are my truest fans. They’re the ones who have volunteered to let me share ideas, links, and more with them anytime I want.

And this is much of what makes an RSS Sponsorship so valuable — the sponsor gets exposure to an audience who’s already paying attention.

Placing ads into RSS feeds is laughable. The ads often look horrendous (if they work at all), and offer a minuscule return on investment for both the publisher and the advertiser. Sponsoring an RSS feed however is a fine idea. It provides the promoter with a high-impact way of getting exposure, and allows the publisher to keep their feed clean from ad clutter.

On Monday I began offering sponsorships to this site’s RSS Feed. Yes, the sponsorships help me to continue writing here, but long-time readers of this site know what an advocate I am for the freelance designer, the 3rd-party developer, et al. I am not exaggerating or lying when I say that part of the reason I set up sponsorships was to offer a top-notch promotional channel for designers, developers, writers, and more.

And so good news: for those looking to promote their product or service, shawnblanc.net is not the only site offering Sponsorships for its RSS Feed.1

  • Monday by Noon: a gem of the Internet. Jonathan posts a well-written, well-informed article on Web design and development every Monday. And now, just before his weekly article is published, you have the chance to be endorsed by Jonathan to his healthy readership of Web professionals.

  • Minimal Mac: a site that has taken off like a rocket over the past year. Patrick Rhone is a trusted advisor to many a Mac nerds and minimalists. He is offering you a chance to sponsor his RSS Feed as well. You get a promotion on Monday and a thank-you post on Friday.

  • The Brooks Review: regular, insightful writing about Apple, technology, and the Web. Ben Brooks is quickly becoming a must-read among many well-known technology sites.

Why am I promoting these other guys? Because sponsorship opportunities are a fabulous channel to promote you app, your book, your freelance business, and more. I get frequent requests from app developers asking me to check out and hopefully promote their app. I get emails from web developers asking me if I know any good designers, and vice versa.

There is certainly no shortage of top-notch products and services worthy of being made known. If you’ve got something you’d like to promote, book a sponsorship on this site. But I also recommend Minimal Mac, Monday by Noon, and The Brooks Review. I believe your promotion would do well there also.


  1. Savvy advertisers may think ahead and sponsor the same week — or back-to-back-to-back weeks — across multiple sites.
Sponsorship Opportunities

Nicholas Felton’s Sweet Mac Setup

Who are you, what do you do, etc…?

Nicholas Felton. (Photo by Ellen Warfield.)

My name is Nicholas Felton. I am a graphic designer based in New York City. I focus primarily on data visualizations… making charts and graphs and maps for print and online. I also run a website called Daytum that I founded with Ryan Case to help people count the big and little things in their lives and compile these statistics into pages like my own Annual Reports.

What is your current setup?

Nicholas Felton's Setup

Nicholas Felton's Setup

My work machine is a dual quad-core Mac Pro with a 30″ Cinema Display. Away from the office, I use a 13″ aluminum Mac Book.

Why this rig?

The first Mac I owned was a Quadra 840AV and I’ve used Mac towers continually since the G3 days. I may migrate to an iMac for the next office machine, but I like having lots of internal drives in the tower. The internal drives are cheaper and seem to last longer than external backups. I also like how easy it is to upgrade the memory, and that I can hang onto the monitor when I swap the computer out.

My favorite laptop was the 12″ G4, so when Apple did the aluminum MacBook refresh, I bought the 13″, and it still holds its own for travel and home use.

What software do you use and for what do you use it?

  • Adobe Illustrator, Photoshop and InDesign CS3 (with occasional excursions into CS5) for design.
  • Textmate or Coda for web work (css and html).
  • I use Processing to make little data visualization and mapping applications that I output to pdf and import into Illustrator.
  • I use Apple’s Numbers and Pages as Excel and Word clones.
  • I also use TextEdit all the time, for writing notes or answering interview questions and saving data sets. It’s remarkably useful.

How does this setup help you do your best creative work?

In plain terms, it’s fast enough, doesn’t crash too often and tends to not get in the way of what I want to do. Fundamentally, it lets me do my best work because I am familiar and comfortable with the way everything is set up, so I spend very little time looking for things. If it weren’t for email, I would be a very productive person.

Nicholas Felton. (Photo by Ellen Warfield.)

Nicholas Felton. (Photo by Ellen Warfield.)

How would your ideal setup look and function?

If Adobe would kill the feature creep and focus on software that’s fast and doesn’t crash I would be most of the way to an ideal setup. Apart from that, I just need a big monitor, a CPU that can keep up and some decent speakers to be happy.

More Sweet Setups

Nicholas’ setup is just one in a series of sweet Mac Setups.


The three photos of Nicholas were taken by Ellen Warfield.

Nicholas Felton’s Sweet Mac Setup

Announcing RSS Feed Sponsorships

Up until this morning the only way to promote a product or a service on this site was through ads placed with Fusion. The Fusion ad network is fantastic, but ads placed there are shown across its entire network. But now, if you have a product or service you’d like to promote directly to the fine readers of shawnblanc.net, you can sponsor the RSS Feed.

Feed sponsorships are week-long, exclusive, and very affordable. Your promotion will reach a handsome audience of tech- and design-savvy Mac nerds. This is a fantastic opportunity for freelancers, developers, designers, and anyone else with a product or service in need of exposure.

More info on pricing, reach, and schedule can all be found on the sponsorship page.

To book your sponsorship, or if you have any questions, please email me.

Announcing RSS Feed Sponsorships

Iain Broome’s Sweet Mac Setup

Who are you, what do you do, etc…?

I’m Iain Broome and I write fiction. My first novel is called A is for Angelica and is represented by Tibor Jones Associates. They’ll be sending the novel out to publishers soon and I’ll be keeping various things crossed, especially my fingers.

By day I’m a copywriter for The Workshop, a leading UK design company. It’s a little more than writing copy though. Yes, I can give you a tasty strapline or plain English paragraph, but I also work on usability, accessibility and wireframing clients’ websites.

I have a couple of blogs. Write for Your Life offers writing advice for all types of writers. It also has snazzy illustrations provided by the marvellous Matt Pearce. Broomeshtick is my personal blog where I talk about writing, design, technology and, well, more writing.

What is your current setup?

Iain Broome's Setup

Iain Broome's Setup

Iain Broome's Setup

Iain Broome's Setup

I bought my first Mac in March 2008. It’s a 20″ iMac which gets backed up wirelessly to a 500gb Time Machine, which in turn connects to an Xbox 360 in the lounge. Or at least it did before the 360’s second bout of RROD. Microsoft, eh? *spits*

I also have a 16gb iPhone 4 and, when my piggy bank is finally full, I’ll be getting a 16gb, wifi-only iPad. I intend to use the iPad for creation as much as consumption.

The idea that you can’t use an iPad to write anything of substance seems ridiculous to me. All you need is a keyboard and a blank screen. The iPad provides both and I can (will) take it anywhere (everywhere).

Finally, I have a Sony A200 Digital SLR camera. One day I will learn how to use it properly.

Why this rig?

The iMac provides all I need and more as a novelist and blogger — let’s face it, words are pretty easy to process. But I also use it to edit images, record podcasts and put together video blog entries for Write for Your Life. The iMac has all the power and storage I could ever want for those things too.

Sometimes I think I might have been better off with a MacBook or MacBook Pro, but the extra screen size comes in handy for watching movies, viewing pictures and having multiple windows open. Truth is, it’s become the hub of our home. CDs and DVDs? Long forgotten. This is streaming central.

My iPhone 4 stays with me throughout the day. I primarily use it for email, Twitter, my todo list and reading articles through Instapaper. We also use it to play music and podcasts wherever we are in the house.

Truth is, it’s the perfect techno-companion and unless something catastrophic happens, I can’t see me using anything other than an iPhone for quite some time.

Oh. I sometimes make phone calls.

What software do you use and for what do you use it?

Okay, this is the important bit. Having a Mac has changed the way I work, that’s for sure. But really, it’s down to the software.

I explained this in a recent post, which I might as well quote:

Drawn by the bright lights and Apple’s promise of all-the-cool-things-I-could-do, I expected dazzlement and wonder with every mouse-swish and keystroke.

But something strange happened. Instead of reveling in the glitz and relative glamour of iMovie, iPhoto and the multimedia posse, I found myself enjoying quiet nights in with my new best friends, strong and silent types like Finder, TextEdit and, more recently, Simplenote.

And the reason was this. I am simply a writer. I don’t need all that other stuff. Or at least, I don’t need it to do what I do best.

So once the dazzlement wore off, what I found was a computer – a word you hear less and less these days – that gave me tools to do things quicker, more efficiently, perhaps even better.

The technology disappeared and left me alone with my words. Just me and them.

That said, my novel was written in Microsoft Word. I know. But only because I had zillions of drafts and edits left over from my pre-Mac days. I use TextEdit for most other writing and have enjoyed WriteRoom on occasion.

In other news: it’s iTunes and Spotify for Music. Safari for browsing. Transmit for transmitting. Acorn for pretty pictures. Adium for chit chat. Simplenote for todo lists and ideas. Alfred for launching. Then 1Password, my trusty online bouncer.

Finally, there is DropBox. The key to it all.

How does this setup help you do your best creative work?

It’s a pretty time-consuming this writing novels, running two blogs while having a full-time job for a design agency business. It means I have to do things whenever and wherever I can. My setup is designed – well, it’s evolved, more accurately – to allow me to do that. It’s all about the sync.

With DropBox, Simplenote and an iPhone 4, I can access everything I need at all times. I can edit files on my work PC at lunch and know they’ll be there when I get home. I can approve comments, make notes or catch up on some reading on my phone while I’m waiting for the bus. And again, when I get home, my Mac is up-to-date.

Novel number one was written on no less than six different computers – a combination of desktop PCs, laptops and my iMac — in even more locations, using goodness knows how many USB drives for transferring and backing up.

Novel two will be written on just my future-iPad and my iMac. That says it all, really.

How would your ideal setup look and function?

It’s just the iPad, I think. Everything else works just as I need it to. I might be tempted, when the time comes, to replace the iMac with a MacBook, but it won’t change the way I work. And that’s the most important thing.

It takes a while to get a setup that you’re happy with, but after two years together, me, my Macs and a few third-party apps are getting on tremendously.

Frankly, we don’t need no one else.

More Sweet Setups

Iain’s setup is just one in a series of sweet Mac Setups.

Iain Broome’s Sweet Mac Setup