My advice for a good backup strategy? Keep it simple. Keep it safe. Don’t stress the details.
The “you should backup regularly” argument needs little coaxing. Everybody “knows” they should backup the problem is they don’t. A backup plan is only as good as its followthrough – which is why Time Machine is so epic. It backs up every hour for you. You don’t even know it’s running but you hear the hard drive spinning, and watch your system slow down for a few minutes.
Once people jump on the backup regularly bandwagon, the sinkhole that many fall into is to stress the details: the absurd fear that some day there will be some file that they will absolutely have to have. And when that day does come they will discover that they have deleted the file – or overwritten it, or something else catastrophic – and thus, by not having that one file at the theoretical moment of truth they will not impress their fellow nerds in a, “Look what I kept for all these years. What do you mean, “so what?”” moment of glory.
Of course, there are those who do need multiple backups, archive history and the ability to roll back, and you know who you are. But for the average user here is my advice: keep it simple; use SuperDuper to keep a bootable copy of your main startup drive, and let Time Machine do its thing to archive stuff. And hope you never need to use either.
Backing Up
With the advent of Time Machine backup awareness went through the roof. So far I have only used Time Machine once since Leopard came out…
It was while working on the NetNewsWire review. I made a folder with some screenshots and had it sitting on my desktop for a day or two. I moved the folder, and a few weeks later when I was ready for the screenshots I couldn’t remember where I had moved the folder to or what it was even called. What I did remember was that the folder had been on my desktop. So I launched into outer space and found the archived version and restored it.
To recap: the only time I have ever used Time Machine was to find a misplaced folder.
My point? Time Machine makes a better archive system than it does a catastrophic events solution. Not that Time Machine is not a good backup solution, but it’s not the best answer to every data-loss problem. Which is why SuperDuper is the ideal companion to everyone using Leopard and an absolute necessity to everyone on 10.4 and below.
On page 14 of his epic Leopard review, John Siracusa talks about Time Machine and shares some (pre-Leopard) backup stats of Mac users based on a poll Apple took:
Eighty percent of Mac users said they knew they should backup their data. (This is scary already. Only 80 percent?) Twenty-six percent said they do backup their data. That actually doesn’t sound too bad until you get to the next question. Only four percent backup regularly.
In a nutshell, this means that if you could snap your fingers and make one Mac user’s main hard drive disappear, there’s a 96 percent chance that you just destroyed files that are completely unrecoverable.
Now, for those of you that know you should backup regularly, but don’t, I’m guessing there are two main reasons:
- Negligence – You just haven’t gotten around to buying a backup hard drive, or if you have you don’t feel like plugging it in to your laptop every. single. night… Ugh.
- Ignorance – I don’t know the real numbers, but before Time Machine came along I’m sure the vast majority of the average Mac user had no idea where to start in regards to setting up a backup plan.I know most of you reading this are much more tech savvy than the average user, but think of how many people you know need help just to sync their iPod. It’s those people who saw backing up as an intimidating venture they didn’t have the energy to figure out, if they thought of it at all.
Time Machine is creating a new mindset for the average user that backing up is important and it can be done without as much effort as they think; arguably making Time Machine the most significant addition to an operating system ever. But not without drawbacks…
SuperDuper’s tag line brags that their software is for “mere mortals”. Meaning people like you and me and even our iPod challenged friends. SuperDuper is not difficult or intimidating. In fact it’s just about as easy to use as Time Machine. But what’s more is that SuperDuper offers some data recovery and emergency response solutions which Time Machine doesn’t.
An Aside About Hardware
To have backups you have to have hard drives. I own four. One in my laptop, two in my Mac Pro and one external firewire.
The HDD in my laptop doesn’t get backed up. It’s my secondary machine, and any important files I may create on it during the day get moved to the Mac Pro. If my laptop dies on me I’m not afraid of losing any vital data. If I do happen to lose some vital file that only exists on my laptop I don’t know what it is anyway, so I’ll let ignorance be bliss.
Of the two HDDs in my tower, one is a 250GB boot disc and the other a 500GB drive for Time Machine. I purposefully bought a smaller backup drive for Time Machine as a way to “hem myself in.” At 500GB it looks like i will get about 6 months worth of archived info, which is more than I need (or want). I don’t want years and years of old files waiting around never to be used like a room in the basement filled with boxes of potentially important keepsakes that most likely belong to my great-aunt twice removed anyway.
My fourth and final hard drive is the most important component of my backup hardware: a Lacie 250GB FireWire400/FireWire800/USB drive dubbed “The Wardrobe”. It sits on the floor behind my Mac Pro and holds the nightly build of my Mac Pro’s boot disc. This is the drive I use with SuperDuper. It will plug into any Mac to give me instant access to my files and operating system. You can buy your own from Amazon.
What I like about the external drive holding the clone of my boot disc is that I can take it with me wherever I want and have an exact copy of my main machine that I can plug into any other Mac. I hardly ever do this, but it’s important to me for two reasons:
Since my laptop is my secondary machine there can be times when it doesn’t have a file I need. Usually it’s not a problem, and I just get the file later in my day when I go home. But if I”m on a long trip I need a different plan. Since Back To My Mac is not exactly reliable yet – and even when it does work it’s less than speedy – having an exact clone of my main hard drive readily available eliminates the possible stress of “client emergencies”.
Secondly, having all my data cloned on the external drive means if I ever sell my Mac Pro, send it to the repair shop or lose it, I am not out of my data. And I’m not sure how you lose a 60 pound tower, but I’m just sayin’…
The Right Tool for the Right Job
For the most part, there are only a few situations when you will be glad you have a backup:
- When you realize you’ve deleted something that was extremely important.
- When your hard drive takes a nose dive and all your info is gone, and you don’t want to pay $2,000 for the guys in space suits to extract your data with tweezers and chewing gum.
- When something else on your computer, unrelated to your hard drive brakes and you have to send your whole computer in for repair, and it conveniently comes back with a clean install of OS X.
- The latest software update or some new application suddenly barfs all over your system and everything is now buggy and unusable. (We’ll get more into this particular situation with SuperDuper’s “Sandboxing” later on.)
Only one of the above four scenarios is best solved by Time Machine; leaving SuperDuper as the ideal solution to the other three.
Time Machine
Like I said earlier, Time Machine makes a better archive system than a backup solution. There are several great reviews of Time Machine already, and there is clearly no need to go into detail on the ins, outs, whats and hows of Time Machine. But for the sake of context here is a brief, laymen’s terms overview of what Time Machine does…
When you first plug in your 2nd hard drive Time Machine asks if you want to use this as your backup drive. You say yes and it copies all your files over to the backup. From that point on Time Machine works in the background.
Every hour it takes a quick look at your whole computer to see if any file, setting or program is new or has changed. If something is new or changed Time Machine backs up those files — thus making “snapshots” of what your computer looked like at any given point in time. (So that’s where they got the name!)
At the end of the day Time Machine will fold your hourly backups into a single backup “snapshot” of that day, and at the end of the month it folds the daily backups into single snapshots for the week.
Time Machine keeps old backups as long as there is room on your backup drive. When the drive gets full, Time Machine starts replacing the oldest snapshots with the newest ones.
So this all comes in to play if you lost, accidentally deleted or (in my case) misplaced a file. You simply open up time machine to get instant access to all the archives. Then use the big arrows to go backward and forward in time, or use the tick marks on the right to select a specific snapshot.
One look at the finder-based interface and it’s clear to anyone that Time Machine’s main purpose is to go back in time to recover lost or missing files.
The biggest problem with Time Machine will arise if and when your startup drive becomes unusable for whatever reason. If all you have is your startup disc and your Time Machine backup then you will need to get a new hard drive, and restore your backup onto it. Even if you can run out to the store and be back lickety-split you’ll still be spending several hours waiting on Time Machine to restore its backup to your new drive.
What then if you need to keep working? Well, if you have a recent backup via SuperDuper you can easily re-start your computer using the backup drive and carry on as you were in a matter of minutes. Minutes! And even suppose you were working on files this morning that you need but you backed up with SuperDuper last night? Once you’re re-booted from your backup, you can then access Time Machine and restore the archived files that Time Machine automatically backed up earlier.
On the Shirt Pocket Watch weblog Dave Nanian explains more on how SuperDuper compliments Time Machine:
Our tagline, Heroic System Recovery for Mere Mortals, tries to sum up the whole idea: SuperDuper! is designed to provide excellent failover support for the all-too-common case where things fail in a pretty catastrophic way, such as when a drive fails, or your system becomes unbootable. We do this by quickly and efficiently creating a fully bootable copy of your source drive. Perhaps more importantly, recovery is near immediate, even if the original drive is completely unusable, because you can start up from your backup and continue working.
You can even take your backup to a totally different Macintosh, start up from it, and work while your failed Macintosh is in the shop… then, when it comes back all fresh and shiny, restore things and keep working. And even if the other Mac is a different CPU type, you can still open and edit the files on the backup.
You cannot do this with Time Machine: Time Machine copies are not bootable until they’re restored.
In SuperDuper!, system recovery is done with a minimum of fuss and bother, and with respect for your time. Yes, Time Machine can restore a full system, but that’s not its strength. Doing so requires you to actually start up from the Leopard DVD (which you’ll need to have with you) and then take the time to restore the backup in full, which interrupts your workflow, requires a working, entirely separate destination device, and takes a lot of your time — at the exact moment when you can least afford it.
The Clearly Time Machine has in no way made SuperDuper insignificant or inconsequential. In fact, if I had to choose between the two I’d stick with SuperDuper. Here’s why…
SuperDuper!
Over the past fews months as I have been writing these reviews it wasn’t until I was writing about MarsEdit that I realized each application has something in common: feel and depth.
NetNewsWire, Mint, Transmit, Coda, MarsEdit and now SuperDuper; each one is an applications which feels light and easy to use but has a depth of features and ability. Each of these apps are useful; from the most basic users to the most advanced tech savvy Apple gurus.
I have only ever used SuperDuper for one thing: absolute headache free backups of my system.
Those 7 words are the entire reason I’m writing this article. Each night when I’m done at my computer I quit out of everything and launch SuperDuper. (If I wanted to set a schedule I could, but I prefer to just do it manually – I’m a control freak.)
I double check the Copy from and the to. It looks good, o.k. then, Copy Now. Off to bed, and I know that all the work I did that day is safe.
If I wake up tomorrow to find my start-up disc went kaput I can just boot up from the external drive as if there was no problem and get right to work. Then when I have time I can replace my drive and restore from SuperDuper or Time Machine at my own leisure.
The good news with SuperDuper now being Leopard compatible,1 is that it integrates with Time Machine…
Time Machine and SuperDuper!
There are two ways SuperDuper works with Time Machine: One is the ability to copy your Time Machine backup over to another drive without losing the archived history.
Second is the ability to store a bootable backup via SuperDuper along side the same files on the same drive as Time Machine. This means if you already have an external hard drive with your Time Machine backup, you can put bootable clone on there as well without interrupting anything. Or if you only want to own one backup hard drive you can use it simultaneously as a bootable clone and as the Time Machine archives.
Unfortunately there is currently no documentation on how SuperDuper operates in conjunction with Time Machine other than what’s mentioned in the release notes.
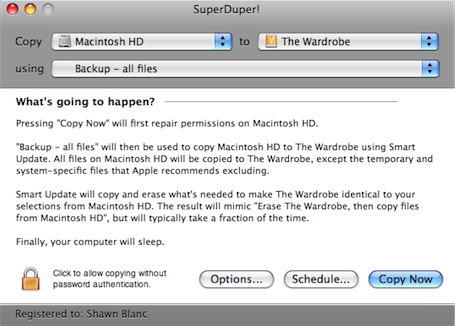
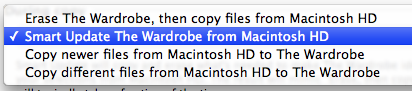
So to make things as clear as I understand them, to create a bootable backup along side Time Machine you have to select your startup volume in the Copy menu, your Time Machine drive in the to menu, “Backup – all files” in the using menu and, most importantly, be sure you choose “Smart Update [Time Machine drive] from [Startup Drive]” in the options tab under the During copy menu.
And even when you do have the correct options set up in SuperDuper and are ready to make your bootable backup onto your Time Machine drive the “What’s going to happen?” text is so poorly written it’s not clear what exactly you’re doing. It even sounds as if you may ruin something:
Pressing “Copy Now” will first repair permissions on Macintosh HD. The Time Machine backups on Time Machine will be preserved. […]
Smart Update will copy and erase what’s needed to make Time Machine identical to your selections from Macintosh HD. The result will mimic “Erase Time Machine, then copy files from Macintosh HD”, but will typically take a fraction of the time.
If not for the second sentence in the first paragraph stating the preservation of the Time Machine backups, it sounds like SuperDuper plans on deleting your whole Time Machine drive to make room for the new backup.
Comparing the “Smart Update…” description to the “Erase then Copy…” description does make the former a little more clear:
Pressing “Copy Now” will first repair permissions on Macintosh HD, and then erase Time Machine. The Time Machine backups on Time Machine will be erased as well. To preserve your Time Machine backups, choose Smart Update.
Despite the copy text not being super duper clear, I have no doubt the process can be trusted.
Sandbox
The “Sandbox” is where SuperDuper shows of some serious backup kung-fu. For those who may not be familiar with what the Sandbox is, it’s easiest to explain with a (simplified) drawing:
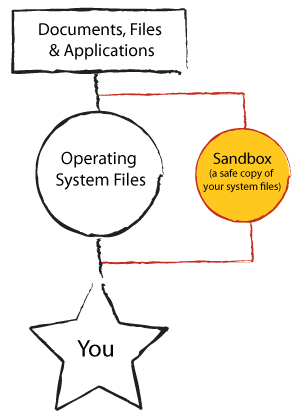
A Sandbox is basically an isolated copy of your system files. SuperDuper will create this for you on a local partition of your startup volume or on an external drive. (If you’re using a laptop SuperDuper recommends partitioning your internal HDD to hold the Sandbox because it has to be always accessible as the start up volume.)
SuperDuper creates the Sandbox by copying over all important system files, then setting the Sandbox as the “startup volume”. Now your computer will boot up and use the Sandbox system files instead of your primary system files. The advantage to this is that you can use your computer just like normal with no worries about installing system updates or new applications. The files will install in the Sandbox and not in the primary system folder.
If a system update or application has a major bug it’s no skin off your back. You can just reboot out of the Sandbox and your back to your clean system files then repair the Sandbox. No harm done, rest easy.
The Sandbox feature is a bit too rich for my blood, and I don’t use. But it is a great testimony to the extent and depth of features that SuperDuper offers for what could be considered a simple “copy and paste” backup utility.
Documentation
Shirt Pocket’s documentation notes on SuperDuper are quite clear and exhaustive, with much more info on the additional features. I recommend you look there for more details, although as of now it hasn’t been updated with any Leopard specific information.
More Reviews
This is just one of a handful of winded and entertaining software reviews.
- Am I the only one surprised to not see a 512×512 pixel icon accompany the 2.5 Leopard compatible update? Shirt Pocket is still using SuperDuper!’s original 128×128 icon. Additionally there is no mention of Leopard compatibility features (i.e. Time Machine stuff) in their help files or reference manual. ↵